Flink 系列文章
1、Flink1.12.7或1.13.5详细介绍及本地安装部署、验证
2、Flink1.13.5二种部署方式(Standalone、Standalone HA )、四种提交任务方式(前两种及session和per-job)验证详细步骤
3、flink重要概念(api分层、角色、执行流程、执行图和编程模型)及dataset、datastream详细示例入门和提交任务至on yarn运行
4、介绍Flink的流批一体、transformations的18种算子详细介绍、Flink与Kafka的source、sink介绍
5、Flink 的 source、transformations、sink的详细示例(一)
5、Flink的source、transformations、sink的详细示例(二)-source和transformation示例
5、Flink的source、transformations、sink的详细示例(三)-sink示例
6、Flink四大基石之Window详解与详细示例(一)
6、Flink四大基石之Window详解与详细示例(二)
7、Flink四大基石之Time和WaterMaker详解与详细示例(watermaker基本使用、kafka作为数据源的watermaker使用示例以及超出最大允许延迟数据的接收实现)
8、Flink四大基石之State概念、使用场景、持久化、批处理的详解与keyed state和operator state、broadcast state使用和详细示例
9、Flink四大基石之Checkpoint容错机制详解及示例(checkpoint配置、重启策略、手动恢复checkpoint和savepoint)
10、Flink的source、transformations、sink的详细示例(二)-source和transformation示例【补充示例】
11、Flink配置flink-conf.yaml详细说明(HA配置、checkpoint、web、安全、zookeeper、historyserver、workers、zoo.cfg)
12、Flink source和sink 的 clickhouse 详细示例
13、Flink 的table api和sql的介绍、示例等系列综合文章链接
本文详细的介绍了flink的Standalone独立集群模式和Standalone HA集群模式的部署、提交任务与验证,同时介绍了Flink on yarn的两种运行模式。
本文依赖环境是hadoop集群可用、zookeeper集群环境可用以及环境是免密登录的。
本文部分图片来源于互联网。
本文分为3个部分,即Standalone独立集群模式部署及验证、Standalone HA模式部署及验证以及Flink on yarn的2种任务提交方式。
一、Standalone独立集群模式部署及验证
Flink支持多种安装模式
- Local—本地单机模式,学习测试时使用
- Standalone—独立集群模式,Flink自带集群,开发测试环境使用
- StandaloneHA—独立集群高可用模式,Flink自带集群,开发测试环境使用
- On Yarn—计算资源统一由Hadoop YARN管理,生产环境使用部署前提
最新版本1.17要求java 11以上版本,1.12还可以使用java 8版本。
1、Standalone独立集群模式
在配置系统之前,请确保在每个节点上安装有以下软件:
- Java 1.8.x 或更高版本
- ssh (必须运行 sshd 以执行用于管理 Flink 各组件的脚本)
- 如果历史服务需要配置hdfs,则需要hadoop集群(该集群和flink可以不是同一个集群,视情况而定)
- 如果集群不满足软件要求,那么你需要安装/更新这些软件。
使集群中所有节点使用免密码 SSH 以及拥有相同的目录结构可以让你使用脚本来控制一切。
本示例接上一篇的本地单机部署,关于下载、解压不再赘述。
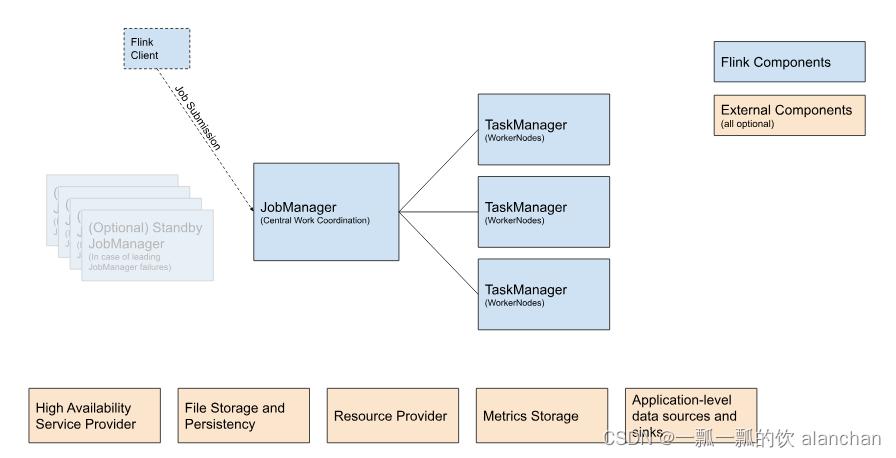
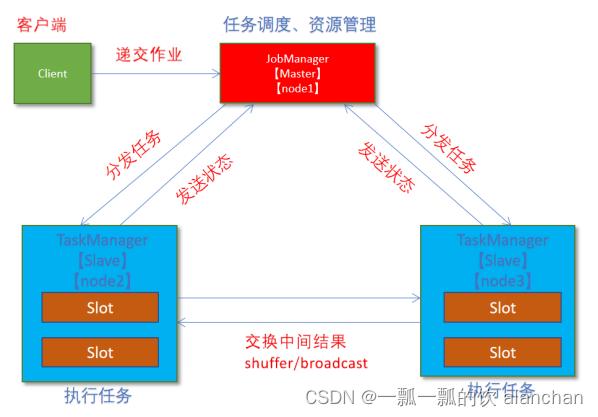
2、节点规划
服务器(Master):server1(服务器名称), JobManager(服务)
服务器(Slave):server2、server3、server4(服务器名称),TaskManager(服务)
3、修改配置
以下操作是在server1上完成的。
更多配置参考:http://iyenn.com/index/link?url=https://nightlies.apache.org/flink/flink-docs-release-1.12/zh/deployment/config.html
1)、修改flink-conf.yaml
vim /usr/local/flink-1.13.5/conf/flink-conf.yaml

jobmanager.rpc.address: server1
#每台机器的可用 CPU 数
taskmanager.numberOfTaskSlots: 3
#每个 TaskManager 的可用内存值
taskmanager.memory.process.size: 4096m
web.submit.enable: true

#配置项来定义 Flink 允许在每个节点上分配的最大内存值,单位是 MB,如果不设置则使用默认值
jobmanager.memory.process.size 和 taskmanager.memory.process.size

#历史服务器(flink的historyserver)
jobmanager.archive.fs.dir: hdfs://server1:8020/flink/completed-jobs/
historyserver.web.address: server1
historyserver.web.port: 8082
historyserver.archive.fs.dir: hdfs://server1:8020/flink/completed-jobs/
- 1
- 2
- 3
- 4
- 5
- 6
- 7
- 8
- 9
- 10
- 11
- 12
- 13
- 14
- 15
- 16
- 17
2)、修改masters
vim /usr/local/flink-1.13.5/conf/masters
# 添加如下内容
server1:8081
- 1
- 2
- 3
3)、修改slaves
vim /usr/local/flink-1.13.5/conf/workers

#添加如下内容
server2
server3
server4
- 1
- 2
- 3
- 4
- 5
- 6
4、分发
cd /usr/local/flink-1.13.5

scp -r /usr/local/flink-1.13.5 server2:$PWD
scp -r /usr/local/flink-1.13.5 server3:$PWD
scp -r /usr/local/flink-1.13.5 server4:$PWD

#如果没有权限,则进行授权
chown -R alanchan:root /usr/local/flink-1.13.5
- 1
- 2
- 3
- 4
- 5
- 6
- 7
- 8
由于Flink没有集成hdfs,在配置历史服务时启动会出现如下异常
Caused by: org.apache.flink.core.fs.UnsupportedFileSystemSchemeException:
Could not find a file system implementation for scheme 'hdfs'. The scheme is not directly supported by Flink and no Hadoop file system to support this scheme could be loaded. For a full list of supported file systems, please see
Caused by: org.apache.flink.core.fs.UnsupportedFileSystemSchemeException: Hadoop is not in the classpath/dependencies.
- 1
- 2
- 3
官网给出的说明
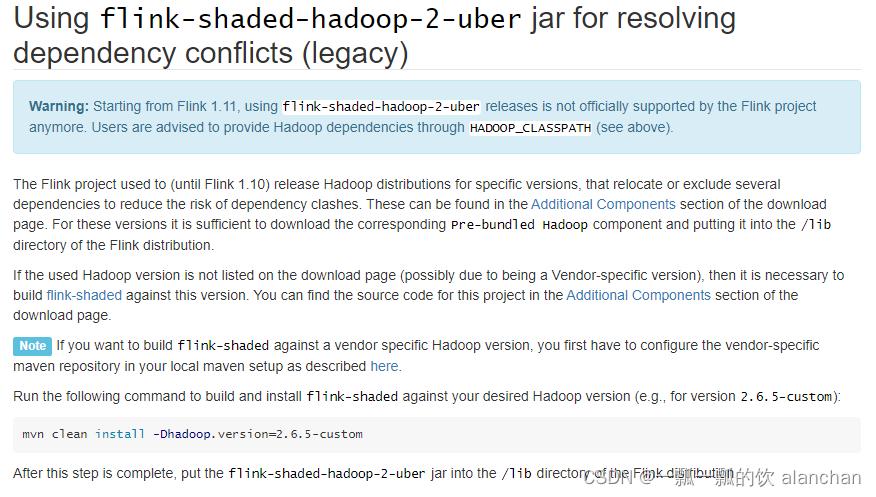
解决办法:
- 1、增加环境变量
export HADOOP_CONF_DIR=/usr/local/bigdata/hadoop-3.1.4/etc/hadoop
或
export HADOOP_CONF_DIR=${HADOOP_HOME}/etc/hadoop
#shell命令,用于获取配置的Hadoop类路径
export HADOOP_CLASSPATH=`hadoop classpath`

source /etc/profile
- 1
- 2
- 3
- 4
- 5
- 6
- 7
- 2、增加jar包至flink的lib文件夹下
flink-shaded-hadoop-2-uber-2.8.3-10.0.jar或flink-shaded-hadoop-2-uber-2.7.5-10.0.jar
注:本示例环境是hadoop 3.1.4版本 - 3、再次启动flink集群和历史服务
start-cluster.sh
historyserver.sh start
- 1
- 2
5、启动/关闭集群
#1、启动flink集群
start-cluster.sh
stop-cluster.sh

#或者单独启动
jobmanager.sh ((start|start-foreground) cluster)|stop|stop-all
taskmanager.sh start|start-foreground|stop|stop-all

[alanchan@server1 bin]$ start-cluster.sh
Starting cluster.
Starting standalonesession daemon on host server1.
Starting taskexecutor daemon on host server2.
Starting taskexecutor daemon on host server3.
Starting taskexecutor daemon on host server4.
[alanchan@server1 bin]$ stop-cluster.sh
Stopping taskexecutor daemon (pid: 28258) on host server2.
Stopping taskexecutor daemon (pid: 26309) on host server3.
Stopping taskexecutor daemon (pid: 27911) on host server4.
Stopping standalonesession daemon (pid: 12782) on host server1.

#2、启动历史服务
historyserver.sh start
#控制台显示日志
historyserver.sh start-foreground
historyserver.sh stop
- 1
- 2
- 3
- 4
- 5
- 6
- 7
- 8
- 9
- 10
- 11
- 12
- 13
- 14
- 15
- 16
- 17
- 18
- 19
- 20
- 21
- 22
- 23
- 24
- 25
6、验证
1)、web UI
flink web:http://server1:8081/#/overview
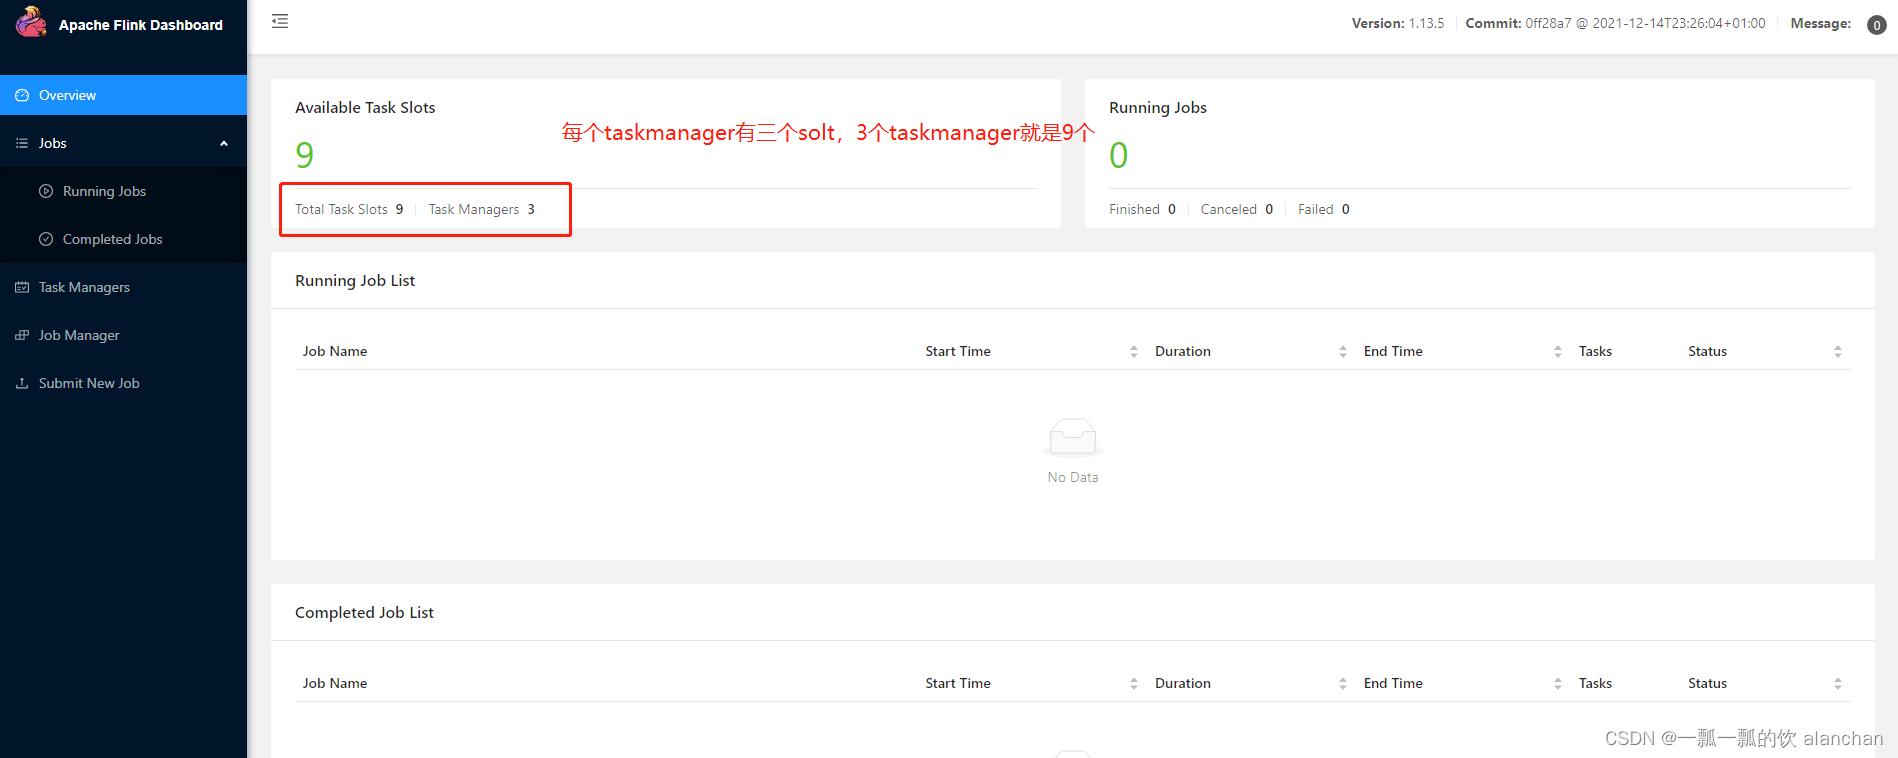
历史服务:http://server1:8082/
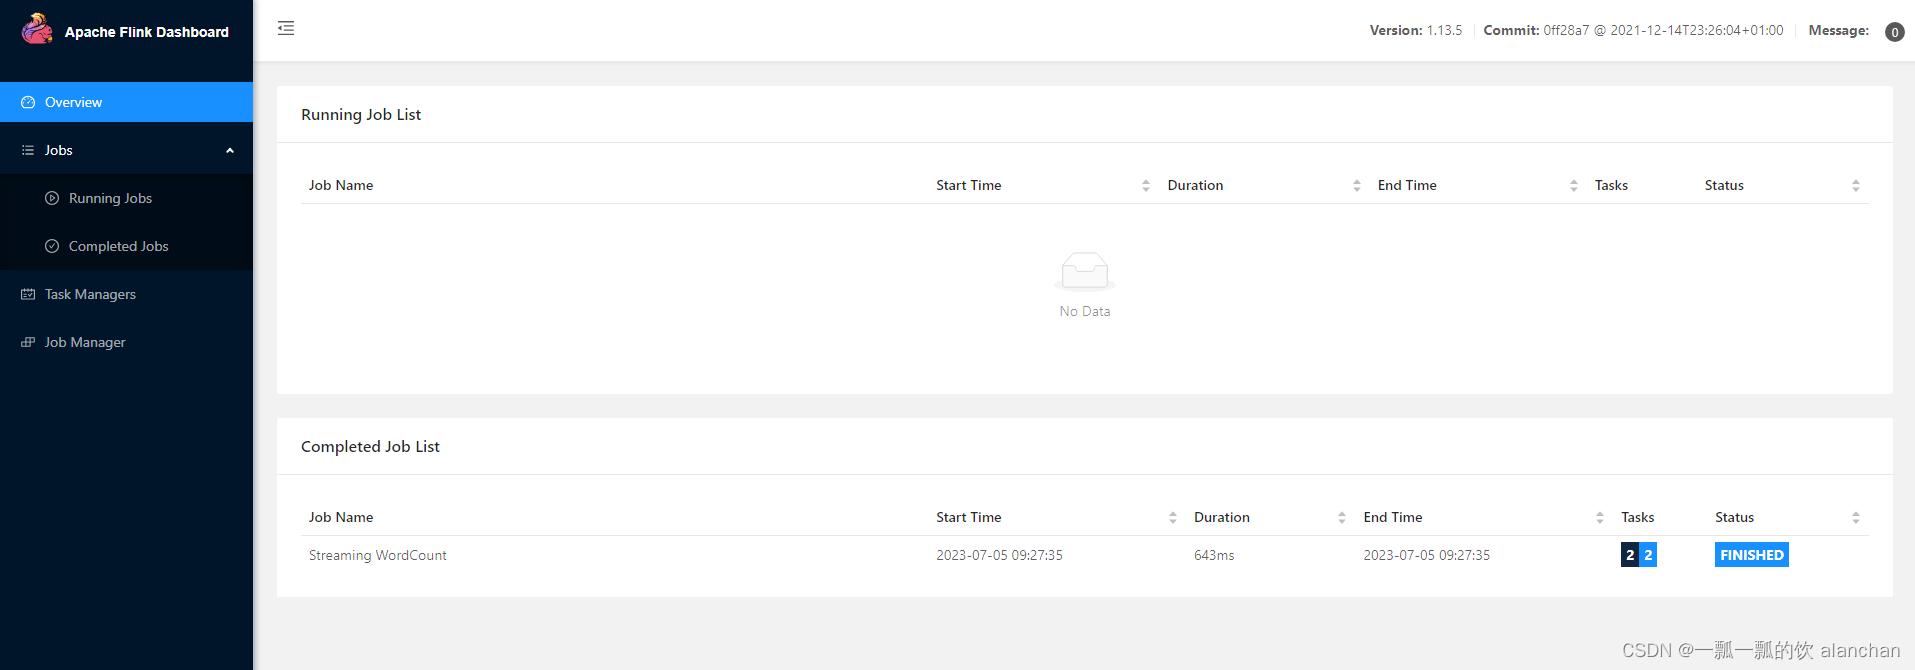
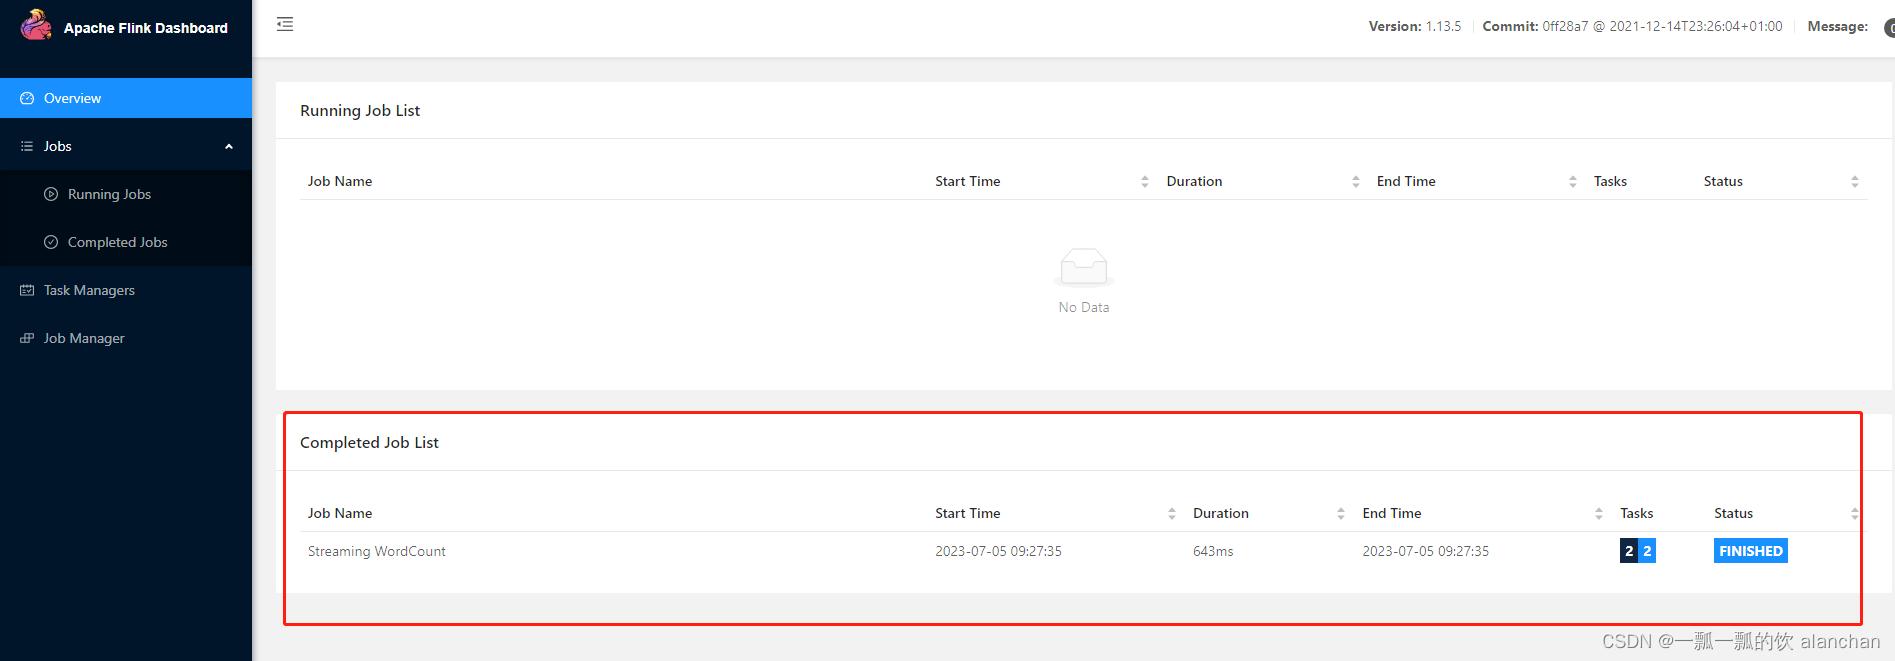
2)、提交任务
提交作业与本地集群部署一致。
[alanchan@server1 bin]$ flink run ../examples/streaming/WordCount.jar
Executing WordCount example with default input data set.
Use --input to specify file input.
Printing result to stdout. Use --output to specify output path.
Job has been submitted with JobID 0f8618fbf173d4272cb41384af382a8d
Program execution finished
Job with JobID 0f8618fbf173d4272cb41384af382a8d has finished.
Job Runtime: 643 ms
- 1
- 2
- 3
- 4
- 5
- 6
- 7
- 8
二、Standalone-HA高可用集群模式部署及验证
1、Standalone-HA高可用集群模式
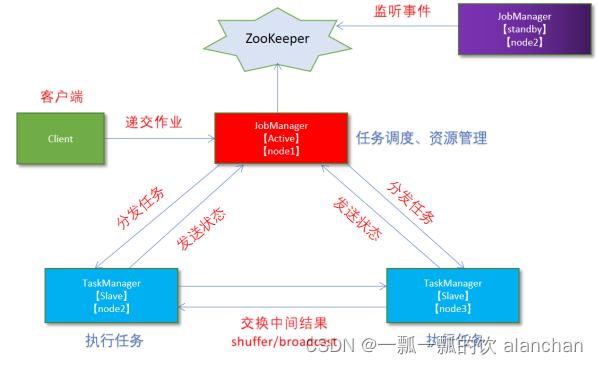
通过zookeeper来管理多个jobmanager,本示例2个jobmanager。
在配置系统之前,请确保在每个节点上安装有以下软件:
- Java 1.8.x 或更高版本
- ssh (必须运行 sshd 以执行用于管理 Flink 各组件的脚本)
- 如果历史服务需要配置hdfs,则需要hadoop集群(该集群和flink可以不是同一个集群,视情况而定)
- zookeeper环境(该集群和flink可以不是同一个集群,视情况而定)
如果集群不满足软件要求,那么你需要安装/更新这些软件。
使集群中所有节点使用免密码 SSH 以及拥有相同的目录结构可以让你使用脚本来控制一切。
2、节点规划
1)、flink节点规划
服务器(Master):server1、server2(服务器名称), JobManager(服务)
服务器(Slave):server2、server3、server4(服务器名称),TaskManager(服务)
2)、zookeeper集群
在部署该集群前,zookeeper集群已经部署好了,其三台服务器为server1、server2和server3,其端口是2118。
如果需要了解其部署参考链接:1、zookeeper3.7.1安装与验证
3)、hadoop集群
在部署该集群前,hadoop集群已经部署好了,其四台服务器为server1、server2、server3和server4,其中server1是namenode、其余的是datanode,其端口是默认。
如果需要了解其部署参考链接:1、hadoop3.1.4简单介绍及部署、简单验证
3、修改配置
以下操作是在server1上完成的,有不是该情况的会说明。
该示例是在standalone独立集群基础上部署的,只改变其需要变化的部分,未变的部分不再赘述。
更多配置参考:http://iyenn.com/index/link?url=https://nightlies.apache.org/flink/flink-docs-release-1.12/zh/deployment/config.html
1)、修改flink-conf.yaml
#开启HA,使用文件系统作为快照存储
state.backend: filesystem
#启用检查点,可以将快照保存到HDFS
state.checkpoints.dir:hdfs://server2:8020/flink-checkpoints
#使用zookeeper搭建高可用
high-availability: zookeeper
#存储JobManager的元数据到HDFS
high-availability.storageDir: hdfs://server2:8020/flink/ha/
#配置ZK集群地址
high-availability.zookeeper.quorum: server1:2118,server2:2118,server3:2118
- 1
- 2
- 3
- 4
- 5
- 6
- 7
- 8
- 9
- 10
2)、修改masters
vim /usr/local/flink-1.13.5/conf/masters

server1:8081
server2:8081
- 1
- 2
- 3
- 4
4、分发
scp -r /usr/local/flink-1.13.5/conf/flink-conf.yaml server2:/usr/local/flink-1.13.5/conf/
scp -r /usr/local/flink-1.13.5/conf/flink-conf.yaml server3:/usr/local/flink-1.13.5/conf/
scp -r /usr/local/flink-1.13.5/conf/flink-conf.yaml server4:/usr/local/flink-1.13.5/conf/

scp -r /usr/local/flink-1.13.5/conf/masters server2:/usr/local/flink-1.13.5/conf/
scp -r /usr/local/flink-1.13.5/conf/masters server3:/usr/local/flink-1.13.5/conf/
scp -r /usr/local/flink-1.13.5/conf/masters server4:/usr/local/flink-1.13.5/conf/
- 1
- 2
- 3
- 4
- 5
- 6
- 7
5、启动/关闭集群
1)、修改flink-conf.yaml
登录server2操作
jobmanager.rpc.address: server2
- 1
2)、启动zookeeper
#启动zookeeper集群,更多命令参考zookeeper相关专栏
zkServer.sh start
zkServer.sh stop
- 1
- 2
- 3
3)、启动hadoop集群
#启动hadoop集群,更多命令参考hadoop相关专栏
start-all.sh
- 1
- 2
4)、启动flink集群
start-cluster.sh
historyserver.sh start

[alanchan@server1 bin]$ start-cluster.sh
Starting HA cluster with 2 masters.
Starting standalonesession daemon on host server1.
Starting standalonesession daemon on host server2.
Starting taskexecutor daemon on host server2.
Starting taskexecutor daemon on host server3.
Starting taskexecutor daemon on host server4.
[alanchan@server1 bin]$ historyserver.sh start
Starting historyserver daemon on host server1.
- 1
- 2
- 3
- 4
- 5
- 6
- 7
- 8
- 9
- 10
- 11
- 12
6、验证
1)、web ui
验证启动情况
flink web server1:http://server1:8081/#/overview
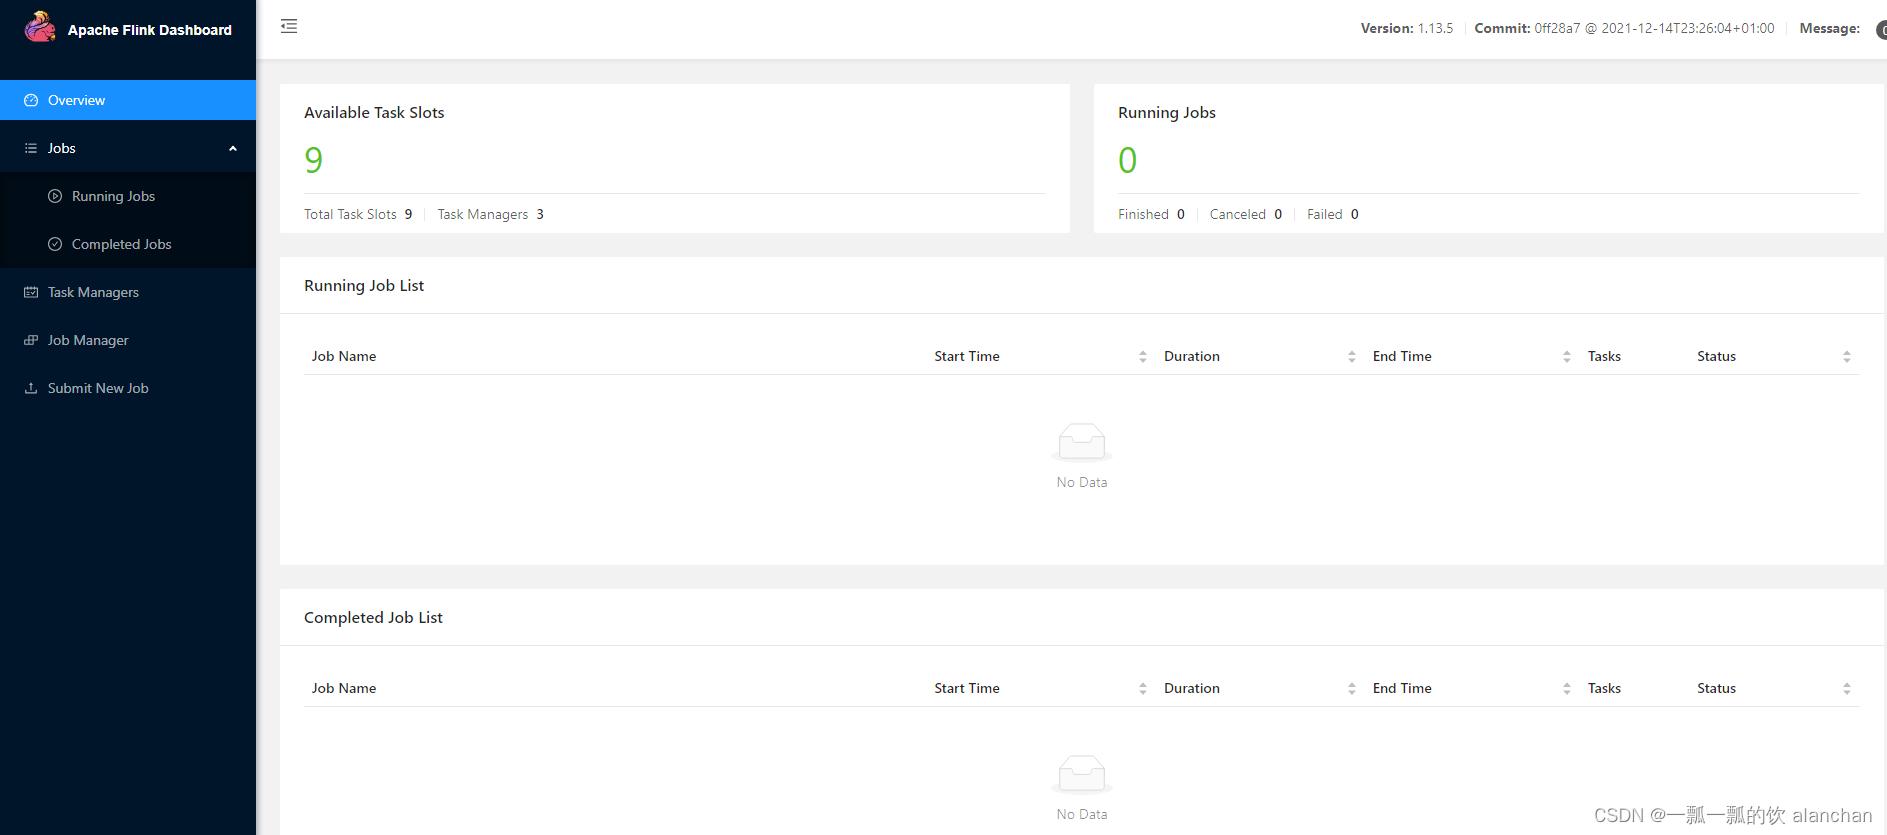
flink web server2:http://server2:8081/#/overview
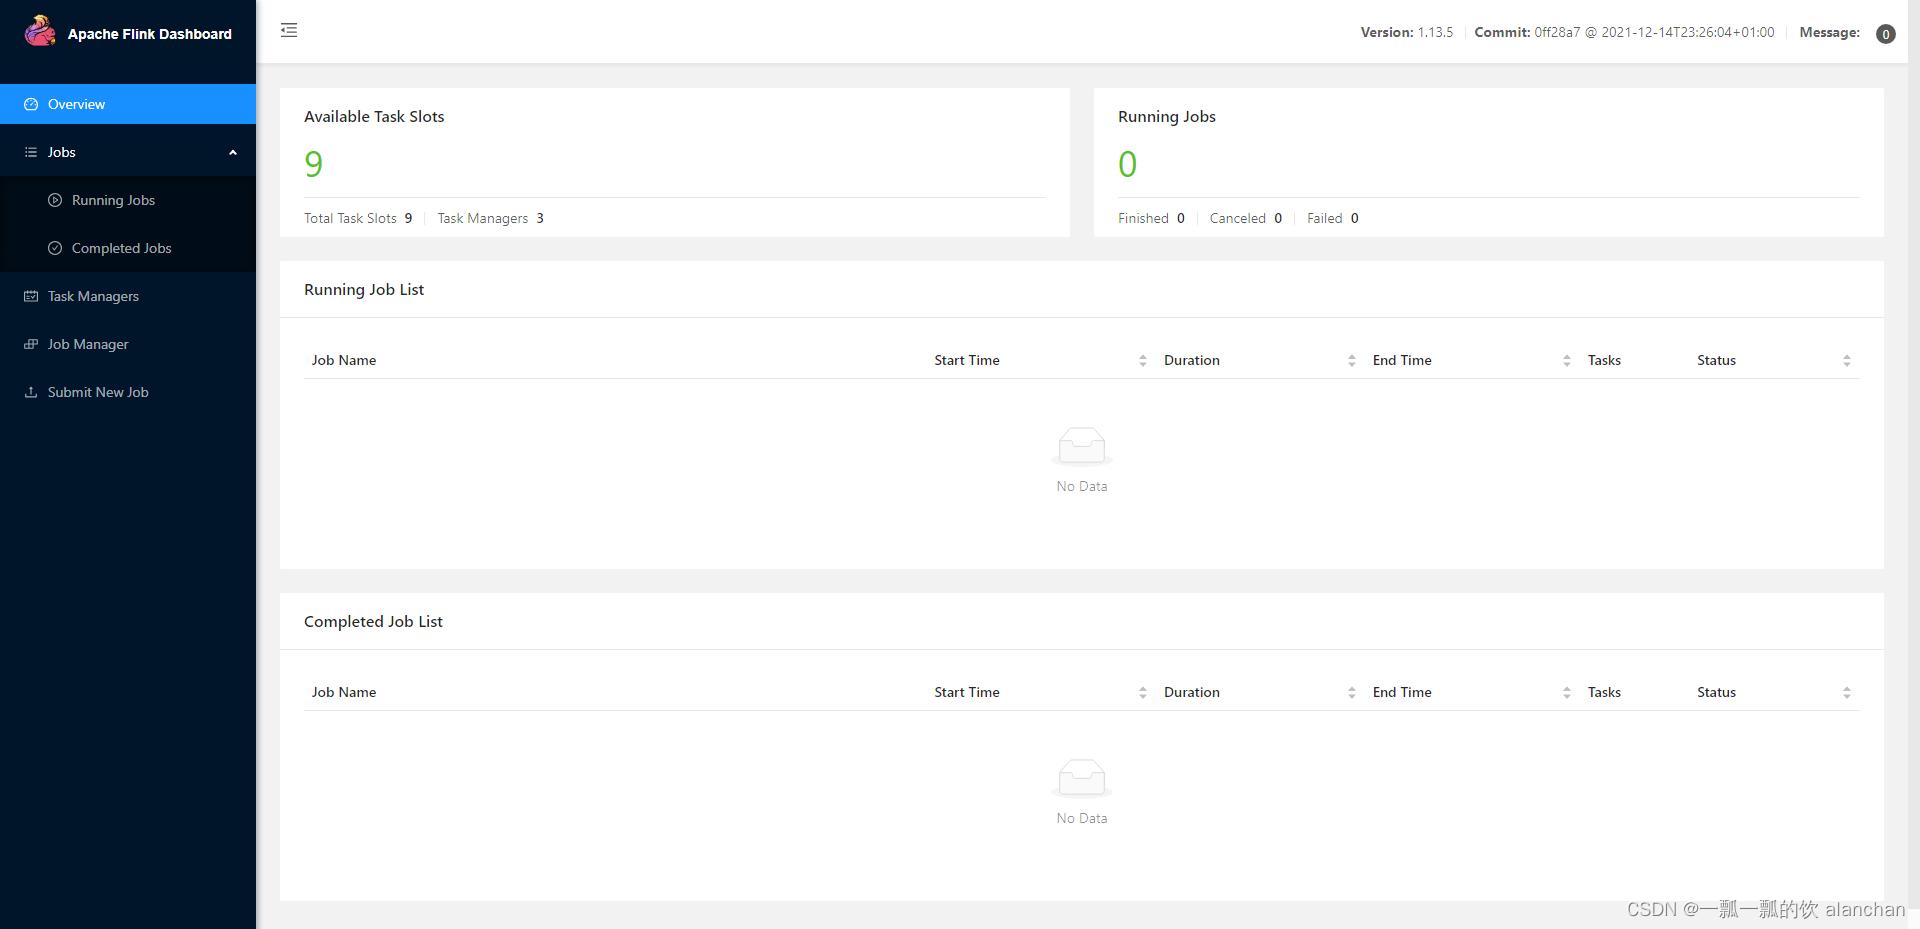
历史服务:http://server1:8082/#/overview

验证HA情况
关闭一个jobmanager,再提交任务看是否正常即可
2)、jps验证进程
根据自己部署时候的节点规划进行验证,以下仅仅是本人的环境验证结果
[alanchan@server1 bin]$ jps
#hadoop
19938 DFSZKFailoverController
20643 ResourceManager
19076 NameNode
#flink
18596 StandaloneSessionClusterEntrypoint
19435 HistoryServer
#zookeeper
14143 QuorumPeerMain
- 1
- 2
- 3
- 4
- 5
- 6
- 7
- 8
- 9
- 10
3)、提交作业
[alanchan@server1 bin]$ flink run ../examples/streaming/WordCount.jar
Executing WordCount example with default input data set.
Use --input to specify file input.
Printing result to stdout. Use --output to specify output path.
Job has been submitted with JobID 0f8618fbf173d4272cb41384af382a8d
Program execution finished
Job with JobID 0f8618fbf173d4272cb41384af382a8d has finished.
Job Runtime: 643 ms
- 1
- 2
- 3
- 4
- 5
- 6
- 7
- 8
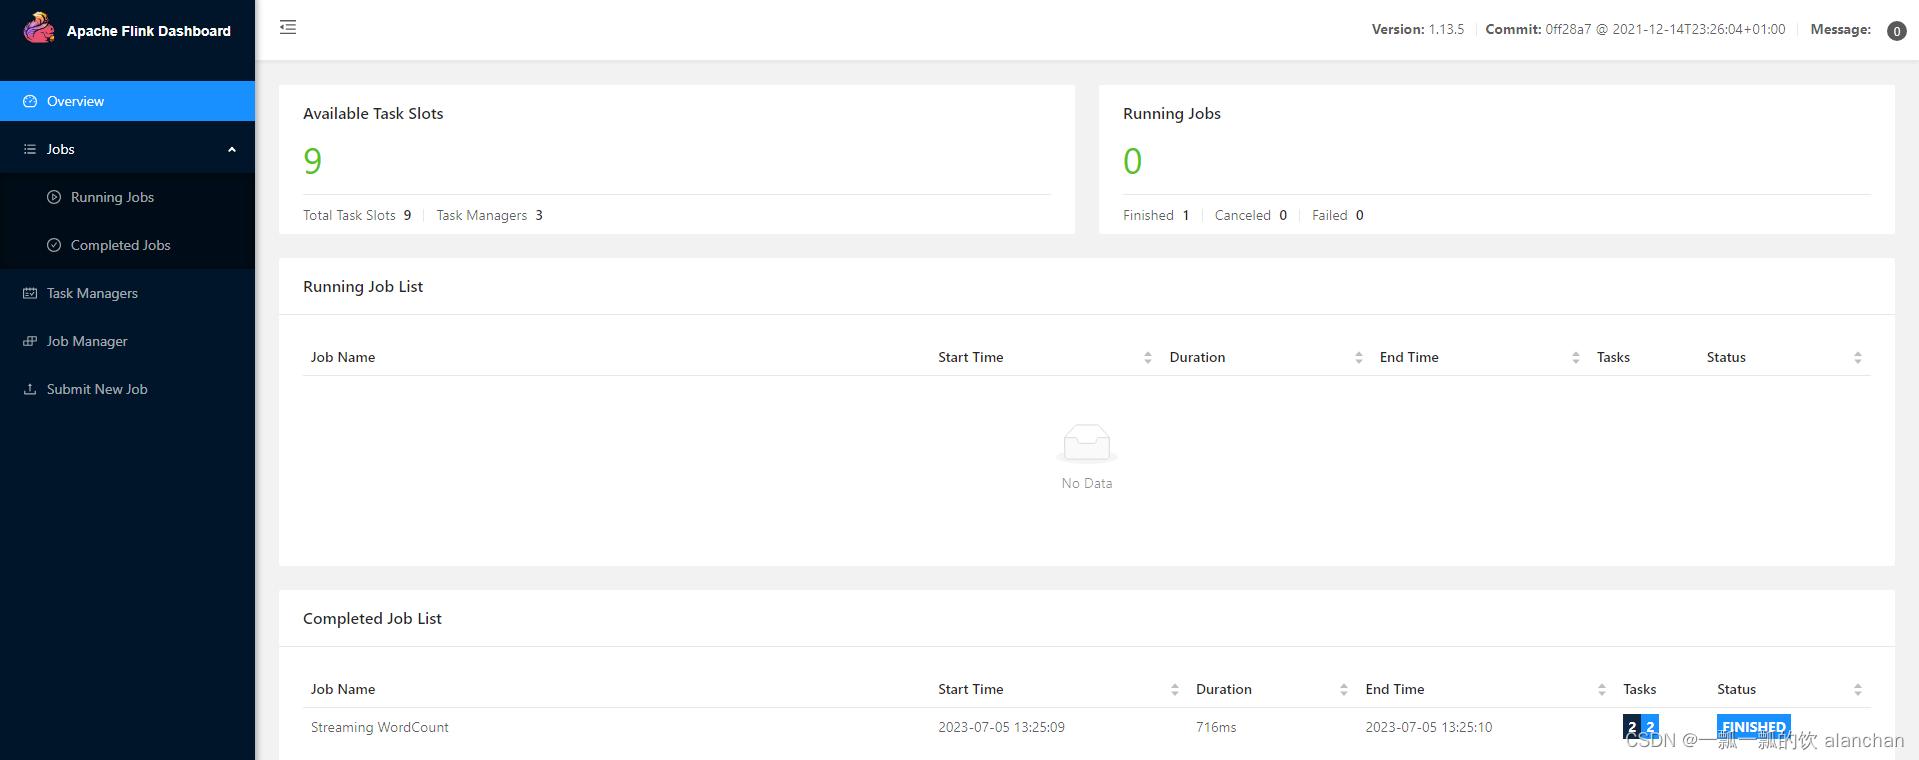
三、Flink On Yarn模式部署与验证
1、Flink On Yarn模式
在实际使用中,更多的使用方式是Flink On Yarn模式。
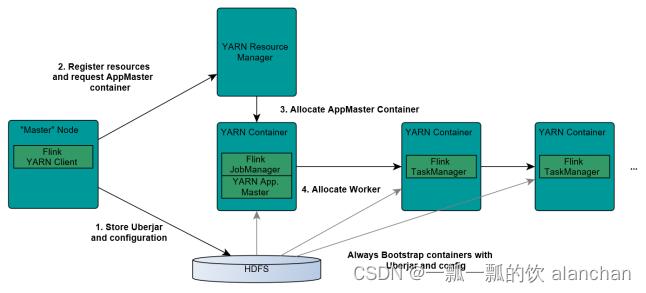
1.Client上传jar包和配置文件到HDFS集群上
2.Client向Yarn ResourceManager提交任务并申请资源
3.ResourceManager分配Container资源并启动ApplicationMaster,然后AppMaster加载Flink的Jar包和配置构建环境,启动JobManager
JobManager和ApplicationMaster运行在同一个container上。一旦他们被成功启动,AppMaster就知道JobManager的地址(AM它自己所在的机器)。
它就会为TaskManager生成一个新的Flink配置文件(他们就可以连接到JobManager)。这个配置文件也被上传到HDFS上。此外,AppMaster容器也提供了Flink的web服务接口。
YARN所分配的所有端口都是临时端口,这允许用户并行执行多个Flink。
4.ApplicationMaster向ResourceManager申请工作资源,NodeManager加载Flink的Jar包和配置构建环境并启动TaskManager
5.TaskManager启动后向JobManager发送心跳包,并等待JobManager向其分配任务
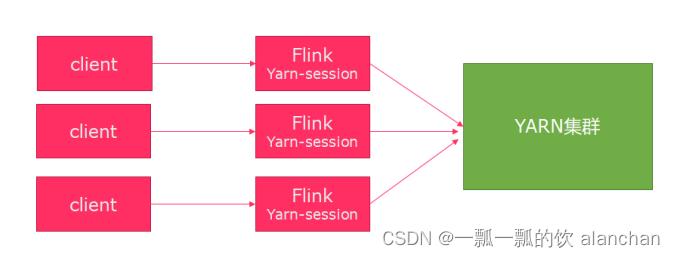
2、session模式
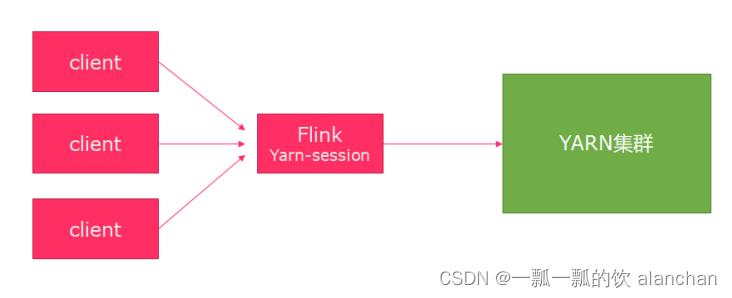
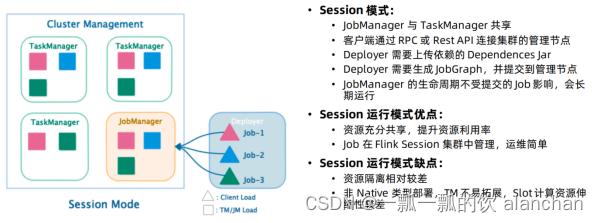
优点:不需要每次递交作业申请资源,而是使用已经申请好的资源,从而提高执行效率
缺点:作业执行完成以后,资源不会被释放,因此一直会占用系统资源
应用场景:适合作业递交比较频繁的场景,小作业比较多的场景
3、Per-Job模式
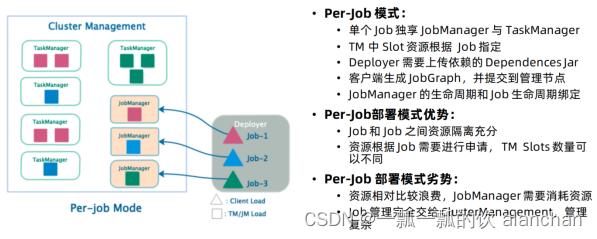
优点:作业运行完成,资源会立刻被释放,不会一直占用系统资源
缺点:每次递交作业都需要申请资源,会影响执行效率,因为申请资源需要消耗时间
应用场景:适合作业比较少的场景、大作业的场景
4、验证
1)、session模式
该模式下分为2步,即使用yarn-session.sh申请资源,然后 flink run提交任务。
1、申请资源yarn-session.sh
在server1上执行
#执行命令
/usr/local/flink-1.13.5/bin/yarn-session.sh -n 2 -tm 1024 -s 1 -d

#申请2个CPU、2g内存
# -n 表示申请2个容器,就是多少个taskmanager
# -tm 表示每个TaskManager的内存大小
# -s 表示每个TaskManager的slots数量
# -d 表示以后台程序方式运行
#出现如下异常
2023-07-05 05:53:19,879 ERROR org.apache.flink.yarn.cli.FlinkYarnSessionCli                [] - Error while running the Flink session.
java.lang.NoClassDefFoundError: javax/ws/rs/ext/MessageBodyReader
        at java.lang.ClassLoader.defineClass1(Native Method) ~[?:1.8.0_144]
        at java.lang.ClassLoader.defineClass(ClassLoader.java:763) ~[?:1.8.0_144]
        at java.security.SecureClassLoader.defineClass(SecureClassLoader.java:142) ~[?:1.8.0_144]
        at java.net.URLClassLoader.defineClass(URLClassLoader.java:467) ~[?:1.8.0_144]
#在flink整个集群的lib文件夹中增加javax.ws.rs-api-2.0.jar(https://repo1.maven.org/maven2/javax/ws/rs/javax.ws.rs-api/2.0/javax.ws.rs-api-2.0.jar),重启flink后再次提交yarn-session即可
- 1
- 2
- 3
- 4
- 5
- 6
- 7
- 8
- 9
- 10
- 11
- 12
- 13
- 14
- 15
- 16
2、验证yarn ui
yarn链接地址:http://server1:8088/cluster
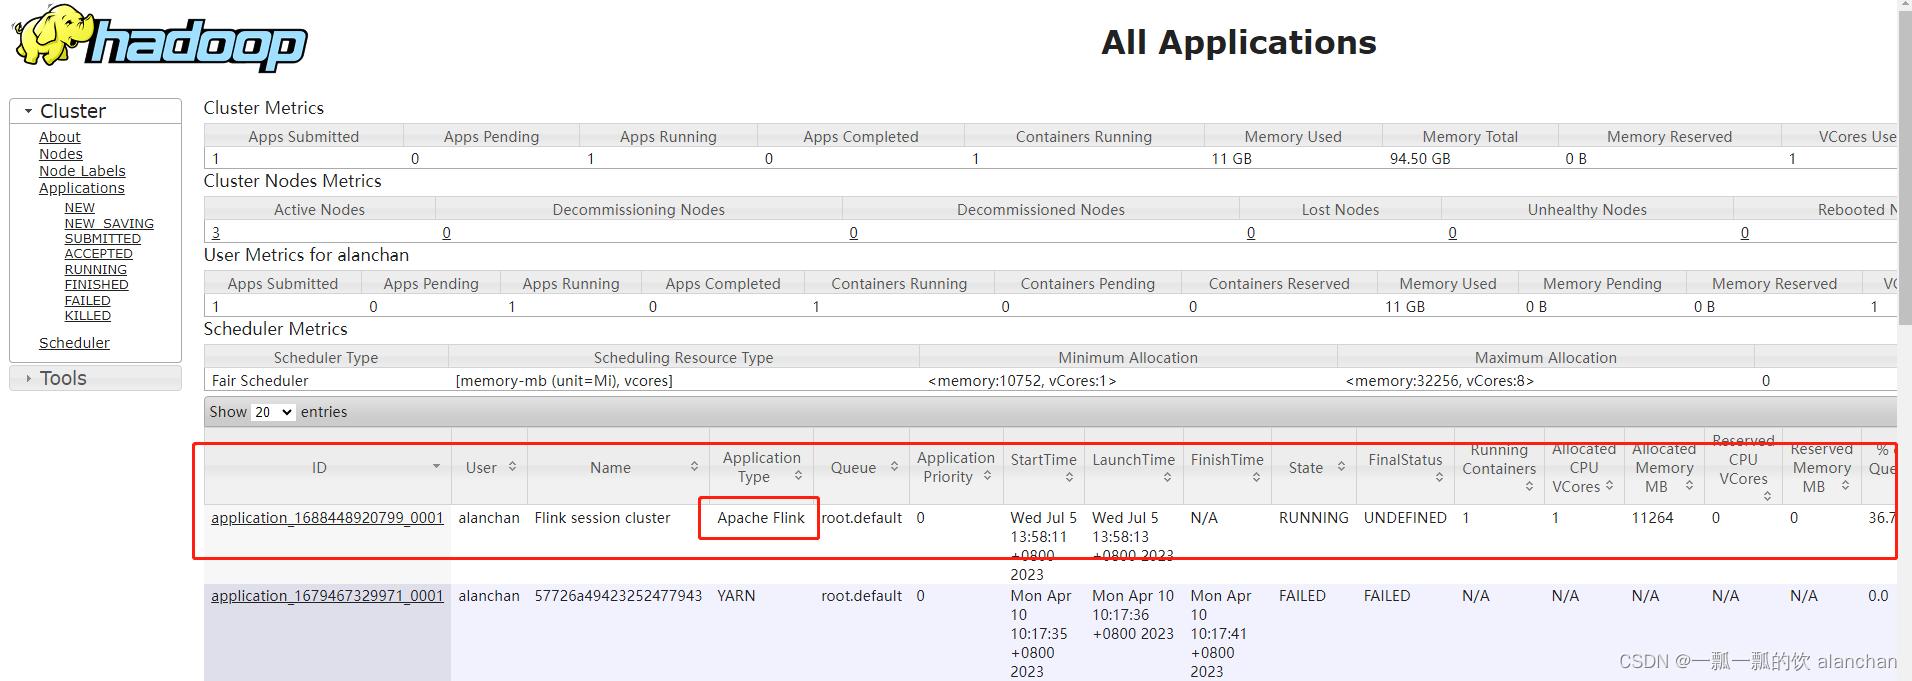
3、使用flink run提交任务
需要在server1上执行。
#多执行几次看看运行情况,或者运行其他的应用也可以
/usr/local/flink-1.13.5/bin/flink run  /usr/local/flink-1.13.5/examples/batch/WordCount.jar

[alanchan@server2 conf]$ /usr/local/flink-1.13.5/bin/flink run  /usr/local/flink-1.13.5/examples/batch/WordCount.jar
Executing WordCount example with default input data set.
Use --input to specify file input.
Printing result to stdout. Use --output to specify output path.
Job has been submitted with JobID de776dfd06c52ebeadb257fe5825f11d
Program execution finished
Job with JobID de776dfd06c52ebeadb257fe5825f11d has finished.
Job Runtime: 827 ms
Accumulator Results:
- c6a7c8cb676ec7110cb43a08e072e0e5 (java.util.ArrayList) [170 elements]


(a,5)
(action,1)
(after,1)
(against,1)
(all,2)
(and,12)
(arms,1)
......
- 1
- 2
- 3
- 4
- 5
- 6
- 7
- 8
- 9
- 10
- 11
- 12
- 13
- 14
- 15
- 16
- 17
- 18
- 19
- 20
- 21
- 22
- 23
4、验证flink提交的任务
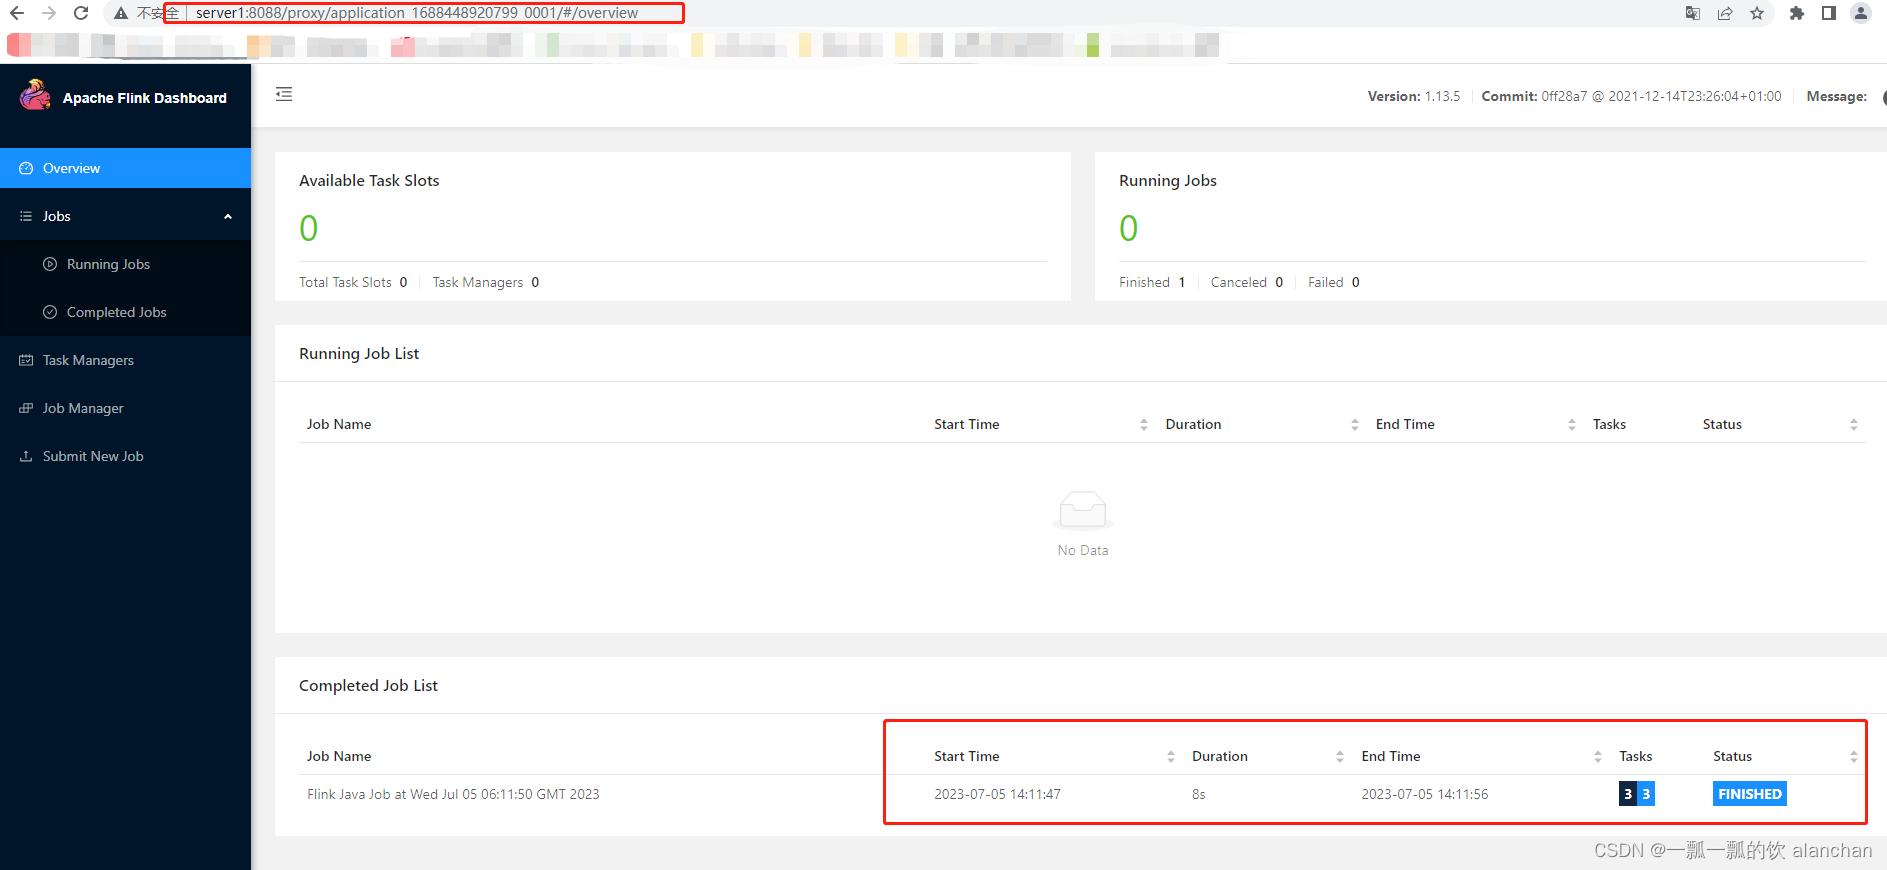
通过上方的ApplicationMaster可以进入Flink的管理界面

点击applicationmaster链接进入如下页面,可以看到flink提交的任务执行情况
5、关闭yarn-session
正常的关闭yarn的任务即可,比如就该示例关闭如下
[alanchan@server1 ~]$ yarn application -kill application_1688448920799_0001
2023-07-05 06:18:10,152 INFO client.AHSProxy: Connecting to Application History server at server1/192.168.10.41:10200
Killing application application_1688448920799_0001
2023-07-05 06:18:10,485 INFO impl.YarnClientImpl: Killed application application_1688448920799_0001
- 1
- 2
- 3
- 4
yarn链接:http://server1:8088/cluster

可以发现已经将该任务关闭了
2)、per-job模式
该种模式不需要多步骤,仅仅一个步骤即可。
1、提交job
/usr/local/flink-1.13.5/bin/flink run -m yarn-cluster -yjm 2048 -ytm 2048 /usr/local/flink-1.13.5/examples/batch/WordCount.jar
# -m  jobmanager的地址
# -yjm 1024 指定jobmanager的内存信息
# -ytm 1024 指定taskmanager的内存信息


[alanchan@server1 bin]$ /usr/local/flink-1.13.5/bin/flink run -m yarn-cluster -yjm 2048 -ytm 2048 /usr/local/flink-1.13.5/examples/batch/WordCount.jar
Executing WordCount example with default input data set.
Use --input to specify file input.
Printing result to stdout. Use --output to specify output path.
2023-07-05 06:24:29,505 WARN  org.apache.flink.yarn.configuration.YarnLogConfigUtil        [] - The configuration directory ('/usr/local/flink-1.13.5/conf') already contains a LOG4J config file.If you want to use logback, then please delete or rename the log configuration file.
2023-07-05 06:24:29,807 INFO  org.apache.hadoop.yarn.client.AHSProxy                       [] - Connecting to Application History server at server1/192.168.10.41:10200
2023-07-05 06:24:29,815 INFO  org.apache.flink.yarn.YarnClusterDescriptor                  [] - No path for the flink jar passed. Using the location of class org.apache.flink.yarn.YarnClusterDescriptor to locate the jar
2023-07-05 06:24:29,922 WARN  org.apache.flink.yarn.YarnClusterDescriptor                  [] - Neither the HADOOP_CONF_DIR nor the YARN_CONF_DIR environment variable is set. The Flink YARN Client needs one of these to be set to properly load the Hadoop configuration for accessing YARN.
2023-07-05 06:24:29,945 INFO  org.apache.flink.yarn.YarnClusterDescriptor                  [] - The configured JobManager memory is 2048 MB. YARN will allocate 10752 MB to make up an integer multiple of its minimum allocation memory (10752 MB, configured via 'yarn.scheduler.minimum-allocation-mb'). The extra 8704 MB may not be used by Flink.
2023-07-05 06:24:29,946 INFO  org.apache.flink.yarn.YarnClusterDescriptor                  [] - The configured TaskManager memory is 2048 MB. YARN will allocate 10752 MB to make up an integer multiple of its minimum allocation memory (10752 MB, configured via 'yarn.scheduler.minimum-allocation-mb'). The extra 8704 MB may not be used by Flink.
2023-07-05 06:24:29,946 INFO  org.apache.flink.yarn.YarnClusterDescriptor                  [] - Cluster specification: ClusterSpecification{masterMemoryMB=10752, taskManagerMemoryMB=2048, slotsPerTaskManager=3}
2023-07-05 06:24:30,298 WARN  org.apache.hadoop.hdfs.shortcircuit.DomainSocketFactory      [] - The short-circuit local reads feature cannot be used because libhadoop cannot be loaded.
2023-07-05 06:24:35,442 INFO  org.apache.flink.yarn.YarnClusterDescriptor                  [] - Submitting application master application_1688448920799_0002
2023-07-05 06:24:35,667 INFO  org.apache.hadoop.yarn.client.api.impl.YarnClientImpl        [] - Submitted application application_1688448920799_0002
2023-07-05 06:24:35,667 INFO  org.apache.flink.yarn.YarnClusterDescriptor                  [] - Waiting for the cluster to be allocated
2023-07-05 06:24:35,669 INFO  org.apache.flink.yarn.YarnClusterDescriptor                  [] - Deploying cluster, current state ACCEPTED
2023-07-05 06:24:41,699 INFO  org.apache.flink.yarn.YarnClusterDescriptor                  [] - YARN application has been deployed successfully.
2023-07-05 06:24:41,700 INFO  org.apache.flink.yarn.YarnClusterDescriptor                  [] - Found Web Interface server4:45227 of application 'application_1688448920799_0002'.
Job has been submitted with JobID 835195679cf827d88f8d35f60f5a923d
Program execution finished
Job with JobID 835195679cf827d88f8d35f60f5a923d has finished.
Job Runtime: 13118 ms
Accumulator Results:
- 1d6bef2182d20bbd9f6c36ce34c28e8e (java.util.ArrayList) [170 elements]


(a,5)
(action,1)
(after,1)
(against,1)
(all,2)
(and,12)
......
- 1
- 2
- 3
- 4
- 5
- 6
- 7
- 8
- 9
- 10
- 11
- 12
- 13
- 14
- 15
- 16
- 17
- 18
- 19
- 20
- 21
- 22
- 23
- 24
- 25
- 26
- 27
- 28
- 29
- 30
- 31
- 32
- 33
- 34
- 35
- 36
- 37
- 38
- 39
2、查看yarnUI界面
yarn链接:http://server1:8088/cluster
提交作业后,yarn任务页面运行情况,其实是和yarn运行任何作业一样,也是state状态由accept变化成run的

作业运行完成后


作业运行完成后,点击history链接,进入下面一个页面。
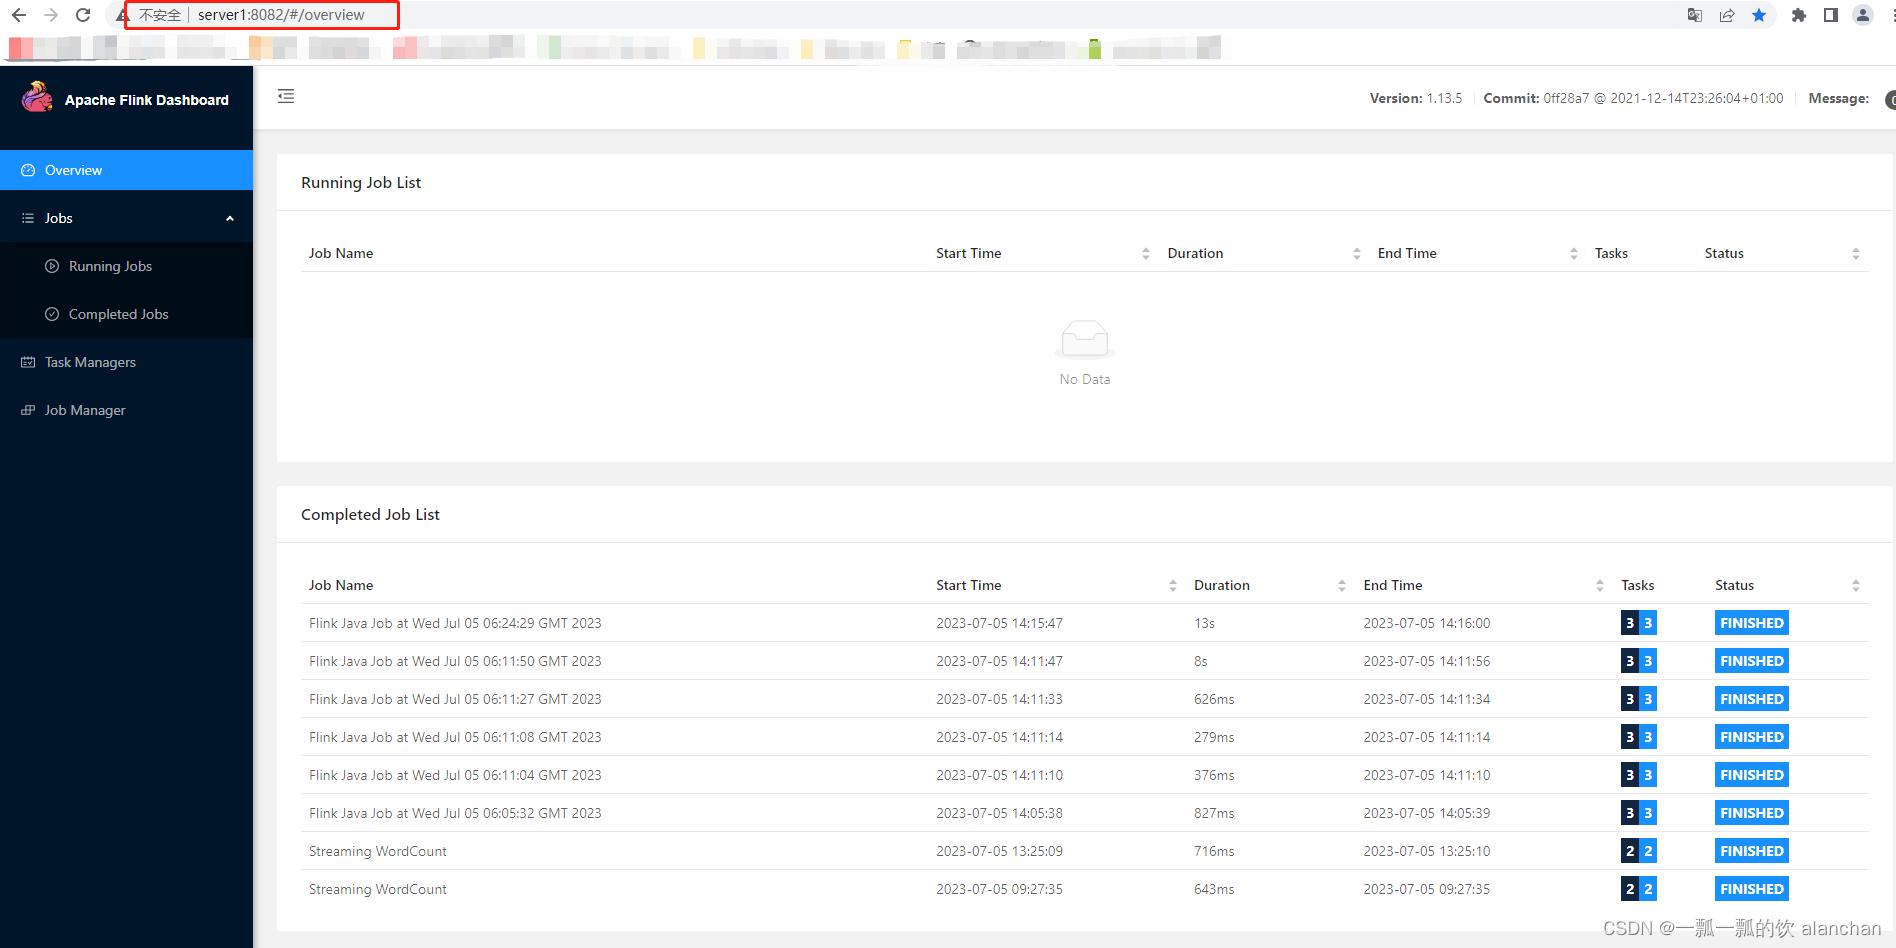
以上,完成了flink的2种部署方式与验证,同时介绍了on yarn的2种运行模式。


评论记录:
回复评论: