
系列文章:
用OpenCV实现Photoshop算法(四): 色阶调整用OpenCV实现Photoshop算法(五): 亮度对比度调整
用OpenCV实现Photoshop算法(六): 变为黑白图像
用OpenCV实现Photoshop算法(七): 调整色相饱和度
用OpenCV实现Photoshop算法(九): 高反差保留
最近学习了OpenCV,于是想用它实现Photoshop的主要功能,用于照片处理。
对于一张照片,PS的一般处理步骤包括:
1, 旋转图片,校正位置。
2,剪切,调整大小,重新构图。
3,调整色阶、曲线,使图片曝光正确、对比适中。
4,调整对比度、饱和度
5,印章去掉不想要的东西,液化调整形体线条
6,对于人像图片,美肤、美白
7, 用色彩平衡、可选颜色等调整色调,形成照片调性
8,加一些光效
9,锐化
以后的一系列博文将采用OpenCV逐一实现Photoshop的算法和功能, 并用计算机视觉人工智能方式,尝试超越Photoshop一点点。
本系列博文基于OpenCV, 编程语言为C++. 由于OpenCV的跨平台性,代码可以在用于Windows, Linux, 作个接口后可用于Android,IOS.
一、图像旋转
OpenCV中, 用 warpAffine() 仿射变换函数即可以实现旋转。
例如,写一个 旋转函数 imageRotate1() 如下:
- #include
- #include
-
- //src为原图像, dst为新图像, angle为旋转角度(正值为顺时针旋转,负值为逆时针旋转)
- int imageRotate1(InputArray src, OutputArray dst, double angle)
- {
- Mat input = src.getMat();
- if( input.empty() ) {
- return -1;
- }
-
- //得到图像大小
- int width = input.cols;
- int height = input.rows;
-
- //计算图像中心点
- Point2f center;
- center.x = width / 2.0;
- center.y = height / 2.0;
-
- //获得旋转变换矩阵
- double scale = 1.0;
- Mat trans_mat = getRotationMatrix2D( center, -angle, scale );
-
- //仿射变换
- warpAffine( input, dst, trans_mat, Size(width, height));
-
- return 0;
- }

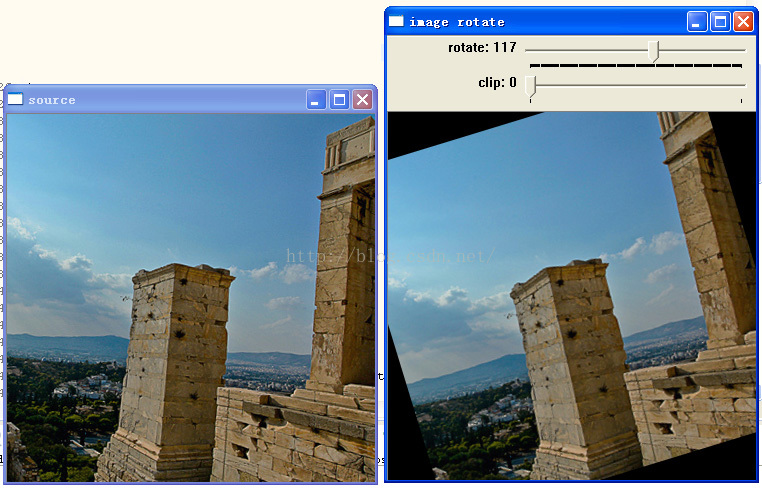
在函数 imageRotate1()中,新图像沿用原图像大小。旋转后,图像的角部被切掉了。
这样显然不正确,需要调整图像尺寸。
调整方式一: 扩大图片,将原图片包含进去,计算示意图如下:
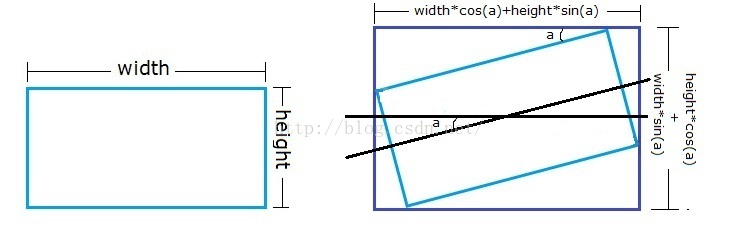
新图片大小为: out_width = (width*cos(a)+height*sin(a); out_height = height*cos(a)+width*sin(a))
修改原函数为 imageRotate2() :
- //图像旋转: src为原图像, dst为新图像, angle为旋转角度
- int imageRotate2(InputArray src, OutputArray dst, double angle)
- {
- Mat input = src.getMat();
- if( input.empty() ) {
- return -1;
- }
-
- //得到图像大小
- int width = input.cols;
- int height = input.rows;
-
- //计算图像中心点
- Point2f center;
- center.x = width / 2.0;
- center.y = height / 2.0;
-
- //获得旋转变换矩阵
- double scale = 1.0;
- Mat trans_mat = getRotationMatrix2D( center, -angle, scale );
-
- //计算新图像大小
- double angle1 = angle * CV_PI / 180. ;
- double a = sin(angle1) * scale;
- double b = cos(angle1) * scale;
- double out_width = height * fabs(a) + width * fabs(b);
- double out_height = width * fabs(a) + height * fabs(b);
-
- //仿射变换
- warpAffine( input, dst, trans_mat, Size(out_width, out_height));
-
- return 0;
- }
图像旋转 -17度 的结果
还是不对,新图像变大了,但图像中心点不对,需要在旋转矩阵中加入平移,在一次变换中同时完成旋转和平移,将新图像的中心点移到正确位置。
再次修改函数为: imageRotate3()
- //图像旋转: src为原图像, dst为新图像, angle为旋转角度
- int imageRotate3(InputArray src, OutputArray dst, double angle)
- {
- Mat input = src.getMat();
- if( input.empty() ) {
- return -1;
- }
-
- //得到图像大小
- int width = input.cols;
- int height = input.rows;
-
- //计算图像中心点
- Point2f center;
- center.x = width / 2.0;
- center.y = height / 2.0;
-
- //获得旋转变换矩阵
- double scale = 1.0;
- Mat trans_mat = getRotationMatrix2D( center, -angle, scale );
-
- //计算新图像大小
- double angle1 = angle * CV_PI / 180. ;
- double a = sin(angle1) * scale;
- double b = cos(angle1) * scale;
- double out_width = height * fabs(a) + width * fabs(b);
- double out_height = width * fabs(a) + height * fabs(b);
-
- //在旋转变换矩阵中加入平移量
- trans_mat.at<double>(0, 2) += cvRound( (out_width - width) / 2 );
- trans_mat.at<double>(1, 2) += cvRound( (out_height - height) / 2);
-
- //仿射变换
- warpAffine( input, dst, trans_mat, Size(out_width, out_height));
-
- return 0;
- }
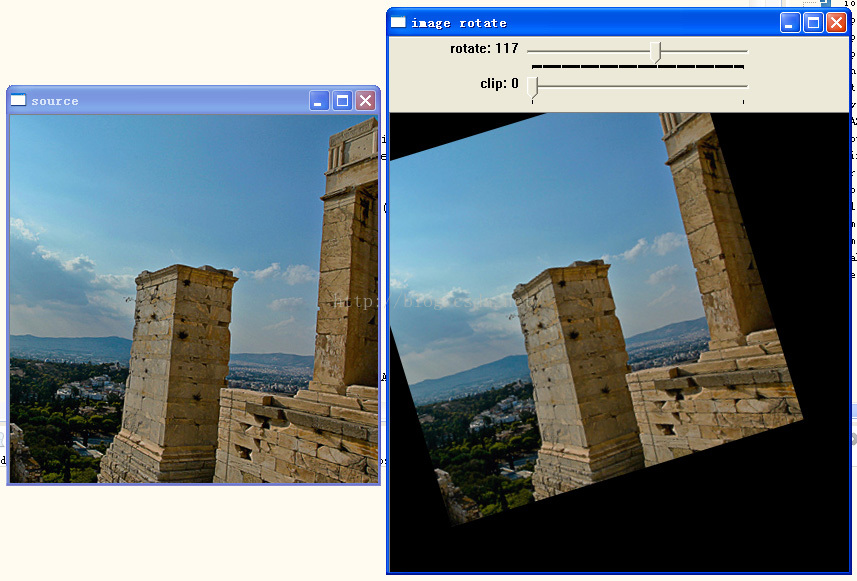
这一次正确了,新图像变大了,同时图像中心点移到了新的中心点,原图像全部能显示出来。
在实际照片旋转中,我们经常采用另一种剪切形式的调整方式:图像旋转后,缩小图片,使图片各个边角均不出现黑边。 下图红框即为新图象大小,如下:
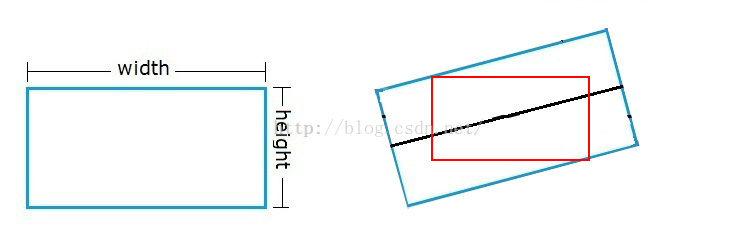
这种调整方式下,新图像大小的计算稍为有点复杂,在网上也没有找到范例,只能自己计算了。
1,如上,旋转后的外边框大小为: out_width =(width*cos(a)+height*sin(a); out_height = height*cos(a)+width*sin(a))
2, 画几根辅助线,如下图:(注意右边图中的粉红三角形)
其最长的边长 len = width*cos(a)
角a 即旋转角度
由于外边框大小已知,则角b 可计算出来。
求解 Y: Y = len / ( 1 / tan( a ) + 1 / tan( b ) )
X = Y * 1 / tan( b )
最后求得 红框的长、宽为: new_width = out_width - 2 * X; new_height = out_height - 2 * Y

再次修改函数为: imageRotate4()
增加了一个参数: isClip , 当isClip为true时,采取缩小图片的剪切方式,否则采取放大图片的方式。
- //图像旋转: src为原图像, dst为新图像, angle为旋转角度, isClip表示是采取缩小图片的方式
- int imageRotate4(InputArray src, OutputArray dst, double angle, bool isClip)
- {
- Mat input = src.getMat();
- if( input.empty() ) {
- return -1;
- }
-
- //得到图像大小
- int width = input.cols;
- int height = input.rows;
-
- //计算图像中心点
- Point2f center;
- center.x = width / 2.0;
- center.y = height / 2.0;
-
- //获得旋转变换矩阵
- double scale = 1.0;
- Mat trans_mat = getRotationMatrix2D( center, -angle, scale );
-
- //计算新图像大小
- double angle1 = angle * CV_PI / 180. ;
- double a = sin(angle1) * scale;
- double b = cos(angle1) * scale;
- double out_width = height * fabs(a) + width * fabs(b); //外边框长度
- double out_height = width * fabs(a) + height * fabs(b);//外边框高度
-
- int new_width, new_height;
- if ( ! isClip ) {
- new_width = cvRound(out_width);
- new_height = cvRound(out_height);
- } else {
- //calculate width and height of clip rect
- double angle2 = fabs(atan(height * 1.0 / width)); //即角度 b
- double len = width * fabs(b);
- double Y = len / ( 1 / fabs(tan(angle1)) + 1 / fabs(tan(angle2)) );
- double X = Y * 1 / fabs(tan(angle2));
- new_width = cvRound(out_width - X * 2);
- new_height= cvRound(out_height - Y * 2);
- }
-
- //在旋转变换矩阵中加入平移量
- trans_mat.at<double>(0, 2) += cvRound( (new_width - width) / 2 );
- trans_mat.at<double>(1, 2) += cvRound( (new_height - height) / 2);
-
- //仿射变换
- warpAffine( input, dst, trans_mat, Size(new_width, new_height));
-
- return 0;
- }
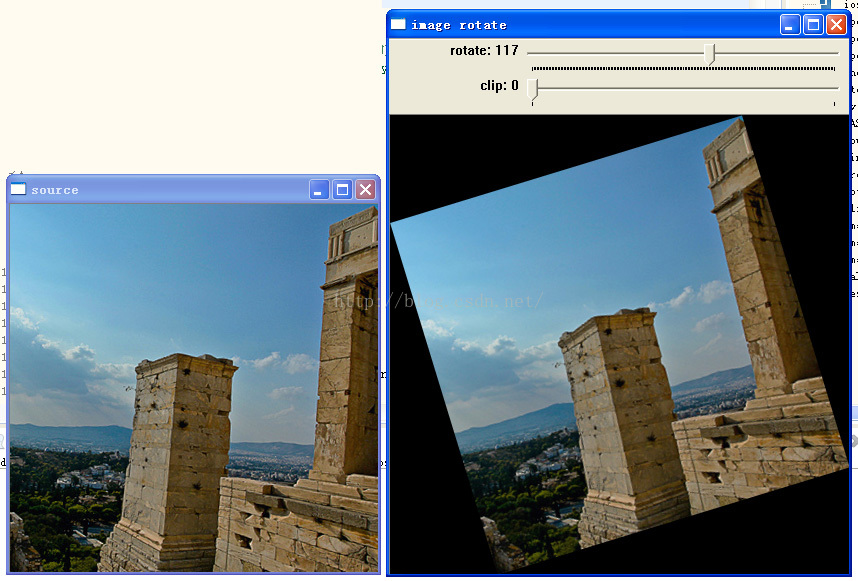
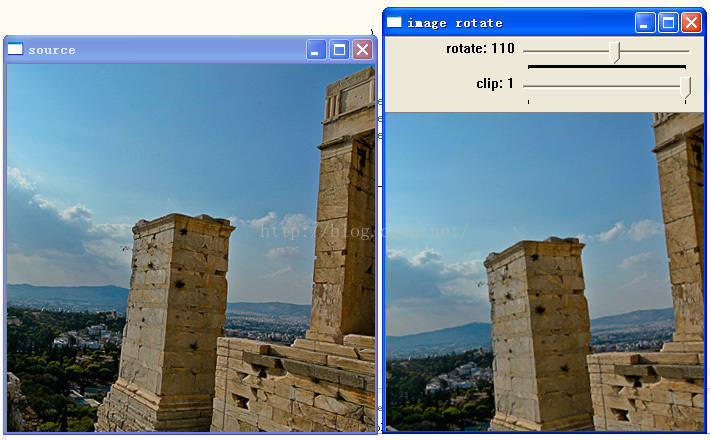
以下是 isClip为true, 旋转角度为 10 的结果,可见图片旋转了、缩小了,没有黑边
由于不注意,人们拍照时经常拍歪了,一般歪得也不多,但照片就不好看了。
因此,有这么一个问题: 能否智能判别图像是否拍歪了,如果歪了,则自动计算出要旋转摆正的角度。从而使得人们一拍照,就自动拍正。
(PS:这个功能是Photoshop没有的,如果能实现,算不算超越Photoshop一点点呢?)
解决思路是这样的:
1, 图像一般有一个或两条长直线(通常这个可能是地平线、建筑物等),且倾斜角度不大
2, 利用 OpenCV图像识别能力,识别出图中有哪些直线。
3, 分析这些直线, 如果长度足够长、且位置相对居中,选取最长的两条直线,测算摆正它所需的角度,做为返回值。
事实上,人工纠正图片的Photoshop操作方式也是这样的:我们在图中人眼找一个基准线,用“度量工具”画一条线,再点菜单“图象/ 旋转画布/ 任意角度", 则Photoshop将计算出需要旋转的角度。
尝试写了一个函数: detectRotation(), 用于自动检测摆正图像的所需的旋转角度, 如下:
- /**
- * 智能检测图像倾斜度
- * 返回值:返回0表示无检测结果,返回非0表示摆正图象需要旋转的角度(-10至10度)
- */
- double detectRotation(InputArray src)
- {
- double max_angle = 6; //可旋转的最大角度
-
- Mat in = src.getMat();
- if( in.empty() ) return 0;
-
- Mat input;
-
- //转为灰度图
- if ( in.type() == CV_8UC1 )
- input = in;
- else if ( in.type() == CV_8UC3 )
- cvtColor(in, input, CV_BGR2GRAY);
- else if ( in.type() == CV_8UC3 )
- cvtColor(in, input, CV_BGRA2GRAY);
- else
- return 0;
-
- Mat dst, cdst;
-
- //执行Canny边缘检测(检测结果为dst, 为黑白图)
- double threshold1 = 90;
- Canny(src, dst, threshold1, threshold1 * 3, 3);
-
- //将Canny边缘检测结果转化为灰度图像(cdst)
- cvtColor(dst, cdst, CV_GRAY2BGR);
-
- //执行霍夫线变换,检测直线
- vector
lines; //存放检测结果的vector - double minLineLength = std::min(dst.cols, dst.rows) * 0.25; //最短线长度
- double maxLineGap = std::min(dst.cols, dst.rows) * 0.03 ; //最小线间距
- int threshold = 90;
- HoughLinesP(dst, lines, 1, CV_PI / 180, threshold, minLineLength, maxLineGap );
-
- //分析所需变量
- int x1, y1, x2 , y2; //直线的两个端点
- int x, y; //直线的中点
- double angle, rotate_angle; //直线的角度,摆正直线需要旋转的角度
- double line_length; //直线长度
- double position_weighted; //直线的位置权重:靠图像中央的线权重为1, 越靠边的线权重越小
- double main_lens[2]; //用于存放最长的二条直线长度的数组 (这两条直线即是主线条)
- double main_angles[2];//用于存放最长的二条直线的摆正需要旋转的角度
- main_lens[0] = main_lens[1] = 0;
- main_angles[0] = main_angles[1] = 0;
-
- //逐个分析各条直线,判断哪个是主线条
- for( size_t i = 0; i < lines.size(); i++ ) {
- //取得直线的两个端点座标
- x1 = lines[i][0]; y1 = lines[i][1]; x2 = lines[i][2]; y2 = lines[i][3];
- x = (x1 + x2 ) / 2; y = (y1 + y2) / 2;
- //计算直线的角度
- angle = (x1 == x2) ? 90 : ( atan ( (y1 - y2) * 1.0 / (x2 - x1) ) ) / CV_PI * 180;
- //摆正直线需要旋转的角度. 如果超出可旋转的最大角度,则忽略这个线。
- if ( fabs(angle - 0) <= max_angle ) {
- rotate_angle = angle - 0;
- } else if ( fabs(angle - 90) <= max_angle ) {
- rotate_angle = angle - 90;
- } else {
- continue;
- }
-
- //计算线的长度
- line_length = sqrt( (x1 - x2) * (x1 - x2) + (y1 - y2) * (y1 - y2) );
- //计算直线的位置权重:靠图像中央的线权重为1, 越靠边的线权重越小
- position_weighted = 1;
- if ( x < dst.cols / 4 || x > dst.cols * 3 / 4 ) position_weighted *= 0.8;
- if ( x < dst.cols / 6 || x > dst.cols * 5 / 6 ) position_weighted *= 0.5;
- if ( x < dst.cols / 8 || x > dst.cols * 7 / 8 ) position_weighted *= 0.5;
- if ( y < dst.rows / 4 || y > dst.rows * 3 / 4 ) position_weighted *= 0.8;
- if ( y < dst.rows / 6 || y > dst.rows * 5 / 6 ) position_weighted *= 0.5;
- if ( y < dst.rows / 8 || y > dst.rows * 7 / 8 ) position_weighted *= 0.5;
-
- //如果 直线长度 * 位置权重 < 最小长度, 则这条线无效
- line_length = line_length * position_weighted;
- if ( line_length < minLineLength ) continue;
-
-
-
- //如果长度为前两名,则存入数据
- if ( line_length > main_lens[1] ) {
- if (line_length > main_lens[0]) {
- main_lens[1] = main_lens[0];
- main_lens[0] = line_length;
- main_angles[1] = main_angles[0];
- main_angles[0] = rotate_angle;
- //如果定义了 SHOW_LINE, 则将该线条画出来
- #ifdef SHOW_LINE
- line( cdst, Point(x1, y1), Point(x2, y2), Scalar(0,0,255), 3, CV_AA);
- #endif
- } else {
- main_lens[1] = line_length;
- main_angles[1] = rotate_angle;
- }
- }
- }
-
- //如果定义了 SHOW_LINE, 则在source_window中显示cdst
- #ifdef SHOW_LINE
- imshow(source_window, cdst);
- #endif
-
- //最后,分析最长的二条直线,得出结果
- if ( main_lens[0] > 0 ) {
- //如果最长的线 与 次长的线 两者长度相近,则返回两者需要旋转的角度的平均值
- if (main_lens[1] > 0 && (main_lens[0] - main_lens[1] / main_lens[0] < 0.2 )) {
- return (main_angles[0] + main_angles[1] ) / 2;
- } else {
- return main_angles[0]; //否则,返回最长的线需要旋转的角度
- }
- } else {
- return 0;
- }
- }
使用detectRotation()函数自动测试角度,并显示出主要线条,运行结果:
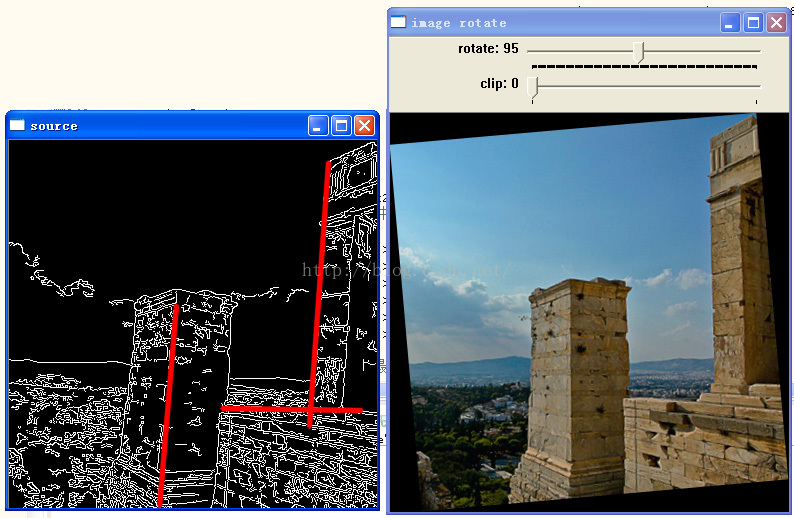
恩,有那么一点意思, 找出了几个主线条,得出旋转 -5 度,则可以摆正图片。
当然,这个 detectRotation()函数还不是很智能,可用性还有待改进。
最后, 把本文所有代码和主程序贴上来(有点长,不过方便复制)。配置好OpenCV开发环境,把代码复制下来,就可以调试了。
代码中需要说明的是: 由于opencv的滚动条只能显示正值。 本例中rotation 的 滚动条,值为100时表示旋转角度为0。 如果小于100, 表示旋转角度为负。
- #include
- #include "opencv2/core.hpp"
- #include "opencv2/imgproc.hpp"
- #include "opencv2/highgui.hpp"
- #include
-
- using namespace std;
- using namespace cv;
-
-
- #define SHOW_LINE
-
- #define BASE 100
-
- static string source_window = "source";
- static string window_name = "image rotate";
- static Mat src;
- static int rotateDegree = 0 + BASE;
- static int clip = 0;
-
- //图像旋转: src为原图像, dst为新图像, angle为旋转角度(正值为顺时针旋转,负值为逆时针旋转)
- int imageRotate1(InputArray src, OutputArray dst, double angle)
- {
- Mat input = src.getMat();
- if( input.empty() ) {
- return -1;
- }
-
- //得到图像大小
- int width = input.cols;
- int height = input.rows;
-
- //计算图像中心点
- Point2f center;
- center.x = width / 2.0;
- center.y = height / 2.0;
-
- //获得旋转变换矩阵
- double scale = 1.0;
- Mat trans_mat = getRotationMatrix2D( center, -angle, scale );
-
- //仿射变换
- warpAffine( input, dst, trans_mat, Size(width, height));
-
- return 0;
- }
-
- //图像旋转: src为原图像, dst为新图像, angle为旋转角度
- int imageRotate2(InputArray src, OutputArray dst, double angle)
- {
- Mat input = src.getMat();
- if( input.empty() ) {
- return -1;
- }
-
- //得到图像大小
- int width = input.cols;
- int height = input.rows;
-
- //计算图像中心点
- Point2f center;
- center.x = width / 2.0;
- center.y = height / 2.0;
-
- //获得旋转变换矩阵
- double scale = 1.0;
- Mat trans_mat = getRotationMatrix2D( center, -angle, scale );
-
- //计算新图像大小
- double angle1 = angle * CV_PI / 180. ;
- double a = sin(angle1) * scale;
- double b = cos(angle1) * scale;
- double out_width = height * fabs(a) + width * fabs(b);
- double out_height = width * fabs(a) + height * fabs(b);
-
- //仿射变换
- warpAffine( input, dst, trans_mat, Size(out_width, out_height));
-
- return 0;
- }
-
- //图像旋转: src为原图像, dst为新图像, angle为旋转角度
- int imageRotate3(InputArray src, OutputArray dst, double angle)
- {
- Mat input = src.getMat();
- if( input.empty() ) {
- return -1;
- }
-
- //得到图像大小
- int width = input.cols;
- int height = input.rows;
-
- //计算图像中心点
- Point2f center;
- center.x = width / 2.0;
- center.y = height / 2.0;
-
- //获得旋转变换矩阵
- double scale = 1.0;
- Mat trans_mat = getRotationMatrix2D( center, -angle, scale );
-
- //计算新图像大小
- double angle1 = angle * CV_PI / 180. ;
- double a = sin(angle1) * scale;
- double b = cos(angle1) * scale;
- double out_width = height * fabs(a) + width * fabs(b);
- double out_height = width * fabs(a) + height * fabs(b);
-
- //在旋转变换矩阵中加入平移量
- trans_mat.at<double>(0, 2) += cvRound( (out_width - width) / 2 );
- trans_mat.at<double>(1, 2) += cvRound( (out_height - height) / 2);
-
- //仿射变换
- warpAffine( input, dst, trans_mat, Size(out_width, out_height));
-
- return 0;
- }
-
-
- //图像旋转: src为原图像, dst为新图像, angle为旋转角度, isClip表示是采取缩小图片的方式
- int imageRotate4(InputArray src, OutputArray dst, double angle, bool isClip)
- {
- Mat input = src.getMat();
- if( input.empty() ) {
- return -1;
- }
-
- //得到图像大小
- int width = input.cols;
- int height = input.rows;
-
- //计算图像中心点
- Point2f center;
- center.x = width / 2.0;
- center.y = height / 2.0;
-
- //获得旋转变换矩阵
- double scale = 1.0;
- Mat trans_mat = getRotationMatrix2D( center, -angle, scale );
-
- //计算新图像大小
- double angle1 = angle * CV_PI / 180. ;
- double a = sin(angle1) * scale;
- double b = cos(angle1) * scale;
- double out_width = height * fabs(a) + width * fabs(b); //外边框长度
- double out_height = width * fabs(a) + height * fabs(b);//外边框高度
-
- int new_width, new_height;
- if ( ! isClip ) {
- new_width = cvRound(out_width);
- new_height = cvRound(out_height);
- } else {
- //calculate width and height of clip rect
- double angle2 = fabs(atan(height * 1.0 / width)); //即角度 b
- double len = width * fabs(b);
- double Y = len / ( 1 / fabs(tan(angle1)) + 1 / fabs(tan(angle2)) );
- double X = Y * 1 / fabs(tan(angle2));
- new_width = cvRound(out_width - X * 2);
- new_height= cvRound(out_height - Y * 2);
- }
-
- //在旋转变换矩阵中加入平移量
- trans_mat.at<double>(0, 2) += cvRound( (new_width - width) / 2 );
- trans_mat.at<double>(1, 2) += cvRound( (new_height - height) / 2);
-
- //仿射变换
- warpAffine( input, dst, trans_mat, Size(new_width, new_height));
-
- return 0;
- }
-
- /**
- * 检测图像倾斜度
- * 返回值:返回0表示无检测结果,返回非0表示摆正图象需要旋转的角度(-10至10度)
- */
- double detectRotation(InputArray src)
- {
- double max_angle = 6; //可旋转的最大角度
-
- Mat in = src.getMat();
- if( in.empty() ) return 0;
-
- Mat input;
-
- //转为灰度图
- if ( in.type() == CV_8UC1 )
- input = in;
- else if ( in.type() == CV_8UC3 )
- cvtColor(in, input, CV_BGR2GRAY);
- else if ( in.type() == CV_8UC3 )
- cvtColor(in, input, CV_BGRA2GRAY);
- else
- return 0;
-
- Mat dst, cdst;
-
- //执行Canny边缘检测(检测结果为dst, 为黑白图)
- double threshold1 = 90;
- Canny(src, dst, threshold1, threshold1 * 3, 3);
-
- //将Canny边缘检测结果转化为灰度图像(cdst)
- cvtColor(dst, cdst, CV_GRAY2BGR);
-
- //执行霍夫线变换,检测直线
- vector
lines; //存放检测结果的vector - double minLineLength = std::min(dst.cols, dst.rows) * 0.25; //最短线长度
- double maxLineGap = std::min(dst.cols, dst.rows) * 0.03 ; //最小线间距
- int threshold = 90;
- HoughLinesP(dst, lines, 1, CV_PI / 180, threshold, minLineLength, maxLineGap );
-
- //分析所需变量
- int x1, y1, x2 , y2; //直线的两个端点
- int x, y; //直线的中点
- double angle, rotate_angle; //直线的角度,摆正直线需要旋转的角度
- double line_length; //直线长度
- double position_weighted; //直线的位置权重:靠图像中央的线权重为1, 越靠边的线权重越小
- double main_lens[2]; //用于存放最长的二条直线长度的数组 (这两条直线即是主线条)
- double main_angles[2];//用于存放最长的二条直线的摆正需要旋转的角度
- main_lens[0] = main_lens[1] = 0;
- main_angles[0] = main_angles[1] = 0;
-
- //逐个分析各条直线,判断哪个是主线条
- for( size_t i = 0; i < lines.size(); i++ ) {
- //取得直线的两个端点座标
- x1 = lines[i][0]; y1 = lines[i][1]; x2 = lines[i][2]; y2 = lines[i][3];
- x = (x1 + x2 ) / 2; y = (y1 + y2) / 2;
- //计算直线的角度
- angle = (x1 == x2) ? 90 : ( atan ( (y1 - y2) * 1.0 / (x2 - x1) ) ) / CV_PI * 180;
- //摆正直线需要旋转的角度. 如果超出可旋转的最大角度,则忽略这个线。
- if ( fabs(angle - 0) <= max_angle ) {
- rotate_angle = angle - 0;
- } else if ( fabs(angle - 90) <= max_angle ) {
- rotate_angle = angle - 90;
- } else {
- continue;
- }
-
- //计算线的长度
- line_length = sqrt( (x1 - x2) * (x1 - x2) + (y1 - y2) * (y1 - y2) );
- //计算直线的位置权重:靠图像中央的线权重为1, 越靠边的线权重越小
- position_weighted = 1;
- if ( x < dst.cols / 4 || x > dst.cols * 3 / 4 ) position_weighted *= 0.8;
- if ( x < dst.cols / 6 || x > dst.cols * 5 / 6 ) position_weighted *= 0.5;
- if ( x < dst.cols / 8 || x > dst.cols * 7 / 8 ) position_weighted *= 0.5;
- if ( y < dst.rows / 4 || y > dst.rows * 3 / 4 ) position_weighted *= 0.8;
- if ( y < dst.rows / 6 || y > dst.rows * 5 / 6 ) position_weighted *= 0.5;
- if ( y < dst.rows / 8 || y > dst.rows * 7 / 8 ) position_weighted *= 0.5;
-
- //如果 直线长度 * 位置权重 < 最小长度, 则这条线无效
- line_length = line_length * position_weighted;
- if ( line_length < minLineLength ) continue;
-
-
-
- //如果长度为前两名,则存入数据
- if ( line_length > main_lens[1] ) {
- if (line_length > main_lens[0]) {
- main_lens[1] = main_lens[0];
- main_lens[0] = line_length;
- main_angles[1] = main_angles[0];
- main_angles[0] = rotate_angle;
- //如果定义了 SHOW_LINE, 则将该线条画出来
- #ifdef SHOW_LINE
- line( cdst, Point(x1, y1), Point(x2, y2), Scalar(0,0,255), 3, CV_AA);
- #endif
- } else {
- main_lens[1] = line_length;
- main_angles[1] = rotate_angle;
- }
- }
- }
-
- //如果定义了 SHOW_LINE, 则在source_window中显示cdst
- #ifdef SHOW_LINE
- imshow(source_window, cdst);
- #endif
-
- //最后,分析最长的二条直线,得出结果
- if ( main_lens[0] > 0 ) {
- //如果最长的线 与 次长的线 两者长度相近,则返回两者需要旋转的角度的平均值
- if (main_lens[1] > 0 && (main_lens[0] - main_lens[1] / main_lens[0] < 0.2 )) {
- return (main_angles[0] + main_angles[1] ) / 2;
- } else {
- return main_angles[0]; //否则,返回最长的线需要旋转的角度
- }
- } else {
- return 0;
- }
- }
-
-
- static void callbackAdjust(int , void *)
- {
- Mat dst;
-
- //imageRotate1(src, dst, rotateDegree - BASE);
- //imageRotate2(src, dst, rotateDegree - BASE);
- //imageRotate3(src, dst, rotateDegree - BASE);
-
- bool isClip = ( clip == 1 );
- imageRotate4(src, dst, rotateDegree - BASE, isClip );
-
- imshow(window_name, dst);
- }
-
-
- int main()
- {
- src = imread("building.jpg");
-
- if ( !src.data ) {
- cout << "error read image" << endl;
- return -1;
- }
-
- namedWindow(source_window);
- imshow(source_window, src);
-
- namedWindow(window_name);
- createTrackbar("rotate", window_name, &rotateDegree, BASE * 2, callbackAdjust);
- createTrackbar("clip", window_name, &clip, 1, callbackAdjust);
-
- //自动检测旋转角度
- double angle = detectRotation(src);
- if ( angle != 0 ) {
- rotateDegree = angle + BASE;
- setTrackbarPos("rotate", window_name, rotateDegree);
- }
-
- callbackAdjust(0, 0);
-
- waitKey();
-
- return 0;
-
- }
评论记录:
回复评论: