
安卓直播推流专栏博客总结
0 . 资源和源码地址 :
- 资源下载地址 : 资源下载地址 , 服务器搭建 , x264 , faac , RTMPDump , 源码及交叉编译库 , 本专栏 Android 直播推流源码 ;
- GitHub 源码地址 : han1202012 / RTMP_Pusher
1. 搭建 RTMP 服务器 : 下面的博客中讲解了如何在 VMWare 虚拟机中搭建 RTMP 直播推流服务器 ;
2. 准备视频编码的 x264 编码器开源库 , 和 RTMP 数据包封装开源库 :
-
【Android RTMP】RTMPDumb 源码导入 Android Studio ( 交叉编译 | 配置 CMakeList.txt 构建脚本 )
-
【Android RTMP】Android Studio 集成 x264 开源库 ( Ubuntu 交叉编译 | Android Studio 导入函数库 )
3. 讲解 RTMP 数据包封装格式 :
4. 图像数据采集 : 从 Camera 摄像头中采集 NV21 格式的图像数据 , 并预览该数据 ;
-
【Android RTMP】Android Camera 视频数据采集预览 ( 视频采集相关概念 | 摄像头预览参数设置 | 摄像头预览数据回调接口 )
-
【Android RTMP】Android Camera 视频数据采集预览 ( NV21 图像格式 | I420 图像格式 | NV21 与 I420 格式对比 | NV21 转 I420 算法 )
-
【Android RTMP】Android Camera 视频数据采集预览 ( 图像传感器方向设置 | Camera 使用流程 | 动态权限申请 )
5. NV21 格式的图像数据编码成 H.264 格式的视频数据 :
-
【Android RTMP】x264 编码器初始化及设置 ( 获取 x264 编码参数 | 编码规格 | 码率 | 帧率 | B帧个数 | 关键帧间隔 | 关键帧解码数据 SPS PPS )
-
【Android RTMP】x264 图像数据编码 ( Camera 图像数据采集 | NV21 图像数据传到 Native 处理 | JNI 传输字节数组 | 局部引用变量处理 | 线程互斥 )
-
【Android RTMP】x264 图像数据编码 ( NV21 格式中的 YUV 数据排列 | Y 灰度数据拷贝 | U 色彩值数据拷贝 | V 饱和度数据拷贝 | 图像编码操作 )
6. 将 H.264 格式的视频数据封装到 RTMP 数据包中 :
-
【Android RTMP】RTMPDump 封装 RTMPPacket 数据包 ( 封装 SPS / PPS 数据包 )
-
【Android RTMP】RTMPDump 封装 RTMPPacket 数据包 ( 关键帧数据格式 | 非关键帧数据格式 | x264 编码后的数据处理 | 封装 H.264 视频数据帧 )
-
【Android RTMP】RTMPDump 推流过程 ( 独立线程推流 | 创建推流器 | 初始化操作 | 设置推流地址 | 启用写出 | 连接 RTMP 服务器 | 发送 RTMP 数据包 )
7. 阶段总结 : 阿里云服务器中搭建 RTMP 服务器 , 并使用电脑软件推流和观看直播内容 ;
-
【Android RTMP】RTMP 直播推流 ( 阿里云服务器购买 | 远程服务器控制 | 搭建 RTMP 服务器 | 服务器配置 | 推流软件配置 | 直播软件配置 | 推流直播效果展示 )
-
【Android RTMP】RTMP 直播推流阶段总结 ( 服务器端搭建 | Android 手机端编码推流 | 电脑端观看直播 | 服务器状态查看 )
8. 处理 Camera 图像传感器导致的 NV21 格式图像旋转问题 :
-
【Android RTMP】NV21 图像旋转处理 ( 问题描述 | 图像顺时针旋转 90 度方案 | YUV 图像旋转细节 | 手机屏幕旋转方向 )
-
【Android RTMP】NV21 图像旋转处理 ( 图像旋转算法 | 后置摄像头顺时针旋转 90 度 | 前置摄像头顺时针旋转 90 度 )
9. 下面这篇博客比较重要 , 里面有一个快速搭建 RTMP 服务器的脚本 , 强烈建议使用 ;
10. 编码 AAC 音频数据的开源库 FAAC 交叉编译与 Android Studio 环境搭建 :
-
【Android RTMP】音频数据采集编码 ( 音频数据采集编码 | AAC 高级音频编码 | FAAC 编码器 | Ubuntu 交叉编译 FAAC 编码器 )
-
【Android RTMP】音频数据采集编码 ( FAAC 头文件与静态库拷贝到 AS | CMakeList.txt 配置 FAAC | AudioRecord 音频采样 PCM 格式 )
11. 解析 AAC 音频格式 :
12 . 将麦克风采集的 PCM 音频采样编码成 AAC 格式音频 , 并封装到 RTMP 包中 , 推流到客户端 :
-
【Android RTMP】音频数据采集编码 ( FAAC 音频编码参数设置 | FAAC 编码器创建 | 获取编码器参数 | 设置 AAC 编码规格 | 设置编码器输入输出参数 )
-
【Android RTMP】音频数据采集编码 ( FAAC 编码器编码 AAC 音频解码信息 | 封装 RTMP 音频数据头 | 设置 AAC 音频数据类型 | 封装 RTMP 数据包 )
-
【Android RTMP】音频数据采集编码 ( FAAC 编码器编码 AAC 音频采样数据 | 封装 RTMP 音频数据头 | 设置 AAC 音频数据类型 | 封装 RTMP 数据包 )
一、 Android RTMP 直播推流简介
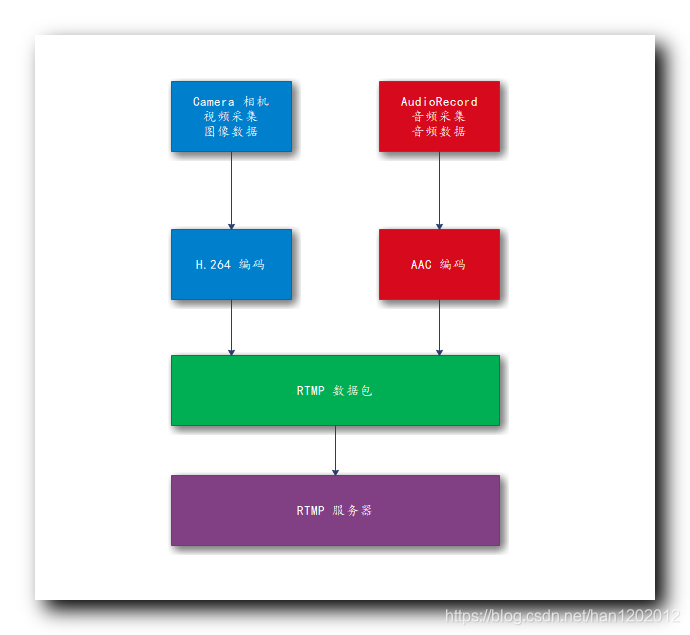
Android 端直播推流原理 :
① 数据采集 : 使用 Camera 相机采集图像数据 , 使用 AudioRecord 采集声音 ;
② 数据编码 : 将图像和声音分别进行编码 , 视频使用 H.264 格式进行编码 , 音频使用 AAC 格式进行编码 ;
③ 数据打包 : 将 H.264 格式的视频数据 , 和 AAC 格式的音频数据 , 打包为 RTMP 格式的数据包 ;
④ 数据发送 : 将上述 RTMP 数据包发送到流媒体服务器 ;
二、 Nginx、RTMP Module 编译环境源码准备
需要在 Linux 服务器中搭建 NGINX RTMP 服务器 , 下面是搭建 NGINX RTMP 流媒体服务器环境及源码准备 ;
1 . 下载 nginx 源码 : 到 NGINX 服务器下载地址 下载 nginx 源码 , 也可以点击此处 , 直接 下载源码 ;
2 . 下载 nginx rtmp 服务器应用 : arut/nginx-rtmp-module , 不要直接下载测试或者不稳定版本 , 下载其发布版本 , 点击 Releases 查看 发布版本 , 这里选择 v1.2.1 发布版本 进行下载 ;
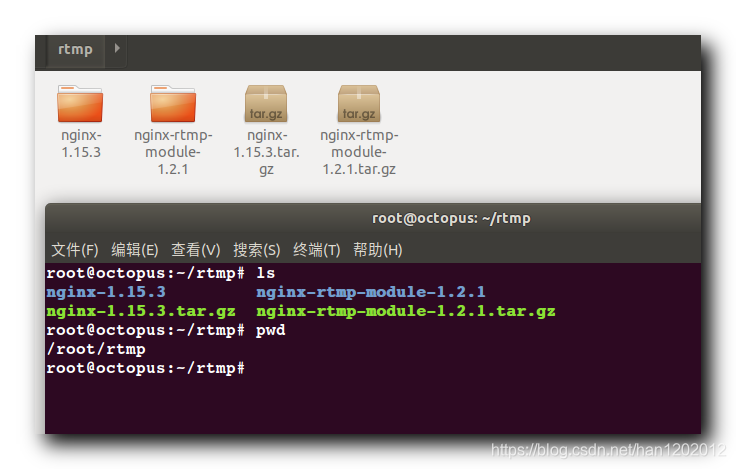
3 . 编译环境准备 : 下载完毕后 , 在 Ubuntu 的 root 用户目录下 , 创建 rtmp 目录 , 将两个包拷贝到 rtmp 目录中 , nginx 服务器与 nginx-rtmp-module 在该目录下进行编译安装 ;
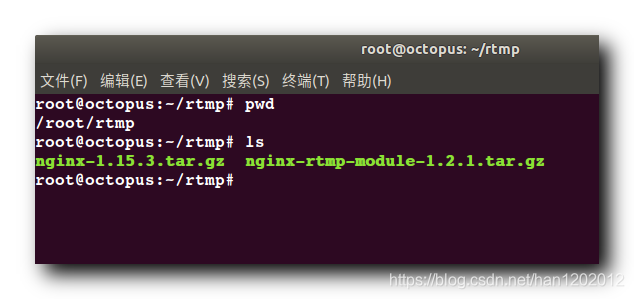
4 . 解压源码 :
① 解压 nginx 源码 : tar xvf nginx-1.15.3.tar.gz ;
② 解压 nginx-rtmp-module 源码 : tar xvf nginx-rtmp-module-1.2.1.tar.gz ;
三、 pcre、OpenSSL、zlib 函数库安装
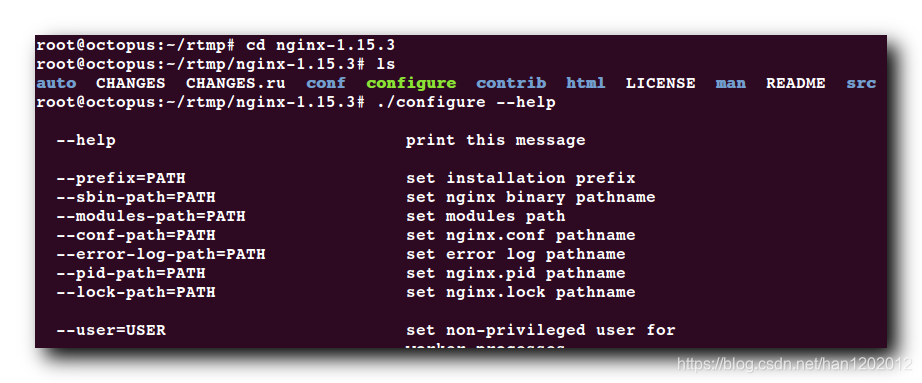
1 . 查看编译配置 : ./configure --help 可以查看编译配置选项 ;
root@octopus:~/rtmp# cd nginx-1.15.3
root@octopus:~/rtmp/nginx-1.15.3# ls
auto  CHANGES  CHANGES.ru  conf  configure  contrib  html  LICENSE  man  README  src
root@octopus:~/rtmp/nginx-1.15.3# ./configure --help
  --help                             print this message
  --prefix=PATH                      set installation prefix
  ...
  --add-module=PATH                  enable external module
  ...
  --with-debug                       enable debug logging

root@octopus:~/rtmp/nginx-1.15.3#
- 1
- 2
- 3
- 4
- 5
- 6
- 7
- 8
- 9
- 10
- 11
- 12
2 . 使用到的编译配置 :
① – prefix=PATH : 代码编译后的安装目录 ;
② – add-module=PATH : 启用外部模块 , 就是启用 RTMP 模块 ;
3 . 编译配置 : 执行 ./configure --prefix=./bin --add-module=…/nginx-rtmp-module-1.2.1 命令 , 配置编译选项 ;
① --prefix=./bin 配置 : 将编译结果 , 安装到当前目录下的 bin 目录 ;
② --add-module=…/nginx-rtmp-module-1.2.1 配置 : 启用外部的 RTMP 直播推流模块 ;
4 . 配置失败 : the HTTP rewrite module requires the PCRE library , 下面安装 PCRE 库 ;
root@octopus:~/rtmp/nginx-1.15.3# ./configure --prefix=./bin --add-module=../nginx-rtmp-module-1.2.1
checking for OS
 + Linux 5.3.0-28-generic x86_64
checking for C compiler ... found
 + using GNU C compiler
 + gcc version: 7.5.0 (Ubuntu 7.5.0-3ubuntu1~18.04)

... 省略1万行

configuring additional modules
adding module in ../nginx-rtmp-module-1.2.1
 + ngx_rtmp_module was configured
checking for PCRE library ... not found
checking for PCRE library in /usr/local/ ... not found
checking for PCRE library in /usr/include/pcre/ ... not found
checking for PCRE library in /usr/pkg/ ... not found
checking for PCRE library in /opt/local/ ... not found

./configure: error: the HTTP rewrite module requires the PCRE library.
You can either disable the module by using --without-http_rewrite_module
option, or install the PCRE library into the system, or build the PCRE library
statically from the source with nginx by using --with-pcre=<path> option.

root@octopus:~/rtmp/nginx-1.15.3#

- 1
- 2
- 3
- 4
- 5
- 6
- 7
- 8
- 9
- 10
- 11
- 12
- 13
- 14
- 15
- 16
- 17
- 18
- 19
- 20
- 21
- 22
- 23
- 24
- 25
5 . 更新 apt-get 源 : 源 存储在 /etc/apt/sources.list 文件中 ;
① 备份源 :
mv /etc/apt/sources.list /etc/apt/sourses.list.backup
- 1
② 添加源 : 创建 /etc/apt/sources.list 文件 , 并将下面的内容拷贝到其中 ; 这是 163 网易提供的源 ;
deb http://mirrors.163.com/ubuntu/ bionic main restricted universe multiverse
deb http://mirrors.163.com/ubuntu/ bionic-security main restricted universe multiverse
deb http://mirrors.163.com/ubuntu/ bionic-updates main restricted universe multiverse
deb http://mirrors.163.com/ubuntu/ bionic-proposed main restricted universe multiverse
deb http://mirrors.163.com/ubuntu/ bionic-backports main restricted universe multiverse
deb-src http://mirrors.163.com/ubuntu/ bionic main restricted universe multiverse
deb-src http://mirrors.163.com/ubuntu/ bionic-security main restricted universe multiverse
deb-src http://mirrors.163.com/ubuntu/ bionic-updates main restricted universe multiverse
deb-src http://mirrors.163.com/ubuntu/ bionic-proposed main restricted universe multiverse
deb-src http://mirrors.163.com/ubuntu/ bionic-backports main restricted universe multiverse
- 1
- 2
- 3
- 4
- 5
- 6
- 7
- 8
- 9
- 10
③ 更新源 :
sudo apt-get update
- 1
6 . 安装 pcre : 执行 sudo apt-get install libpcre3 libpcre3-dev 命令 , 安装成功 ;
root@octopus:~/rtmp/nginx-1.15.3# sudo apt-get install libpcre3 libpcre3-dev
- 1
7 . 再次执行编译配置选项 : 执行 ./configure --prefix=./bin --add-module=…/nginx-rtmp-module-1.2.1 命令 , 报错 SSL modules require the OpenSSL library , 继续安装 OpenSSL 库 ;
root@octopus:~/rtmp/nginx-1.15.3# ./configure --prefix=./bin --add-module=../nginx-rtmp-module-1.2.1
checking for OS
 + Linux 5.3.0-28-generic x86_64
checking for C compiler ... found
 + using GNU C compiler
 + gcc version: 7.5.0 (Ubuntu 7.5.0-3ubuntu1~18.04)

... 省略1万行

configuring additional modules
adding module in ../nginx-rtmp-module-1.2.1
 + ngx_rtmp_module was configured
checking for PCRE library ... found
checking for PCRE JIT support ... found
checking for OpenSSL library ... not found
checking for OpenSSL library in /usr/local/ ... not found
checking for OpenSSL library in /usr/pkg/ ... not found
checking for OpenSSL library in /opt/local/ ... not found

./configure: error: SSL modules require the OpenSSL library.
You can either do not enable the modules, or install the OpenSSL library
into the system, or build the OpenSSL library statically from the source
with nginx by using --with-openssl=<path> option.

root@octopus:~/rtmp/nginx-1.15.3#
- 1
- 2
- 3
- 4
- 5
- 6
- 7
- 8
- 9
- 10
- 11
- 12
- 13
- 14
- 15
- 16
- 17
- 18
- 19
- 20
- 21
- 22
- 23
- 24
- 25
- 26
8 . 安装 OpenSSL 库 :
sudo apt-get install openssl libssl-dev
- 1
9 . 继续尝试配置 : 报错 the HTTP gzip module requires the zlib library , 缺少 zlib 库 , 继续安装 zlib 库 ;
root@octopus:~/rtmp/nginx-1.15.3# ./configure --prefix=./bin --add-module=../nginx-rtmp-module-1.2.1
checking for OS
 + Linux 5.3.0-28-generic x86_64
checking for C compiler ... found
 + using GNU C compiler
 + gcc version: 7.5.0 (Ubuntu 7.5.0-3ubuntu1~18.04)

... 省略

configuring additional modules
adding module in ../nginx-rtmp-module-1.2.1
 + ngx_rtmp_module was configured
checking for PCRE library ... found
checking for PCRE JIT support ... found
checking for OpenSSL library ... found
checking for zlib library ... not found

./configure: error: the HTTP gzip module requires the zlib library.
You can either disable the module by using --without-http_gzip_module
option, or install the zlib library into the system, or build the zlib library
statically from the source with nginx by using --with-zlib=<path> option.
- 1
- 2
- 3
- 4
- 5
- 6
- 7
- 8
- 9
- 10
- 11
- 12
- 13
- 14
- 15
- 16
- 17
- 18
- 19
- 20
- 21
- 22
10 . 安装 zlib 库 : sudo apt-get install zlib1g-dev ;
sudo apt-get install zlib1g-dev
- 1
11 . 继续尝试配置 : 这会成功了 , 可以开始编译了 ;
root@octopus:~/rtmp/nginx-1.15.3# ./configure --prefix=./bin --add-module=../nginx-rtmp-module-1.2.1
checking for OS
 + Linux 5.3.0-28-generic x86_64
checking for C compiler ... found
 + using GNU C compiler
 + gcc version: 7.5.0 (Ubuntu 7.5.0-3ubuntu1~18.04)
checking for gcc -pipe switch ... found
checking for -Wl,-E switch ... found

... 省略

configuring additional modules
adding module in ../nginx-rtmp-module-1.2.1
 + ngx_rtmp_module was configured
checking for PCRE library ... found
checking for PCRE JIT support ... found
checking for OpenSSL library ... found
checking for zlib library ... found
creating objs/Makefile

Configuration summary
  + using system PCRE library
  + using system OpenSSL library
  + using system zlib library

  nginx path prefix: "./bin"
  nginx binary file: "./bin/sbin/nginx"
  nginx modules path: "./bin/modules"
  nginx configuration prefix: "./bin/conf"
  nginx configuration file: "./bin/conf/nginx.conf"
  nginx pid file: "./bin/logs/nginx.pid"
  nginx error log file: "./bin/logs/error.log"
  nginx http access log file: "./bin/logs/access.log"
  nginx http client request body temporary files: "client_body_temp"
  nginx http proxy temporary files: "proxy_temp"
  nginx http fastcgi temporary files: "fastcgi_temp"
  nginx http uwsgi temporary files: "uwsgi_temp"
  nginx http scgi temporary files: "scgi_temp"

root@octopus:~/rtmp/nginx-1.15.3#
- 1
- 2
- 3
- 4
- 5
- 6
- 7
- 8
- 9
- 10
- 11
- 12
- 13
- 14
- 15
- 16
- 17
- 18
- 19
- 20
- 21
- 22
- 23
- 24
- 25
- 26
- 27
- 28
- 29
- 30
- 31
- 32
- 33
- 34
- 35
- 36
- 37
- 38
- 39
- 40
- 41
12 . 总结 : 这里总结下上面的坑 , 巨坑 , 百度了半小时 ;
① 需要安装的库 : pcre、OpenSSL、zlib ;
② 相应的安装命令 :
sudo apt-get install libpcre3 libpcre3-dev
sudo apt-get install openssl libssl-dev
sudo apt-get install zlib1g-dev
- 1
- 2
- 3
四、 编译安装 Nginx
1 . 生成的 Makefile 文件 : 上面执行完 ./configure --prefix=./bin --add-module=…/nginx-rtmp-module-1.2.1 命令后 , 会生成 Makefile 文件 ;

2 . 编译安装 : 执行 make install 进行编译安装 , 执行完毕后 , 生成 bin 目录 , 编译生成的文件都安装在这里 ;
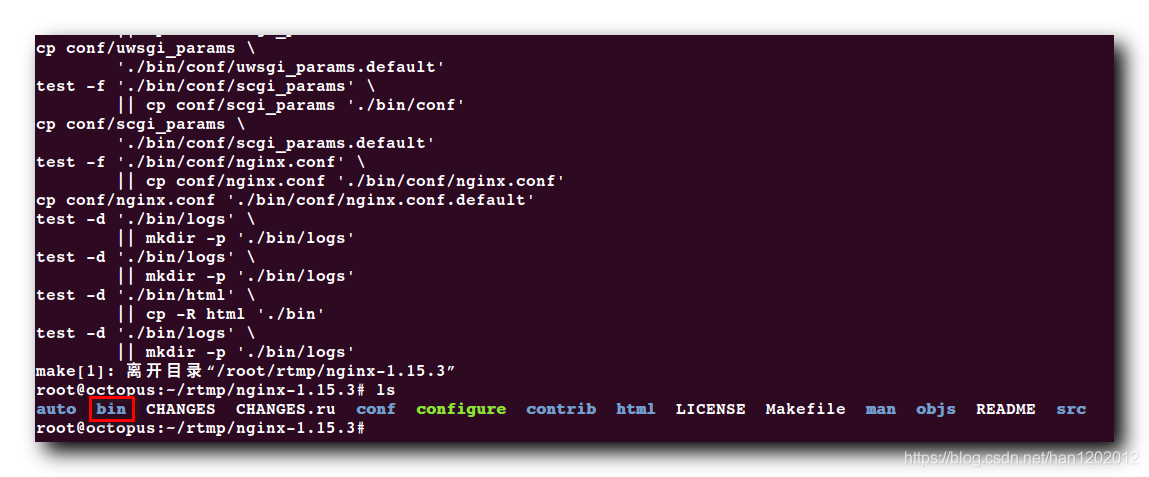
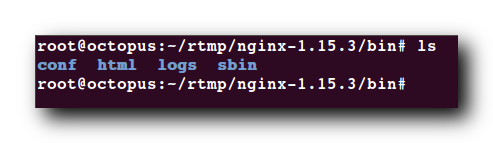
3 . 查看 bin 目录 : bin 目录下生成了 4 4 4 个文件 ;
① conf : 服务器配置脚本目录 , 有很多配置脚本 ;
② html : HTTP 网页放在这里 ;
③ logs : 存放日志 ;
④ sbin : 可执行文件 ;
五、 配置 RTMP
1 . 配置 conf/nginx.conf 脚本 : Nginx 服务器默认是没有 RTMP 功能的 , 需要手动配置 , 这里就需要在 conf/nginx.conf 脚本中进行配置 ;
2 . Nginx RTMP 配置示例 : 在 nginx-rtmp-module-1.2.1/test 目录下 , 有一个 nginx.conf 配置文件 , 该配置文件提供了 Nginx 服务器中的 RTMP 配置方法 , 仅做参考 ;
worker_processes  1;

error_log  logs/error.log debug;

events {
    worker_connections  1024;
}

rtmp {
    server {
        listen 1935;

        application myapp {
            live on;

            #record keyframes;
            #record_path /tmp;
            #record_max_size 128K;
            #record_interval 30s;
            #record_suffix .this.is.flv;

            #on_publish http://localhost:8080/publish;
            #on_play http://localhost:8080/play;
            #on_record_done http://localhost:8080/record_done;
        }
    }
}

http {
    server {
        listen      8080;

        location /stat {
            rtmp_stat all;
            rtmp_stat_stylesheet stat.xsl;
        }

        location /stat.xsl {
            root /path/to/nginx-rtmp-module/;
        }

        location /control {
            rtmp_control all;
        }

        #location /publish {
        #    return 201;
        #}

        #location /play {
        #    return 202;
        #}

        #location /record_done {
        #    return 203;
        #}

        location /rtmp-publisher {
            root /path/to/nginx-rtmp-module/test;
        }

        location / {
            root /path/to/nginx-rtmp-module/test/www;
        }
    }
}
- 1
- 2
- 3
- 4
- 5
- 6
- 7
- 8
- 9
- 10
- 11
- 12
- 13
- 14
- 15
- 16
- 17
- 18
- 19
- 20
- 21
- 22
- 23
- 24
- 25
- 26
- 27
- 28
- 29
- 30
- 31
- 32
- 33
- 34
- 35
- 36
- 37
- 38
- 39
- 40
- 41
- 42
- 43
- 44
- 45
- 46
- 47
- 48
- 49
- 50
- 51
- 52
- 53
- 54
- 55
- 56
- 57
- 58
- 59
- 60
- 61
- 62
- 63
- 64
- 65
- 66
3 . RTMP 配置模块 : 下面是专门配置 RTMP 的模块 ;
① server : 表示服务器 ;
② listen 1935 : 表示其监听 1935 端口号 , HTTP 协议默认端口是 80, RTMP 协议的默认端口是 1935 ;
③ application myapp : 对应 RTMP 地址中的应用 , 如下所示 ;
④ live on : 启动直播 ;
⑤ drop_idle_publisher 5s : 闲置 5 秒以上的连接会被丢弃 ;
⑥ RTMP 地址示例 : rtmp://192.168.1.15:1935/myapp ;
//RTMP 地址格式
rtmp://IP地址:端口号/应用名称
- 1
- 2
⑦ RTMP 配置示例 :
rtmp {
    server {
        listen 1935;

        application myapp {
            live on;
            drop_idle_publisher 5s;

            #record keyframes;
            #record_path /tmp;
            #record_max_size 128K;
            #record_interval 30s;
            #record_suffix .this.is.flv;

            #on_publish http://localhost:8080/publish;
            #on_play http://localhost:8080/play;
            #on_record_done http://localhost:8080/record_done;
        }
    }
}
- 1
- 2
- 3
- 4
- 5
- 6
- 7
- 8
- 9
- 10
- 11
- 12
- 13
- 14
- 15
- 16
- 17
- 18
- 19
- 20
4 . HTTP 模块配置 : 需要修改 3 3 3 个位置 , /path/to/nginx-rtmp-module/ 替换为真实的 nginx-rtmp-module 目录 , 即 /root/rtmp/nginx-rtmp-module-1.2.1/
http {
    server {
        listen      8080;

        location /stat {
            rtmp_stat all;
            rtmp_stat_stylesheet stat.xsl;
        }

        location /stat.xsl {
            #root /path/to/nginx-rtmp-module/;
            root /root/rtmp/nginx-rtmp-module-1.2.1/;
        }

        location /control {
            rtmp_control all;
        }

        #location /publish {
        #    return 201;
        #}

        #location /play {
        #    return 202;
        #}

        #location /record_done {
        #    return 203;
        #}

        location /rtmp-publisher {
            #root /path/to/nginx-rtmp-module/test;
            root /root/rtmp/nginx-rtmp-module-1.2.1/test;
        }

        location / {
            #root /path/to/nginx-rtmp-module/test/www;
            root /root/rtmp/nginx-rtmp-module-1.2.1/test/www;
        }
    }
}
- 1
- 2
- 3
- 4
- 5
- 6
- 7
- 8
- 9
- 10
- 11
- 12
- 13
- 14
- 15
- 16
- 17
- 18
- 19
- 20
- 21
- 22
- 23
- 24
- 25
- 26
- 27
- 28
- 29
- 30
- 31
- 32
- 33
- 34
- 35
- 36
- 37
- 38
- 39
- 40
- 41
5 . 端口检查 : 该 Nginx RTMP 服务器启动后 , 需要使用 8080 和 1935 两个端口 , 确保这两个端口可以使用 ;
lsof -i:8080
lsof -i:1935
- 1
- 2
6 . 最终配置文件 : user root; 是必须的 , 如果在 root 用户下启动 Nginx , 必须配置该选项 ; 非 root 用户启动 Nginx 服务器 , 配置 user nobody;
user  root;
worker_processes  1;

error_log  logs/error.log debug;

events {
    worker_connections  1024;
}

rtmp {
    server {
        listen 1935;

        application myapp {
            live on;
        }
    }
}

http {
    server {
        listen 8080;

        location /stat {
            rtmp_stat all;
            rtmp_stat_stylesheet stat.xsl;
        }

        location /stat.xsl {
            root /root/rtmp/nginx-rtmp-module-1.2.1/;
        }

        location /control {
            rtmp_control all;
        }

        location /rtmp-publisher {
            root /root/rtmp/nginx-rtmp-module-1.2.1/test;
        }

        location / {
            root /root/rtmp/nginx-rtmp-module-1.2.1/test/www;
        }
    }
}
- 1
- 2
- 3
- 4
- 5
- 6
- 7
- 8
- 9
- 10
- 11
- 12
- 13
- 14
- 15
- 16
- 17
- 18
- 19
- 20
- 21
- 22
- 23
- 24
- 25
- 26
- 27
- 28
- 29
- 30
- 31
- 32
- 33
- 34
- 35
- 36
- 37
- 38
- 39
- 40
- 41
- 42
- 43
- 44
- 45
六、 修改 Nginx 和 RTMP Module 权限
启动时出现 403 错误 , 怀疑是文件权限不足 , 这里将 nginx-1.15.3 和 nginx-rtmp-module-1.2.1 赋予所有的权限 ;
root@octopus:~/rtmp# chmod -R 777 nginx-1.15.3
root@octopus:~/rtmp# chmod -R 777 nginx-rtmp-module-1.2.1
- 1
- 2
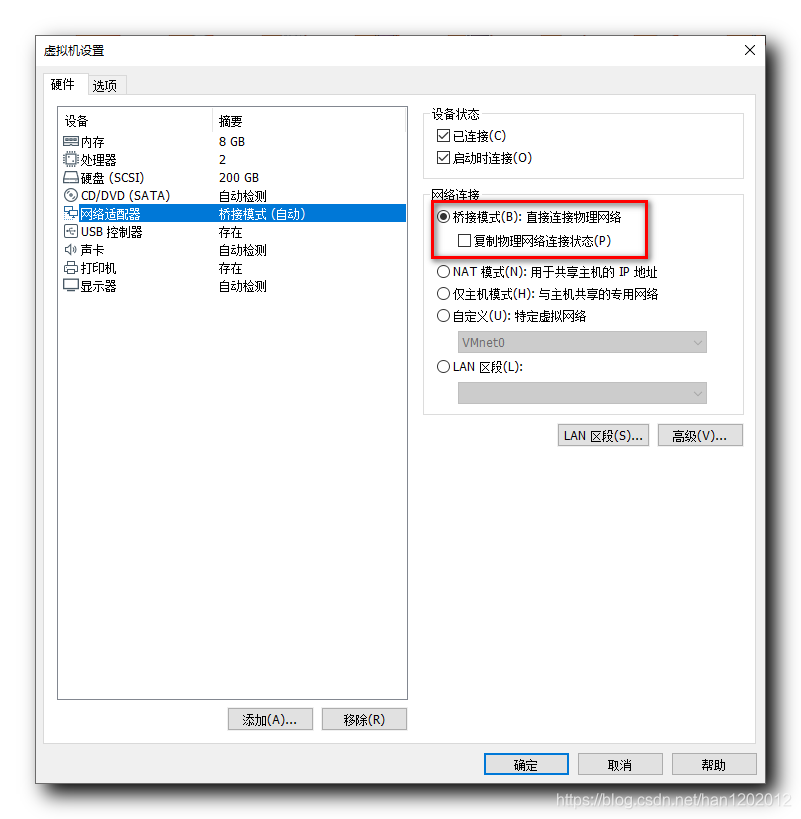
七、 虚拟机网络配置
配置虚拟机网络 : 使用 桥接模式 , 这样虚拟机相当于局域网中的一个服务器 , 局域网内的手机可以与该服务器 ( 虚拟机 ) 通信 ;
八、 启动 Nginx 服务器
1 . Nginx 服务器路径 : /root/rtmp/nginx-1.15.3/bin/sbin/nginx
2 . 启动 Nginx 服务器 : 需要在 nginx-1.15.3 目录下启动 , 因为要查找 logs/error.log 日志文件 , 只有在该目录下 , 才能按照 logs/error.log 路径查找到该错误日志文件 ;
root@octopus:~/rtmp/nginx-1.15.3# bin/
conf/ html/ logs/ sbin/
root@octopus:~/rtmp/nginx-1.15.3# bin/sbin/nginx
root@octopus:~/rtmp/nginx-1.15.3#
- 1
- 2
- 3
- 4
3 . 启动失败示例 : 在 nginx-1.15.3/bin 目录下启动 , 报错信息 ;
root@octopus:~/rtmp/nginx-1.15.3/bin# ./sbin/nginx
nginx: [alert] could not open error log file: open() "./bin/logs/error.log" failed (2: No such file or directory)
2020/06/08 23:22:02 [emerg] 79171#0: open() "./bin/conf/nginx.conf" failed (2: No such file or directory)
root@octopus:~/rtmp/nginx-1.15.3/bin#
- 1
- 2
- 3
- 4
4 . 启动后查看端口号 :
lsof -i:1935 命令 , 查看当前 1935 端口的应用 ;
lsof -i:8080 命令 , 查看当前 8080 端口命令 ;
root@octopus:~/rtmp/nginx-1.15.3# /root/rtmp/nginx-1.15.3/bin/sbin/nginx
root@octopus:~/rtmp/nginx-1.15.3# lsof -i:1935
COMMAND   PID USER   FD   TYPE DEVICE SIZE/OFF NODE NAME
nginx   86054 root    6u  IPv4 277762      0t0  TCP *:1935 (LISTEN)
nginx   86055 root    6u  IPv4 277762      0t0  TCP *:1935 (LISTEN)
root@octopus:~/rtmp/nginx-1.15.3# lsof -i:8080
COMMAND   PID USER   FD   TYPE DEVICE SIZE/OFF NODE NAME
nginx   86054 root    7u  IPv4 277763      0t0  TCP *:http-alt (LISTEN)
nginx   86055 root    7u  IPv4 277763      0t0  TCP *:http-alt (LISTEN)
root@octopus:~/rtmp/nginx-1.15.3#
- 1
- 2
- 3
- 4
- 5
- 6
- 7
- 8
- 9
- 10
5 . 浏览器访问 RTMP 服务器端 : 在浏览器端访问 虚拟机中的 RTMP 服务器 , 地址是 http://192.168.1.15:8080/ ;

评论记录:
回复评论: