
本文分享YOLO11中,从xxx.pt权重文件转为.onnx文件,然后使用.onnx文件,进行目标检测任务的模型推理。
用ONNX模型推理,便于算法到开发板或芯片的部署。
备注:本文是使用Python,编写ONNX模型推理代码的
目录
1、导出ONNX模型
首先我们训练好的模型,生成xxx.pt权重文件;
然后用下面代码,导出ONNX模型(简洁版)
- from ultralytics import YOLO
-
- # 加载一个模型,路径为 YOLO 模型的 .pt 文件
- model = YOLO("runs/detect/train/weights/best.pt")
-
- # 导出模型,格式为 ONNX
- model.export(format="onnx")
运行代码后,会在上面路径中生成best.onnx文件的
- 比如,填写的路径是:"runs/detect/train/weights/best.pt"
- 那么在runs/detect/train/weights/目录中,会生成与best.pt同名的onnx文件,即best.onnx
上面代码示例是简单版,如果需要更专业设置ONNX,用下面版本的
YOLO11导出ONNX模型(专业版)
-
- from ultralytics import YOLO
-
- # 加载一个模型,路径为 YOLO 模型的 .pt 文件
- model = YOLO(r"runs/detect/train3/weights/best.pt")
-
- # 导出模型,设置多种参数
- model.export(
- format="onnx", # 导出格式为 ONNX
- imgsz=(640, 640), # 设置输入图像的尺寸
- keras=False, # 不导出为 Keras 格式
- optimize=False, # 不进行优化 False, 移动设备优化的参数,用于在导出为TorchScript 格式时进行模型优化
- half=False, # 不启用 FP16 量化
- int8=False, # 不启用 INT8 量化
- dynamic=False, # 不启用动态输入尺寸
- simplify=True, # 简化 ONNX 模型
- opset=None, # 使用最新的 opset 版本
- workspace=4.0, # 为 TensorRT 优化设置最大工作区大小(GiB)
- nms=False, # 不添加 NMS(非极大值抑制)
- batch=1, # 指定批处理大小
- device="cpu" # 指定导出设备为CPU或GPU,对应参数为"cpu" , "0"
- )

对于model.export( )函数中,各种参数说明:
format="onnx":指定导出模型的格式为 onnx。imgsz=(640, 640):输入图像的尺寸设为 640x640。如果需要其他尺寸可以修改这个值。keras=False:不导出为 Keras 格式的模型。optimize=False:不应用 TorchScript 移动设备优化。half=False:不启用 FP16(半精度)量化。int8=False:不启用 INT8 量化。dynamic=False:不启用动态输入尺寸。simplify=True:简化模型以提升 ONNX 模型的性能。opset=None:使用默认的 ONNX opset 版本,如果需要可以手动指定。workspace=4.0:为 TensorRT 优化指定最大工作空间大小为 4 GiB。nms=False:不为 CoreML 导出添加非极大值抑制(NMS)。batch=1:设置批处理大小为 1。- device="cpu", 指定导出设备为CPU或GPU,对应参数为"cpu" , "0"
参考官网文档:https://docs.ultralytics.com/modes/export/#arguments
当然了,YOLO11中不仅支持ONNX模型,还支持下面表格中格式
| 支持的导出格式 | format参数值 | 生成的模型示例 | model.export( )函数的参数 |
|---|---|---|---|
| PyTorch | - | yolo11n.pt | - |
| TorchScript | torchscript | yolo11n.torchscript | imgsz, optimize, batch |
| ONNX | onnx | yolo11n.onnx | imgsz, half, dynamic, simplify, opset, batch |
| OpenVINO | openvino | yolo11n_openvino_model/ | imgsz, half, int8, batch |
| TensorRT | engine | yolo11n.engine | imgsz, half, dynamic, simplify, workspace, int8, batch |
| CoreML | coreml | yolo11n.mlpackage | imgsz, half, int8, nms, batch |
| TF SavedModel | saved_model | yolo11n_saved_model/ | imgsz, keras, int8, batch |
| TF GraphDef | pb | yolo11n.pb | imgsz, batch |
| TF Lite | tflite | yolo11n.tflite | imgsz, half, int8, batch |
| TF Edge TPU | edgetpu | yolo11n_edgetpu.tflite | imgsz |
| TF.js | tfjs | yolo11n_web_model/ | imgsz, half, int8, batch |
| PaddlePaddle | paddle | yolo11n_paddle_model/ | imgsz, batch |
| NCNN | ncnn | yolo11n_ncnn_model/ | imgsz, half, batch |
2、目标检测——ONNX模型推理
我们需要编写代码实现了一个使用 ONNXRuntime 执行 YOLOv11 检测模型推理的完整流程,包含图像预处理、推理、后处理和可视化 。
需要编写的代码功能包括:
-
预处理: 读取输入图像,通过 letterbox 填充图像,自动调整图像尺寸,使其符合模型的输入尺寸要求,并归一化并转换为模型输入的格式 。
-
模型推理: 使用 ONNXRuntime 加载YOLO11 模型,并根据系统环境自动选择 CPU 或 GPU 执行推理。预处理后的图像输入到模型中,模型返回预测的边界框、类别和分数等输出结果。
-
后处理: 对模型输出的边界框、类别和分数进行处理,首先根据置信度阈值过滤低置信度的检测结果。然后根据缩放比例将边界框映射回原图的尺寸,应用非极大值抑制(NMS)去除重叠的边界框,最终提取有效的检测结果。
-
可视化: 在输入图像上绘制检测到的边界框、类别名称和置信度,使用不同颜色区分不同类别的对象。可选择将带有检测结果的图像保存到文件中,最终输出检测结果保存的路径。
2.1、ONNX模型推理-整体流程
首先编写一个用于运行YOLO11检测模型的推理类:YOLO11
ONNX推理流程:预处理 -> 推理 -> 后处理
- class YOLO11:
- """YOLO11 目标检测模型类,用于处理推理和可视化。"""
- def __init__(self, onnx_model, input_image, confidence_thres, iou_thres):
- """
- 初始化 YOLO11 类的实例。
- 参数:
- onnx_model: ONNX 模型的路径。
- input_image: 输入图像的路径。
- confidence_thres: 用于过滤检测结果的置信度阈值。
- iou_thres: 非极大值抑制(NMS)的 IoU(交并比)阈值。
- """
- self.onnx_model = onnx_model
- self.input_image = input_image
- self.confidence_thres = confidence_thres
- self.iou_thres = iou_thres
-
- # 加载类别名称
- self.classes = CLASS_NAMES
-
- # 为每个类别生成一个颜色调色板
- self.color_palette = np.random.uniform(0, 255, size=(len(self.classes), 3))
-
-
- def main(self):
- # 使用 ONNX 模型创建推理会话,自动选择CPU或GPU
- session = ort.InferenceSession(
- self.onnx_model,
- providers=["CUDAExecutionProvider", "CPUExecutionProvider"] if ort.get_device() == "GPU" else ["CPUExecutionProvider"],
- )
- # 打印模型的输入尺寸
- print("YOLO11 ? 目标检测 ONNXRuntime")
- print("模型名称:", self.onnx_model)
-
- # 获取模型的输入形状
- model_inputs = session.get_inputs()
- input_shape = model_inputs[0].shape
- self.input_width = input_shape[2]
- self.input_height = input_shape[3]
- print(f"模型输入尺寸:宽度 = {self.input_width}, 高度 = {self.input_height}")
-
- # 预处理图像数据,确保使用模型要求的尺寸 (640x640)
- img_data = self.preprocess()
-
- # 使用预处理后的图像数据运行推理
- outputs = session.run(None, {model_inputs[0].name: img_data})
-
- # 对输出进行后处理以获取输出图像
- return self.postprocess(self.img, outputs) # 输出图像
2.2、预处理函数
然后编写输入图像预处理函数:preprocess
主要功能:对输入的图像进行读取、颜色空间转换、尺寸调整、归一化等预处理操作,并返回适合模型输入的图像数据。
- 使用 OpenCV 读取图像。
- 将图像从 BGR 格式转换为 RGB 格式。
- 使用
letterbox函数保持图像的宽高比并填充图像,使其符合模型要求的输入尺寸。 - 归一化图像数据(像素值除以 255.0)。
- 转换图像通道的维度,符合 PyTorch 模型的输入格式(通道优先)。
- 扩展图像维度以匹配模型输入的 batch 大小。
- def preprocess(self):
- """
- 对输入图像进行预处理,以便进行推理。
- 返回:
- image_data: 经过预处理的图像数据,准备进行推理。
- """
- # 使用 OpenCV 读取输入图像
- self.img = cv2.imread(self.input_image)
- # 获取输入图像的高度和宽度
- self.img_height, self.img_width = self.img.shape[:2]
-
- # 将图像颜色空间从 BGR 转换为 RGB
- img = cv2.cvtColor(self.img, cv2.COLOR_BGR2RGB)
-
- # 保持宽高比,进行 letterbox 填充, 使用模型要求的输入尺寸
- img, self.ratio, (self.dw, self.dh) = self.letterbox(img, new_shape=(self.input_width, self.input_height))
-
- # 通过除以 255.0 来归一化图像数据
- image_data = np.array(img) / 255.0
-
- # 将图像的通道维度移到第一维
- image_data = np.transpose(image_data, (2, 0, 1)) # 通道优先
-
- # 扩展图像数据的维度,以匹配模型输入的形状
- image_data = np.expand_dims(image_data, axis=0).astype(np.float32)
-
- # 返回预处理后的图像数据
- return image_data
预处理函数preprocess,会依赖letterbox函数。
letterbox函数功能:将图像缩放并进行填充,以保持宽高比,最终将图像调整到指定的输入尺寸。
- 计算图像的缩放比例,保证宽高比不变。
- 根据缩放后的图像尺寸,计算需要的填充量(上下左右)。
- 对图像进行缩放和添加边框(填充),确保最终图像尺寸符合目标输入尺寸。
- 返回调整后的图像、缩放比例及填充尺寸。
- def letterbox(self, img, new_shape=(640, 640), color=(114, 114, 114), auto=False, scaleFill=False, scaleup=True):
- """
- 将图像进行 letterbox 填充,保持纵横比不变,并缩放到指定尺寸。
- """
- shape = img.shape[:2] # 当前图像的宽高
- print(f"Original image shape: {shape}")
-
- if isinstance(new_shape, int):
- new_shape = (new_shape, new_shape)
-
- # 计算缩放比例
- r = min(new_shape[0] / shape[0], new_shape[1] / shape[1]) # 选择宽高中最小的缩放比
- if not scaleup: # 仅缩小,不放大
- r = min(r, 1.0)
-
- # 缩放后的未填充尺寸
- new_unpad = (int(round(shape[1] * r)), int(round(shape[0] * r)))
-
- # 计算需要的填充
- dw, dh = new_shape[1] - new_unpad[0], new_shape[0] - new_unpad[1] # 计算填充的尺寸
- dw /= 2 # padding 均分
- dh /= 2
-
- # 缩放图像
- if shape[::-1] != new_unpad: # 如果当前图像尺寸不等于 new_unpad,则缩放
- img = cv2.resize(img, new_unpad, interpolation=cv2.INTER_LINEAR)
-
- # 为图像添加边框以达到目标尺寸
- top, bottom = int(round(dh)), int(round(dh))
- left, right = int(round(dw)), int(round(dw))
- img = cv2.copyMakeBorder(img, top, bottom, left, right, cv2.BORDER_CONSTANT, value=color)
- print(f"Final letterboxed image shape: {img.shape}")
-
- return img, (r, r), (dw, dh)
2.3、后处理函数
再编写后处理函数:postprocess
该代码的功能是对模型的输出结果进行后处理,主要用于从目标检测模型的输出中提取边界框(bounding boxes)、置信度分数和类别ID,并将这些检测结果绘制在输入图像上。
A、模型输出后处理
- 将模型的输出数据进行转置和压缩,使其符合处理的预期格式。
- 遍历模型的每一个检测结果,提取检测框的坐标(x, y, w, h)、类别得分,并通过阈值过滤掉低置信度的检测结果。
- 计算检测框在原始图像上的实际位置,考虑缩放和填充的影响。
B、缩放和填充调整
- 根据图像的缩放比例和填充量,将检测框的坐标从网络输入尺寸(如640x640)调整回原始图像尺寸。
C、非极大值抑制(NMS)
- 使用非极大值抑制(NMS)算法对检测结果进行过滤,删除重叠的检测框,仅保留最高置信度的框。
D、绘制检测结果
- 使用
draw_detections方法在输入图像上绘制边界框,并标注检测类别和置信度。 - 最终返回包含检测结果的图像,图像上绘制了所有有效的检测框和对应的标签。
- def postprocess(self, input_image, output):
- """
- 对模型输出进行后处理,以提取边界框、分数和类别 ID。
- 参数:
- input_image (numpy.ndarray): 输入图像。
- output (numpy.ndarray): 模型的输出。
- 返回:
- numpy.ndarray: 包含检测结果的输入图像。
- """
- # 转置并压缩输出,以匹配预期形状
- outputs = np.transpose(np.squeeze(output[0]))
- rows = outputs.shape[0]
- boxes, scores, class_ids = [], [], []
-
- # 计算缩放比例和填充
- ratio = self.img_width / self.input_width, self.img_height / self.input_height
-
- for i in range(rows):
- classes_scores = outputs[i][4:]
- max_score = np.amax(classes_scores)
- if max_score >= self.confidence_thres:
- class_id = np.argmax(classes_scores)
- x, y, w, h = outputs[i][0], outputs[i][1], outputs[i][2], outputs[i][3]
-
- # 将框调整到原始图像尺寸,考虑缩放和填充
- x -= self.dw # 移除填充
- y -= self.dh
- x /= self.ratio[0] # 缩放回原图
- y /= self.ratio[1]
- w /= self.ratio[0]
- h /= self.ratio[1]
- left = int(x - w / 2)
- top = int(y - h / 2)
- width = int(w)
- height = int(h)
-
- boxes.append([left, top, width, height])
- scores.append(max_score)
- class_ids.append(class_id)
-
- indices = cv2.dnn.NMSBoxes(boxes, scores, self.confidence_thres, self.iou_thres)
- for i in indices:
- box = boxes[i]
- score = scores[i]
- class_id = class_ids[i]
- self.draw_detections(input_image, box, score, class_id)
- return input_image
2.4、检测效果可视化函数
该代码的功能是根据检测结果在输入图像上绘制边界框和标签,以可视化目标检测的结果。
- def draw_detections(self, img, box, score, class_id):
- """
- 在输入图像上绘制检测到的边界框和标签。
- 参数:
- img: 用于绘制检测结果的输入图像。
- box: 检测到的边界框。
- score: 对应的检测分数。
- class_id: 检测到的目标类别 ID。
-
- 返回:
- None
- """
- # 提取边界框的坐标
- x1, y1, w, h = box
-
- # 获取类别对应的颜色
- color = self.color_palette[class_id]
-
- # 在图像上绘制边界框
- cv2.rectangle(img, (int(x1), int(y1)), (int(x1 + w), int(y1 + h)), color, 2)
-
- # 创建包含类别名和分数的标签文本
- label = f"{self.classes[class_id]}: {score:.2f}"
-
- # 计算标签文本的尺寸
- (label_width, label_height), _ = cv2.getTextSize(label, cv2.FONT_HERSHEY_SIMPLEX, 0.5, 1)
-
- # 计算标签文本的位置
- label_x = x1
- label_y = y1 - 10 if y1 - 10 > label_height else y1 + 10
-
- # 绘制填充的矩形作为标签文本的背景
- cv2.rectangle(img, (label_x, label_y - label_height), (label_x + label_width, label_y + label_height), color, cv2.FILLED)
-
- # 在图像上绘制标签文本
- cv2.putText(img, label, (label_x, label_y), cv2.FONT_HERSHEY_SIMPLEX, 0.5, (0, 0, 0), 1, cv2.LINE_AA)
2.5、YOLO11目标检测——ONNX模型推理完整代码
完整代码,如下所示:
- # Ultralytics YOLO ?, AGPL-3.0 license
-
- import argparse
- import cv2
- import numpy as np
- import onnxruntime as ort
-
- # 类外定义类别映射关系,使用字典格式
- CLASS_NAMES = {
- 0: 'class_name1', # 类别 0 名称
- 1: 'class_name2', # 类别 1 名称
- 2: 'class_name3' # 类别 1 名称
- # 可以添加更多类别...
- }
-
-
- class YOLO11:
- """YOLO11 目标检测模型类,用于处理推理和可视化。"""
- def __init__(self, onnx_model, input_image, confidence_thres, iou_thres):
- """
- 初始化 YOLO11 类的实例。
- 参数:
- onnx_model: ONNX 模型的路径。
- input_image: 输入图像的路径。
- confidence_thres: 用于过滤检测结果的置信度阈值。
- iou_thres: 非极大值抑制(NMS)的 IoU(交并比)阈值。
- """
- self.onnx_model = onnx_model
- self.input_image = input_image
- self.confidence_thres = confidence_thres
- self.iou_thres = iou_thres
-
- # 加载类别名称
- self.classes = CLASS_NAMES
-
- # 为每个类别生成一个颜色调色板
- self.color_palette = np.random.uniform(0, 255, size=(len(self.classes), 3))
-
- def preprocess(self):
- """
- 对输入图像进行预处理,以便进行推理。
- 返回:
- image_data: 经过预处理的图像数据,准备进行推理。
- """
- # 使用 OpenCV 读取输入图像
- self.img = cv2.imread(self.input_image)
- # 获取输入图像的高度和宽度
- self.img_height, self.img_width = self.img.shape[:2]
-
- # 将图像颜色空间从 BGR 转换为 RGB
- img = cv2.cvtColor(self.img, cv2.COLOR_BGR2RGB)
-
- # 保持宽高比,进行 letterbox 填充, 使用模型要求的输入尺寸
- img, self.ratio, (self.dw, self.dh) = self.letterbox(img, new_shape=(self.input_width, self.input_height))
-
- # 通过除以 255.0 来归一化图像数据
- image_data = np.array(img) / 255.0
-
- # 将图像的通道维度移到第一维
- image_data = np.transpose(image_data, (2, 0, 1)) # 通道优先
-
- # 扩展图像数据的维度,以匹配模型输入的形状
- image_data = np.expand_dims(image_data, axis=0).astype(np.float32)
-
- # 返回预处理后的图像数据
- return image_data
-
-
- def letterbox(self, img, new_shape=(640, 640), color=(114, 114, 114), auto=False, scaleFill=False, scaleup=True):
- """
- 将图像进行 letterbox 填充,保持纵横比不变,并缩放到指定尺寸。
- """
- shape = img.shape[:2] # 当前图像的宽高
- print(f"Original image shape: {shape}")
-
- if isinstance(new_shape, int):
- new_shape = (new_shape, new_shape)
-
- # 计算缩放比例
- r = min(new_shape[0] / shape[0], new_shape[1] / shape[1]) # 选择宽高中最小的缩放比
- if not scaleup: # 仅缩小,不放大
- r = min(r, 1.0)
-
- # 缩放后的未填充尺寸
- new_unpad = (int(round(shape[1] * r)), int(round(shape[0] * r)))
-
- # 计算需要的填充
- dw, dh = new_shape[1] - new_unpad[0], new_shape[0] - new_unpad[1] # 计算填充的尺寸
- dw /= 2 # padding 均分
- dh /= 2
-
- # 缩放图像
- if shape[::-1] != new_unpad: # 如果当前图像尺寸不等于 new_unpad,则缩放
- img = cv2.resize(img, new_unpad, interpolation=cv2.INTER_LINEAR)
-
- # 为图像添加边框以达到目标尺寸
- top, bottom = int(round(dh)), int(round(dh))
- left, right = int(round(dw)), int(round(dw))
- img = cv2.copyMakeBorder(img, top, bottom, left, right, cv2.BORDER_CONSTANT, value=color)
- print(f"Final letterboxed image shape: {img.shape}")
-
- return img, (r, r), (dw, dh)
-
-
-
- def postprocess(self, input_image, output):
- """
- 对模型输出进行后处理,以提取边界框、分数和类别 ID。
- 参数:
- input_image (numpy.ndarray): 输入图像。
- output (numpy.ndarray): 模型的输出。
- 返回:
- numpy.ndarray: 包含检测结果的输入图像。
- """
- # 转置并压缩输出,以匹配预期形状
- outputs = np.transpose(np.squeeze(output[0]))
- rows = outputs.shape[0]
- boxes, scores, class_ids = [], [], []
-
- # 计算缩放比例和填充
- ratio = self.img_width / self.input_width, self.img_height / self.input_height
-
- for i in range(rows):
- classes_scores = outputs[i][4:]
- max_score = np.amax(classes_scores)
- if max_score >= self.confidence_thres:
- class_id = np.argmax(classes_scores)
- x, y, w, h = outputs[i][0], outputs[i][1], outputs[i][2], outputs[i][3]
-
- # 将框调整到原始图像尺寸,考虑缩放和填充
- x -= self.dw # 移除填充
- y -= self.dh
- x /= self.ratio[0] # 缩放回原图
- y /= self.ratio[1]
- w /= self.ratio[0]
- h /= self.ratio[1]
- left = int(x - w / 2)
- top = int(y - h / 2)
- width = int(w)
- height = int(h)
-
- boxes.append([left, top, width, height])
- scores.append(max_score)
- class_ids.append(class_id)
-
- indices = cv2.dnn.NMSBoxes(boxes, scores, self.confidence_thres, self.iou_thres)
- for i in indices:
- box = boxes[i]
- score = scores[i]
- class_id = class_ids[i]
- self.draw_detections(input_image, box, score, class_id)
- return input_image
-
-
-
- def draw_detections(self, img, box, score, class_id):
- """
- 在输入图像上绘制检测到的边界框和标签。
- 参数:
- img: 用于绘制检测结果的输入图像。
- box: 检测到的边界框。
- score: 对应的检测分数。
- class_id: 检测到的目标类别 ID。
-
- 返回:
- None
- """
- # 提取边界框的坐标
- x1, y1, w, h = box
-
- # 获取类别对应的颜色
- color = self.color_palette[class_id]
-
- # 在图像上绘制边界框
- cv2.rectangle(img, (int(x1), int(y1)), (int(x1 + w), int(y1 + h)), color, 2)
-
- # 创建包含类别名和分数的标签文本
- label = f"{self.classes[class_id]}: {score:.2f}"
-
- # 计算标签文本的尺寸
- (label_width, label_height), _ = cv2.getTextSize(label, cv2.FONT_HERSHEY_SIMPLEX, 0.5, 1)
-
- # 计算标签文本的位置
- label_x = x1
- label_y = y1 - 10 if y1 - 10 > label_height else y1 + 10
-
- # 绘制填充的矩形作为标签文本的背景
- cv2.rectangle(img, (label_x, label_y - label_height), (label_x + label_width, label_y + label_height), color, cv2.FILLED)
-
- # 在图像上绘制标签文本
- cv2.putText(img, label, (label_x, label_y), cv2.FONT_HERSHEY_SIMPLEX, 0.5, (0, 0, 0), 1, cv2.LINE_AA)
-
-
- def main(self):
- # 使用 ONNX 模型创建推理会话,自动选择CPU或GPU
- session = ort.InferenceSession(
- self.onnx_model,
- providers=["CUDAExecutionProvider", "CPUExecutionProvider"] if ort.get_device() == "GPU" else ["CPUExecutionProvider"],
- )
- # 打印模型的输入尺寸
- print("YOLO11 ? 目标检测 ONNXRuntime")
- print("模型名称:", self.onnx_model)
-
- # 获取模型的输入形状
- model_inputs = session.get_inputs()
- input_shape = model_inputs[0].shape
- self.input_width = input_shape[2]
- self.input_height = input_shape[3]
- print(f"模型输入尺寸:宽度 = {self.input_width}, 高度 = {self.input_height}")
-
- # 预处理图像数据,确保使用模型要求的尺寸 (640x640)
- img_data = self.preprocess()
-
- # 使用预处理后的图像数据运行推理
- outputs = session.run(None, {model_inputs[0].name: img_data})
-
- # 对输出进行后处理以获取输出图像
- return self.postprocess(self.img, outputs) # 输出图像
-
-
-
- if __name__ == "__main__":
- # 创建参数解析器以处理命令行参数
- parser = argparse.ArgumentParser()
- parser.add_argument("--model", type=str, default="runs/detect/train/weights/best.onnx", help="输入你的 ONNX 模型路径。")
- parser.add_argument("--img", type=str, default=r"datasets/test.jpg", help="输入图像的路径。")
- parser.add_argument("--conf-thres", type=float, default=0.5, help="置信度阈值")
- parser.add_argument("--iou-thres", type=float, default=0.45, help="NMS IoU 阈值")
- args = parser.parse_args()
-
- # 使用指定的参数创建 YOLO11 类的实例
- detection = YOLO11(args.model, args.img, args.conf_thres, args.iou_thres)
-
- # 执行目标检测并获取输出图像
- output_image = detection.main()
-
- # 保存输出图像到文件
- cv2.imwrite("det_result_picture.jpg", output_image)
-
- print("图像已保存为 det_result_picture.jpg")
-
需要修改类别映射关系,以及类别对应的颜色
比如,定义两个类别(car、person), 示例代码:
- # 类外定义类别映射关系,使用字典格式
- CLASS_NAMES = {
- 0: 'car', # 类别 0 名称
- 1: 'person' # 类别 1 名称
- # 可以添加更多类别...
- }
运行代码,打印信息:
YOLO11 ? 目标检测 ONNXRuntime
模型名称: runs/detect/train/weights/best.onnx
模型输入尺寸:宽度 = 640, 高度 = 640
Original image shape: (398, 700)
Final letterboxed image shape: (640, 640, 3)
图像已保存为 det_result_picture.jpg
可视化看一下分割效果,保存名称是:det_result_picture.jpg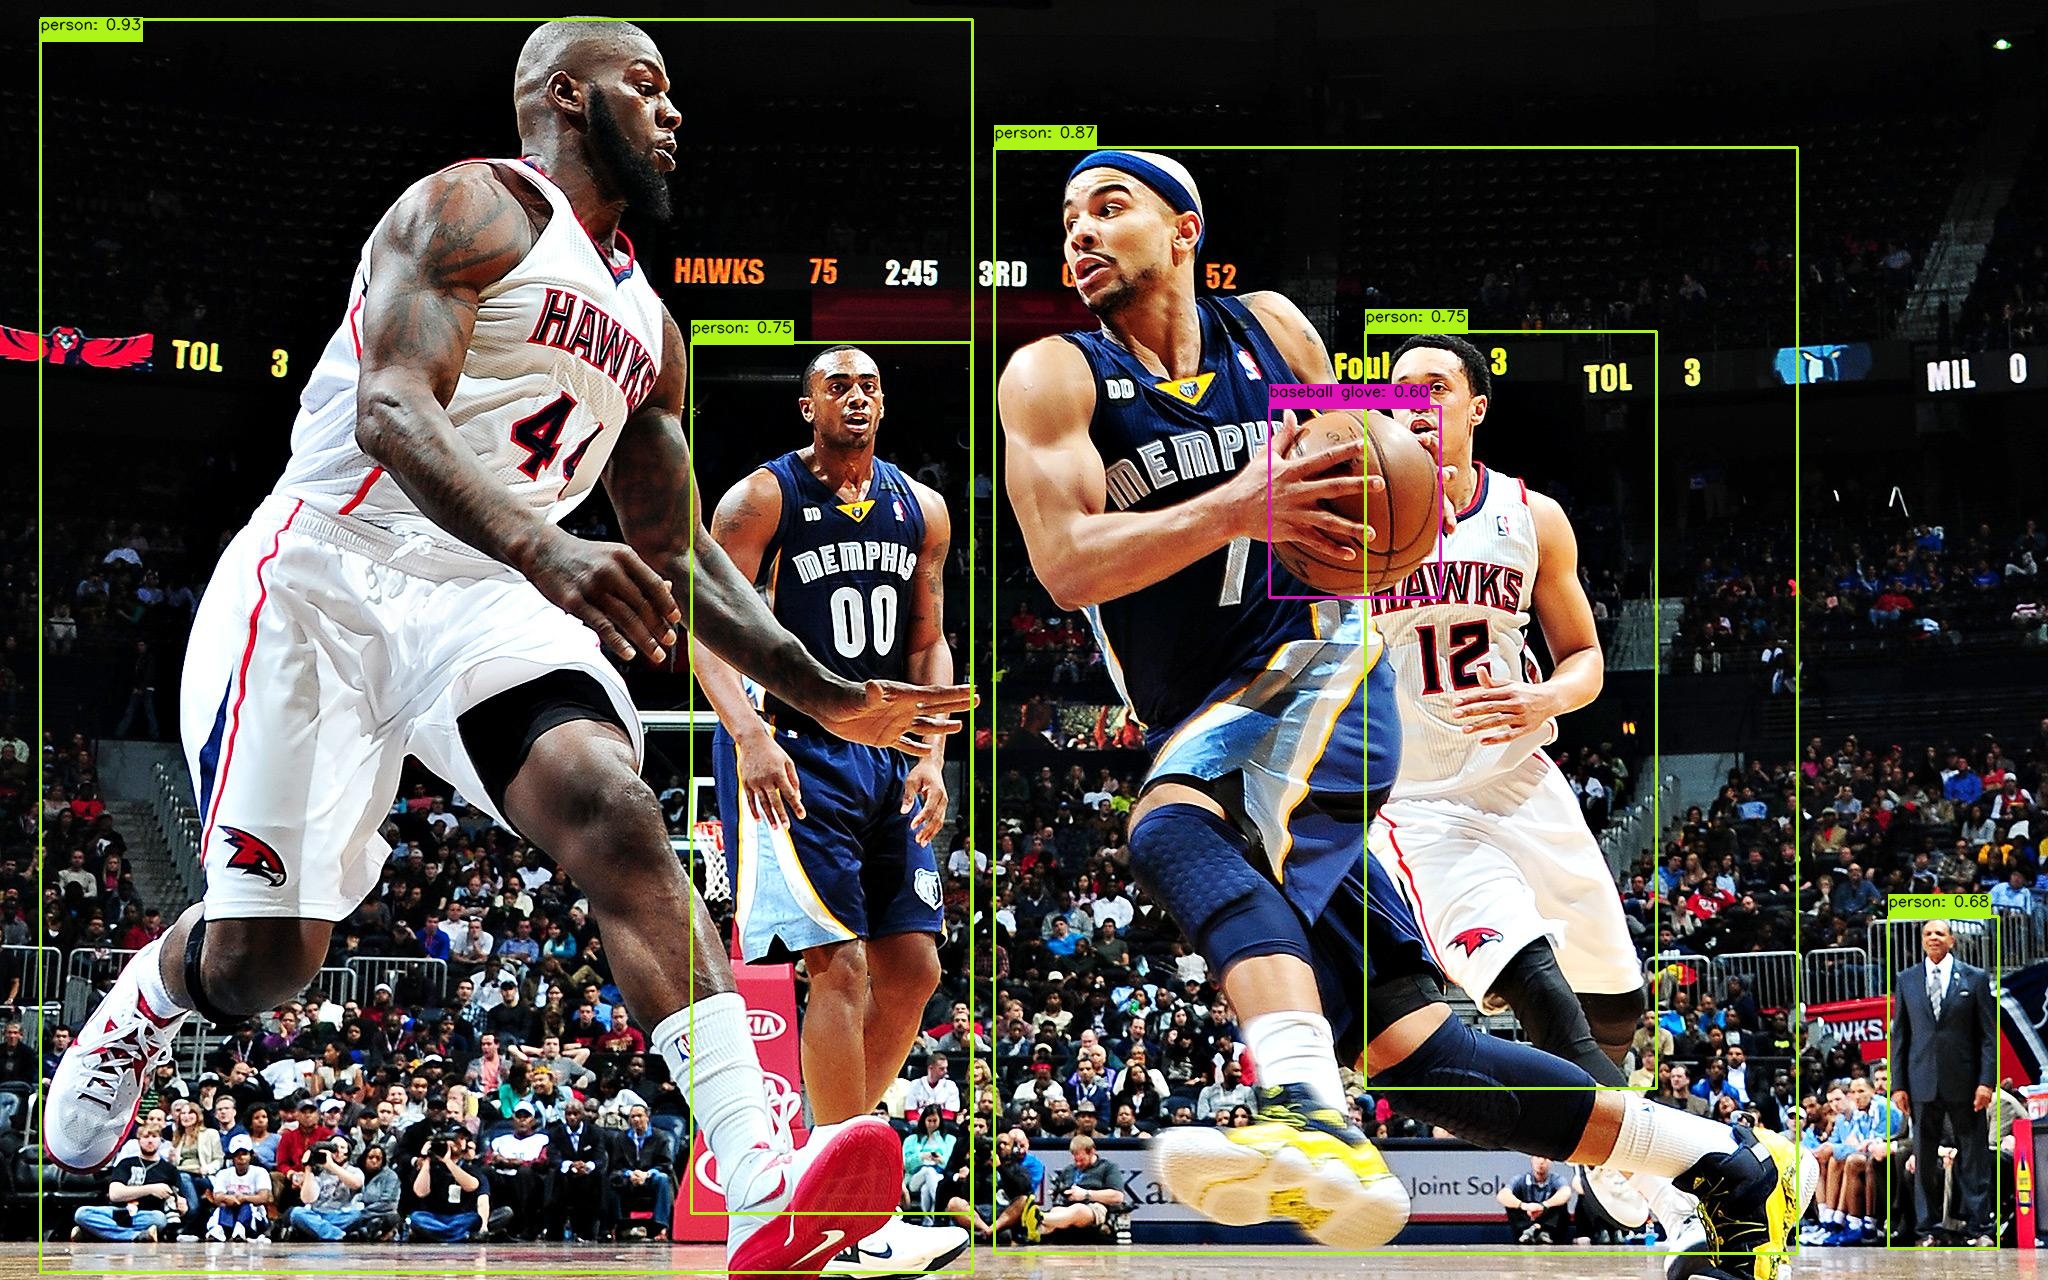
YOLO11相关文章推荐:
一篇文章快速认识YOLO11 | 关键改进点 | 安装使用 | 模型训练和推理-CSDN博客
一篇文章快速认识 YOLO11 | 实例分割 | 模型训练 | 自定义数据集-CSDN博客
YOLO11模型推理 | 目标检测与跟踪 | 实例分割 | 关键点估计 | OBB旋转目标检测-CSDN博客
YOLO11模型训练 | 目标检测与跟踪 | 实例分割 | 关键点姿态估计-CSDN博客
YOLO11 实例分割 | 自动标注 | 预标注 | 标签格式转换 | 手动校正标签-CSDN博客
YOLO11 实例分割 | 导出ONNX模型 | ONNX模型推理-CSDN博客
分享完成,欢迎大家多多点赞和收藏,谢谢~
评论记录:
回复评论: