
来试试 Stable Diffusion 在图像编辑中的应用吧~
Diffusion实战篇:
【Diffusion实战】训练一个diffusion模型生成S曲线(Pytorch代码详解)
【Diffusion实战】训练一个diffusion模型生成蝴蝶图像(Pytorch代码详解)
【Diffusion实战】引导一个diffusion模型根据文字生成图像(Pytorch代码详解)
【Diffusion实战】训练一个类别引导diffusion模型(Pytorch代码详解)
【Diffusion实战】基于Stable Diffusion实现文本到图像的生成(Pytorch代码详解)
Diffusion综述篇:
【Diffusion综述】医学图像分析中的扩散模型(一)
【Diffusion综述】医学图像分析中的扩散模型(二)
【Diffusion综述】扩散模型在 MRI 影像中的应用
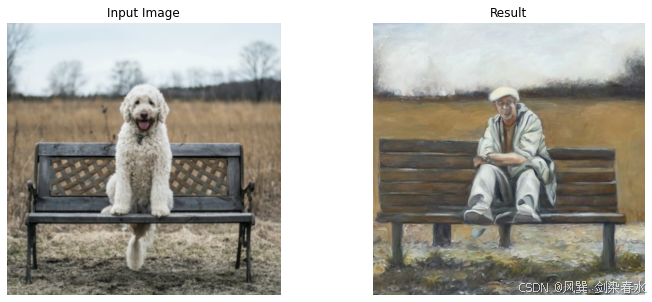
1、Img2Img
Img2Img 可以利用文字提示实现图对图的转换;
预训练pipeline下载:stabilityai/stable-diffusion-2-1-base
import torch
from PIL import Image
from matplotlib import pyplot as plt
from diffusers import StableDiffusionImg2ImgPipeline

init_image = Image.open('./dog.png').convert("RGB")
device = torch.device("cuda" if torch.cuda.is_available() else "cpu")

model_id = "E:/Code/kuosan/stable-diffusion-2-1-base"
img2img_pipe = StableDiffusionImg2ImgPipeline.from_pretrained(model_id).to(device)

result_image = img2img_pipe(
    prompt="An oil painting of a man on a bench", # 图像编辑文本提示
    image = init_image, # 输入待编辑的图片
    strength = 0.7, # 设为 0 时文本编辑不起作用,设为 1 时作用强度最大
).images[0]

# View the result
fig, axs = plt.subplots(1, 2, figsize=(12, 5))
axs[0].imshow(init_image);axs[0].set_title('Input Image');axs[0].axis('off')
axs[1].imshow(result_image);axs[1].set_title('Result');axs[1].axis('off')
- 1
- 2
- 3
- 4
- 5
- 6
- 7
- 8
- 9
- 10
- 11
- 12
- 13
- 14
- 15
- 16
- 17
- 18
- 19
- 20
- 21
输出图像为:
改变提示 prompt 和 strength 能获得各种各样的图像:
result_image = img2img_pipe(
    prompt="There was a withered tree on the moor", # 图像编辑文本提示
    image = init_image, # 输入待编辑的图片
    strength = 0.8, # 设为 0 时文本编辑不起作用,设为 1 时作用强度最大
).images[0]
- 1
- 2
- 3
- 4
- 5
输出图像为:
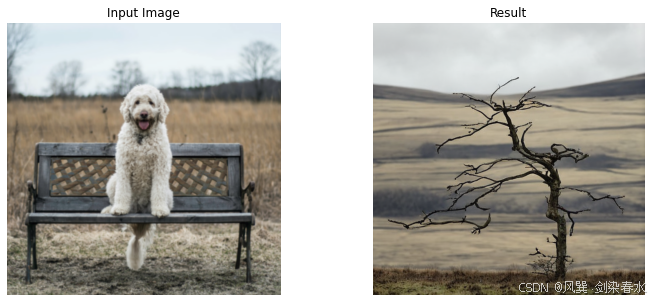
大家可以自己玩玩,虽然有时候生成的图像是有点子抽象…
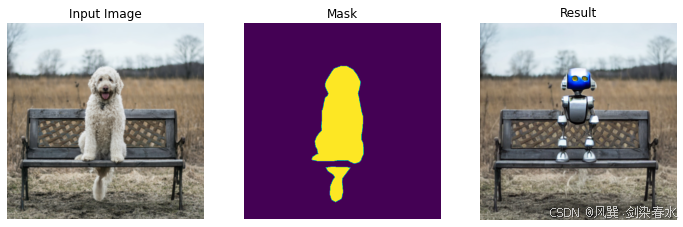
2、Inpainting
Inpainting 可以保留一张图像中一部分不变,在给定的其他部分生成新的内容;
预训练 pipeline 下载:booksforcharlie/stable-diffusion-inpainting
import torch
import numpy as np
from PIL import Image
from matplotlib import pyplot as plt
from diffusers import StableDiffusionInpaintPipeline

init_image = Image.open('./dog.png').convert("RGB")
mask_image = Image.open('./dog_mask.png').convert("L")

device = torch.device("cuda" if torch.cuda.is_available() else "cpu")
model_id = "E:/Code/kuosan/stable-diffusion-inpainting"
inpaint_pipe = StableDiffusionInpaintPipeline.from_pretrained(model_id).to(device)

prompt = "A small robot, high resolution, sitting on a park bench"

result_image = inpaint_pipe(prompt=prompt, image=init_image, mask_image=mask_image).images[0]

fig, axs = plt.subplots(1, 3, figsize=(12, 5))
axs[0].imshow(init_image);axs[0].set_title('Input Image');axs[0].axis('off')
axs[1].imshow(mask_image);axs[1].set_title('Mask');axs[1].axis('off')
axs[2].imshow(result_image);axs[2].set_title('Result');axs[2].axis('off')
- 1
- 2
- 3
- 4
- 5
- 6
- 7
- 8
- 9
- 10
- 11
- 12
- 13
- 14
- 15
- 16
- 17
- 18
- 19
- 20
- 21
输出图像为:
改变提示 prompt:
prompt = "A sunflower, high resolution, stands beside a park bench"
- 1
输出图像为:

emmm…就是这向日葵上似乎带了点狗毛…
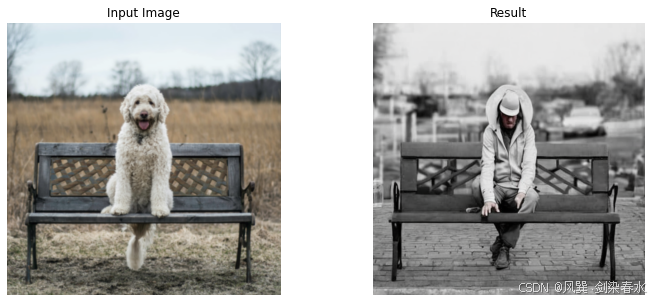
3、Depth2Image
Depth2Image 能够使用不同的颜色或纹理生成新图片;
预训练 pipeline 下载:stabilityai/stable-diffusion-2-depth
import torch
import numpy as np
from PIL import Image
from matplotlib import pyplot as plt
from diffusers import StableDiffusionDepth2ImgPipeline

init_image = Image.open('./dog.png').convert("RGB")

device = torch.device("cuda" if torch.cuda.is_available() else "cpu")
model_id = "E:/Code/kuosan/stable-diffusion-2-depth"
Depth2Img_pipe = StableDiffusionDepth2ImgPipeline.from_pretrained(model_id).to(device)

prompt = "A man on a bench"

result_image = Depth2Img_pipe(prompt=prompt, image=init_image).images[0]

fig, axs = plt.subplots(1, 2, figsize=(12, 5))
axs[0].imshow(init_image);axs[0].set_title('Input Image');axs[0].axis('off')
axs[1].imshow(result_image);axs[1].set_title('Result');axs[1].axis('off')
- 1
- 2
- 3
- 4
- 5
- 6
- 7
- 8
- 9
- 10
- 11
- 12
- 13
- 14
- 15
- 16
- 17
- 18
- 19
输出图像为:
改变提示 prompt:
prompt = "Cartoon style, high resolution, featuring a little kitten happily playing"
- 1
输出图像为:
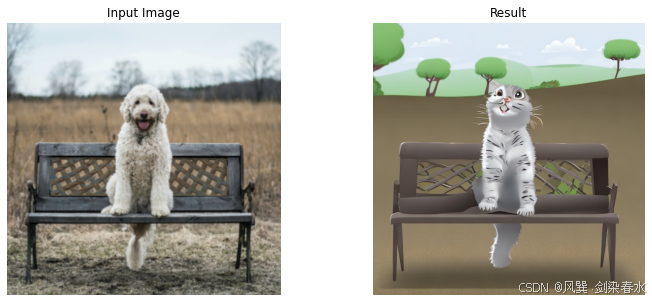
还是比较忠于原图的,哈哈…
pipeline 太强了,简直 0 帧起手~
评论记录:
回复评论: