
涉及硬件的音视频能力,比如采集、渲染、硬件编码、硬件解码,通常是与客户端操作系统强相关的,就算是跨平台的多媒体框架也必须使用平台原生语言的模块来支持这些功能
本系列文章将详细讲述移动端音视频的采集、渲染、硬件编码、硬件解码这些涉及硬件的能力该如何实现
本文为该系列文章的第 2 篇,将详细讲述在 iOS 平台下如何实现视频的硬件编码
往期精彩内容,可参考
前言
视频编码,就是对视频数据进行压缩,压缩后的数据可以封装在容器内,形成视频文件,也可以进行网络传输,来实现视频会议、直播等业务场景。常见的编码格式有 H.264/AVC、H.265/HEVC、H266/VVC、AV1 等等
为什么要压缩,因为未压缩的视频数据实在是太大了。最直观的例子:分辨率 1080p + 帧率 24 + 时长 2 小时的电影中,未经压缩的视频数据,使用最常用的 RGB 颜色表示方式,占用空间约为 1920 * 1080 * 3 * 24 * 7200 = 1001 GB,快要达到 1 TB 的数据量了。因此视频数据不做压缩,是没有现实意义的,存储和传输的成本会高到离谱
在 iOS 平台,Apple 提供的硬件编码功能,目前仅支持 H.264 和 H.265,本文也将介绍这 2 种格式的硬件编码该如何实现。在阅读本文之前,建议预先了解下 H.264 和 H.265 的码流结构这些原理性的内容,方便后续更好的理解本文内容
整体流程
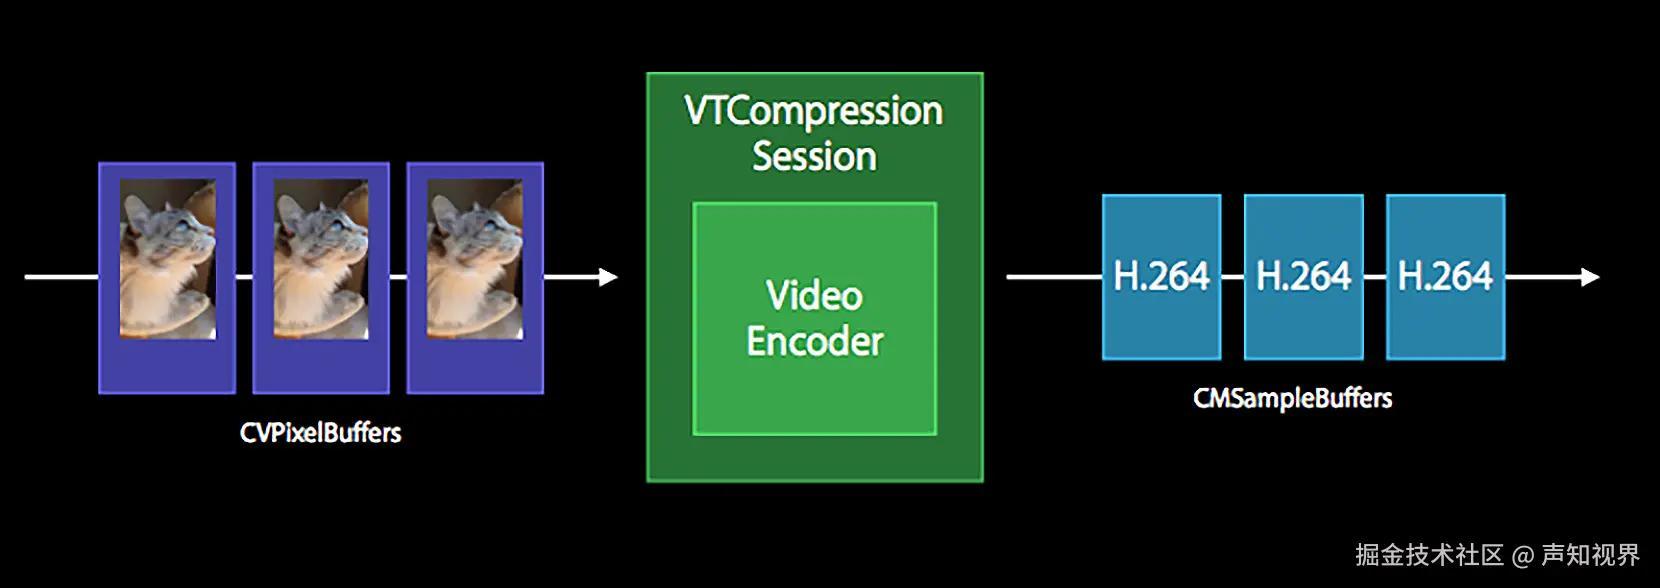
本文所介绍的编码流程,如下图所示

数据变化的过程,如下图所示
系统框架
用到了 VideoToolbox,引入头文件
arduino 代码解读复制代码#import
初始化编码器
构造 source_image_buffer_attributes
- kCVPixelBufferOpenGLESCompatibilityKey、kCVPixelBufferMetalCompatibilityKey,无脑设置为 true
- kCVPixelBufferIOSurfacePropertiesKey 要设置成非 NULL 的值,简单来说能够让编码器更高效的读取 CVPixelBuffer 中的图像数据
- 编码器支持的格式只有 NV12,也就是 kCVPixelFormatType_420YpCbCr8BiPlanarFullRange
选择编码器类型
- H.264 使用 kCMVideoCodecType_H264
- H.265 使用 kCMVideoCodecType_HEVC
ini 代码解读复制代码    const size_t attributes_size = 4;
    CFTypeRef keys[attributes_size] = {
        kCVPixelBufferOpenGLESCompatibilityKey,
        kCVPixelBufferMetalCompatibilityKey,
        kCVPixelBufferIOSurfacePropertiesKey,
        kCVPixelBufferPixelFormatTypeKey
    };
    CFDictionaryRef io_surface_ref = CFDictionaryCreate(kCFAllocatorDefault, nullptr, nullptr, 0, &kCFTypeDictionaryKeyCallBacks, &kCFTypeDictionaryValueCallBacks);
    OSType pixelFormat = kCVPixelFormatType_420YpCbCr8BiPlanarFullRange;
    CFNumberRef pixel_format_ref = CFNumberCreate(nullptr, kCFNumberLongType, &pixelFormat);
    CFTypeRef values[attributes_size] = {
        kCFBooleanTrue,
        kCFBooleanTrue,
        io_surface_ref,
        pixel_format_ref
    };
    CFDictionaryRef source_image_buffer_attributes = CFDictionaryCreate(kCFAllocatorDefault, keys, values, attributes_size, &kCFTypeDictionaryKeyCallBacks, &kCFTypeDictionaryValueCallBacks);

    // 创建编码器
    OSStatus status = VTCompressionSessionCreate(nullptr,
                                                 pixel_width,
                                                 pixel_height,
                                                 kCMVideoCodecType_H264,
                                                 nullptr,
                                                 source_image_buffer_attributes,
                                                 nullptr,
                                                 nullptr,
                                                 nullptr,
                                                 &encode_session_);
    CFRelease(io_surface_ref);
    CFRelease(pixel_format_ref);
    CFRelease(source_image_buffer_attributes);
设置编码器参数
设置编码级别
- H.264:一般以 kVTProfileLevel_H264 开头
- H.265:一般以 kVTProfileLevel_HEVC 开头
ini 代码解读复制代码    status = VTSessionSetProperty(encode_session_,
                                  kVTCompressionPropertyKey_ProfileLevel,
                                  kVTProfileLevel_H264_Baseline_AutoLevel);
设置帧率
ini 代码解读复制代码    int frame_rate = xxx;
    CFNumberRef frame_rate_ref = CFNumberCreate(kCFAllocatorDefault, kCFNumberIntType, &frame_rate);
    status = VTSessionSetProperty(encode_session_,
                                  kVTCompressionPropertyKey_ExpectedFrameRate,
                                  frame_rate_ref);
    CFRelease(frame_rate_ref);
设置关键帧间隔
ini 代码解读复制代码    int key_frame_interval = xxx;
    CFNumberRef key_frame_interval_ref = CFNumberCreate(kCFAllocatorDefault, kCFNumberIntType, &key_frame_interval);
    status = VTSessionSetProperty(encode_session_,
                                  kVTCompressionPropertyKey_MaxKeyFrameInterval,
                                  key_frame_interval_ref);
    CFRelease(key_frame_interval_ref);
设置码率,单位 bps(比特每秒)
ini 代码解读复制代码    long long bit_rate = xxx;
    CFNumberRef bit_rate_ref = CFNumberCreate(kCFAllocatorDefault, kCFNumberLongLongType, &bit_rate);
    status = VTSessionSetProperty(encode_session_,
                                  kVTCompressionPropertyKey_AverageBitRate,
                                  bit_rate_ref);
    CFRelease(bit_rate_ref);
设置实时编码
ini 代码解读复制代码    status = VTSessionSetProperty(encode_session_,
                                  kVTCompressionPropertyKey_RealTime,
                                  kCFBooleanTrue);
设置 B 帧开关
ini 代码解读复制代码    status = VTSessionSetProperty(encode_session_,
                                  kVTCompressionPropertyKey_AllowFrameReordering,
                                  kCFBooleanFalse);
提前准备编码器
ini 代码解读复制代码status = VTCompressionSessionPrepareToEncodeFrames(encode_session_);
进行编码
每帧开始编码之前要准备参数
-
数据源 CVPixelBuffer,存储的是未编码的图像数据,有 2 种获取方式
- 从摄像头采集流程可以直接拿到,可以参考文章:音视频基础能力之 iOS 视频篇(一):视频采集
- 读取内存中的数据,然后构造 CVPixelBuffer,将数据拷入 CVPixelBuffer 的地址,读取本地文件时常用
-
时间戳 CMTime,表示当前视频帧的展示时间,由 2 部分组成,value(时间值)和 timescale(时间刻度)
- timescale 表示把 1 秒分为多少块
- value 表示当前时间占用了多少个按照 timescale 分割的时间块
- 举例:假设 CMTimeMake(0, 1000) 为起始时间,CMTimeMake(1, 1000) 代表当前时间戳为 1,相比起始时间经过了 1 毫秒,同理可知 CMTimeMake(2, 1000) 就是经过了 2 毫秒
-
frame_properties,正常情况下都传 NULL,如果需要编码器马上编一个 IDR 帧,则会用到该参数
调用 VTCompressionSessionEncodeFrame 方法进行编码,iOS 9 开始支持用 block 处理编码回调,比起静态函数方便了很多,编码后的数据存储在 CMSampleBuffer 当中
ini 代码解读复制代码    CMTime presentation_time_stamp = CMTimeMake(time_stamp, 1000);

    NSDictionary *frame_properties = nil;
    if (force_key_frame_flag) {
        frame_properties = @{(__bridge NSString *)kVTEncodeFrameOptionKey_ForceKeyFrame : @(1)};
        force_key_frame_flag = false;
    }
    CFDictionaryRef frame_properties_ref = frame_properties ? (__bridge CFDictionaryRef)frame_properties : nullptr;

    OSStatus status = VTCompressionSessionEncodeFrameWithOutputHandler(encode_session_,
                                                                       pixelBuffer,
                                                                       presentation_time_stamp,
                                                                       kCMTimeInvalid,
                                                                       frame_properties_ref,
                                                                       nullptr,
                                                                       ^(OSStatus status,
                                                                         VTEncodeInfoFlags infoFlags,
                                                                         CMSampleBufferRef sampleBuffer) {
        if ((status != noErr) ||
            (infoFlags == kVTEncodeInfo_FrameDropped) ||
            (!CMSampleBufferDataIsReady(sampleBuffer))) {
            // 表示当前帧编码失败了
            return;
        }

        // 编码之后的操作
    });
处理数据回调
处理数据回调,需要注意 2 点
-
编码后的数据是按照 AVCC/HVCC 格式封装的,也就是 NALU 头部会有 4 个字节代表 NALU 的长度,如果要进行网络传输,通常需要将头部 4 个字节替换为 0x00000001 的起始码。而 iOS 中该 4 字节长度是按照大端字节序存储的,需要转为 iOS 系统默认的小端字节序进行读取
-
编码后的数据需要判断是否为关键帧,若为关键帧,需要做额外处理
- 对于 H.264,需要通过 CMSampleBufferRef 对应的 CMFormatDescriptionRef 读取 sps 和 pps 数据,然后拼接到关键帧数据的头部,因为 sps 和 pps 数据不会被包含在 CMSampleBuffer 中
- 对于 H.265,关键帧在 H.264 的基础上会多出 vps 数据,也需要通过 CMFormatDescriptionRef 进行读取,然后拼接到关键帧数据的头部
- 同时 vps、sps 和 pps 也是 NALU,因此它们之前也要拼接 4 个字节的起始码 0x00000001
ini 代码解读复制代码    CMBlockBufferRef block_buffer = CMSampleBufferGetDataBuffer(sampleBuffer);

    char *buffer_data = nullptr;
    size_t buffer_length = 0;
    OSStatus status = CMBlockBufferGetDataPointer(block_buffer,
                                                  0,
                                                  nullptr,
                                                  &buffer_length,
                                                  &buffer_data);

    bool is_key_frame = JudgeIfKeyFrame(sampleBuffer);
    if (isKeyFrame) {
        // 提取 sps、pps,若是 H.265,还需要 vps

        // 在关键帧前面加上 vps、sps、pps

        // vps、sps、pps 的头部也要加上 4 字节起始码 0x00000001
    }

    // 通过开头 4 个字节能够获取到当前 NALU 的长度
    uint32_t nalu_length = 0;
    memcpy(&nalu_length, buffer_data, 4);
    nalu_length = CFSwapInt32BigToHost(nalu_length);

    // 将帧数据之前的 4 字节长度替换为 0x00000001
判断是否为关键帧的逻辑
ini 代码解读复制代码bool JudgeIfKeyFrame(CMSampleBufferRef sampleBuffer) {
    CFArrayRef attachments = CMSampleBufferGetSampleAttachmentsArray(sampleBuffer, true);
    if (attachments) {
        CFDictionaryRef attachment = (CFDictionaryRef)CFArrayGetValueAtIndex(attachments, 0);
        CFBooleanRef depends_on_others = (CFBooleanRef)CFDictionaryGetValue(attachment, kCMSampleAttachmentKey_DependsOnOthers);
        if (depends_on_others == kCFBooleanFalse) {
            return true;
        }
    }
    return false;
}
H.264 获取 sps 和 pps 的代码
arduino 代码解读复制代码size_t sps_size, pps_size;
const uint8_t *sps_data, *pps_data;
CMFormatDescriptionRef format_ref = CMSampleBufferGetFormatDescription(sampleBuffer);
CMVideoFormatDescriptionGetH264ParameterSetAtIndex(format_ref, 0, &sps_data, &sps_size, nullptr, nullptr);
CMVideoFormatDescriptionGetH264ParameterSetAtIndex(format_ref, 1, &pps_data, &pps_size, nullptr, nullptr);
H.265 获取 vps、sps、pps 的代码
arduino 代码解读复制代码size_t vps_size, sps_size, pps_size;
const uint8_t *vps_data, *sps_data, *pps_data;
CMFormatDescriptionRef format_ref = CMSampleBufferGetFormatDescription(sampleBuffer);
CMVideoFormatDescriptionGetHEVCParameterSetAtIndex(format_ref, 0, &vps_data, &vps_size, nullptr, nullptr);
CMVideoFormatDescriptionGetHEVCParameterSetAtIndex(format_ref, 1, &sps_data, &sps_size, nullptr, nullptr);
CMVideoFormatDescriptionGetHEVCParameterSetAtIndex(format_ref, 2, &pps_data, &pps_size, nullptr, nullptr);
完整的 H.264 关键帧长这个样子

完整的 H.265 关键帧长这个样子

释放资源
需要释放编码器时,调用以下代码
scss 代码解读复制代码VTCompressionSessionCompleteFrames(encode_session_, kCMTimeIndefinite);
VTCompressionSessionInvalidate(encode_session_);
写在最后
以上就是本文的所有内容了,介绍了在 iOS 平台下如何实现视频的硬件编码
本文为音视频基础能力系列文章的第 2 篇
往期精彩内容,可参考
后续精彩内容,敬请期待
如果您觉得以上内容对您有所帮助的话,欢迎关注我们运营的公众号声知视界,会定期推送音视频技术、移动端技术为主轴的科普类、基础知识类、行业资讯类等文章。
评论记录:
回复评论: