
Swift + UIView 实现通过透明度的判读进行事件穿透
在开发过程中会有这样一种场景:在一个页面A上有一个透明或者半透明的view B,希望在点击ViewB的透明或者半透明区域的时候,将点击事件透传给下层页面A。像下面这样,在蓝色的发布球动画播放播放结束后,有一部分发布球区域是透明的,此时我们希望这部分区域不响应发布球的点击事件,而是将手势透传到背后的背景,可能点击或者滑动。

废话不多说,swift实现如下:
swift 代码解读复制代码@objcMembers
public class ViewB : UIView {
    // 如果点击点是透明的,则手势透传
    override public func point(inside point: CGPoint, with event: UIEvent?) -> Bool {
        return alphaOfPoint(point: point) != 0
    }

    func alphaOfPoint(point: CGPoint) -> CGFloat {
        return alphaOfPointFromLayer(point: point)
    }

    // 判断点击点的透明度
    func alphaOfPointFromLayer(point: CGPoint) -> CGFloat {
        var pixel = [UInt8](repeatElement(0, count: 4))
        let colorSpace = CGColorSpaceCreateDeviceRGB()
        let context = CGContext(data: &pixel, width: 1, height: 1, bitsPerComponent: 8, bytesPerRow: 4, space: colorSpace, bitmapInfo: CGImageAlphaInfo.premultipliedLast.rawValue)
               context?.setBlendMode(.copy)
               context?.translateBy(x: -point.x, y: -point.y)
        if let context = context {
            layer.render(in: context)
        }
        let alpha = CGFloat(pixel[3]) / CGFloat(255.0)
        return alpha
    }
}
其中:
- point(inside:with:)方法是 UIView 的一个覆盖方法,用于判断某个点是否在视图的可响应区域内。返回 true 表示该点在视图的边界内,返回false表示该点在视图的边界外。
- 如果子视图不透明部分覆盖了 ViewB 的某个区域,那么在相应点上的透明度将是子视图的透明度。
Swift + UIScrollView 实现简易的多Tab横滑组件
在开发中,嵌套滚动视图(NestScrollView)是一种常见的UI组件,通常用于实现类似于Tab栏与内容页联动的效果。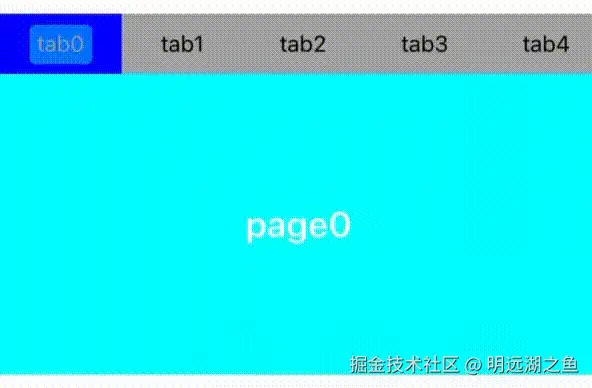
在代码实现中,updateTabButtonSelection(selectedIndex:) 和 scrollViewDidScroll(_:) 是实现 Tab 栏与内容页联动 的核心方法,联动协作流程:
1.用户点击 Tab 按钮:
scss 代码解读复制代码→ 触发 tabButtonTapped(_:)
→ 调用 updateTabButtonSelection(selectedIndex:)
→ 更新按钮状态并滚动 Tab 栏。
→ 手动设置 contentScrollView 的偏移量。
2.用户滑动内容页:
scss 代码解读复制代码→ 触发 scrollViewDidScroll(_:)
→ 计算当前页面索引。
→ 超过阈值时更新 curSelectedIndex。
→ 调用 updateTabButtonSelection(selectedIndex:)
→ 同步 Tab 栏状态。
废话不多说,swift实现如下:
swift 代码解读复制代码import UIKit

let mockData: [[String: String]] = [
    ["tabName": "tab0", "tabContent": "page0"],
    ["tabName": "tab1", "tabContent": "page1"],
    ["tabName": "tab2", "tabContent": "page2"],
    ["tabName": "tab3", "tabContent": "page3"],
    ["tabName": "tab4", "tabContent": "page4"],
    ["tabName": "tab5", "tabContent": "page5"],
    ["tabName": "tab6", "tabContent": "page6"]
]

public class NestScrollView: UIView {

    private let buttonWidth: CGFloat = 80 // 按钮的宽度
    private let tabBarHeight: CGFloat = 40 // TabBar的高度
    private let pageHeight: CGFloat = 200.0  // PageView的高度

    private var numberOfItems: Int = 0 // 页面的数量
    private var curSelectedIndex: Int = 0 // 跟踪当前选中的索引
    private let colors: [UIColor] = [.red, .black, .orange, .brown, .green, .cyan, .purple]

    private let containerView: UIView = UIView()
    private let tabBarScrollView: UIScrollView = UIScrollView()
    private var buttons: [UIButton] = []
    private let contentScrollView: UIScrollView = UIScrollView()

    public override init(frame: CGRect) {
        super.init(frame: frame)
        numberOfItems = mockData.count
        setupView()
    }

    required init?(coder: NSCoder) {
        fatalError("init(coder:) has not been implemented")
    }

    private func setupView() {
        tabBarScrollView.backgroundColor = .lightGray
        tabBarScrollView.showsHorizontalScrollIndicator = false
        addSubview(tabBarScrollView)

        contentScrollView.backgroundColor = .clear
        contentScrollView.isPagingEnabled = true
        contentScrollView.showsHorizontalScrollIndicator = false
        contentScrollView.delegate = self
//        contentScrollView.isScrollEnabled = false // 禁用滚动,只通过按钮点击切换页面
        addSubview(contentScrollView)
    }

    override public func layoutSubviews() {
        super.layoutSubviews()
        containerView.frame = CGRect(x: 0.0, y: 0.0, width: bounds.width, height: bounds.height);
        layoutTabBar()
        layoutContentScrollView()
    }

    private func layoutTabBar() {
        tabBarScrollView.frame = CGRect(x: 0, y: 0, width: bounds.width, height: tabBarHeight)
        tabBarScrollView.contentSize = CGSize(width: buttonWidth * CGFloat(numberOfItems), height: tabBarHeight)

        // 移除已存在的子视图
        buttons.forEach { $0.removeFromSuperview() }
        buttons.removeAll()

        // 添加每一个 tabView
        for (index, data) in mockData.enumerated() {
            let button = UIButton(type: .system)
            button.setTitle(data["tabName"], for: .normal)
            button.tag = index
            button.addTarget(self, action: #selector(tabButtonTapped(_:)), for: .touchUpInside)
            button.frame = CGRect(x: buttonWidth * CGFloat(index), y: 0, width: buttonWidth, height: tabBarHeight)
            buttons.append(button)
            tabBarScrollView.addSubview(button)
        }

        // 初始化选中
        updateTabButtonSelection(selectedIndex: 0)
    }

    private func layoutContentScrollView() {
        // 下面内容区的布局
        let pageWidth = containerView.frame.width

        contentScrollView.frame = CGRect(x: 0.0, y: tabBarHeight, width: pageWidth, height: pageHeight)
        contentScrollView.contentSize = CGSize(width: CGFloat(numberOfItems) * pageWidth, height: pageHeight)

        // 移除已存在的子视图
        contentScrollView.subviews.forEach { $0.removeFromSuperview() }

        // 添加每一个 pageView
        for (index, data) in mockData.enumerated() {
            let pageView = UIView(frame: CGRect(x: CGFloat(index) * pageWidth, y: 0, width: pageWidth, height: pageHeight))
            let colorIndex = index % colors.count // 颜色循环
            pageView.backgroundColor = colors[colorIndex]

            // 添加一个标签到每个 pageView
            let label = UILabel(frame: pageView.bounds)
            label.text = data["tabContent"]
            label.textAlignment = .center
            label.textColor = .white
            label.font = UIFont.boldSystemFont(ofSize: 24)

            pageView.addSubview(label)

            contentScrollView.addSubview(pageView)
        }
    }


    @objc private func tabButtonTapped(_ sender: UIButton) {
        curSelectedIndex = sender.tag
        let offset = CGPoint(x: CGFloat(curSelectedIndex) * contentScrollView.bounds.width, y: 0)
        contentScrollView.setContentOffset(offset, animated: false)
        updateTabButtonSelection(selectedIndex: curSelectedIndex)
    }

    private func updateTabButtonSelection(selectedIndex: Int) {
        for (index, button) in buttons.enumerated() {
            button.isSelected = (index == selectedIndex)
            button.setTitleColor(button.isSelected ? .white : .black, for: .normal)
            button.backgroundColor = button.isSelected ? .blue : .clear
        }

        let selectedButton = buttons[selectedIndex]
        let buttonFrame = selectedButton.frame
        let buttonLeftX = buttonFrame.minX
        let buttonRightX = buttonFrame.maxX
        let scrollOffset = tabBarScrollView.contentOffset.x
        let scrollWidth = tabBarScrollView.bounds.width
        var newOffset: CGFloat = scrollOffset

        if buttonLeftX < scrollOffset {
            newOffset = buttonLeftX
        } else if buttonRightX > scrollOffset + scrollWidth {
            newOffset = buttonRightX - scrollWidth
        }
        let maxOffset = tabBarScrollView.contentSize.width - scrollWidth
        newOffset = max(0, min(newOffset, maxOffset))
        tabBarScrollView.setContentOffset(CGPoint(x: newOffset, y: 0), animated: true)
    }
}

extension NestScrollView: UIScrollViewDelegate {

    public func scrollViewDidScroll(_ scrollView: UIScrollView) {
        // 根据当前页面计算边界
        let pageWidth = containerView.frame.width
        let scrollThreshold = pageWidth / 2.0

        // 检测滚动距离,只有当距离超过阈值时才更新页面
        let contentOffset = scrollView.contentOffset.x
        let pageIndex = Int((contentOffset + (pageWidth / 2)) / pageWidth) // 计算出当前页索引
        let scrollDelta = contentOffset - CGFloat(curSelectedIndex) * pageWidth

        if abs(scrollDelta) > scrollThreshold && pageIndex != curSelectedIndex && pageIndex >= 0 && pageIndex < numberOfItems {
            curSelectedIndex = pageIndex
            updateTabButtonSelection(selectedIndex: curSelectedIndex)
        }
    }
}
注意:评论区有朋友提到tab按钮不定宽时怎么处理,我实际开发中遇到的也是这种情况(只不过demo简易处理了)。我的做法是手动计算内容宽度使得每个按钮宽度正确和tabBar总宽度正确,文本按钮可以用tabName.boundingRec计算(传入字体、字号等参数就可以了),图片按钮可以用图片宽高实现缩放计算(因为渲染时高度是固定的,注意图片加载是异步的,得加载完成才能计算)。计算宽度时需要注意的细节是计算出来的宽度可能处于临界值丢精度导致出现文字内容显示省略号,因此宽度+1。
评论记录:
回复评论: