elasticsearch
安装配置
https://blog.csdn.net/Y_cen/article/details/131856995
app文章搜索
创建索引库
- 使用postman添加映射
Put请求, Json格式 : http://192.168.174.133:9200/app_info_article{ "mappings":{ "properties":{ "id":{ "type":"long" }, "publishTime":{ "type":"date" }, "layout":{ "type":"integer" }, "images":{ "type":"keyword", "index": false }, "staticUrl":{ "type":"keyword", "index": false }, "authorId": { "type": "long" }, "authorName": { "type": "text" }, "title":{ "type":"text", "analyzer":"ik_smart" }, "content":{ "type":"text", "analyzer":"ik_smart" } } } }- 1
- 2
- 3
- 4
- 5
- 6
- 7
- 8
- 9
- 10
- 11
- 12
- 13
- 14
- 15
- 16
- 17
- 18
- 19
- 20
- 21
- 22
- 23
- 24
- 25
- 26
- 27
- 28
- 29
- 30
- 31
- 32
- 33
- 34
- 35
- 36
- 37
- 依赖
<dependency> <groupId>org.elasticsearch.clientgroupId> <artifactId>elasticsearch-rest-high-level-clientartifactId> <version>7.12.1version> dependency> <dependency> <groupId>org.elasticsearch.clientgroupId> <artifactId>elasticsearch-rest-clientartifactId> <version>7.12.1version> dependency> <dependency> <groupId>org.elasticsearchgroupId> <artifactId>elasticsearchartifactId> <version>7.12.1version> dependency>- 1
- 2
- 3
- 4
- 5
- 6
- 7
- 8
- 9
- 10
- 11
- 12
- 13
- 14
- 15
- 16
- 导入数据
@Autowired private ApArticleMapper apArticleMapper; @Autowired private RestHighLevelClient restHighLevelClient; /** * 注意:数据量的导入,如果数据量过大,需要分页导入 * @throws Exception */ @Test public void init() throws Exception { // 1. 查询所有符合条件的文章数据 List<SearchArticleVo> searchArticleVos = apArticleMapper.loadArticleList(); // 2. 批量导入到es索引库 BulkRequest bulkRequest = new BulkRequest("app_info_article"); for (SearchArticleVo searchArticleVo : searchArticleVos) { IndexRequest indexRequest = new IndexRequest().id(searchArticleVo.getId().toString()).source(JSON.toJSONString(searchArticleVo), XContentType.JSON); // 批量添加数据 bulkRequest.add(indexRequest); } restHighLevelClient.bulk(bulkRequest, RequestOptions.DEFAULT); }- 1
- 2
- 3
- 4
- 5
- 6
- 7
- 8
- 9
- 10
- 11
- 12
- 13
- 14
- 15
- 16
- 17
- 18
- 19
- 20
- 21
- 22
- 23
app文章搜索
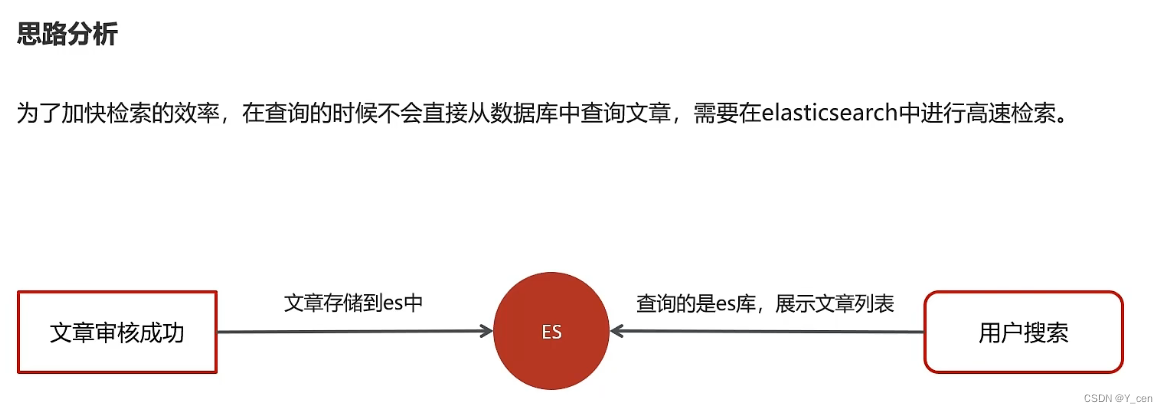
思路分析

具体实现
- 配置
没有使用数据库, 所以无需数据源的自动配置spring: autoconfigure: exclude: org.springframework.boot.autoconfigure.jdbc.DataSourceAutoConfiguration elasticsearch: host: 192.168.174.133 port: 9200- 1
- 2
- 3
- 4
- 5
- 6
- 业务代码
@Service public class ArticleSearchServiceImpl implements ArticleSearchService { @Autowired private RestHighLevelClient restHighLevelClient; /** * es文章分页检索 * @param dto * @return */ @Override public ResponseResult search(UserSearchDto dto) throws IOException { // 1. 检查参数 if(dto == null || StringUtils.isBlank(dto.getSearchWords())){ return ResponseResult.errorResult(AppHttpCodeEnum.PARAM_INVALID); } // 2. 设置查询条件 SearchRequest searchRequest = new SearchRequest("app_info_article"); SearchSourceBuilder searchSourceBuilder = new SearchSourceBuilder(); // 布尔查询 BoolQueryBuilder boolQueryBuilder = QueryBuilders.boolQuery(); // 2.1 关键字的分词之后查询 QueryStringQueryBuilder queryStringQueryBuilder = QueryBuilders.queryStringQuery(dto.getSearchWords()).field("title").field("content").defaultOperator(Operator.OR); boolQueryBuilder.must(queryStringQueryBuilder); // 2.2 查询小于mindate的数据 RangeQueryBuilder rangeQueryBuilder = QueryBuilders.rangeQuery("publishTime").lt(dto.getMinBehotTime().getTime()); boolQueryBuilder.filter(rangeQueryBuilder); // 2.3 分页查询 searchSourceBuilder.from(0); searchSourceBuilder.size(dto.getPageSize()); // 2.4 按照发布时间倒序查询 searchSourceBuilder.sort("publishTime", SortOrder.DESC); // 2.5 设置高亮 title HighlightBuilder highlightBuilder = new HighlightBuilder(); highlightBuilder.field("title"); highlightBuilder.preTags(""); highlightBuilder.postTags(""); searchSourceBuilder.highlighter(highlightBuilder); searchSourceBuilder.query(boolQueryBuilder); searchRequest.source(searchSourceBuilder); SearchResponse searchResponse = restHighLevelClient.search(searchRequest, RequestOptions.DEFAULT); // 3. 结果封装返回 List<Map> list = new ArrayList(); SearchHit[] hits = searchResponse.getHits().getHits(); for (SearchHit hit : hits) { String json = hit.getSourceAsString(); Map map = JSON.parseObject(json, Map.class); // 处理高亮 if(hit.getHighlightFields() != null && hit.getHighlightFields().size() > 0){ Text[] titles = hit.getHighlightFields().get("title").getFragments(); String title = StringUtils.join(titles); // 高亮标题 map.put("h_title", title); }else{ // 原始标题 map.put("h_title", map.get("title")); } list.add(map); } return ResponseResult.okResult(list); } }- 1
- 2
- 3
- 4
- 5
- 6
- 7
- 8
- 9
- 10
- 11
- 12
- 13
- 14
- 15
- 16
- 17
- 18
- 19
- 20
- 21
- 22
- 23
- 24
- 25
- 26
- 27
- 28
- 29
- 30
- 31
- 32
- 33
- 34
- 35
- 36
- 37
- 38
- 39
- 40
- 41
- 42
- 43
- 44
- 45
- 46
- 47
- 48
- 49
- 50
- 51
- 52
- 53
- 54
- 55
- 56
- 57
- 58
- 59
- 60
- 61
- 62
- 63
- 64
- 65
- 66
- 67
- 68
- 69
- 70
- 71
- 72
- 网关配置
app端网关#搜索微服务 - id: leadnews-search uri: lb://leadnews-search predicates: - Path=/search/** filters: - StripPrefix= 1- 1
- 2
- 3
- 4
- 5
- 6
- 7
新增文章创建索引
思路分析

具体实现
- Producer
SearchArticleVo需要静态地址, 所以需要在FreeMarker生成静态文章, 上传到MinIo之后再发送创建索引的消息@Service @Slf4j @Transactional public class ArticleFreemarkerServiceImpl implements ArticleFreemarkerService { ... @Override @Async public void buildArticleToMinIO(ApArticle article, String content) { if(StringUtils.isNotBlank(content)) { ... // kafka: 新增文章创建索引, 发送消息 createArticleESIndex(article, content, path); } } @Autowired private KafkaTemplate<String, String> kafkaTemplate; private void createArticleESIndex(ApArticle article, String content, String path) { SearchArticleVo searchArticleVo = new SearchArticleVo(); BeanUtils.copyProperties(article, searchArticleVo); searchArticleVo.setContent(content); searchArticleVo.setStaticUrl(path); kafkaTemplate.send(ArticleConstants.ARTICLE_ES_SYNC_TOPIC, JSON.toJSONString(searchArticleVo)); } }- 1
- 2
- 3
- 4
- 5
- 6
- 7
- 8
- 9
- 10
- 11
- 12
- 13
- 14
- 15
- 16
- 17
- 18
- 19
- 20
- 21
- 22
- 23
- 24
- 25
- 26
- 27
- 28
- 29
- 30
- Listener
@Component @Slf4j public class SyncArticleListener { @Autowired private RestHighLevelClient restHighLevelClient; @KafkaListener(topics = ArticleConstants.ARTICLE_ES_SYNC_TOPIC) public void onMessage(String message) { if(StringUtils.isNotBlank(message)){ log.info("SyncArticleListener, message={}", message); SearchArticleVo vo = JSON.parseObject(message, SearchArticleVo.class); IndexRequest indexRequest = new IndexRequest("app_info_article"); indexRequest.id(vo.getId().toString()); indexRequest.source(message, XContentType.JSON); try { restHighLevelClient.index(indexRequest, RequestOptions.DEFAULT); } catch (IOException e) { log.error("sync es error={}", e); throw new RuntimeException(e); } } } }- 1
- 2
- 3
- 4
- 5
- 6
- 7
- 8
- 9
- 10
- 11
- 12
- 13
- 14
- 15
- 16
- 17
- 18
- 19
- 20
- 21
- 22
- 23
- 24
- 25
- 26
- 27
- 28
- 29
MongoDB
安装配置
# 拉取镜像
docker pull mongo
# 创建容器
docker run -di --name mongo -p 27017:27017 -v ~/data/mongodata:/data mongo
- 1
- 2
- 3
- 4
SpringBoot集成MongoDB
- 依赖
<dependency> <groupId>org.springframework.bootgroupId> <artifactId>spring-boot-starter-data-mongodbartifactId> dependency>- 1
- 2
- 3
- 4
- 配置
spring: data: mongodb: host: 192.168.174.133 port: 27017 database: leadnews-history- 1
- 2
- 3
- 4
- 5
- 6
- 使用
public class MongoTest { @Autowired private MongoTemplate mongoTemplate; //保存 @Test public void saveTest(){ ApAssociateWords apAssociateWords = new ApAssociateWords(); apAssociateWords.setAssociateWords("黑马头条"); apAssociateWords.setCreatedTime(new Date()); mongoTemplate.save(apAssociateWords); } //查询一个 @Test public void saveFindOne(){ ApAssociateWords apAssociateWords = mongoTemplate.findById("64e46fd4f3a760442bf50527", ApAssociateWords.class); System.out.println(apAssociateWords); } //条件查询 @Test public void testQuery(){ Query query = Query.query(Criteria.where("associateWords").is("黑马头条")) .with(Sort.by(Sort.Direction.DESC,"createdTime")); List<ApAssociateWords> apAssociateWordsList = mongoTemplate.find(query, ApAssociateWords.class); System.out.println(apAssociateWordsList); } @Test public void testDel(){ mongoTemplate.remove(Query.query(Criteria.where("associateWords").is("黑马头条")),ApAssociateWords.class); } }- 1
- 2
- 3
- 4
- 5
- 6
- 7
- 8
- 9
- 10
- 11
- 12
- 13
- 14
- 15
- 16
- 17
- 18
- 19
- 20
- 21
- 22
- 23
- 24
- 25
- 26
- 27
- 28
- 29
- 30
- 31
- 32
- 33
- 34
- 35
- 36
app文章搜索记录
保存搜索记录
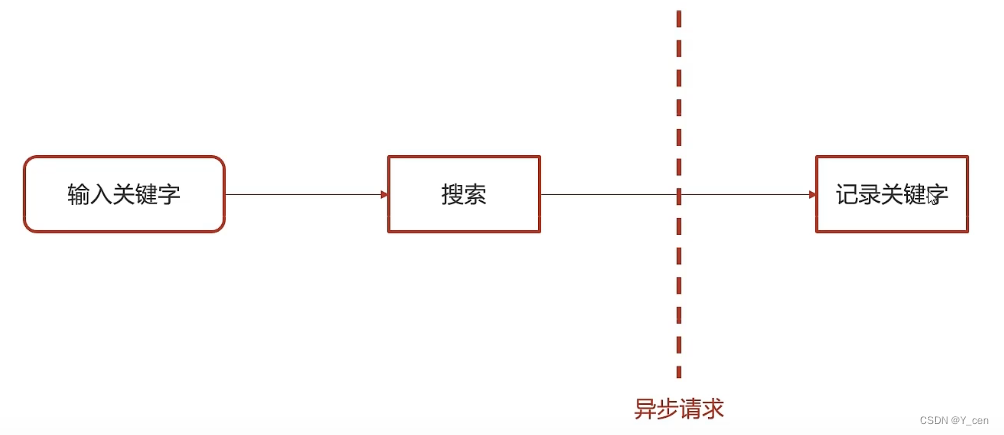
思路分析
异步保存

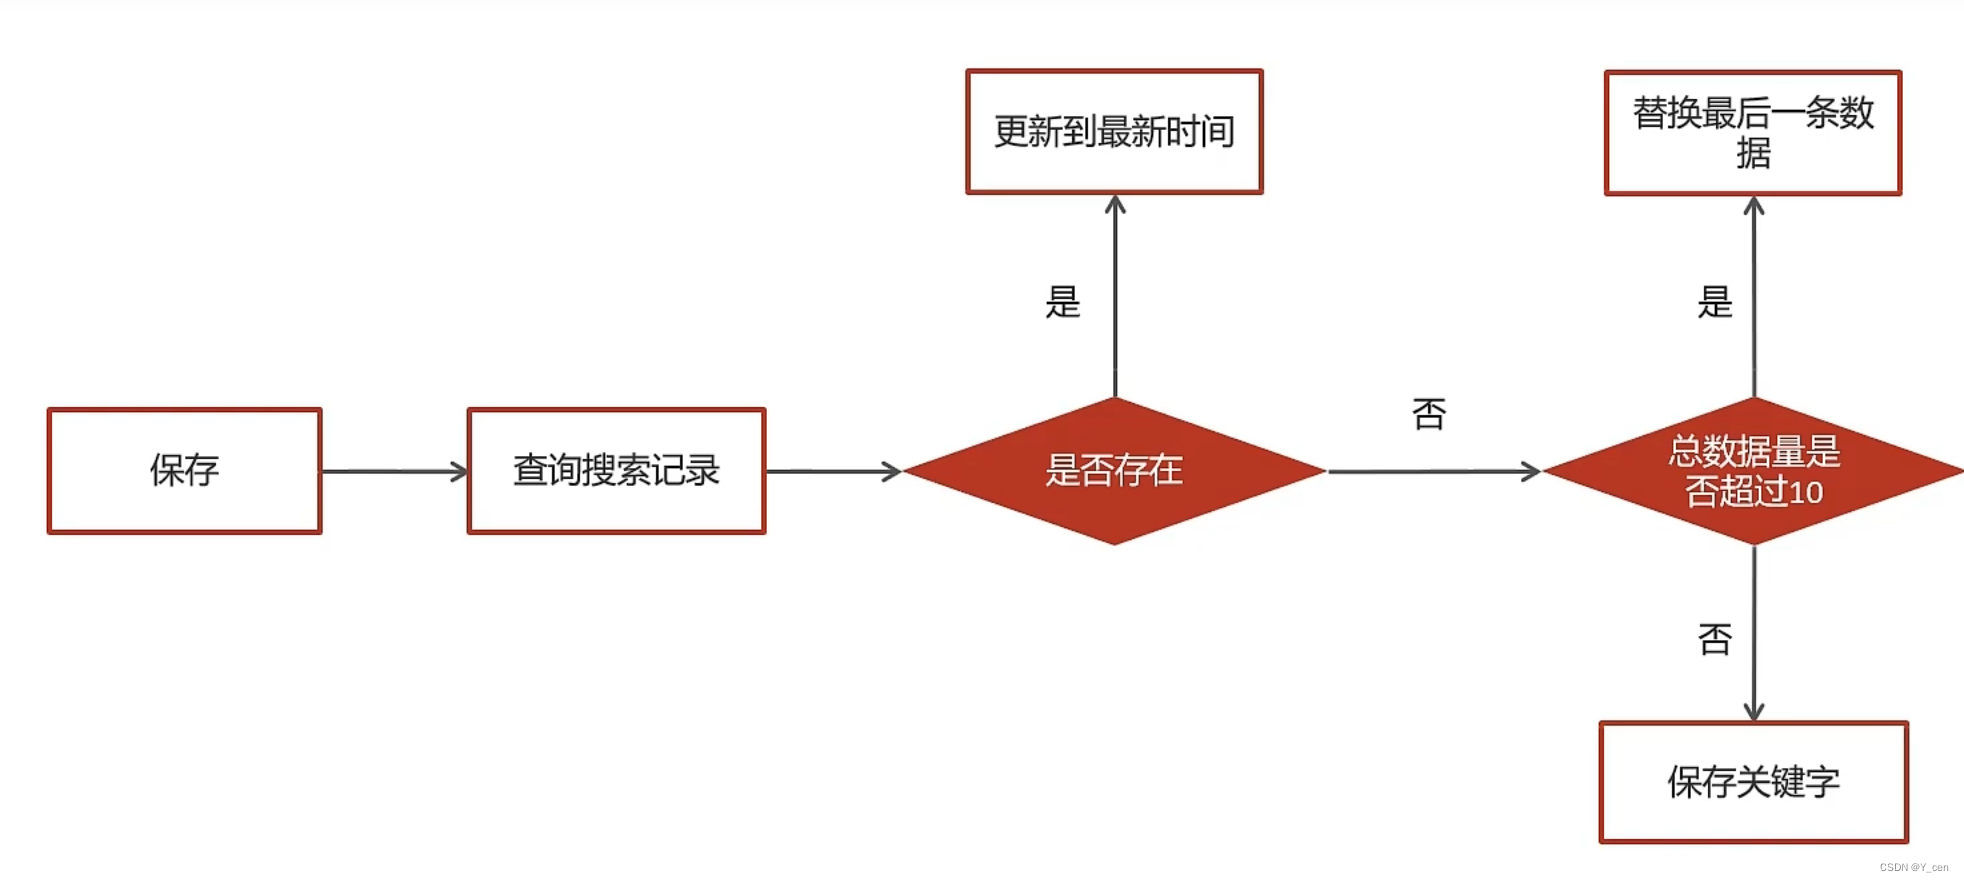
保存数据

具体实现
public class ApUserSearchServiceImpl implements ApUserSearchService {

    @Autowired
    private MongoTemplate mongoTemplate;

    /**
     * 保存用户搜索记录
     * @param keyword
     * @param userId
     */
    @Override
    @Async
    public void insert(String keyword, Integer userId) {
        // 1. 查询当前用户的搜索关键词
        Query query = Query.query(Criteria.where("userId").is(userId).and("keyword").is(keyword));
        ApUserSearch apUserSearch = mongoTemplate.findOne(query, ApUserSearch.class);

        // 2. 存在, 更新创建时间
        if(apUserSearch != null){
            apUserSearch.setCreatedTime(new Date());
            mongoTemplate.save(apUserSearch);
            return;
        }

        // 3. 不存在, 判断当前历史记录总数量是否超过10
        apUserSearch = new ApUserSearch();
        apUserSearch.setUserId(userId);
        apUserSearch.setKeyword(keyword);
        apUserSearch.setCreatedTime(new Date());

        Query query1 = Query.query(Criteria.where("userId").is(userId));
        query1.with(Sort.by(Sort.Direction.DESC, "createTime"));
        List<ApUserSearch> apUserSearchList = mongoTemplate.find(query1, ApUserSearch.class);

        if(apUserSearchList == null || apUserSearchList.size() < 10){
            mongoTemplate.save(apUserSearch);
        }else{
            ApUserSearch lastUserSearch = apUserSearchList.get(apUserSearchList.size() - 1);
            mongoTemplate.findAndReplace(Query.query(Criteria.where("id").is(lastUserSearch.getId())), apUserSearch);
        }
    }
}
- 1
- 2
- 3
- 4
- 5
- 6
- 7
- 8
- 9
- 10
- 11
- 12
- 13
- 14
- 15
- 16
- 17
- 18
- 19
- 20
- 21
- 22
- 23
- 24
- 25
- 26
- 27
- 28
- 29
- 30
- 31
- 32
- 33
- 34
- 35
- 36
- 37
- 38
- 39
- 40
- 41
- 42
在文章搜索中调用, 因为未登录也可能有token(游客), 所以需要判断是否登录.
ApUser user = AppThreadLocalUtil.getUser();
// 异步调用, 保存搜索记录
if(user!=null && dto.getFromIndex() == 0){
    apUserSearchService.insert(dto.getSearchWords(), user.getId());
}
- 1
- 2
- 3
- 4
- 5
查询搜索历史
public ResponseResult findUserSearch() {
    // 获取当前用户
    ApUser user = AppThreadLocalUtil.getUser();
    if(user == null){
        return ResponseResult.errorResult(AppHttpCodeEnum.NEED_LOGIN);
    }
    // 根据用户查询数据, 根据时间排序
    Query query = Query.query(Criteria.where("userId").is(user.getId()));
    query.with(Sort.by(Sort.Direction.DESC, "createdTime"));
    List<ApUserSearch> apUserSearchList = mongoTemplate.find(query, ApUserSearch.class);
    return ResponseResult.okResult(apUserSearchList);
}
- 1
- 2
- 3
- 4
- 5
- 6
- 7
- 8
- 9
- 10
- 11
- 12
删除搜索历史
public ResponseResult delUserSearch(HistorySearchDto dto) {
    // 检查参数
    if(dto.getId() == null){
        return ResponseResult.errorResult(AppHttpCodeEnum.PARAM_INVALID);
    }
    // 获取当前用户
    ApUser user = AppThreadLocalUtil.getUser();
    if(user == null){
        return ResponseResult.errorResult(AppHttpCodeEnum.NEED_LOGIN);
    }
    // 删除
    Query query = Query.query(Criteria.where("id").is(dto.getId()).and("userId").is(user.getId()));
    mongoTemplate.remove(query, ApUserSearch.class);
    return ResponseResult.okResult(AppHttpCodeEnum.SUCCESS);
}
- 1
- 2
- 3
- 4
- 5
- 6
- 7
- 8
- 9
- 10
- 11
- 12
- 13
- 14
- 15
搜索联想词
public class ApAssociateWordsServiceImpl implements ApAssociateWordsService {

    @Autowired
    private MongoTemplate mongoTemplate;

    /**
     * 搜索联想词
     * @param dto
     * @return
     */
    @Override
    public ResponseResult search(UserSearchDto dto) {
        // 1. 检查参数
        if(StringUtils.isBlank(dto.getSearchWords())){
            return ResponseResult.errorResult(AppHttpCodeEnum.PARAM_INVALID);
        }
        // 2. 分页检索
        if(dto.getPageSize() > 20){
            dto.setPageSize(20);
        }
        // 3. 执行查询, 模糊查询
        Query query = Query.query(Criteria.where("associateWords").regex(".*?\\" + dto.getSearchWords() + ".*"));
        query.limit(dto.getPageSize());
        List<ApAssociateWords> apAssociateWordsList = mongoTemplate.find(query, ApAssociateWords.class);
        return ResponseResult.okResult(apAssociateWordsList);
    }
}
- 1
- 2
- 3
- 4
- 5
- 6
- 7
- 8
- 9
- 10
- 11
- 12
- 13
- 14
- 15
- 16
- 17
- 18
- 19
- 20
- 21
- 22
- 23
- 24
- 25
- 26
- 27
来源
Gitee
https://gitee.com/yu-ba-ba-ba/leadnews


评论记录:
回复评论: