
一、漏桶算法
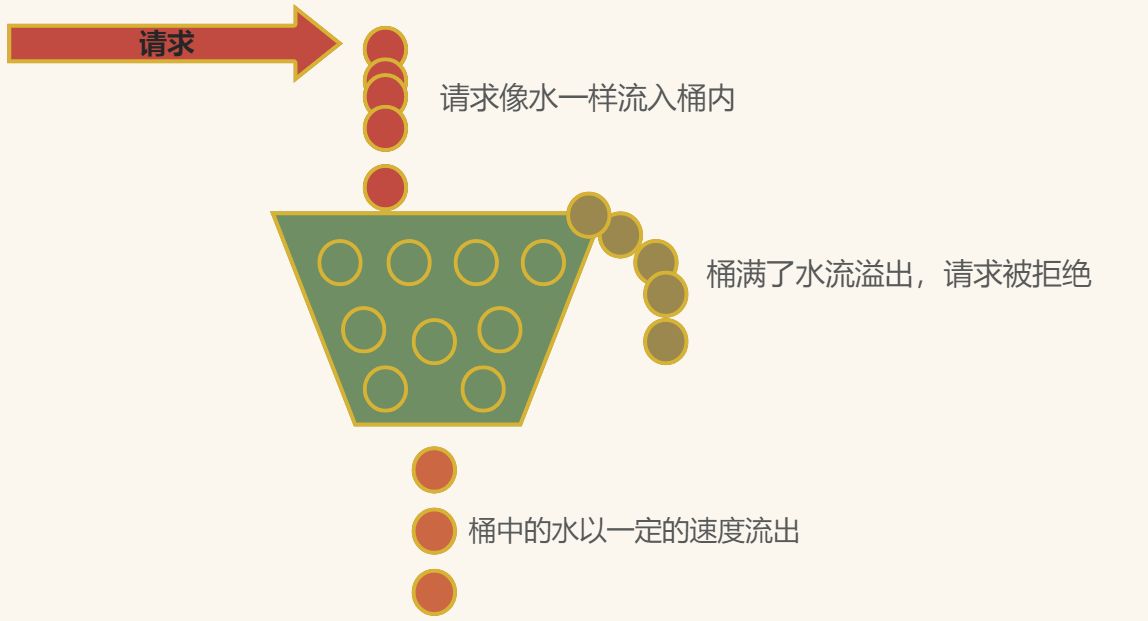
1.漏桶算法的思想和原理
1.固定容量的漏桶:系统维护一个固定容量的漏桶,用来存放请求。
2.请求入桶:当一个请求到达系统时,相当于将水倒入漏桶。如果漏桶已满,多余的请求会被丢弃或拒绝。
3.恒定速率的出桶:漏桶以恒定的速率处理请求,就像漏斗中的水稳定地漏出一样。
4.平滑流量:通过漏桶的出水速率,可以平滑流入系统的请求,避免突发流量。
5.限流判断:当一个请求到达时,会检查漏桶是否已满,如果漏桶已满,则触发限流机制,拒绝请求。
漏桶算法的实现步骤是,先声明一个队列用来保存请求,这个队列相当于漏斗,当队列容量满了之后就放弃新来的请求,然后重新声明一个线程定期(指定速率)从任务队列中获取一个或多个任务进行执行,这样就实现了漏桶算法。
优点:可以有效控制流量,避免突发请求的冲击,保持系统稳定性;
缺点:可能会影响请求响应时间,且不使用大并发量的请求系统;
2.具体实现
import java.util.concurrent.Executors;
import java.util.concurrent.ScheduledExecutorService;
import java.util.concurrent.TimeUnit;
import java.util.concurrent.atomic.AtomicLong;

public class LeakyBucket {
    private final long capacity; // 桶容量
    private final long rate; // 漏水速率
    private long water; // 当前水量
    private long lastLeakTime; // 上一次漏水时间
    private final AtomicLong requestCount; // 请求计数

    public LeakyBucket(long capacity, long rate) {
        this.capacity = capacity;
        this.rate = rate;
        this.water = 0;
        this.lastLeakTime = System.currentTimeMillis();
        this.requestCount = new AtomicLong(0);

        //以固定的速率漏水
        ScheduledExecutorService scheduler = Executors.newScheduledThreadPool(1);
        scheduler.scheduleAtFixedRate(this::leakWater, 0, 1, TimeUnit.SECONDS);
    }

    //限流
    public synchronized boolean allowRequest() {
        long currentTime = System.currentTimeMillis();
        long elapsedTime = currentTime - lastLeakTime;
        water = Math.max(0, water - elapsedTime * rate); // 漏水
        lastLeakTime = currentTime;

        if (water < capacity) {
            water++;
            requestCount.incrementAndGet();
            return true; // 请求通过
        }
        return false; // 漏桶已满,限流
    }

    public long getRequestCount() {
        return requestCount.get();
    }

    //以固定速率漏水
    private synchronized void leakWater() {
        long currentTime = System.currentTimeMillis();
        long elapsedTime = currentTime - lastLeakTime;
        water = Math.max(0, water - elapsedTime * rate); // 漏水
        lastLeakTime = currentTime;
    }

    public static void main(String[] args) {
        // 创建一个容量为 10,速率为 2/S的漏桶
        LeakyBucket leakyBucket = new LeakyBucket(10, 2);

        // 模拟请求
        for (int i = 0; i < 20; i++) {
            boolean allowed = leakyBucket.allowRequest();
            if (allowed) {
                System.out.println("Request " + (i + 1) + ": Allowed");
            } else {
                System.out.println("Request " + (i + 1) + ": Limited");
            }
        }

        // 输出总请求数
        System.out.println("Total requests: " + leakyBucket.getRequestCount());
    }
}
- 1
- 2
- 3
- 4
- 5
- 6
- 7
- 8
- 9
- 10
- 11
- 12
- 13
- 14
- 15
- 16
- 17
- 18
- 19
- 20
- 21
- 22
- 23
- 24
- 25
- 26
- 27
- 28
- 29
- 30
- 31
- 32
- 33
- 34
- 35
- 36
- 37
- 38
- 39
- 40
- 41
- 42
- 43
- 44
- 45
- 46
- 47
- 48
- 49
- 50
- 51
- 52
- 53
- 54
- 55
- 56
- 57
- 58
- 59
- 60
- 61
- 62
- 63
- 64
- 65
- 66
- 67
- 68
- 69
- 70
二、令牌桶算法
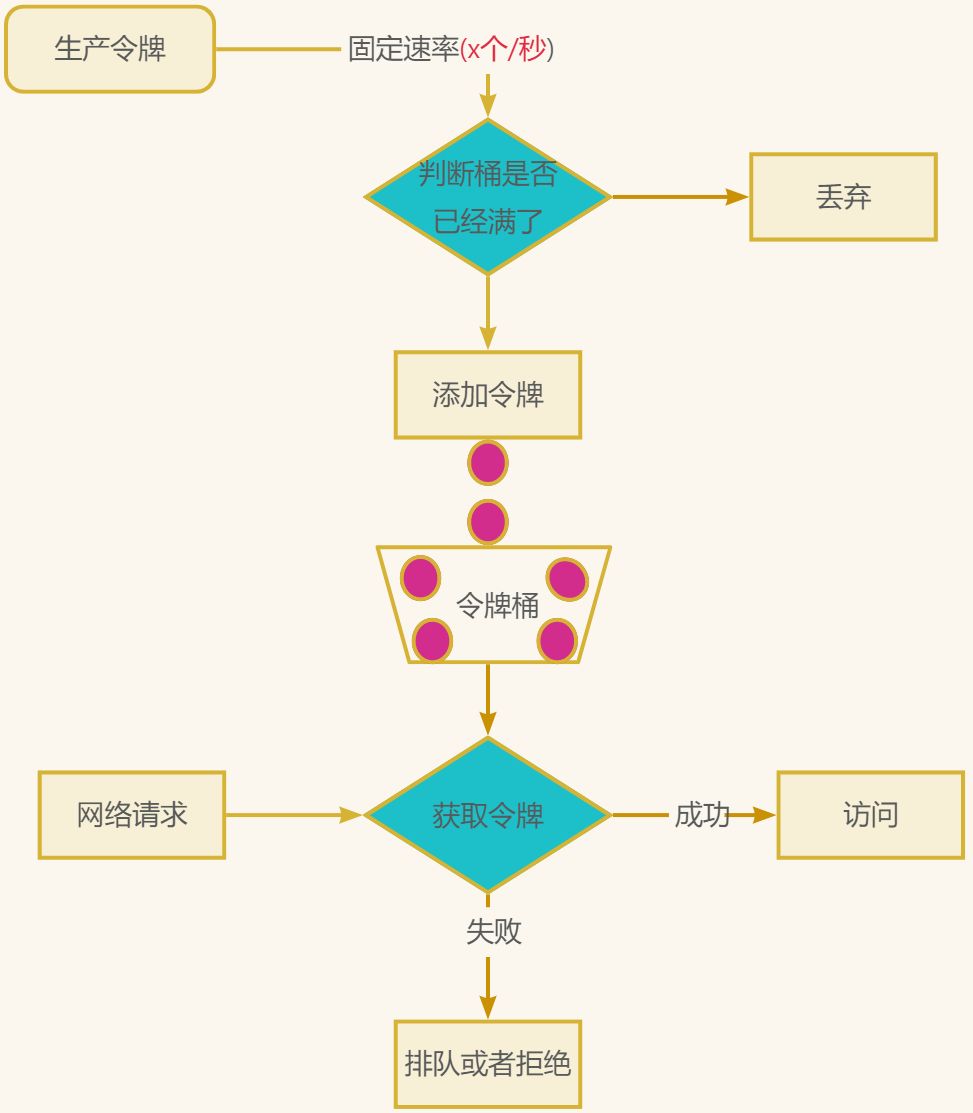
1.令牌桶算法流程:
1.放入令牌到桶:按照固定的速率被放入令牌桶中,比如每秒放5个、10个、100个令牌到桶中。
2.获取令牌:所有的请求在处理之前都需要拿到一个可用的令牌才会被处理。
3.令牌桶满了拒绝:桶中最多能放1000个令牌,当桶满时,就不能继续放入了,新添加的令牌要么被丢弃,要么就直接拒绝。
优点:
1.避免了突发流量对系统的冲击。
2.可以根据需求调整令牌生成速率和令牌桶的容量,以适应不同的流星控制需求。
缺点:
1.不适合瞬时突发流量,令牌桶算法可能无法处理突然涌入的大量请求,因为令牌桶的令牌生成速率是固定的。
2.如果请求需要等待令牌桶中的令牌,可能会导致一些请求的响应时间增加。
2.具体实现
2.1 编程实现
import java.util.concurrent.Executors;
import java.util.concurrent.ScheduledExecutorService;
import java.util.concurrent.ScheduledFuture;
import java.util.concurrent.TimeUnit;
import java.util.concurrent.atomic.AtomicLong;

public class TokenBucket {
    private final long capacity; // 令牌桶容量
    private final long rate; // 令牌生成速率
    private AtomicLong tokens; // 当前令牌数量
    private ScheduledExecutorService scheduler;

    public TokenBucket(long capacity, long rate) {
        this.capacity = capacity;
        this.rate = rate;
        this.tokens = new AtomicLong(0);
        this.scheduler = Executors.newScheduledThreadPool(1);

        ScheduledFuture<?> future = scheduler.scheduleAtFixedRate(this::addToken, 0, 1, TimeUnit.SECONDS);
    }

    public boolean allowRequest() {
        long currentTokens = tokens.get();
        if (currentTokens > 0) {
            tokens.decrementAndGet();
            return true; // 有令牌,允许请求通过
        }
        return false; // 无令牌,限流
    }

    //添加令牌
    private void addToken() {
        long newTokens = Math.min(capacity, tokens.get() + rate);
        tokens.set(newTokens);
    }

    public void shutdown() {
        scheduler.shutdown();
    }

    public static void main(String[] args) {
        TokenBucket tokenBucket = new TokenBucket(10, 2); // 创建容量为10,速率为2的令牌桶

        // 模拟请求
        for (int i = 0; i < 20; i++) {
            boolean allowed = tokenBucket.allowRequest();
            if (allowed) {
                System.out.println("Request " + (i + 1) + ": Allowed");
            } else {
                System.out.println("Request " + (i + 1) + ": Limited");
            }
        }

        tokenBucket.shutdown();
    }
}
- 1
- 2
- 3
- 4
- 5
- 6
- 7
- 8
- 9
- 10
- 11
- 12
- 13
- 14
- 15
- 16
- 17
- 18
- 19
- 20
- 21
- 22
- 23
- 24
- 25
- 26
- 27
- 28
- 29
- 30
- 31
- 32
- 33
- 34
- 35
- 36
- 37
- 38
- 39
- 40
- 41
- 42
- 43
- 44
- 45
- 46
- 47
- 48
- 49
- 50
- 51
- 52
- 53
- 54
- 55
- 56
2.2 使用 Google 开源的 guava 包
(1)导入依赖
<!-- https://mvnrepository.com/artifact/com.google.guava/guava -->
<dependency>
    <groupId>com.google.guava</groupId>
    <artifactId>guava</artifactId>
    <version>28.2-jre</version>
</dependency>
- 1
- 2
- 3
- 4
- 5
- 6
(2)代码实现
import java.lang.annotation.*;
import java.util.concurrent.TimeUnit;


@Target(ElementType.METHOD)
@Retention(RetentionPolicy.RUNTIME)
@Documented
public @interface Limiter {
    int NOT_LIMITED = 0;
    String LIMIT_ERROR = "使用太频繁了,稍后再试..." ;

    /**
     * 限流key,唯一
     *
     * @return
     */
    String key() default "";


    /**
     * 时间单位内允许的次数
     *
     * @return
     */
    double qps() default NOT_LIMITED;

    /**
     * 最大等待时间
     *
     * @return
     */
    int timeout() default NOT_LIMITED;


    /**
     * 最大等待时间单位
     *
     * @return
     */
    TimeUnit timeUnit() default TimeUnit.MILLISECONDS;
}
- 1
- 2
- 3
- 4
- 5
- 6
- 7
- 8
- 9
- 10
- 11
- 12
- 13
- 14
- 15
- 16
- 17
- 18
- 19
- 20
- 21
- 22
- 23
- 24
- 25
- 26
- 27
- 28
- 29
- 30
- 31
- 32
- 33
- 34
- 35
- 36
- 37
- 38
- 39
- 40
- 41
import cn.hutool.core.util.StrUtil;
import com.google.common.util.concurrent.RateLimiter;
import com.hytera.annotation.Limiter;
import lombok.extern.slf4j.Slf4j;
import org.aspectj.lang.ProceedingJoinPoint;
import org.aspectj.lang.annotation.Around;
import org.aspectj.lang.annotation.Aspect;
import org.aspectj.lang.reflect.MethodSignature;
import org.springframework.core.annotation.AnnotationUtils;
import org.springframework.stereotype.Component;
import utils.IpUtil;
import java.lang.reflect.Method;
import java.util.concurrent.ConcurrentHashMap;
import java.util.concurrent.ConcurrentMap;

/**
 * @Author: zt  2024/1/9 17:48
 * @CreateTime: 2024/1/9 17:48
 * @描述:限流
 **/
@Slf4j
@Aspect
@Component
public class RateLimiterAspect {

    private static final ConcurrentMap<String, RateLimiter> RATE_LIMITER_CACHE = new ConcurrentHashMap<>();


    @Around("@annotation(com.hytera.annotation.Limiter)")
    public Object pointcut(ProceedingJoinPoint point) throws Throwable {
        MethodSignature signature = (MethodSignature) point.getSignature();
        Method method = signature.getMethod();
        Limiter rateLimiter = AnnotationUtils.findAnnotation(method, Limiter.class);
        if (rateLimiter != null && rateLimiter.qps() > Limiter.NOT_LIMITED) {
            double qps = rateLimiter.qps();
            String ip = IpUtil.getIpAddress();
            String key = StrUtil.isEmpty(rateLimiter.key())?method.getName()+"-"+IpUtil.getIpAddress():rateLimiter.key()+"-"+ ip;
            RateLimiter limiter = RATE_LIMITER_CACHE.get(key);
            if (limiter == null) {
                RATE_LIMITER_CACHE.put(key, RateLimiter.create(qps));
                log.debug("【{}】的QPS设置为: {}", method.getName(), RATE_LIMITER_CACHE.get(key).getRate());
            }else {
                //超时或者获取不到令牌,则报错
                boolean b = limiter.tryAcquire(rateLimiter.timeout(), rateLimiter.timeUnit());
                if (b) {
                    throw new RuntimeException(Limiter.LIMIT_ERROR);//自定义异常
                }
            }
        }
        return point.proceed();
    }
}
- 1
- 2
- 3
- 4
- 5
- 6
- 7
- 8
- 9
- 10
- 11
- 12
- 13
- 14
- 15
- 16
- 17
- 18
- 19
- 20
- 21
- 22
- 23
- 24
- 25
- 26
- 27
- 28
- 29
- 30
- 31
- 32
- 33
- 34
- 35
- 36
- 37
- 38
- 39
- 40
- 41
- 42
- 43
- 44
- 45
- 46
- 47
- 48
- 49
- 50
- 51
- 52
三、Nginx限流
Nginx 提供了两种限流手段:一是控制速率,二是控制并发连接数。
一、控制速率
我们需要使用 limit_req_zone 用来限制单位时间内的请求数,即速率限制,示例配置如下:
#限制每个 IP 访问的速度为 2r/s,因为 Nginx 的限流统计是基于毫秒的,我们设置的速度是 2r/s,转换一下就是 500ms 内单个 IP 只允许通过 1 个请求,从 501ms 开始才允许通过第 2 个请求。
limit_req_zone $binary_remote_addr zone=mylimit:10m rate=2r/s;
server {
    location / {
        limit_req zone=mylimit;
    }
}
- 1
- 2
- 3
- 4
- 5
- 6
- 7
#使用 burst 关键字,控制一个 IP 单位总时间内的总访问次数
#burst=4,设置一个大小为4的缓冲区域,当大量请求到来,请求数量超过限流频率时,将其放入缓冲区域
limit_req_zone $binary_remote_addr zone=mylimit:10m rate=2r/s;
server {
    location / {
        limit_req zone=mylimit burst=4;
    }
}
- 1
- 2
- 3
- 4
- 5
- 6
- 7
- 8
二、控制并发连接数
#limit_conn perip 10 表示限制单个 IP 同时最多能持有 10 个连接;
#limit_conn perserver 100 表示 server 同时能处理并发连接的总数为 100 个。
limit_conn_zone $binary_remote_addr zone=perip:10m;
limit_conn_zone $server_name zone=perserver:10m;
server {
    ...
    limit_conn perip 10;
    limit_conn perserver 100;
}
- 1
- 2
- 3
- 4
- 5
- 6
- 7
- 8
- 9
四、Redis+Lua限流
1.Lua介绍
Lua 是一种轻量小巧的脚本语言,用标准C语言编写并以源代码形式开放, 其设计目的是为了嵌入应用程序中,从而为应用程序提供灵活的扩展和定制功。
2.Lua优势:
(1)减少网络开销: 不使用 Lua 的代码需要向 Redis 发送多次请求, 而脚本只需一次即可, 减少网络传输;
(2)原子操作: Redis 将整个脚本作为一个原子执行, 无需担心并发, 也就无需事务;
(3)复用: 脚本会永久保存 Redis 中, 其他客户端可继续使用。
3.具体实现:
(1)编写Lua脚本(将其放在resources/scripts/redis目录下):
-- 下标从 1 开始
local key = KEYS[1]
local now = tonumber(ARGV[1])
local ttl = tonumber(ARGV[2])
local expired = tonumber(ARGV[3])
-- 最大访问量
local max = tonumber(ARGV[4])

-- 清除过期的数据
-- 移除指定分数区间内的所有元素,expired 即已经过期的 score
-- 根据当前时间毫秒数 - 超时毫秒数,得到过期时间 expired
redis.call('zremrangebyscore', key, 0, expired)

-- 获取 zset 中的当前元素个数
local current = tonumber(redis.call('zcard', key))
local next = current + 1

if next > max then
  -- 达到限流大小 返回 0
  return 0;
else
  -- 往 zset 中添加一个值、得分均为当前时间戳的元素,[value,score]
  redis.call("zadd", key, now, now)
  -- 每次访问均重新设置 zset 的过期时间,单位毫秒
  redis.call("pexpire", key, ttl)
  return next
end
- 1
- 2
- 3
- 4
- 5
- 6
- 7
- 8
- 9
- 10
- 11
- 12
- 13
- 14
- 15
- 16
- 17
- 18
- 19
- 20
- 21
- 22
- 23
- 24
- 25
- 26
- 27
(2)代码实现:
import org.springframework.context.annotation.Bean;
import org.springframework.context.annotation.Configuration;
import org.springframework.core.io.ClassPathResource;
import org.springframework.data.redis.core.script.DefaultRedisScript;
import org.springframework.data.redis.core.script.RedisScript;
import org.springframework.scripting.support.ResourceScriptSource;


@Configuration
public class RedisConfig {
    @Bean
    @SuppressWarnings("unchecked")
    public RedisScript<Long> limitRedisScript() {
        DefaultRedisScript redisScript = new DefaultRedisScript<>();
        redisScript.setScriptSource(new ResourceScriptSource(new ClassPathResource("scripts/redis/limit.lua")));
        redisScript.setResultType(Long.class);
        return redisScript;
    }
}
- 1
- 2
- 3
- 4
- 5
- 6
- 7
- 8
- 9
- 10
- 11
- 12
- 13
- 14
- 15
- 16
- 17
- 18
- 19
import org.springframework.core.annotation.AliasFor;
import org.springframework.core.annotation.AnnotationUtils;
import java.lang.annotation.*;
import java.util.concurrent.TimeUnit;

@Target(ElementType.METHOD)
@Retention(RetentionPolicy.RUNTIME)
@Documented
public @interface RateLimiter {
    long DEFAULT_REQUEST = 10;

    /**
     * max 最大请求数
     */
    @AliasFor("max") long value() default DEFAULT_REQUEST;

    /**
     * 限流key
     */
    String key() default "";

    /**
     * 超时时长,默认1分钟
     */
    long timeout() default 1;

    /**
     * 超时时间单位,默认 分钟
     */
    TimeUnit timeUnit() default TimeUnit.MINUTES;
}
- 1
- 2
- 3
- 4
- 5
- 6
- 7
- 8
- 9
- 10
- 11
- 12
- 13
- 14
- 15
- 16
- 17
- 18
- 19
- 20
- 21
- 22
- 23
- 24
- 25
- 26
- 27
- 28
- 29
- 30
- 31
- 32
import cn.hutool.core.util.StrUtil;
import com.xkcoding.ratelimit.redis.annotation.RateLimiter;
import com.xkcoding.ratelimit.redis.util.IpUtil;
import lombok.RequiredArgsConstructor;
import lombok.extern.slf4j.Slf4j;
import org.aspectj.lang.ProceedingJoinPoint;
import org.aspectj.lang.annotation.Around;
import org.aspectj.lang.annotation.Aspect;
import org.aspectj.lang.annotation.Pointcut;
import org.aspectj.lang.reflect.MethodSignature;
import org.springframework.beans.factory.annotation.Autowired;
import org.springframework.core.annotation.AnnotationUtils;
import org.springframework.data.redis.core.StringRedisTemplate;
import org.springframework.data.redis.core.script.RedisScript;
import org.springframework.stereotype.Component;
import java.lang.reflect.Method;
import java.time.Instant;
import java.util.Collections;
import java.util.concurrent.TimeUnit;

/**
 *
 * 限流切面
 *
 *
 * @author yangkai.shen
 * @date Created in 2019-09-30 10:30
 */
@Slf4j
@Aspect
@Component
@RequiredArgsConstructor(onConstructor_ = @Autowired)
public class RateLimiterAspect {
    private final static String SEPARATOR = ":";
    private final static String REDIS_LIMIT_KEY_PREFIX = "limit:";
    private final StringRedisTemplate stringRedisTemplate;
    private final RedisScript<Long> limitRedisScript;


    @Around("@annotation(com.xkcoding.ratelimit.redis.annotation.RateLimiter)")
    public Object pointcut(ProceedingJoinPoint point) throws Throwable {
        MethodSignature signature = (MethodSignature) point.getSignature();
        Method method = signature.getMethod();
        // 通过 AnnotationUtils.findAnnotation 获取 RateLimiter 注解
        RateLimiter rateLimiter = AnnotationUtils.findAnnotation(method, RateLimiter.class);
        if (rateLimiter != null) {
            String key = rateLimiter.key();
            // 默认用类名+方法名做限流的 key 前缀
            if (StrUtil.isBlank(key)) {
                key = method.getDeclaringClass().getName() + StrUtil.DOT + method.getName();
            }
            // 最终限流的 key 为 前缀 + IP地址
            key = key + SEPARATOR + IpUtil.getIpAddr();

            long max = rateLimiter.max();
            long timeout = rateLimiter.timeout();
            TimeUnit timeUnit = rateLimiter.timeUnit();
            boolean limited = shouldLimited(key, max, timeout, timeUnit);
            if (limited) {
                throw new RuntimeException("手速太快了,慢点儿吧~");
            }
        }

        return point.proceed();
    }

    private boolean shouldLimited(String key, long max, long timeout, TimeUnit timeUnit) {
        // 最终的 key 格式为:
        // limit:自定义key:IP
        // limit:类名.方法名:IP
        key = REDIS_LIMIT_KEY_PREFIX + key;
        // 统一使用单位毫秒
        long ttl = timeUnit.toMillis(timeout);
        // 当前时间毫秒数
        long now = Instant.now().toEpochMilli();
        long expired = now - ttl;
        Long executeTimes = stringRedisTemplate.execute(limitRedisScript, Collections.singletonList(key), now + "", ttl + "", expired + "", max + "");
        if (executeTimes != null) {
            if (executeTimes == 0) {
                log.error("【{}】在单位时间 {} 毫秒内已达到访问上限,当前接口上限 {}", key, ttl, max);
                return true;
            } else {
                log.info("【{}】在单位时间 {} 毫秒内访问 {} 次", key, ttl, executeTimes);
                return false;
            }
        }
        return false;
    }
- 1
- 2
- 3
- 4
- 5
- 6
- 7
- 8
- 9
- 10
- 11
- 12
- 13
- 14
- 15
- 16
- 17
- 18
- 19
- 20
- 21
- 22
- 23
- 24
- 25
- 26
- 27
- 28
- 29
- 30
- 31
- 32
- 33
- 34
- 35
- 36
- 37
- 38
- 39
- 40
- 41
- 42
- 43
- 44
- 45
- 46
- 47
- 48
- 49
- 50
- 51
- 52
- 53
- 54
- 55
- 56
- 57
- 58
- 59
- 60
- 61
- 62
- 63
- 64
- 65
- 66
- 67
- 68
- 69
- 70
- 71
- 72
- 73
- 74
- 75
- 76
- 77
- 78
- 79
- 80
- 81
- 82
- 83
- 84
- 85
- 86
- 87
- 88
评论记录:
回复评论: