
文章目录
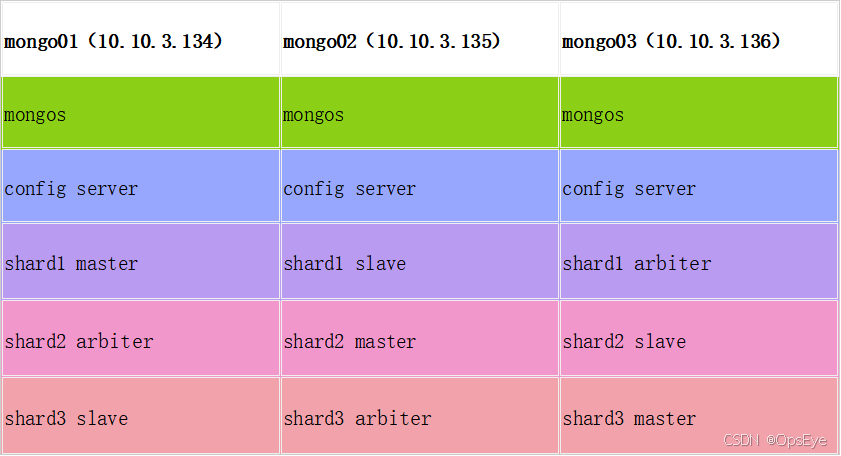
一、集群规划
1.1 集群安装规划
1.2 端口规划
mongos:20000
config:21000
shard1:27001
shard2:27002
shard3:27003
1.3 目录创建
数据目录:
/mongodb/data/config
/mongodb/data/shard1
/mongodb/data/shard2
/mongodb/data/shard3
日志目录:
/mongodb/logs/mongos
/mongodb/logs/config
/mongodb/logs/shard1
/mongodb/logs/shard2
/mongodb/logs/shard3
配置目录:
/usr/local/mongodb/conf
/usr/local/mongodb/server
二、mongodb安装(三台均需要操作)
2.1 下载、解压
https://www.mongodb.com/try/download/community-edition/releases/archive
cd /usr/local/
tar -zxvf mongodb-linux-x86_64-rhel70-4.0.26.tgz
- 1
- 2
2.2 配置环境变量
vim /etc/profile
#mongodb path
export MONGODB_HOME=/usr/local/mongodb
export PATH=$MONGODB_HOME/bin:$PATH
- 1
- 2
- 3
source /etc/profile
三、mongodb组件配置
3.1 配置config server的副本集
3.1.1 config配置文件
vim /usr/local/mongodb/conf/config.conf
## content
systemLog:
  destination: file
  logAppend: true
  path: /mongodb/logs/config.log

# Where and how to store data.
storage:
  dbPath: /mongodb/data/config
  journal:
    enabled: true

# how the process runs
processManagement:
  fork: true
  pidFilePath: /mongodb/logs/config/configsrv.pid

# network interfaces
net:
  port: 21000
  bindIp: 0.0.0.0

#operationProfiling:
replication:
  replSetName: config
sharding:
  clusterRole: configsvr

- 1
- 2
- 3
- 4
- 5
- 6
- 7
- 8
- 9
- 10
- 11
- 12
- 13
- 14
- 15
- 16
- 17
- 18
- 19
- 20
- 21
- 22
- 23
- 24
- 25
- 26
- 27
3.1.2 config server启动
/usr/local/mongodb/bin/mongod -f /usr/local/mongodb/conf/config.conf &
3.1.3 初始化config
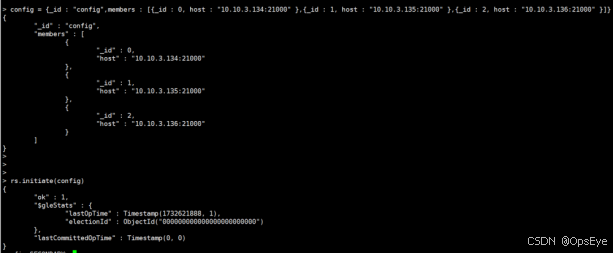
只需要在一台主机上执行
mongo 10.10.3.134:21000

config = {_id : "config",members : [{_id : 0, host : "10.10.3.134:21000" },{_id : 1, host : "10.10.3.135:21000" },{_id : 2, host : "10.10.3.136:21000" }]}

rs.initiate(config)
- 1
- 2
- 3
- 4
- 5
需要关闭防火墙,selinux
3.2 配置shard1 server的副本集
3.2.1 shard1配置文件
vim /usr/local/mongodb/conf/shard1.conf
# where to write logging data.
systemLog:
  destination: file
  logAppend: true
  path: /mongodb/logs/shard1/shard1.log

# Where and how to store data.
storage:
  dbPath: /mongodb/data/shard1
  journal:
    enabled: true
  wiredTiger:
    engineConfig:
       cacheSizeGB: 1

# how the process runs
processManagement:
  fork: true
  pidFilePath: /mongodb/logs/shard1/shard1.pid

# network interfaces
net:
  port: 27001
  bindIp: 0.0.0.0

#operationProfiling:
replication:
  replSetName: shard1
sharding:
  clusterRole: shardsvr
- 1
- 2
- 3
- 4
- 5
- 6
- 7
- 8
- 9
- 10
- 11
- 12
- 13
- 14
- 15
- 16
- 17
- 18
- 19
- 20
- 21
- 22
- 23
- 24
- 25
- 26
- 27
- 28
- 29
- 30
同步配置文件
scp /usr/local/mongodb/conf/shard1.conf root@mongo02:/usr/local/mongodb/conf/
scp /usr/local/mongodb/conf/shard1.conf root@mongo03:/usr/local/mongodb/conf/
- 1
- 2
3.2.2 启动shard1
三台主机上执行
/usr/local/mongodb/bin/mongod -f /usr/local/mongodb/conf/shard1.conf &
- 1
3.2.3 初始化shard1
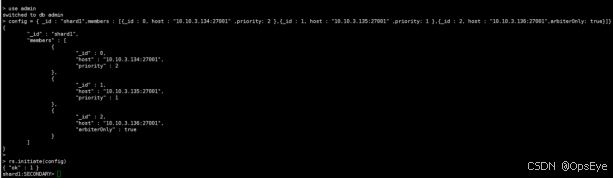
只需要在一台主机上执行
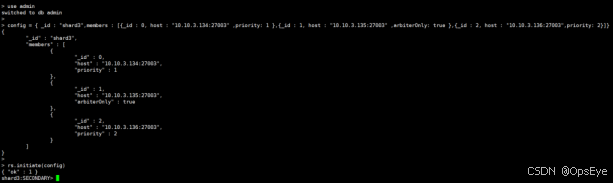
mongo mongo01:27001

use admin

config = { _id : "shard1",members : [{_id : 0, host : "10.10.3.134:27001" ,priority: 2 },{_id : 1, host : "10.10.3.135:27001" ,priority: 1 },{_id : 2, host : "10.10.3.136:27001",arbiterOnly: true}]}
- 1
- 2
- 3
- 4
- 5
“priority”优先级,数字越大,优先等级越高;“arbiterOnly”仲裁节点:仲裁节点根据优先等级判断哪个节点作为主节点
3.3 配置shard2 server的副本集
3.3.1 shard2配置文件
vim /usr/local/mongodb/conf/shard2.conf
# where to write logging data.
systemLog:
  destination: file
  logAppend: true
  path: /mongodb/logs/shard2/shard2.log

# Where and how to store data.
storage:
  dbPath: /mongodb/data/shard2
  journal:
    enabled: true
  wiredTiger:
    engineConfig:
       cacheSizeGB: 1

# how the process runs
processManagement:
  fork: true
  pidFilePath: /mongodb/logs/shard2/shard2.pid

# network interfaces
net:
  port: 27002
  bindIp: 0.0.0.0

#operationProfiling:
replication:
  replSetName: shard2
sharding:
  clusterRole: shardsvr
- 1
- 2
- 3
- 4
- 5
- 6
- 7
- 8
- 9
- 10
- 11
- 12
- 13
- 14
- 15
- 16
- 17
- 18
- 19
- 20
- 21
- 22
- 23
- 24
- 25
- 26
- 27
- 28
- 29
- 30
同步配置文件
scp /usr/local/mongodb/conf/shard2.conf root@mongo02:/usr/local/mongodb/conf/
scp /usr/local/mongodb/conf/shard2.conf root@mongo03:/usr/local/mongodb/conf/
- 1
- 2
3.3.2 启动shard2
三台主机上执行
/usr/local/mongodb/bin/mongod -f /usr/local/mongodb/conf/shard2.conf &
3.3.3 初始化shard2
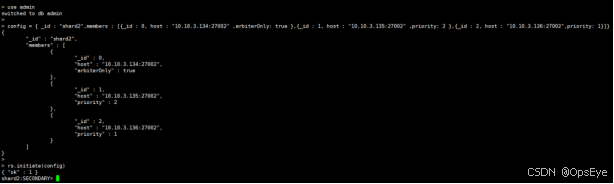
只需要在一台主机上执行
mongo mongo01:27002

use admin

config = { _id : "shard2",members : [{_id : 0, host : "10.10.3.134:27002" ,arbiterOnly: true },{_id : 1, host : "10.10.3.135:27002" ,priority: 2 },{_id : 2, host : "10.10.3.136:27002",priority: 1}]}

rs.initiate(config)
- 1
- 2
- 3
- 4
- 5
- 6
- 7
3.4 配置shard3 server的副本集
3.4.1 shard3配置文件
vim /usr/local/mongodb/conf/shard3.conf
# where to write logging data.
systemLog:
  destination: file
  logAppend: true
  path: /mongodb/logs/shard3/shard3.log

# Where and how to store data.
storage:
  dbPath: /mongodb/data/shard3
  journal:
    enabled: true
  wiredTiger:
    engineConfig:
       cacheSizeGB: 1

# how the process runs
processManagement:
  fork: true
  pidFilePath: /mongodb/logs/shard3/shard3.pid

# network interfaces
net:
  port: 27003
  bindIp: 0.0.0.0

#operationProfiling:
replication:
  replSetName: shard3
sharding:
  clusterRole: shardsvr
- 1
- 2
- 3
- 4
- 5
- 6
- 7
- 8
- 9
- 10
- 11
- 12
- 13
- 14
- 15
- 16
- 17
- 18
- 19
- 20
- 21
- 22
- 23
- 24
- 25
- 26
- 27
- 28
- 29
- 30
同步配置文件
scp /usr/local/mongodb/conf/shard3.conf root@mongo02:/usr/local/mongodb/conf/
scp /usr/local/mongodb/conf/shard3.conf root@mongo03:/usr/local/mongodb/conf/
- 1
- 2
3.4.2 启动shard3
三台主机上执行
/usr/local/mongodb/bin/mongod -f /usr/local/mongodb/conf/shard3.conf &
- 1
3.4.3 初始化shard3
只需要在一台主机上执行
mongo mongo01:27003

use admin

config = { _id : "shard3",members : [{_id : 0, host : "10.10.3.134:27003" ,priority: 1 },{_id : 1, host : "10.10.3.135:27003" ,arbiterOnly: true },{_id : 2, host : "10.10.3.136:27003",priority: 2}]}

rs.initiate(config)
- 1
- 2
- 3
- 4
- 5
- 6
- 7
3.5 配置mongos server的副本集
3.5.1 mongos配置文件
vim /usr/local/mongodb/conf/mongos.conf
systemLog:
  destination: file
  logAppend: true
  path: /mongodb/logs/mongos/mongos.log
processManagement:
  fork: true
  pidFilePath: /mongodb/logs/mongos/mongos.pid

# network interfaces
net:
  port: 20000
  bindIp: 0.0.0.0
sharding:
  configDB: config/10.10.3.134:21000,10.10.3.135:21000,10.10.3.136:21000
- 1
- 2
- 3
- 4
- 5
- 6
- 7
- 8
- 9
- 10
- 11
- 12
- 13
- 14
同步配置文件
scp /usr/local/mongodb/conf/mongos.conf root@mongo02:/usr/local/mongodb/conf/
scp /usr/local/mongodb/conf/mongos.conf root@mongo03:/usr/local/mongodb/conf/
- 1
- 2
3.5.2 启动mongos
三台主机上执行
/usr/local/mongodb/bin/mongos -f /usr/local/mongodb/conf/mongos.conf &
- 1
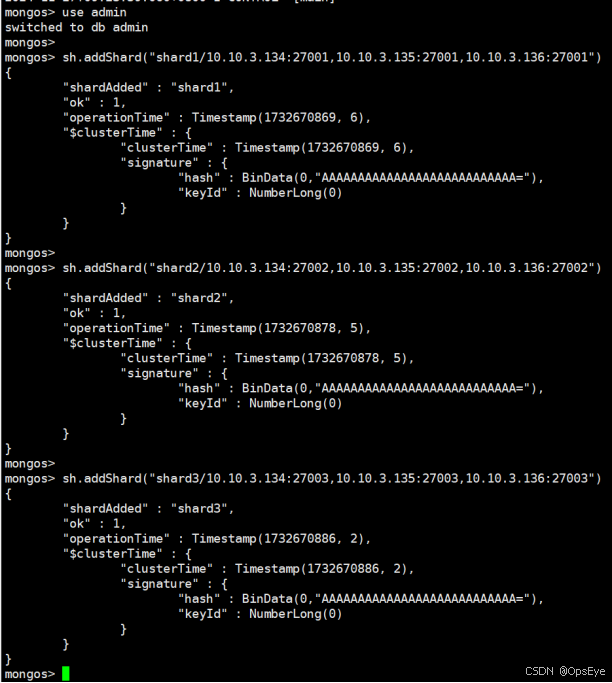
3.6 添加分片
只需要在一台主机上执行
mongo mongo01:20000
sh.addShard("shard1/10.10.3.134:27001,10.10.3.135:27001,10.10.3.136:27001")
sh.addShard("shard2/10.10.3.134:27002,10.10.3.135:27002,10.10.3.136:27002")
sh.addShard("shard3/10.10.3.134:27003,10.10.3.135:27003,10.10.3.136:27003")
- 1
- 2
- 3
- 4
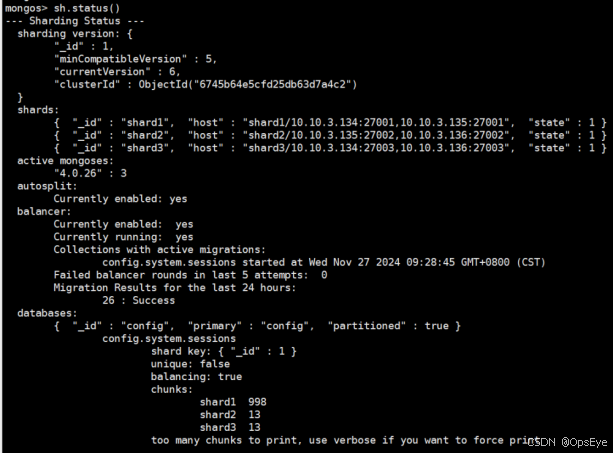
查看分片状态
sh.status()
- 1
3.7 安全验证
3.7.1 生成key文件
openssl rand -base64 756 > /usr/local/mongodb/conf/KeyFile.file
- 1
分发key文件
scp /usr/local/mongodb/conf/KeyFile.file root@mongo02:/usr/local/mongodb/conf/
scp /usr/local/mongodb/conf/KeyFile.file root@mongo03:/usr/local/mongodb/conf/
- 1
- 2
3.7.2 创建管理员用户密码
只需要在一台主机上执行
mongo -port 20000

use admin

db.createUser(
{
user:"live",
pwd:"xxxx",
roles:[{role:"root",db:"admin"}]
}
)
- 1
- 2
- 3
- 4
- 5
- 6
- 7
- 8
- 9
- 10
- 11

3.7.3 关闭所有的节点
按照先后顺序来处理关闭,mongos>config>shard3>shard2>shard1
三台主机的服务都关闭后再关闭下一个服务。例如三台主机mongos服务都关闭后再关闭config服务,以此类推
关闭mongos
mongo -port 20000

use admin

db.auth('live','xxxx')

db.shutdownServer()
- 1
- 2
- 3
- 4
- 5
- 6
- 7

关闭config
/usr/local/mongodb/bin/mongod -f /usr/local/mongodb/conf/config.conf --shutdown
- 1
关闭shard
/usr/local/mongodb/bin/mongod -f /usr/local/mongodb/conf/shard3.conf --shutdown
/usr/local/mongodb/bin/mongod -f /usr/local/mongodb/conf/shard2.conf --shutdown
/usr/local/mongodb/bin/mongod -f /usr/local/mongodb/conf/shard1.conf --shutdown
- 1
- 2
- 3
3.7.4 在配置文件后添加key文件
config.conf、shard1.conf、shard2.conf、shard3.conf最后添加:
security:
  keyFile: /usr/local/mongodb/conf/KeyFile.file
  authorization: enabled
- 1
- 2
- 3
mongos.conf配置文件中最后添加:
security:
keyFile: /usr/local/mongodb/conf/KeyFile.file
- 1
- 2
同步配置文件
scp *.conf root@mongo02:/usr/local/mongodb/conf/
scp *.conf root@mongo03:/usr/local/mongodb/conf/
- 1
- 2
3.7.5 启动所有节点
启动顺序:config>shadr1>shadr2>shadr3>mongos
三台主机的服务都开启后再开启下一个服务。例如三台主机config服务都开启后再开启shard1服务,以此类推
/usr/local/mongodb/bin/mongod -f /usr/local/mongodb/conf/config.conf &
/usr/local/mongodb/bin/mongod -f /usr/local/mongodb/conf/shard1.conf &
/usr/local/mongodb/bin/mongod -f /usr/local/mongodb/conf/shard2.conf &
/usr/local/mongodb/bin/mongod -f /usr/local/mongodb/conf/shard3.conf &
/usr/local/mongodb/bin/mongos -f /usr/local/mongodb/conf/mongos.conf &
- 1
- 2
- 3
- 4
- 5
3.7.6 开启分片
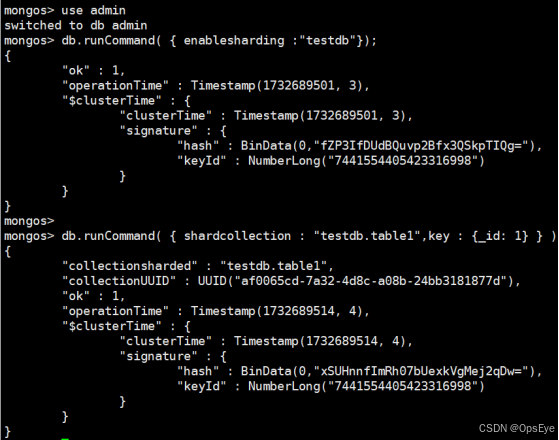
mongo 10.10.3.134:20000
use admin
db.auth('live','xxxx')
#为testdb库开启分片功能
db.runCommand( { enablesharding :"testdb"})
#指定数据库里需要分片的集合和片键
db.runCommand( { shardcollection : "testdb.table1",key : {_id: 1} } )
- 1
- 2
- 3
- 4
- 5
- 6
- 7
3.7.7 设置chunksize
use testdb
#设置数据块的大小,超过这个数据块大小(1M)就会分裂,自动均衡迁移到别的分片
db.settings.save({"_id":"chunksize","value":1})
#查看配置
db.settings.find()
- 1
- 2
- 3
- 4
- 5

四、验证
4.1 批量插入数据
use testdb

for (var i = 1; i <= 100000; i++){db.table1.insert({"_id":i,"test1":"testval1"+i});}

#查看数据分布
db.table1.getShardDistribution()
- 1
- 2
- 3
- 4
- 5
- 6
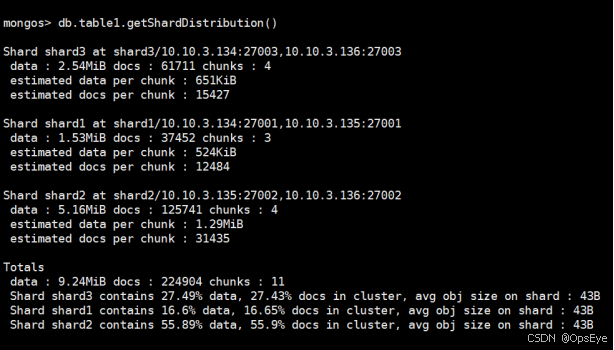
等十几分钟后,数据会均匀分配到其他分片

评论记录:
回复评论: