
作者:来自 Elastic Carly Richmond

你是否经常听到 AI 代理(AI agents)这个词,但不太确定它们是什么,或者如何在 TypeScript(或 JavaScript)中构建一个?跟我一起深入了解 AI 代理的概念、它们的可能应用场景,以及一个使用 AI SDK 和 Elasticsearch 构建的旅行规划代理示例。
你是否经常听到 AI 代理这个词,但不太确定它们是什么,或者它们如何与 Elastic 关联?在这里,我将深入探讨 AI 代理,具体包括:
什么是 AI 代理?
AI 代理是一种能够自主执行任务并代表人类采取行动的软件,它利用人工智能实现这一目标。AI 代理通过结合一个或多个大语言模型(large language models - LLMs)与用户定义的工具(或函数)来执行特定操作。例如,这些工具可以执行以下操作:
-
从数据库、传感器、API 或 Elasticsearch 等搜索引擎提取信息。
-
执行复杂计算,并让 LLM 总结其结果。
-
基于各种数据输入快速做出关键决策。
-
根据响应触发必要的警报和反馈。
AI 代理可以做什么?
AI 代理可以根据其类型在多个领域中应用,可能的示例包括:
-
基于效用的代理:评估行动并提供推荐以最大化收益,例如根据用户的观看历史推荐电影和电视剧。
-
基于模型的代理:根据传感器输入实时决策,例如自动驾驶汽车或智能吸尘器。
-
学习型代理:结合数据和机器学习识别模式和异常,例如用于欺诈检测。
-
投资建议代理:根据用户的风险偏好和现有投资组合提供投资建议,以最大化收益。如果能权衡准确性、声誉风险和监管因素,这将加速决策过程。
-
简单聊天机器人:如当前的聊天机器人,可访问用户账户信息并用自然语言回答基本问题。
示例:旅行规划助手
为了更好地理解 AI 代理的功能,以及如何使用熟悉的 Web 技术构建一个 AI 代理,我们来看一个使用 AI SDK、TypeScript 和 Elasticsearch 编写的简单旅行规划助手示例。
架构
我们的示例由 5 个不同的元素组成:
-
一个名为 weatherTool 的工具,从 Weather API 获取提问者指定位置的天气数据。
-
一个名为 fcdoTool 的工具,从 GOV.UK content API 提供目的地的当前旅行状态。
-
flightTool 工具使用简单查询从 Elasticsearch 获取航班信息。
-
以上所有信息都会传递给 LLM GPT-4 Turbo。
模型选择
在构建你的第一个 AI 代理时,确定使用哪个模型可能会很困难。资源如 Hugging Face Open LLM Leaderboard 是一个不错的起点。此外,你还可以参考 Berkeley Function-Calling Leaderboard 来获取工具使用的指导。
在我们的案例中,AI SDK 特别推荐使用具有强大工具调用能力的模型,例如 gpt-4 或 gpt-4-turbo,这在其 Prompt Engineering 文档中有详细说明。如果选择了错误的模型,可能会导致 LLM 无法按预期调用多个工具,甚至会出现兼容性错误,如下所示:
- # Llama3 lack of tooling support (3.1 or higher)
- llama3 does not support tools
-
- # Unsupported toolChoice option to configure tool usage
- AI_UnsupportedFunctionalityError: 'Unsupported tool choice type: required' functionality not supported.
先决条件
要运行此示例,请确保按照仓库 README 中的先决条件进行操作。
基础聊天助手
你可以使用 AI SDK 创建的最简单的 AI 代理将生成来自 LLM 的响应,而无需任何额外的上下文。AI SDK 支持许多 JavaScript 框架,具体可参考其文档。然而,AI SDK UI 库文档列出了对 React、Svelte、Vue.js 和 SolidJS 的不同支持,许多教程针对 Next.js。因此,我们的示例使用 Next.js 编写。
任何 AI SDK 聊天机器人的基本结构使用 useChat 钩子来处理来自后端路由的请求,默认情况下是 /api/chat/:
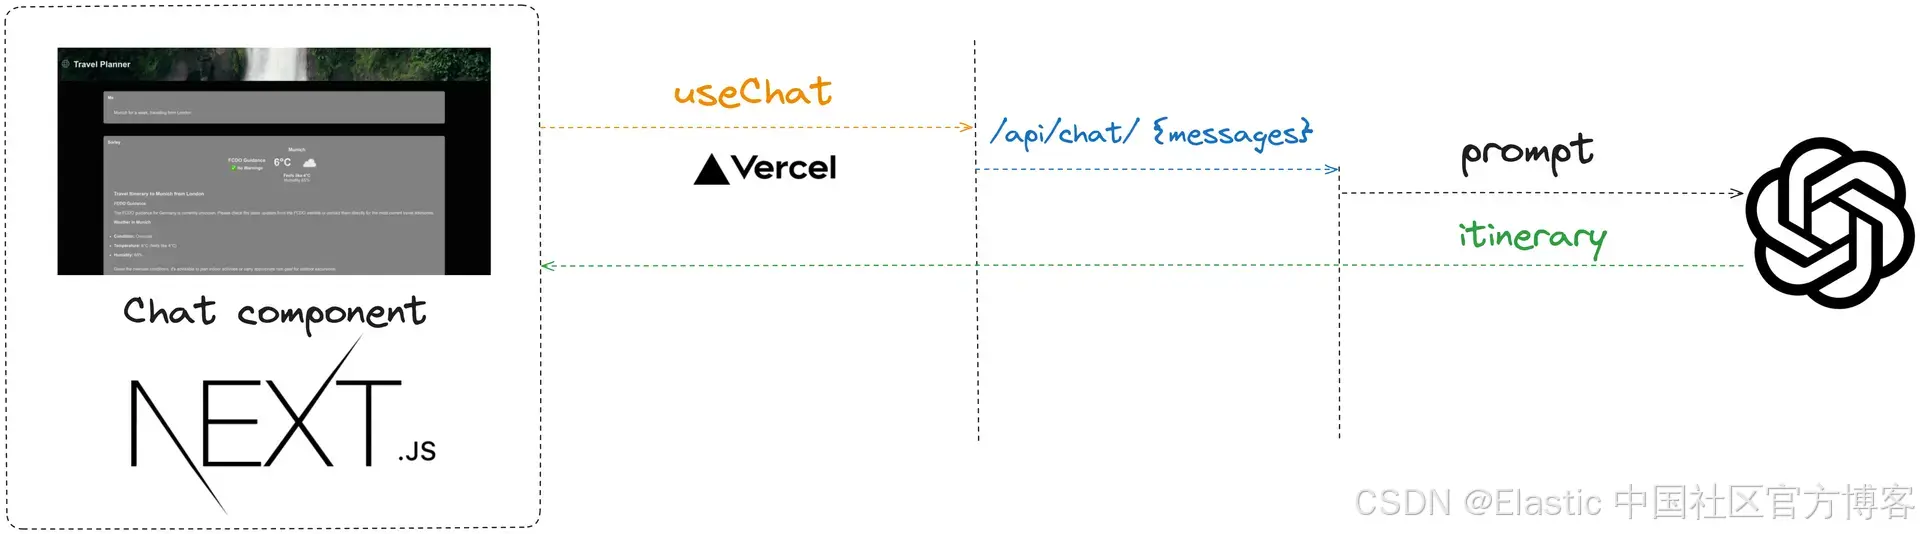
page.tsx 文件包含了我们在 Chat 组件中的客户端实现,包括由 useChat hook 暴露的提交、加载和错误处理功能。加载和错误处理功能是可选的,但建议提供请求状态的指示。与简单的 REST 调用相比,代理可能需要相当长的时间来响应,因此在此过程中保持用户更新状态非常重要,避免用户快速连续点击和重复调用。
由于该组件涉及客户端交互,我使用了 use client 指令,以确保该组件被视为客户端包的一部分:
- 'use client';
-
- import { useChat } from '@ai-sdk/react';
- import Spinner from './components/spinner';
-
- export default function Chat() {
- /* useChat hook helps us handle the input, resulting messages, and also handle the loading and error states for a better user experience */
- const { messages, input, handleInputChange, handleSubmit, isLoading, stop, error, reload } = useChat();
-
- return (
- <div className="chat__form">
- <div className="chat__messages">
- {
- /* Display all user messages and assistant responses */
- messages.map(m => (
- <div key={m.id} className="message">
- <div>
- { /* Messages with the role of *assistant* denote responses from the LLM*/ }
- <div className="role">{m.role === "assistant" ? "Sorley" : "Me"}</div>
- { /* User or LLM generated content */}
- <div className="itinerary__div" dangerouslySetInnerHTML={{ __html: markdownConverter.makeHtml(m.content) }}></div>
- </div>
- </div>
- ))}
- </div>
-
- {
- /* Spinner shows when awaiting a response */
- isLoading && (
- <div className="spinner__container">
- <Spinner />
- <button id="stop__button" type="button" onClick={() => stop()}>
- Stop
- </button>
- </div>
- )}
-
- {
- /* Show error message and return button when something goes wrong */
- error && (
- <>
- <div className="error__container">Unable to generate a plan. Please try again later!</div>
- <button id="retry__button" type="button" onClick={() => reload()}>
- Retry
- </button>
- </>
- )}
-
- { /* Form using default input and submission handler form the useChat hook */ }
- <form onSubmit={handleSubmit}>
- <input
- className="search-box__input"
- value={input}
- placeholder="Where would you like to go?"
- onChange={handleInputChange}
- disabled={error != null}
- />
- </form>
- </div>
- );
- }

Chat 组件将通过钩子暴露的 input 属性保持用户输入,并在提交时将响应发送到相应的路由。我使用了默认的 handleSubmit 方法,它将调用 /ai/chat/ 的 POST 路由。
该路由的处理程序位于 /ai/chat/route.ts 中,通过 OpenAI provider 程序初始化与 gpt-4-turbo LLM 的连接:
- import { openai } from '@ai-sdk/openai';
- import { streamText } from 'ai';
- import { NextResponse } from 'next/server';
-
- // Allow streaming responses up to 30 seconds to address typically longer responses from LLMs
- export const maxDuration = 30;
-
- // Post request handler
- export async function POST(req: Request) {
- const { messages } = await req.json();
-
- try {
- // Generate response from the LLM using the provided model, system prompt and messages
- const result = streamText({
- model: openai('gpt-4-turbo'),
- system: 'You are a helpful assistant that returns travel itineraries',
- messages
- });
-
- // Return data stream to allow the useChat hook to handle the results as they are streamed through for a better user experience
- return result.toDataStreamResponse();
- } catch(e) {
- console.error(e);
- return new NextResponse("Unable to generate a plan. Please try again later!");
- }
- }
请注意,上述实现将默认从环境变量 OPENAI_API_KEY 中提取 API 密钥。如果需要自定义 OpenAI 提供程序的配置,可以使用 createOpenAI 方法来覆盖提供程序的设置。
通过以上路由,结合 Showdown 帮助将 GPT 的 Markdown 输出格式化为 HTML,再加上一些 CSS 魔法(在 globals.css 文件中),我们最终得到了一个简单的响应式 UI,可以根据用户的提示生成行程:
基本的 LLM 行程视频
添加工具
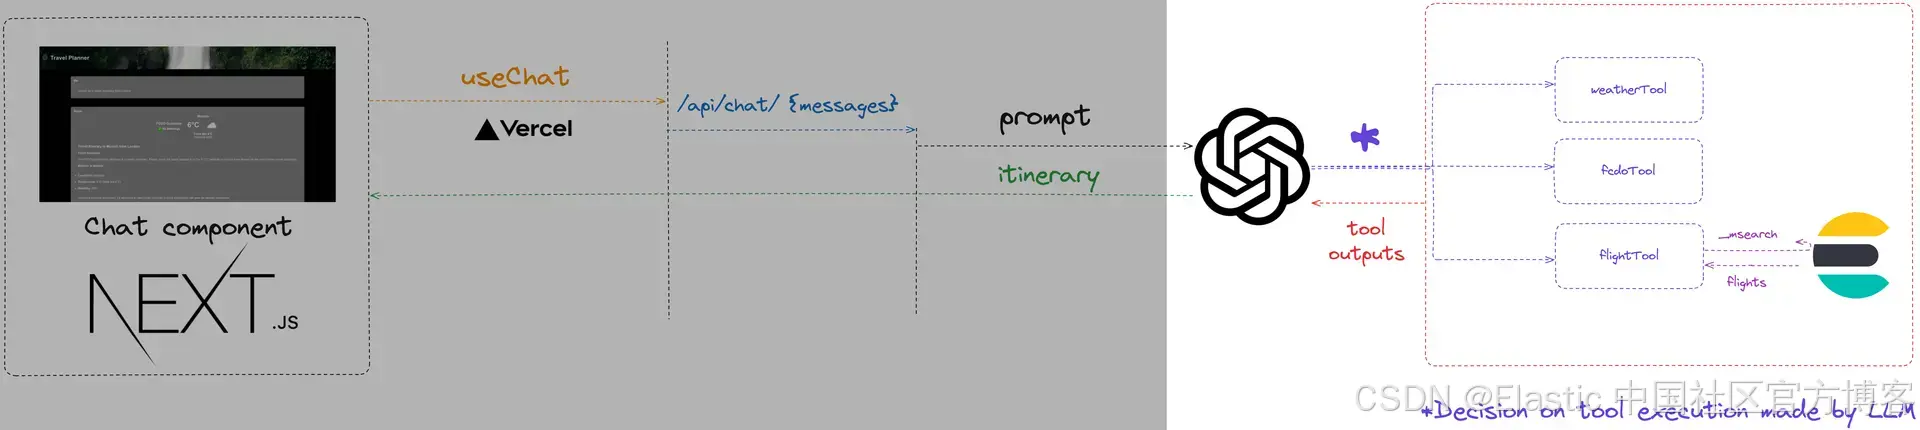
向 AI 代理添加工具基本上就是创建 LLM 可以使用的自定义功能,以增强其生成的响应。在此阶段,我将添加 3 个新的工具,LLM 可以选择在生成行程时使用,如下图所示:
天气工具
虽然生成的行程是一个很好的开始,但我们可能希望添加 LLM 没有经过训练的额外信息,比如天气。这促使我们编写第一个工具,它不仅可以作为 LLM 的输入,还能提供额外的数据,帮助我们调整 UI。
创建的天气工具,完整代码如下,接受一个参数 location,LLM 将从用户输入中提取该位置。schema 属性使用 TypeScript 的 schema 验证库 Zod 来验证传入的参数类型,确保传递的是正确的参数类型。description 属性允许你定义工具的功能,帮助 LLM 决定是否调用该工具。
- import { tool as createTool } from 'ai';
- import { z } from 'zod';
-
- import { WeatherResponse } from '../model/weather.model';
-
- export const weatherTool = createTool({
- description:
- 'Display the weather for a holiday location',
- parameters: z.object({
- location: z.string().describe('The location to get the weather for')
- }),
- execute: async function ({ location }) {
- // While a historical forecast may be better, this example gets the next 3 days
- const url = `https://api.weatherapi.com/v1/forecast.json?q=${location}&days=3&key=${process.env.WEATHER_API_KEY}`;
-
- try {
- const response = await fetch(url);
- const weather : WeatherResponse = await response.json();
- return {
- location: location,
- condition: weather.current.condition.text,
- condition_image: weather.current.condition.icon,
- temperature: Math.round(weather.current.temp_c),
- feels_like_temperature: Math.round(weather.current.feelslike_c),
- humidity: weather.current.humidity
- };
- } catch(e) {
- console.error(e);
- return {
- message: 'Unable to obtain weather information',
- location: location
- };
- }
- }
- });
你可能已经猜到,execute 属性是我们定义异步函数并实现工具逻辑的地方。具体来说,发送到天气 API 的位置会传递给我们的工具函数。然后,响应会被转换为一个单一的 JSON 对象,可以显示在 UI 上,并且也用于生成行程。
鉴于我们目前只运行一个工具,因此不需要考虑顺序或并行流程。简单来说,就是在原始 api/chat 路由中处理 LLM 输出的 streamText 方法中添加 tools 属性:
- import { weatherTool } from '@/app/ai/weather.tool';
-
- // Other imports omitted
-
- export const tools = {
- displayWeather: weatherTool,
- };
-
- // Post request handler
- export async function POST(req: Request) {
- const { messages } = await req.json();
-
- // Generate response from the LLM using the provided model, system prompt and messages (try catch block omitted)
- const result = streamText({
- model: openai('gpt-4-turbo'),
- system:
- 'You are a helpful assistant that returns travel itineraries based on the specified location.',
- messages,
- maxSteps: 2,
- tools
- });
-
- // Return data stream to allow the useChat hook to handle the results as they are streamed through for a better user experience
- return result.toDataStreamResponse();
- }
工具输出与消息一起提供,这使我们能够为用户提供更完整的体验。每条消息包含一个 parts 属性,其中包含 type 和 state 属性。当这些属性的值分别为 tool-invocation 和 result 时,我们可以从 toolInvocation 属性中提取返回的结果,并按需要显示它们。
更改后的 page.tsx 源代码将显示天气摘要以及生成的行程:
- 'use client';
-
- import { useChat } from '@ai-sdk/react';
- import Image from 'next/image';
-
- import { Weather } from './components/weather';
-
- import pending from '../../public/multi-cloud.svg';
-
- export default function Chat() {
- /* useChat hook helps us handle the input, resulting messages, and also handle the loading and error states for a better user experience */
- const { messages, input, handleInputChange, handleSubmit, isLoading, stop, error, reload } = useChat();
-
- return (
- <div className="chat__form">
- <div className="chat__messages">
- {
- /* Display all user messages and assistant responses */
- messages.map(m => (
- <div key={m.id} className="message">
- <div>
- { /* Messages with the role of *assistant* denote responses from the LLM */}
- <div className="role">{m.role === "assistant" ? "Sorley" : "Me"}</div>
- { /* Tool handling */}
- <div className="tools__summary">
- {
- m.parts.map(part => {
- if (part.type === 'tool-invocation') {
- const { toolName, toolCallId, state } = part.toolInvocation;
-
- if (state === 'result') {
- { /* Show weather results */}
- if (toolName === 'displayWeather') {
- const { result } = part.toolInvocation;
- return (
- <div key={toolCallId}>
- <Weather {...result} />
- </div>
- );
- }
- } else {
- return (
- <div key={toolCallId}>
- {toolName === 'displayWeather' ? (
- <div className="weather__tool">
- <Image src={pending} width={80} height={80} alt="Placeholder Weather"/>
- <p className="loading__weather__message">Loading weather...</p>
- </div>
- ) : null}
- </div>
- );
- }
- }
- })}
- </div>
- { /* User or LLM generated content */}
- <div className="itinerary__div" dangerouslySetInnerHTML={{ __html: markdownConverter.makeHtml(m.content) }}></div>
-
- </div>
- </div>
- ))}
- </div>
-
- { /* Spinner and loading handling omitted */ }
-
- { /* Form using default input and submission handler form the useChat hook */}
- <form onSubmit={handleSubmit}>
- <input
- className="search-box__input"
- value={input}
- placeholder="Where would you like to go?"
- onChange={handleInputChange}
- disabled={error != null}
- />
- </form>
- </div>
- );
- }
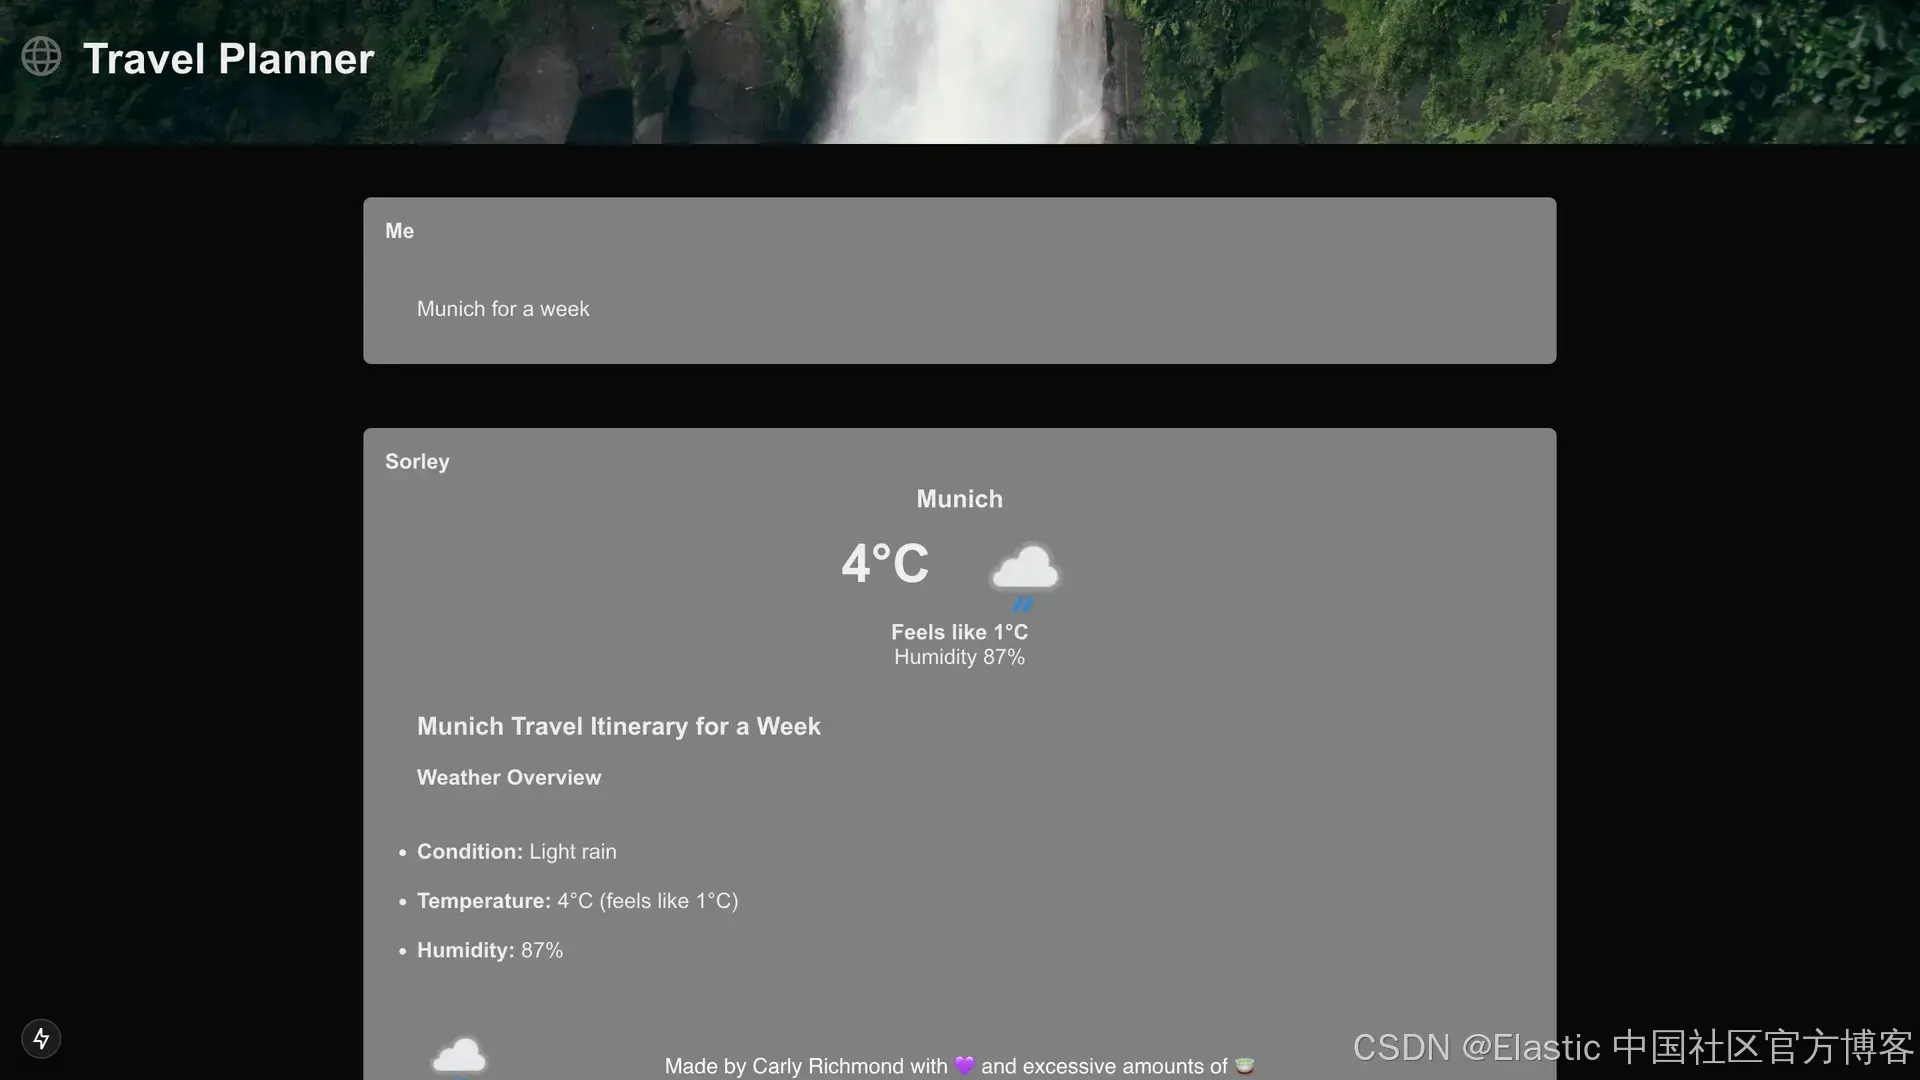
上述代码将向用户提供以下输出:
FCO 工具
AI 代理的强大之处在于 LLM 可以选择触发多个工具来获取相关信息,以生成响应。假设我们想要查看目标国家的旅行指南。下面的代码展示了如何创建一个新的工具 fcdoGuidance,它可以触发一个对 GOV.UK Content API 的 API 调用:
- import { tool as createTool } from 'ai';
- import { z } from 'zod';
-
- import { FCDOResponse } from '../model/fco.model';
-
- export const fcdoTool = createTool({
- description:
- 'Display the FCDO guidance for a destination',
- parameters: z.object({
- country: z.string().describe('The country of the location to get the guidance for')
- }),
- execute: async function ({ country }) {
- const url = `https://www.gov.uk/api/content/foreign-travel-advice/${country.toLowerCase()}`;
-
- try {
- const response = await fetch(url, { headers: { 'Content-Type': 'application/json' } });
- const fcoResponse: FCDOResponse = await response.json();
-
- const alertStatus: string = fcoResponse.details.alert_status.length == 0 ? 'Unknown' :
- fcoResponse.details.alert_status[0].replaceAll('_', ' ');
-
- return {
- status: alertStatus,
- url: fcoResponse.details?.document?.url
- };
- } catch(e) {
- console.error(e);
- return {
- message: 'Unable to obtain FCDO information',
- location: location
- };
- }
- }
- });
你会注意到,格式与之前讨论的天气工具非常相似。事实上,要将该工具包含到 LLM 输出中,只需将其添加到 tools 属性,并修改 /api/chat 路由中的提示即可:
- // Imports omitted
-
- export const tools = {
- fcdoGuidance: fcdoTool,
- displayWeather: weatherTool,
- };
-
- // Post request handler
- export async function POST(req: Request) {
- const { messages } = await req.json();
-
- // Generate response from the LLM using the provided model, system prompt and messages (try/ catch block omitted)
- const result = streamText({
- model: openai('gpt-4-turbo'),
- system:
- "You are a helpful assistant that returns travel itineraries based on a location" +
- "Use the current weather from the displayWeather tool to adjust the itinerary and give packing suggestions." +
- "If the FCDO tool warns against travel DO NOT generate an itinerary.",
- messages,
- maxSteps: 2,
- tools
- });
-
- // Return data stream to allow the useChat hook to handle the results as they are streamed through for a better user experience
- return result.toDataStreamResponse();
- }
一旦将显示工具输出的组件添加到页面,对于不建议旅行的国家,输出应该如下所示:
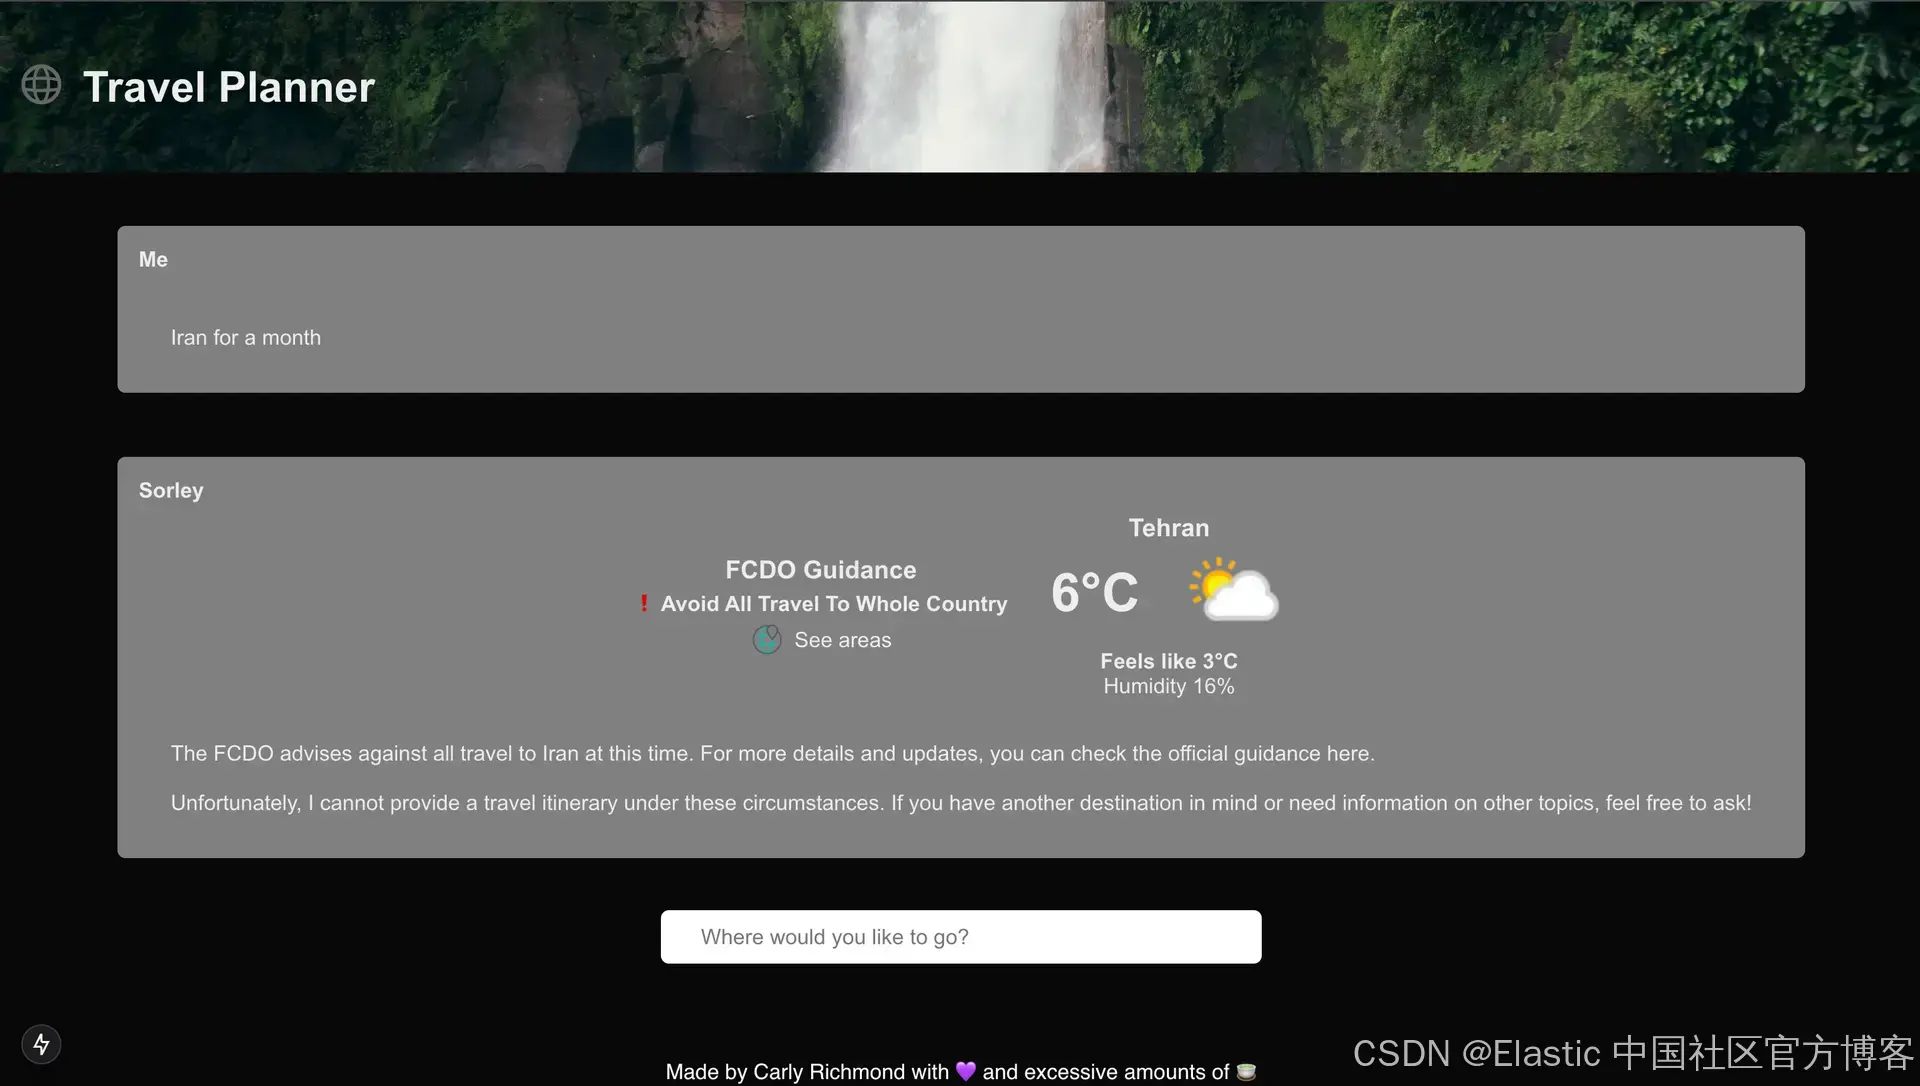
支持工具调用的LLM可以选择是否调用工具,除非它认为有必要。使用gpt-4-turbo时,我们的两个工具会并行调用。然而,之前尝试使用llama3.1时,取决于输入,只有一个模型会被调用。
航班信息工具
RAG(Retrieval Augmented Generation - 检索增强生成)指的是一种软件架构,其中从搜索引擎或数据库中提取的文档作为上下文传递给 LLM,以基于提供的文档集来生成回应。这种架构允许 LLM 根据它之前没有训练过的数据生成更准确的回应。虽然 Agentic RAG 通过定义的工具或结合向量或混合搜索处理文档,但也可以像我们这里所做的那样,利用 RAG 作为与传统词汇搜索的复杂流程的一部分。
为了将航班信息与其他工具一起传递给LLM,最后一个工具 flightTool 通过 Elasticsearch JavaScript 客户端,从 Elasticsearch 中拉取出发和到达航班的航班信息,使用提供的出发地和目的地:
- import { tool as createTool } from 'ai';
- import { z } from 'zod';
-
- import { Client } from '@elastic/elasticsearch';
- import { SearchResponseBody } from '@elastic/elasticsearch/lib/api/types';
-
- import { Flight } from '../model/flight.model';
-
- const index: string = "upcoming-flight-data";
- const client: Client = new Client({
- node: process.env.ELASTIC_ENDPOINT,
- auth: {
- apiKey: process.env.ELASTIC_API_KEY || "",
- },
- });
-
- function extractFlights(response: SearchResponseBody<Flight>): (Flight | undefined)[] {
- return response.hits.hits.map(hit => { return hit._source})
- }
-
- export const flightTool = createTool({
- description:
- "Get flight information for a given destination from Elasticsearch, both outbound and return journeys",
- parameters: z.object({
- destination: z.string().describe("The destination we are flying to"),
- origin: z
- .string()
- .describe(
- "The origin we are flying from (defaults to London if not specified)"
- ),
- }),
- execute: async function ({ destination, origin }) {
- try {
- const responses = await client.msearch({
- searches: [
- { index: index },
- {
- query: {
- bool: {
- must: [
- {
- match: {
- origin: origin,
- },
- },
- {
- match: {
- destination: destination,
- },
- },
- ],
- },
- },
- },
-
- // Return leg
- { index: index },
- {
- query: {
- bool: {
- must: [
- {
- match: {
- origin: destination,
- },
- },
- {
- match: {
- destination: origin,
- },
- },
- ],
- },
- },
- },
- ],
- });
-
- if (responses.responses.length < 2) {
- throw new Error("Unable to obtain flight data");
- }
-
- return {
- outbound: extractFlights(responses.responses[0] as SearchResponseBody<Flight>),
- inbound: extractFlights(responses.responses[1] as SearchResponseBody<Flight>)
- };
- } catch (e) {
- console.error(e);
- return {
- message: "Unable to obtain flight information",
- location: location,
- };
- }
- },
- });
这个示例使用了 Multi search API 来分别拉取出发和到达航班的信息,然后通过 extractFlights 工具方法提取文档。
为了使用工具的输出,我们需要再次修改我们的提示和工具集合,更新 /ai/chat/route.ts 文件:
- // Imports omitted
-
- // Allow streaming responses up to 30 seconds to address typically longer responses from LLMs
- export const maxDuration = 30;
-
- export const tools = {
- getFlights: flightTool,
- displayWeather: weatherTool,
- fcdoGuidance: fcdoTool
- };
-
- // Post request handler
- export async function POST(req: Request) {
- const { messages } = await req.json();
-
- // Generate response from the LLM using the provided model, system prompt and messages (try/ catch block omitted)
- const result = streamText({
- model: openai('gpt-4-turbo'),
- system:
- "You are a helpful assistant that returns travel itineraries based on location, the FCDO guidance from the specified tool, and the weather captured from the displayWeather tool." +
- "Use the flight information from tool getFlights only to recommend possible flights in the itinerary." +
- "Return an itinerary of sites to see and things to do based on the weather." +
- "If the FCDO tool warns against travel DO NOT generate an itinerary.",
- messages,
- maxSteps: 2,
- tools
- });
-
- // Return data stream to allow the useChat hook to handle the results as they are streamed through for a better user experience
- return result.toDataStreamResponse();
- }
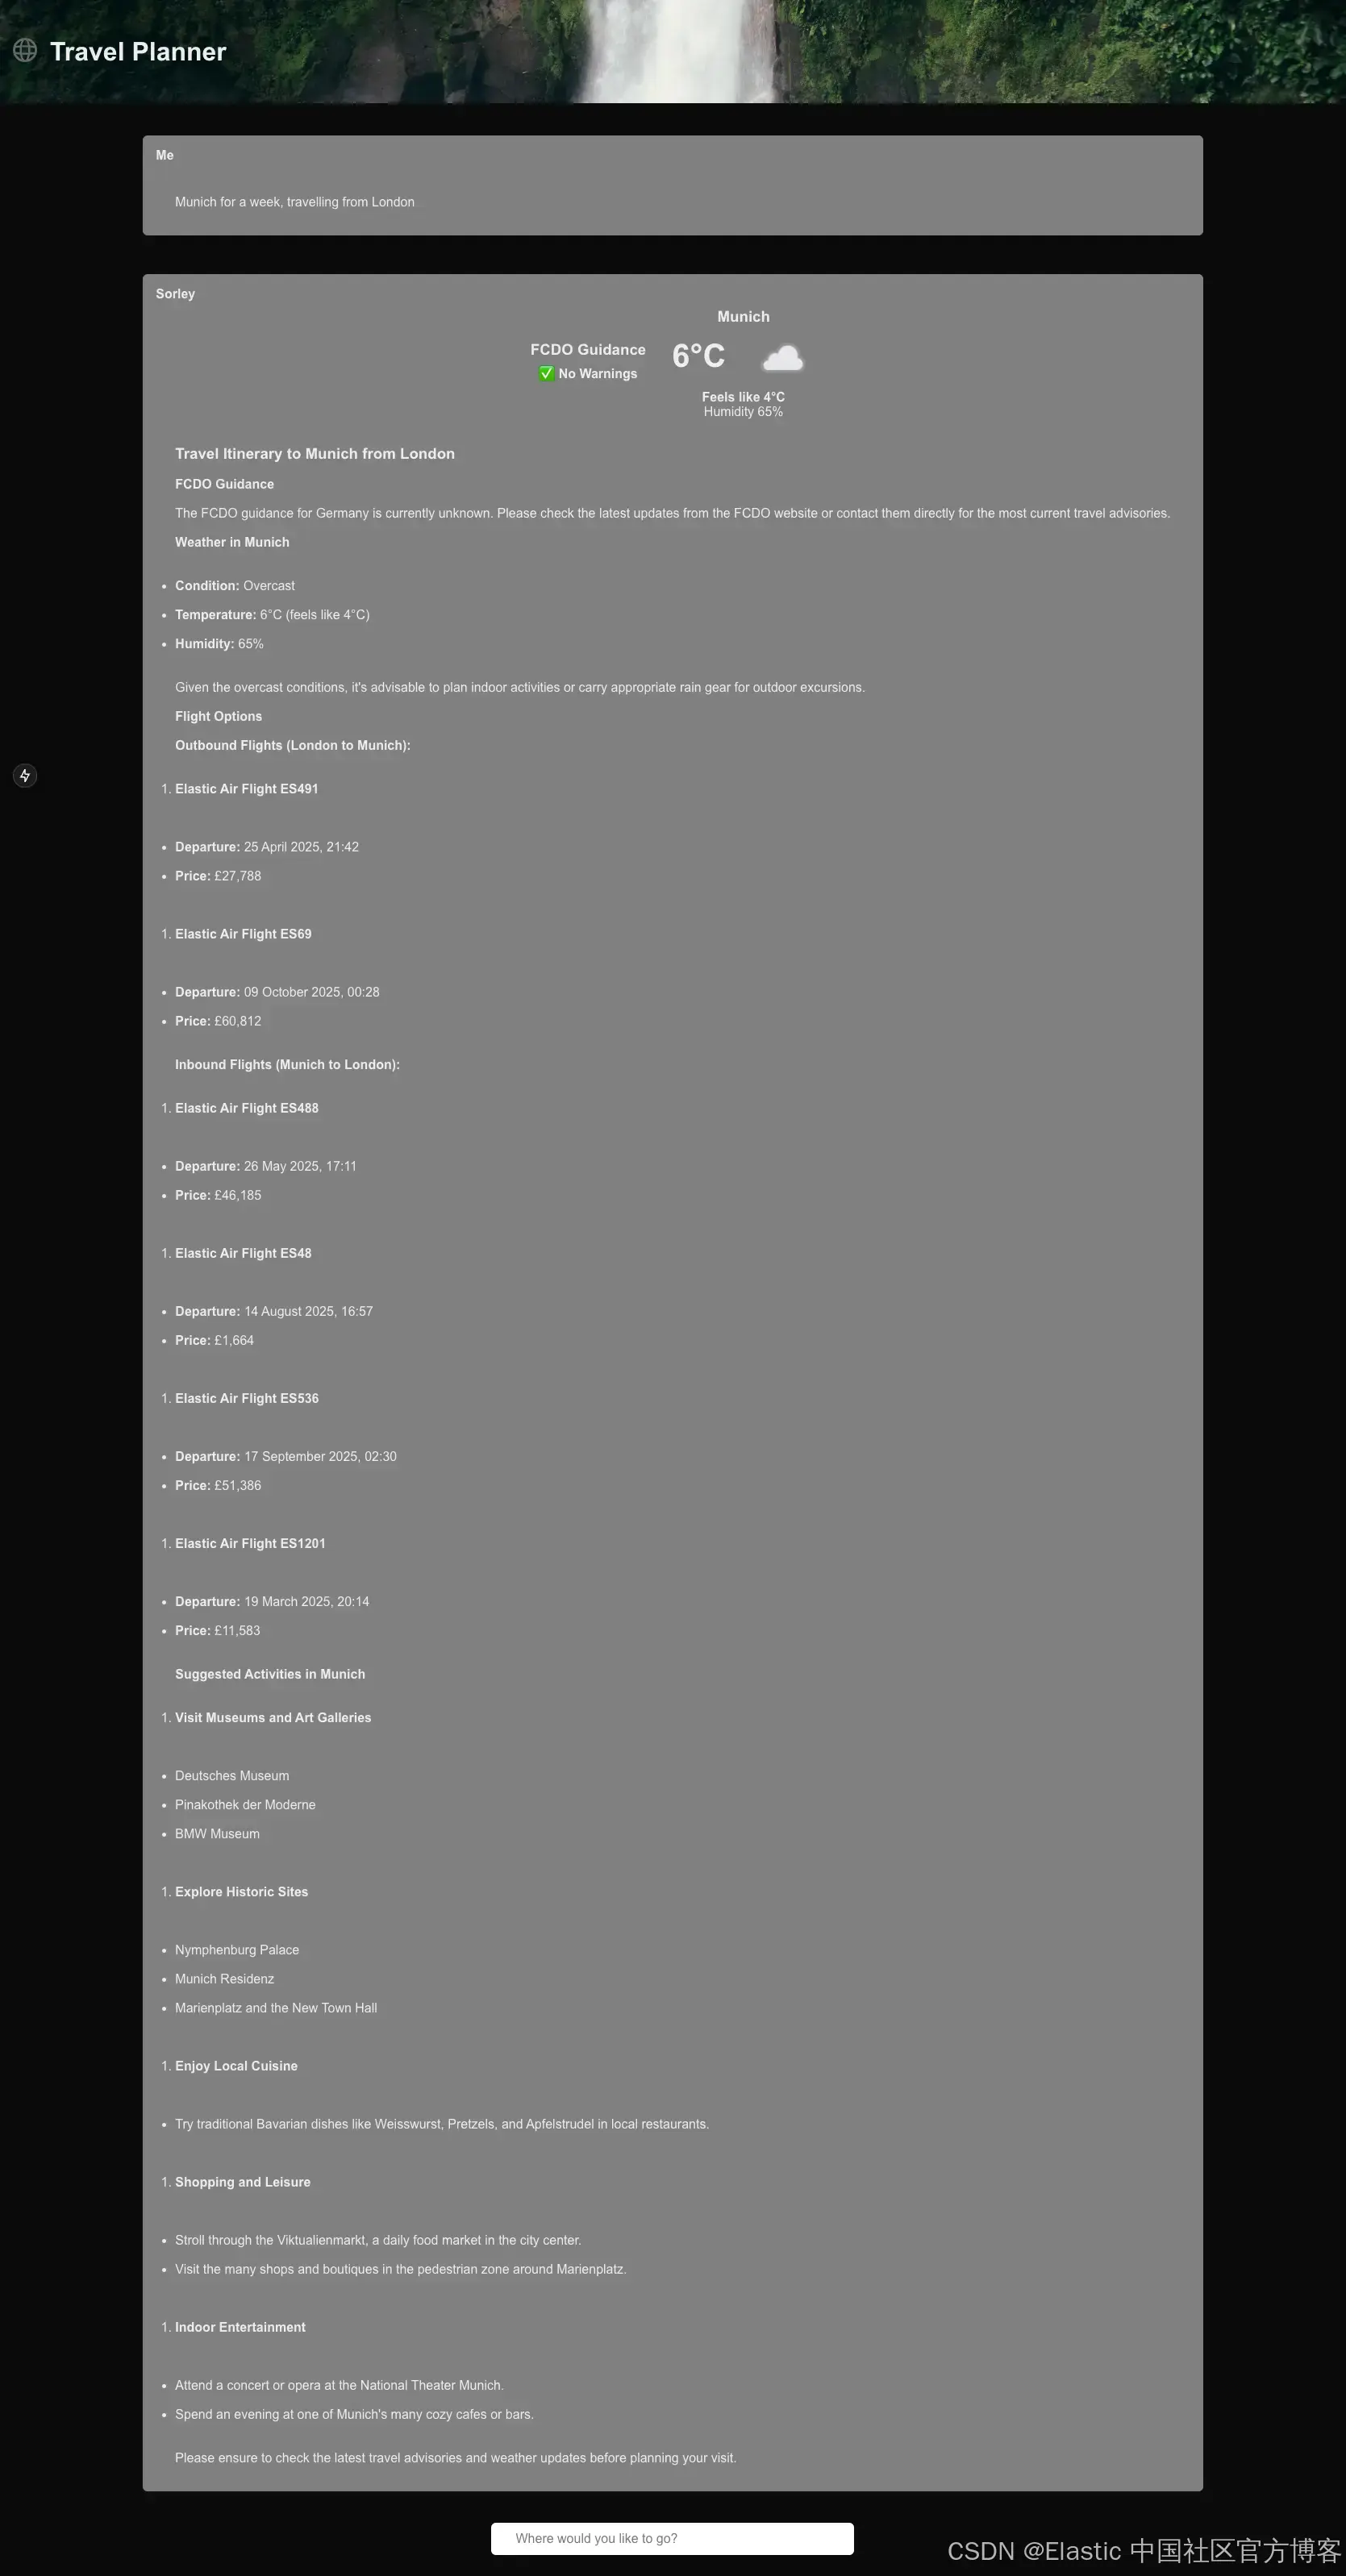
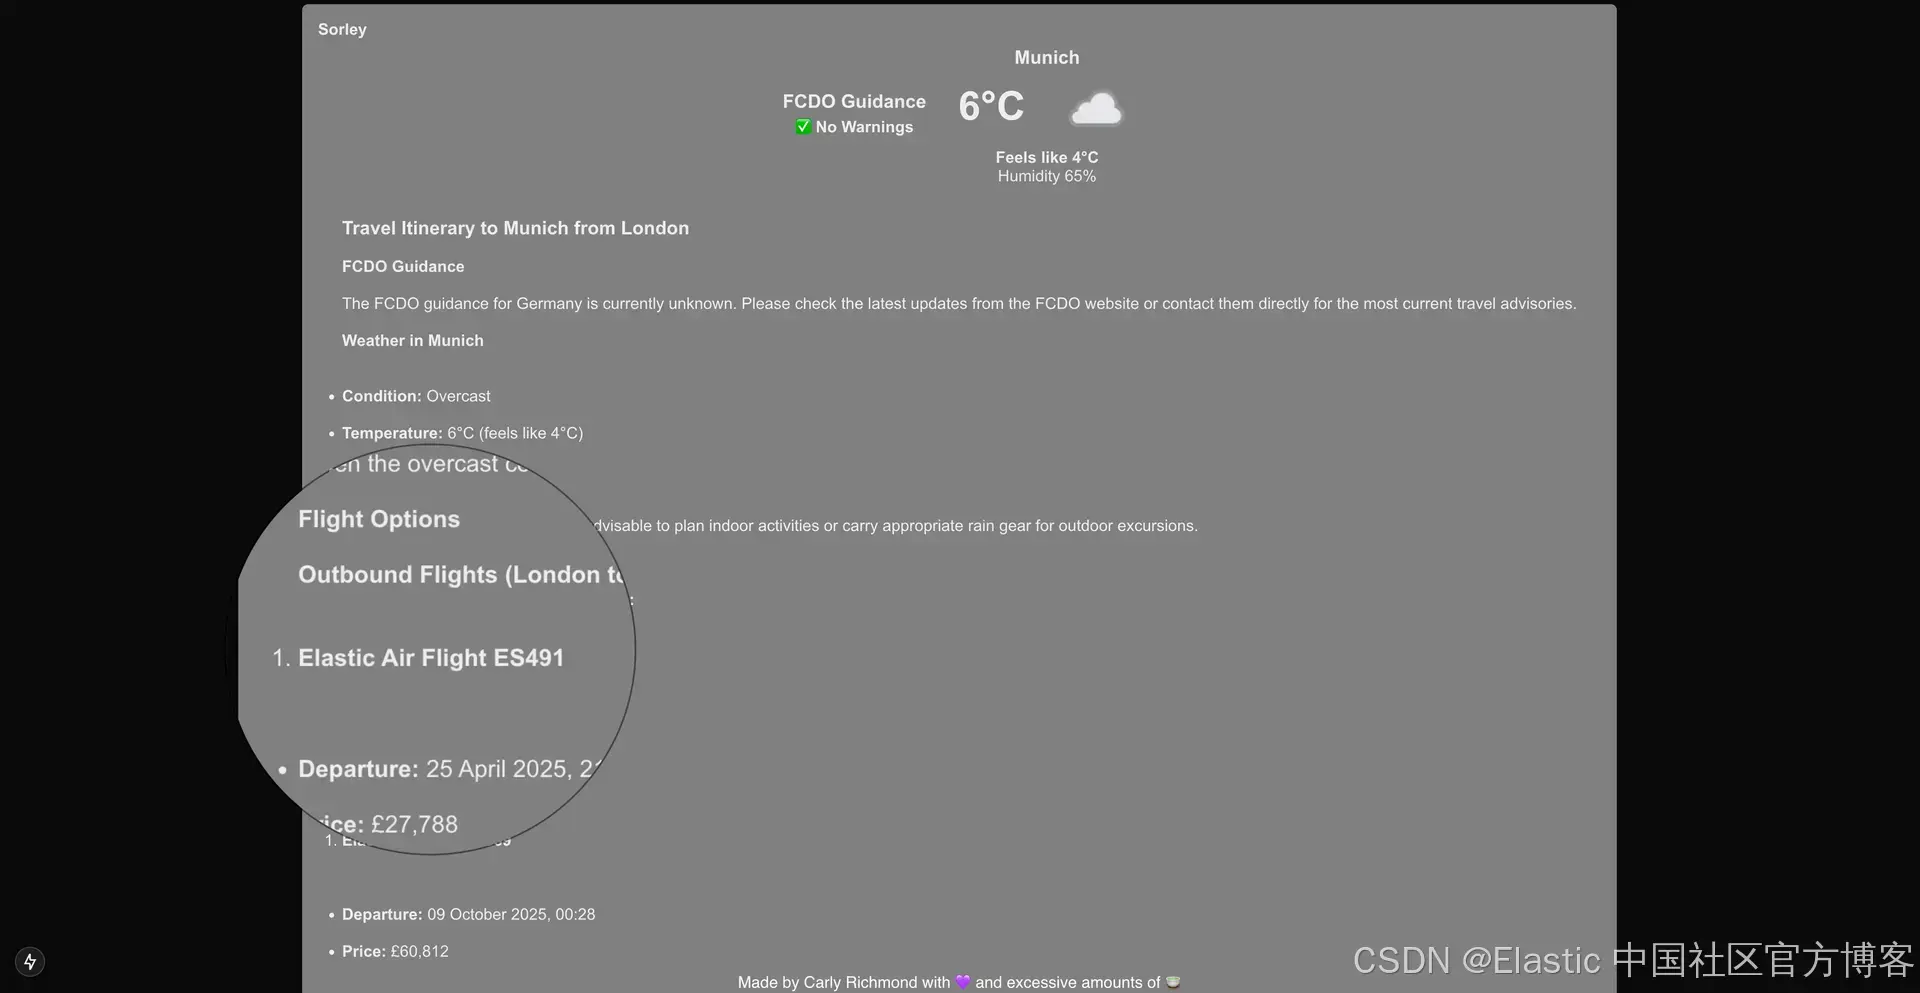
通过最终的提示,所有 3 个工具将被调用,以生成包含航班选项的行程:
总结
如果你之前对 AI 代理还不完全了解,现在你应该清楚了!我们通过使用 AI SDK、Typescript 和 Elasticsearch 的简单旅行规划示例来进行了解。我们可以扩展我们的规划器,添加其他数据源,允许用户预订旅行以及旅游,甚至根据位置生成图像横幅(目前 AI SDK 中对此的支持仍处于实验阶段)。
如果你还没有深入了解代码,可以在这里查看!
资源
- AI SDK 核心文档
- AI SDK 核心 > 工具调用
- Elasticsearch JavaScript 客户端
- 旅行规划 AI 代理 | GitHub
想要获得 Elastic 认证吗?查看下次 Elasticsearch 工程师培训的时间!
Elasticsearch 拥有众多新功能,可以帮助你为你的使用案例构建最佳搜索解决方案。深入了解我们的示例笔记本,了解更多内容,开始免费云试用,或在本地机器上尝试 Elastic。
原文:Building AI Agents with AI SDK and Elastic - Elasticsearch Labs

 微信公众号
微信公众号

评论记录:
回复评论: