
00. 目录
01. 命令概述
systemctl命令是系统服务管理器指令,它实际上将 service和chkconfig这两个命令组合到一起。
Centos7之后从init完全换成了systemd的启动方式,systemd 启动服务的机制主要是通过 systemctl 的这个系统服务管理指令来处理。systemctl在用法上也囊括 service / chkconfig / setup / init 的大部分功能。
| 任务 | 旧指令 | 新指令 |
|---|---|---|
| 使某服务自动启动 | chkconfig --level 3 httpd on | systemctl enable httpd.service |
| 使某服务不自动启动 | chkconfig --level 3 httpd off | systemctl disable httpd.service |
| 检查服务状态 | service httpd status | systemctl status httpd.service (服务详细信息) systemctl is-enabled httpd.service (仅显示是否 Active) |
| 显示所有已启动的服务 | chkconfig --list | systemctl list-units --type=service |
| 启动某服务 | service httpd start | systemctl start httpd.service |
| 停止某服务 | service httpd stop | systemctl stop httpd.service |
| 重启某服务 | service httpd restart | systemctl restart httpd.service |
| 某服务重新加载配置文件 | service httpd reload | systemctl reload httpd.service |
02. 命令格式
格式:systemctl [选项...] {命令} ...
- 1
03. 常用选项
-start	启动服务
-stop	停止服务
-restart	重启服务
-enable	使某服务开机自启
-disable	关闭某服务开机自启
-status	查看服务状态
-list-units –type=service	列举所有已启动服务
- 1
- 2
- 3
- 4
- 5
- 6
- 7
04. 参考示例
4.1 输出所有已经启动服务
[deng@localhost ~]$ systemctl
- 1
4.2 输出所有已经启动的单元
[deng@localhost ~]$ systemctl list-units
- 1
4.3 显示启动失败的服务
[deng@localhost ~]$ systemctl --failed
  UNIT            LOAD   ACTIVE SUB    DESCRIPTION
● network.service loaded failed failed LSB: Bring up/down networking
● postfix.service loaded failed failed Postfix Mail Transport Agent
- 1
- 2
- 3
- 4
4.4 查看所有已经安装的服务
[deng@localhost ~]$ systemctl list-unit-files
UNIT FILE                                     STATE
proc-sys-fs-binfmt_misc.automount             static
dev-hugepages.mount                           static
dev-mqueue.mount                              static
proc-fs-nfsd.mount                            static
proc-sys-fs-binfmt_misc.mount                 static
sys-fs-fuse-connections.mount                 static
- 1
- 2
- 3
- 4
- 5
- 6
- 7
- 8
4.5 启动服务
[root@localhost ~]# systemctl start sshd
- 1
4.6 停止服务
[root@localhost ~]# systemctl stop sshd
- 1
4.7 重启服务
[root@localhost ~]# systemctl restart sshd
- 1
4.8 重新加载服务配置
[root@localhost ~]# systemctl reload sshd
- 1
4.9 查看服务状态
[root@localhost ~]# systemctl status sshd
● sshd.service - OpenSSH server daemon
   Loaded: loaded (/usr/lib/systemd/system/sshd.service; enabled; vendor preset: enabled)
   Active: active (running) since 六 2019-08-17 20:56:41 CST; 1min 10s ago
- 1
- 2
- 3
- 4
4.10 查看服务是否开机启动
[root@localhost ~]# systemctl is-enabled sshd
enabled
[root@localhost ~]#
- 1
- 2
- 3
4.11 开机自动启动服务
[root@localhost ~]# systemctl enable sshd
[root@localhost ~]#
- 1
- 2
4.12 开机不启动服务
[root@localhost ~]# systemctl disable sshd
Removed symlink /etc/systemd/system/multi-user.target.wants/sshd.service.
[root@localhost ~]#
- 1
- 2
- 3
4.13 显示服务帮助信息
[root@localhost ~]# systemctl help sshd
- 1
4.14 重新加载systemd
[root@localhost ~]# systemctl daemon-reload
- 1
4.15 重新启动系统
[root@localhost ~]# systemctl reboot
- 1
4.16 关机
[root@localhost ~]# systemctl poweroff
- 1
4.17 休眠
[root@localhost ~]# systemctl hibernate
- 1
hibernate:休眠模式则是将系统状态保存到硬盘当中,保存完毕后,将计算机关机。当用户尝试唤醒系统时,系统会开始正常运行,然后将保存在硬盘中的系统状态恢复回来。因为数据需要从硬盘读取,因此唤醒的速度比较慢(如果你使用的是 SSD 磁盘,唤醒的速度也是非常快的)。
4.18 待机
[root@localhost ~]# systemctl suspend
- 1
suspend:暂停模式会将系统的状态保存到内存中,然后关闭掉大部分的系统硬件,当然,并没有实际关机。当用户按下唤醒机器的按钮,系统数据会从内存中回复,然后重新驱动被大部分关闭的硬件,所以唤醒系统的速度比较快。
4.19 混合休眠模式(同时休眠到硬盘并待机)
[root@localhost ~]# systemctl hybrid-sleep
- 1
4.20 相当于telinit 3 或 telinit 5
[root@localhost ~]# systemctl isolate graphical.target
- 1
graphical.target:就是文字界面再加上图形界面,这个 target 已经包含了下面的 multi-user.target。
multi-user.target:纯文本模式!
rescue.target:在无法使用 root 登陆的情况下,systemd 在开机时会多加一个额外的临时系统,与你原本的系统无关。这时你可以取得 root 的权限来维护你的系统。
emergency.target:紧急处理系统的错误,在无法使用 rescue.target 时,可以尝试使用这种模式!
shutdown.target:就是执行关机。
getty.target:可以设置 tty 的配置。
正常的模式是 multi-user.target 和 graphical.target 两个,救援方面的模式主要是 rescue.target 以及更严重的 emergency.target。如果要修改可提供登陆的 tty 数量,则修改 getty.target。
4.21 列出所有已经启动的服务
[root@localhost ~]# systemctl list-units --type=service
- 1
4.22 查看目前是否运行指定服务
[root@localhost ~]# systemctl is-active sshd
active
[root@localhost ~]#
- 1
- 2
- 3
4.23 列出unit的配置
[root@localhost ~]# systemctl show
- 1
4.24 查看服务的配置
[root@localhost ~]# systemctl show sshd.service
- 1
4.25 注销服务
[root@localhost ~]# systemctl mask sshd.service
Created symlink from /etc/systemd/system/sshd.service to /dev/null.
[root@localhost ~]#
- 1
- 2
- 3
4.26 反注销服务
[root@localhost ~]# systemctl unmask sshd.service
Removed symlink /etc/systemd/system/sshd.service.
[root@localhost ~]#
- 1
- 2
- 3
4.27 只查看服务类型的unit
[root@localhost ~]# systemctl list-units  --type=service --all
  UNIT                         LOAD      ACTIVE   SUB     DESCRIPTION
  abrt-ccpp.service            loaded    active   exited  Install ABRT coredump hoo
  abrt-oops.service            loaded    active   running ABRT kernel log watcher
  abrt-vmcore.service          loaded    inactive dead    Harvest vmcores for ABRT
  abrt-xorg.service            loaded    active   running ABRT Xorg log watcher
  abrtd.service                loaded    active   running ABRT Automated Bug Report
  accounts-daemon.service      loaded    active   running Accounts Service
  alsa-restore.service         loaded    inactive dead    Save/Restore Sound Card S
  alsa-state.service           loaded    active   running Manage Sound Card State (
● apparmor.service             not-found inactive dead    apparmor.service
- 1
- 2
- 3
- 4
- 5
- 6
- 7
- 8
- 9
- 10
- 11
4.28 进入救援模式
[root@localhost ~]# systemctl rescue
- 1
4.29 进入紧急救援模式
[root@localhost ~]# systemctl emergency
- 1
4.30 本机 socket 的服务
[root@localhost ~]# systemctl list-sockets
- 1
05. 附录
参考:https://blog.csdn.net/skh2015java/article/details/94012643
概述
功能简介
DAC(Digital to Analog Converter)是一种通过电流、电压或电荷的形式将数字信号转换为模拟信号的设备,主要用于:
-
作为过程控制计算机系统的输出通道,与执行器相连,实现对生产过程的自动控制。
-
在利用反馈技术的模数转换器设计中,作为重要的功能模块呈现。
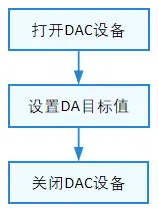
DAC接口定义了完成DAC传输的通用方法集合,包括:
-
DAC设备管理:打开或关闭DAC设备。
-
DAC设置目标值:设置DAC设备需要将数字信号转成模拟信号的目标值。
基本概念
- 分辨率
分辨率指的是DAC模块能够转换的二进制位数,位数越多分辨率越高。
- 转换精度
精度是指输入端加有最大数值时,DAC的实际输出值和理论计算值之差,DAC转换器的转换精度与DAC转换器的集成芯片结构和接口电路配置有关。理想情况下,DAC的转换精度越小越好,因此为了获得更高精度的DAC转换结果,首先要保证选择的DAC转换器具备足够高的分辨率。其次,接口电路的器件或电源存在误差时,会造成DAC转换的误差,若这些误差超过一定程度,就会导致DAC转换错误。
- 转换速度
转换速度一般由建立时间决定。从输入由全0突变为全1时开始,到输出电压稳定在FSR±½LSB范围(或以FSR±x%FSR指明范围)内为止,这段时间称为建立时间,它是DAC的最大响应时间,所以用它衡量转换速度的快慢。
满量程范围FSR(Full Scale Range),是指DAC输出信号幅度的最大范围,不同的DAC有不同的满量程范围,该范围可以用正、负电流或者正、负电压来限制。
最低有效位LSB(Least Significant Byte),指的是一个二进制数字中的第0位(即最低位)。
运作机制
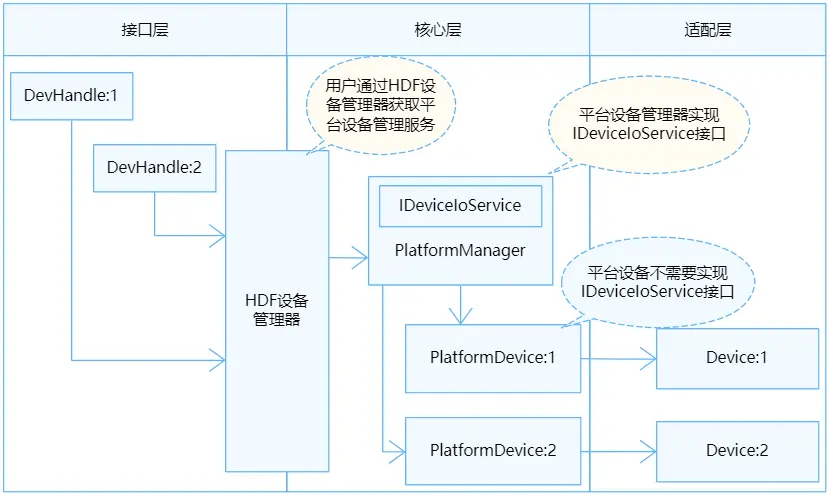
在HDF框架中,同类型设备对象较多时(可能同时存在十几个同类型配置器),如果采用独立服务模式,则需要配置更多的设备节点,且相关服务会占据更多的内存资源。相反,采用统一服务模式可以使用一个设备服务作为管理器,统一处理所有同类型对象的外部访问(这会在配置文件中有所体现),实现便捷管理和节约资源的目的。DAC模块接口适配模式采用统一服务模式(如图1)。
DAC模块各分层的作用为:接口层提供打开设备、写入数据和关闭设备的接口。核心层主要提供绑定设备、初始化设备以及释放设备的能力。适配层实现其它具体的功能。
说明:
核心层可以调用接口层的函数,核心层通过钩子函数调用适配层函数,从而适配层可以间接的调用接口层函数,但是不可逆转接口层调用适配层函数。
图 1 DAC统一服务模式
约束与限制
DAC模块当前仅支持轻量和小型系统内核(LiteOS-A)。
使用指导
场景介绍
DAC模块的主要工作是以电流、电压或电荷的形式将数字信号转换为模拟信号,主要应用于音频设备中。日常所见的音响、耳机等,均使用DAC模块作为数模转换的通道。
接口说明
DAC模块提供的主要接口如下所示,具体API详见//drivers/hdf_core/framework/include/platform/dac_if.h。
表 1 DAC驱动API接口功能介绍
class="table-box">| 接口名 | 接口描述 |
|---|---|
| DevHandle DacOpen(uint32_t number) | 打开DAC设备。 |
| void DacClose(DevHandle handle) | 关闭DAC设备。 |
| int32_t DacWrite(DevHandle handle, uint32_t channel, uint32_t val) | 设置DA目标值。 |


 class="blog_extension_card_cont">


评论记录:
回复评论: