00. 目录
01. 命令概述
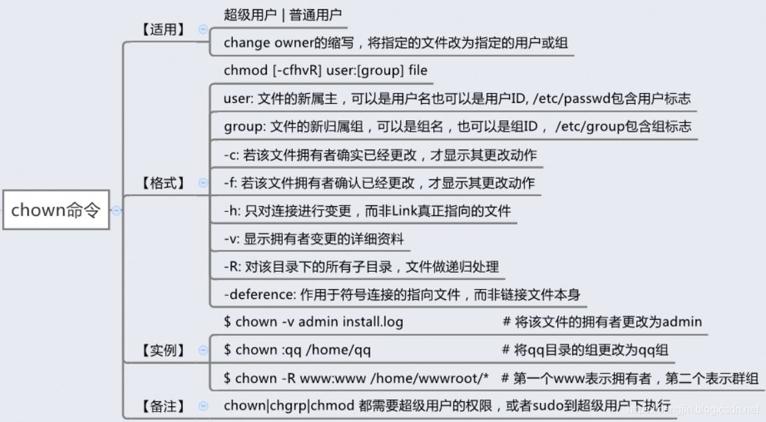
chown - 修改文件所有者和所属组
Linux/Unix 属于多用户多任务操作系统,所有的文件皆有拥有者。利用 chown 命令可以将指定文件的拥有者改为指定的用户或组,用户可以是用户名或者用户ID,组可以是组名或者组ID,文件是以空格分开的要改变权限的文件列表,支持通配符。 一般来说,这个指令仅限系统管理者(root)所使用,普通用户没有权限改变文件所属者及所属组。
02. 命令格式
用法:chown [选项]... [所有者][:[组]] 文件...
 或:chown [选项]... --reference=参考文件 文件...
- 1
- 2
03. 常用选项
当使用 --referebce 参数时,将文件的所有者和所属组更改为与指定参考文件相同。

  -c, --changes                 类似 verbose,但只在有更改时才显示结果
      --dereference             受影响的是符号链接所指示的对象,而非符号链接本身
  -h, --no-dereference          会影响符号链接本身,而非符号链接所指示的目的地
                                (当系统支持更改符号链接的所有者时,此选项才有用)
      --from=当前所有者:当前所属组
                                只当每个文件的所有者和组符合选项所指定时才更改所
                                有者和组。其中一个可以省略,这时已省略的属性就不
                                需要符合原有的属性。
      --no-preserve-root        不特殊对待"/"(默认值)
      --preserve-root           不允许在"/"上递归操作
  -f, --silent, --quiet 去除大部份的错误信息
      --reference=参考文件      使用参考文件的所属组,而非指定值
  -R, --recursive               递归处理所有的文件及子目录
  -v, --verbose                 为处理的所有文件显示诊断信息

      --help            显示此帮助信息并退出
      --version         显示版本信息并退出
- 1
- 2
- 3
- 4
- 5
- 6
- 7
- 8
- 9
- 10
- 11
- 12
- 13
- 14
- 15
- 16
- 17
- 18
- 19
04. 参考示例
4.1 修改文件所属者和所属组为tom
[root@itcast test]# ls -l file
-rwxr-x--x 1 deng deng 0 8月   6 20:06 file
[root@itcast test]# chown tom:tom file
[root@itcast test]# ls -l file
-rwxr-x--x 1 tom tom 0 8月   6 20:06 file
[root@itcast test]#
- 1
- 2
- 3
- 4
- 5
- 6
4.2 修改文件所属者为deng用户
[root@itcast test]# chown deng file
[root@itcast test]# ls -l file
-rwxr-x--x 1 deng tom 0 8月   6 20:06 file
[root@itcast test]#
- 1
- 2
- 3
- 4
4.3 修改文件所属者为deng用户和所属组为itcast组
[root@itcast test]# chown deng:itcast file
[root@itcast test]# ls -l file
-rwxr-x--x 1 deng itcast 0 8月   6 20:06 file
[root@itcast test]#
- 1
- 2
- 3
- 4
4.4 修改文件所属组为tom组
[root@itcast test]# chown :tom file
[root@itcast test]# ls -l file
-rwxr-x--x 1 deng tom 0 8月   6 20:06 file
[root@itcast test]#
- 1
- 2
- 3
- 4
4.5 递归修改所有的文件及子目录所属者和所属组
[root@itcast test]# chown -R deng:deng test/
- 1
4.6 显示修改动作
[root@itcast test]# chown -c root:root file
changed ownership of "file" from deng:tom to root:root
[root@itcast test]#
- 1
- 2
- 3
或者
[root@itcast test]# chown -v deng:deng file
changed ownership of "file" from root:root to deng:deng
[root@itcast test]#
- 1
- 2
- 3
4.7 修改文件所属者和所属组
[root@itcast test]# chown 1002:1003 file
[root@itcast test]# ls -l file
-rwxr-x--x 1 itcast itcast 0 8月   6 20:06 file
[root@itcast test]#
- 1
- 2
- 3
- 4
注意:1002和1003必须是存在的用户和用户组。
4.8 修改文件所属组
[root@itcast test]# chown .deng file
[root@itcast test]# ls -l file
-rwxr-x--x 1 itcast deng 0 8月   6 20:06 file
[root@itcast test]#
- 1
- 2
- 3
- 4
注意:组用户名deng前面有一个点。
05. 总结
06. 附录
在熟悉下OpenHarmony鸿蒙轻内核提供的虚拟内存(Virtual memory)管理模块之前,作为预备基础知识,我们先了解下虚拟内存进程空间编号,进程空间编号功能相对独立,源代码文件单独维护。涉及的头文件和C源代码文件分别为arch/arm/arm/include/los_asid.h和arch/arm/arm/src/los_asid.c。本文先介绍OpenHarmony鸿蒙轻内核LiteOS-A的虚拟地址空间编号知识,然后详细分析进程空间编号的申请与释放操作。
1. 地址空间编号数组
虚拟内存地址空间编号取值范围为[0,255],256个编号对应8位数值。为了记录256个进程地址空间编号的使用状态需要256个比特位来维护。下述代码中位图字数BITMAP_NUM_WORDS(1UL << MMU_ARM_ASID_BITS)等于8,即地址空间编号数组的大小为8,每个位图字32位,正好对应256个比特位。
#define MMU_ARM_ASID_BITS           8
......
STATIC UINTPTR g_asidPool[BITMAP_NUM_WORDS(1UL << MMU_ARM_ASID_BITS)];
 class="hljs-button signin active" data-title="登录复制" data-report-click="{"spm":"1001.2101.3001.4334"}">


 class="blog_extension_card_cont">


评论记录:
回复评论: