测试
yxml库测试步骤与double-conversion库基本一致,可参考CMake方式组织编译的库移植的测试过程,以下内容介绍yxml库测试用例的使用方法:
表3 生成的test目录结构示意
class="table-box">
| 名称 | 描述 |
|---|
| OpenHarmony/third_party/yxml/yxml/out/test/test.sh | 自动化测试脚本,由于OpenHarmony不支持脚本运行,因此无法使用,可参考其内容手动测试 |
| OpenHarmony/third_party/yxml/yxml/out/test/test | 用于测试的可执行文件 |
| OpenHarmony/third_party/yxml/yxml/out/test/*.xml | 测试输入文件 |
| OpenHarmony/third_party/yxml/yxml/out/test/*.out | 期望的输出文件 |
test.sh内容如下所示:
#!/bin/sh
for i in *.xml; do
  b=`basename $i .xml`
  o=${b}.out
  t=${b}.test
  ./test <$i >$t
  if [ -n "`diff -q $o $t`" ]; then
    echo "Test failed for $i:"
    diff -u $o $t
    exit 1
  fi
done
echo "All tests completed successfully."
 class="hljs-button signin active" data-title="登录复制" data-report-click="{"spm":"1001.2101.3001.4334"}">
由于OpenHarmony的shell中暂不支持输入输出重定向(<和>),所以测试时需要将输入*.xml文件内容直接复制进shell后回车,输出内容会直接展示在shell窗口。过程如下:
下列操作假定已按照2.4节的步骤搭建OpenHarmony,挂载并进入nfs目录:
-
执行下列命令
./test

 class="hljs-button signin active" data-title="登录复制" data-report-click="{"spm":"1001.2101.3001.4334"}">
-
复制*.xml内容到shell 以表3test目录下pi01.xml为例,内容如下,输入到shell并回车:
class="hljs-button signin active" data-title="登录复制" data-report-click="{"spm":"1001.2101.3001.4334"}">
class="hljs-button signin active" data-title="登录复制" data-report-click="{"spm":"1001.2101.3001.4334"}">
- 比较shell中输出的内容与表3test目录中对应的*.out文件是否一致 输出结果如下:
    pistart SomePI
    picontent abc
    piend
    elemstart a
    elemend
    ok
 class="hljs-button signin active" data-title="登录复制" data-report-click="{"spm":"1001.2101.3001.4334"}">
经比较与表3test目录下pi01.out内容一致,测试通过。
将该库编译添加到OpenHarmony工程中
yxml库添加的过程除了适配文件build.gn和config.gni有些许变化外,其他和double-conversion库完全一致,参考CMake方式组织编译的库移植的配置过程。要修改的适配文件及添加后的目录结构如下:
import("config.gni")
group("yxml") {
    if (ohos_build_thirdparty_migrated_from_fuchisa == true) {
        deps = [":make"]
    }
}
if (ohos_build_thirdparty_migrated_from_fuchisa == true) {
    action("make") {
        script = "//third_party/yxml/build_thirdparty.py"
        outputs = ["$target_out_dir/log_yxml.txt"]
        exec_path = rebase_path(rebase_path("./yxml", root_build_dir))
        command = "make clean && $MAKE_COMMAND"
        args = [
            "--path=$exec_path",
            "--command=${command}"
        ]
    }
}
 class="hljs-button signin active" data-title="登录复制" data-report-click="{"spm":"1001.2101.3001.4334"}"> class="hide-preCode-box">
- 1
- 2
- 3
- 4
- 5
- 6
- 7
- 8
- 9
- 10
- 11
- 12
- 13
- 14
- 15
- 16
- 17
- 18
TEST_ENABLE = "YES"

if (TEST_ENABLE == "YES") {
    MAKE_COMMAND = "make test OHOS_SYSROOT_PATH=${root_out_dir}sysroot/"
} else {
    MAKE_COMMAND = "make OHOS_SYSROOT_PATH=${root_out_dir}sysroot/"
}

 class="hljs-button signin active" data-title="登录复制" data-report-click="{"spm":"1001.2101.3001.4334"}">
-
添加完成后目录结构示意:
表4 添加到工程后的目录结构
class="table-box">| 名称 | 描述 |
|---|
| OpenHarmony/third_party/yxml/BUILD.gn | 将三方库加入工程的gn适配文件 |
| OpenHarmony/third_party/yxml/build_thirdparty.py | GN调用shell命令脚本文件,由上面GN文件将相关命令传入,实现GN转Makefile |
| OpenHarmony/third_party/yxml/config.gni | 三方库编译配置文件,可修改该文件来配置用例是否参与构建等 |
| OpenHarmony/third_party/yxml/yxml/ | 要移植的三方库目录 |
如果大家想更加深入的学习 OpenHarmony(鸿蒙南向) 开发的全栈内容,不妨可以参考以下相关学习文档进行学习,助你快速提升自己:
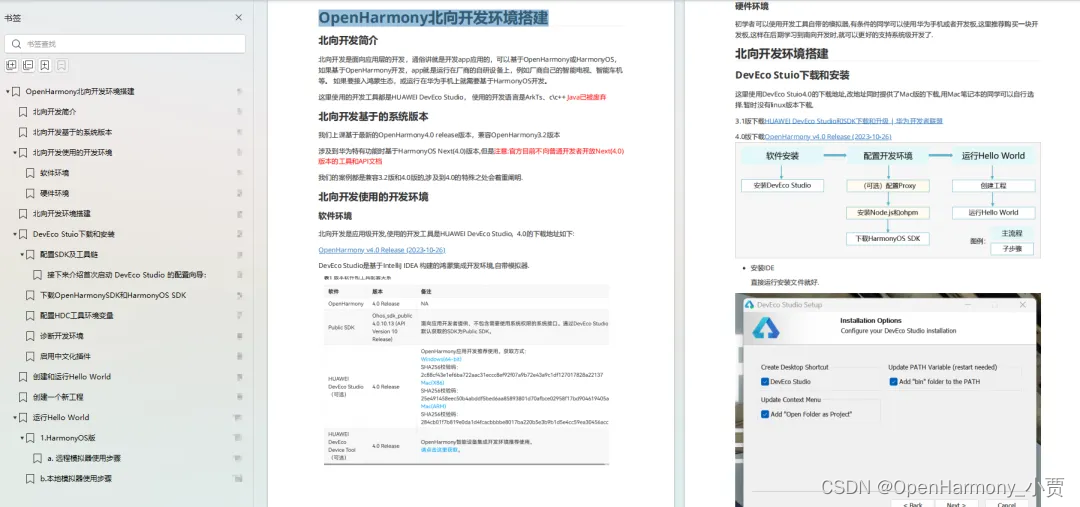
- 搭建开发环境
- Windows 开发环境的搭建
- Ubuntu 开发环境搭建
- Linux 与 Windows 之间的文件共享
- ……
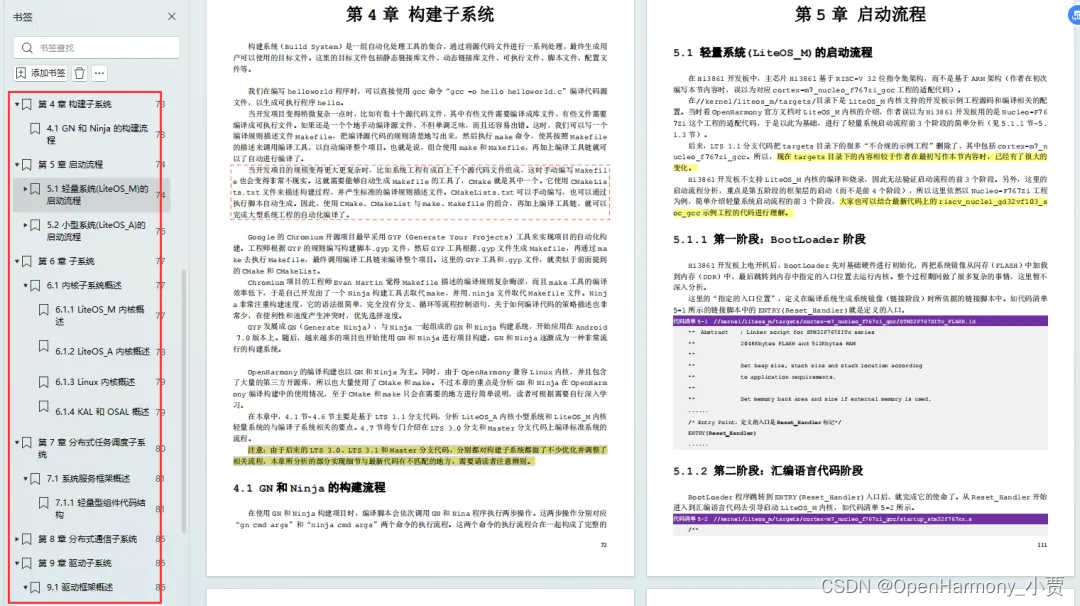
- 构建子系统
- 启动流程
- 子系统
- 分布式任务调度子系统
- 分布式通信子系统
- 驱动子系统
- ……

写在最后
- 如果你觉得这篇内容对你还蛮有帮助,我想邀请你帮我三个小忙:
- 点赞,转发,有你们的 『点赞和评论』,才是我创造的动力。
- 关注小编,同时可以期待后续文章ing🚀,不定期分享原创知识。
- 想要获取更多完整鸿蒙最新学习资源,请移步前往小编:
https://qr21.cn/FV7h05

data-report-view="{"mod":"1585297308_001","spm":"1001.2101.3001.6548","dest":"https://blog.csdn.net/maniuT/article/details/140845831","extend1":"pc","ab":"new"}">>
id="blogExtensionBox" style="width:400px;margin:auto;margin-top:12px" class="blog-extension-box"> class="blog_extension blog_extension_type2" id="blog_extension">
class="extension_official" data-report-click="{"spm":"1001.2101.3001.6471"}" data-report-view="{"spm":"1001.2101.3001.6471"}">
class="blog_extension_card_left">
 class="blog_extension_card_cont">
鸿蒙开发学习资料领取!!!
class="blog_extension_card_cont_r">
class="blog_extension_card_cont">
鸿蒙开发学习资料领取!!!
class="blog_extension_card_cont_r">
 微信名片
微信名片


评论记录:
回复评论: