
00. 目录
01. 命令概述
tree命令以树状图列出目录的内容。
02. 命令格式
tree [选项] [参数]
03. 常用选项
-a 显示所有文件和目录。
-A 使用ASNI绘图字符显示树状图而非以ASCII字符组合。
-C 在文件和目录清单加上色彩,便于区分各种类型。
-d 显示目录名称而非内容。
-D 列出文件或目录的更改时间。
-f 在每个文件或目录之前,显示完整的相对路径名称。
-F 在执行文件,目录,Socket,符号连接,管道名称名称,各自加上"*","/","=","@","|"号。
-g 列出文件或目录的所属群组名称,没有对应的名称时,则显示群组识别码。
-i 不以阶梯状列出文件或目录名称。
-I 不显示符合范本样式的文件或目录名称。
-l 如遇到性质为符号连接的目录,直接列出该连接所指向的原始目录。
-L 层级显示
-n 不在文件和目录清单加上色彩。
-N 直接列出文件和目录名称,包括控制字符。
-p 列出权限标示。
-P 只显示符合范本样式的文件或目录名称。
-q 用"?"号取代控制字符,列出文件和目录名称。
-s 列出文件或目录大小。
-t 用文件和目录的更改时间排序。
-u 列出文件或目录的拥有者名称,没有对应的名称时,则显示用户识别码。
-x 将范围局限在现行的文件系统中,若指定目录下的某些子目录,其存放于另一个文件系统上,则将该子目录予以排除在寻找范围外。

- 1
- 2
- 3
- 4
- 5
- 6
- 7
- 8
- 9
- 10
- 11
- 12
- 13
- 14
- 15
- 16
- 17
- 18
- 19
- 20
- 21
04. 参考示例
4.1 tree命令安装,Centos7.5为例
[deng@localhost test]$ yum install tree
- 1
4.2 以树状图列出目录的内容
[deng@localhost test]$ mkdir -p a/b/c/d
[deng@localhost test]$ tree a
a
└── b
    └── c
        └── d

3 directories, 0 files
[deng@localhost test]$
- 1
- 2
- 3
- 4
- 5
- 6
- 7
- 8
- 9
4.3 显示目录的内容的时候,指定级别
使用 tree -L n 命令,n 为数字,表示查看当前第 n 级的目录和文件。
//指定只显示一级文件和目录
[deng@localhost home]$ tree -L 1 /home
/home
├── deng
└── oracle

2 directories, 0 files
[deng@localhost home]$
- 1
- 2
- 3
- 4
- 5
- 6
- 7
- 8
//指定最多显示二级文件和目录
[deng@localhost home]$ tree -L 2 /home
/home
├── deng
│   ├── bak
│   ├── bj34
│   ├── instantclient_11_2
│   ├── oracle_client_11gR2.tar.gz
│   ├── oradiag_deng
│   ├── projects
│   ├── scott_data.sql
│   ├── share
│   ├── sz12
│   ├── test
│   ├── test.c
│   ├── test.cpp
│   ├── \345\205\254\345\205\261
│   ├── \346\250\241\346\235\277
│   ├── \350\247\206\351\242\221
│   ├── \345\233\276\347\211\207
│   ├── \346\226\207\346\241\243
│   ├── \344\270\213\350\275\275
│   ├── \351\237\263\344\271\220
│   └── \346\241\214\351\235\242
└── oracle [error opening dir]

18 directories, 4 files
[deng@localhost home]$
- 1
- 2
- 3
- 4
- 5
- 6
- 7
- 8
- 9
- 10
- 11
- 12
- 13
- 14
- 15
- 16
- 17
- 18
- 19
- 20
- 21
- 22
- 23
- 24
- 25
- 26
- 27
- 28
4.4 在每个文件或目录之前,显示完整的相对路径名称。
[deng@localhost test]$ tree -f
.
└── ./a
    └── ./a/b
        └── ./a/b/c
            └── ./a/b/c/d

4 directories, 0 files
[deng@localhost test]$
- 1
- 2
- 3
- 4
- 5
- 6
- 7
- 8
- 9
4.5 显示目录名称而非内容。
[deng@localhost test]$ tree -d /etc/systemd/
/etc/systemd/
├── system
│   ├── basic.target.wants
│   ├── bluetooth.target.wants
│   ├── default.target.wants
│   ├── dev-virtio\\x2dports-org.qemu.guest_agent.0.device.wants
│   ├── getty.target.wants
│   ├── graphical.target.wants
│   ├── local-fs.target.wants
│   ├── multi-user.target.wants
│   ├── network-online.target.wants
│   ├── printer.target.wants
│   ├── remote-fs.target.wants
│   ├── sockets.target.wants
│   ├── sysinit.target.wants
│   ├── system-update.target.wants
│   ├── timers.target.wants
│   └── vmtoolsd.service.requires
└── user

18 directories
[deng@localhost test]$
- 1
- 2
- 3
- 4
- 5
- 6
- 7
- 8
- 9
- 10
- 11
- 12
- 13
- 14
- 15
- 16
- 17
- 18
- 19
- 20
- 21
- 22
- 23
4.6 在文件和目录清单加上色彩,便于区分各种类型。
[deng@localhost ~]$ tree -C /home
- 1
4.7 列出文件或目录大小。
[deng@localhost test]$ tree -s a/
a/
└── [         15]  b
    └── [         15]  c
        └── [          6]  d

3 directories, 0 files
[deng@localhost test]$
- 1
- 2
- 3
- 4
- 5
- 6
- 7
- 8
05. 附录
概述
自定义组件中的变量被状态装饰器(@State,@Prop等)装饰后成为状态变量,而状态变量的改变会引起使用该变量的UI组件渲染刷新。状态变量的不合理使用可能会带来冗余刷新等性能问题。开发者可以使用状态变量组件定位工具获取状态管理相关信息,例如自定义组件拥有的状态变量、状态变量的同步对象和关联组件等,了解状态变量影响UI的范围,写出高性能应用代码。
本文将通过场景示例为开发者提供状态变量组件定位工具的实践指导,并对工具相关的调试命令和输出结果作解释说明。
使用流程
状态变量组件定位工具是通过使用HiDumper工具中特定的命令来获取组件和状态管理相关的信息。开发者可以使用工具查看指定自定义组件拥有的状态变量信息,了解其中各个状态变量影响的组件范围。
工具的使用流程可以分为以下几步:
1、设备上打开组件所在页面。
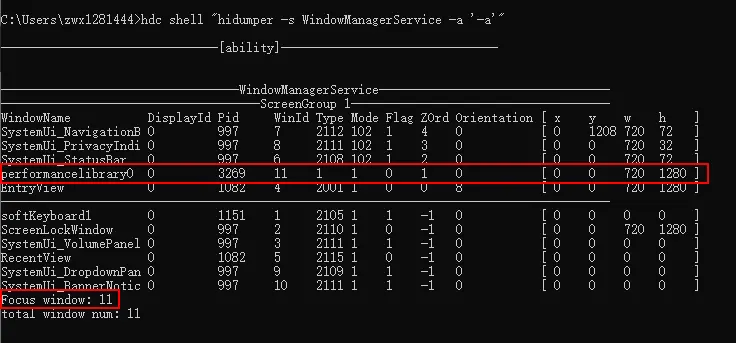
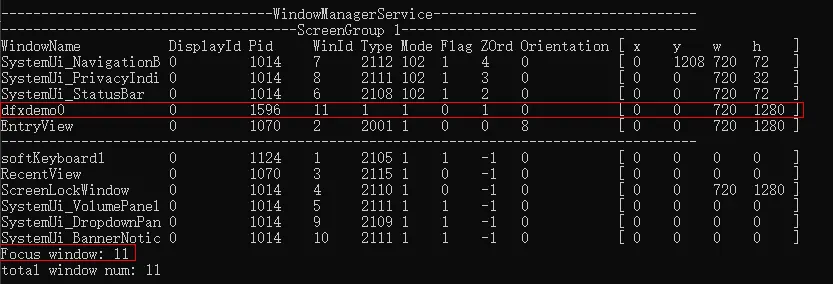
2、获取应用的窗口Id。
3、基于应用窗口Id获取应用的自定义组件树,找到目标组件和它的节点Id。
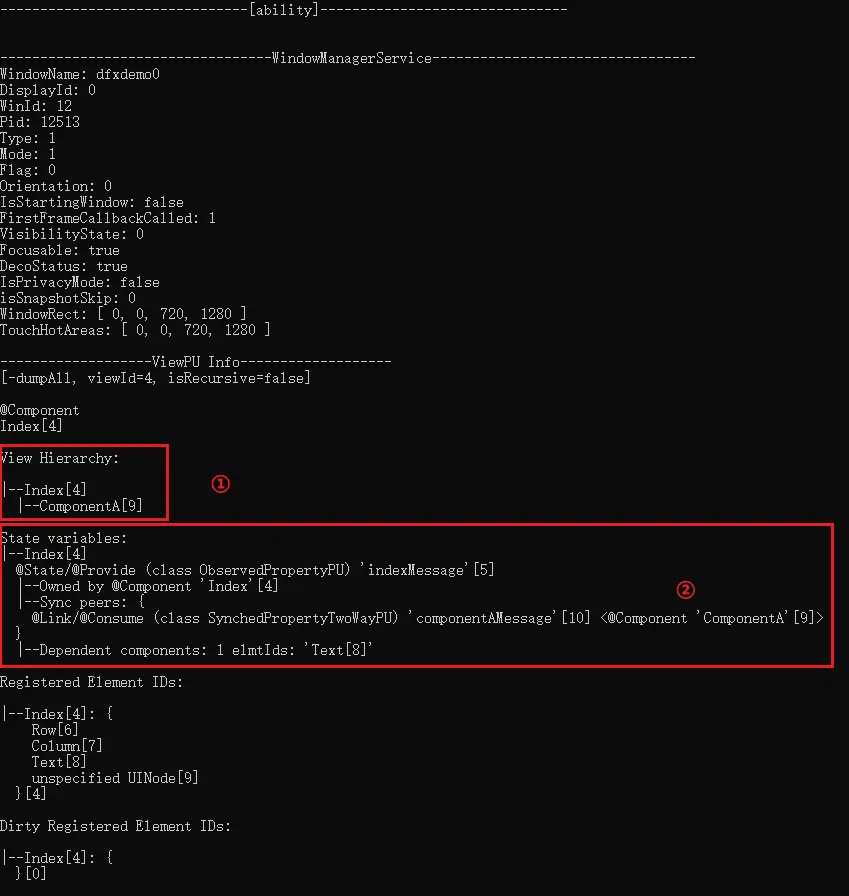
4、根据上一步获取的组件节点Id获取组件拥有的状态变量信息。
5、找到目标状态变量,查看它影响的组件范围。
在明确目标组件包含的状态变量和变量影响的组件刷新范围后,开发者可以根据需求分析是否存在状态变量的不合理使用,并对相应代码分析和优化。
场景示例
下面通过一个点击按钮更改状态变量引起组件刷新的场景示例,为开发者提供工具的实践指导。场景示例仅展示部分关键代码。
在以下代码中,创建了自定义组件ComponentA、SpecialImage,每个组件都拥有一些状态变量和UI组件。组件ComponentA中存在Move和Scale两个按钮,在按钮的点击回调中改变状态变量的值刷新相应的组件。
// 常量声明
// ...
// 样式属性类
class UIStyle {
  public translateX: number = 0;
  public translateY: number = 0;
  public scaleX: number = 0.3;
  public scaleY: number = 0.3;
}
@Component
struct ComponentA {
  @Link uiStyle: UIStyle; // uiStyle的属性被多个组件使用
  build() {
    Column() {
      // 使用状态变量的组件
      SpecialImage({ specialImageUiStyle: this.uiStyle })
      Stack() {
        Column() {
          Image($r('app.media.icon'))
            .scale({
              x: this.uiStyle.scaleX,
              y: this.uiStyle.scaleY
            })
        }
        Stack() {
          Text('Hello World')
        }
      }
      .translate({
        x: this.uiStyle.translateX,
        y: this.uiStyle.translateY
      })

      // 通过按钮点击回调修改状态变量的值,引起相应的组件刷新
      Column() {
        Button('Move')
          .onClick(() => {
            animateTo({ duration: animationDuration }, () => {
              this.uiStyle.translateY = (this.uiStyle.translateY + translateYChangeValue) % translateYChangeRange;
            })
          })
        Button('Scale')
          .onClick(() => {
            this.uiStyle.scaleX = (this.uiStyle.scaleX + scaleXChangeValue) % scaleXChangeRange;
          })
      }
    }
  }
}
@Component
struct SpecialImage {
  @Link specialImageUiStyle: UIStyle;
  private opacityNum: number = 0.5; // 默认透明度
  private isRenderSpecialImage(): number {
    // Image每次渲染时透明度增加0.1, 在0-1之间循环
    this.opacityNum = (this.opacityNum + opacityChangeValue) % opacityChangeRange;
    return this.opacityNum;
  }
  build() {
    Column() {
      Image($r('app.media.icon'))
        .scale({
          x: this.specialImageUiStyle.scaleX,
          y: this.specialImageUiStyle.scaleY
        })
        .opacity(this.isRenderSpecialImage())
      Text("SpecialImage")
    }
  }
}
// 页面根组件,ComponentA的父组件
 class="hljs-button signin active" data-title="登录复制" data-report-click="{"spm":"1001.2101.3001.4334"}">


 class="blog_extension_card_cont">


评论记录:
回复评论: