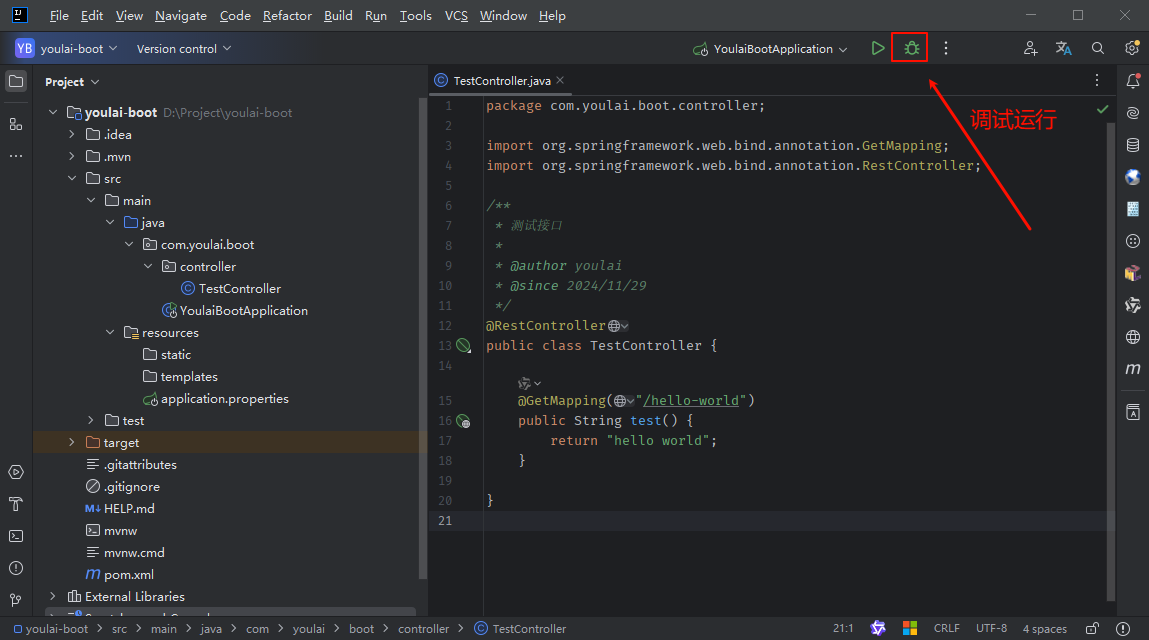
在项目的右上角,点击 🐞 (手动绿色)图标以调试运行项目。
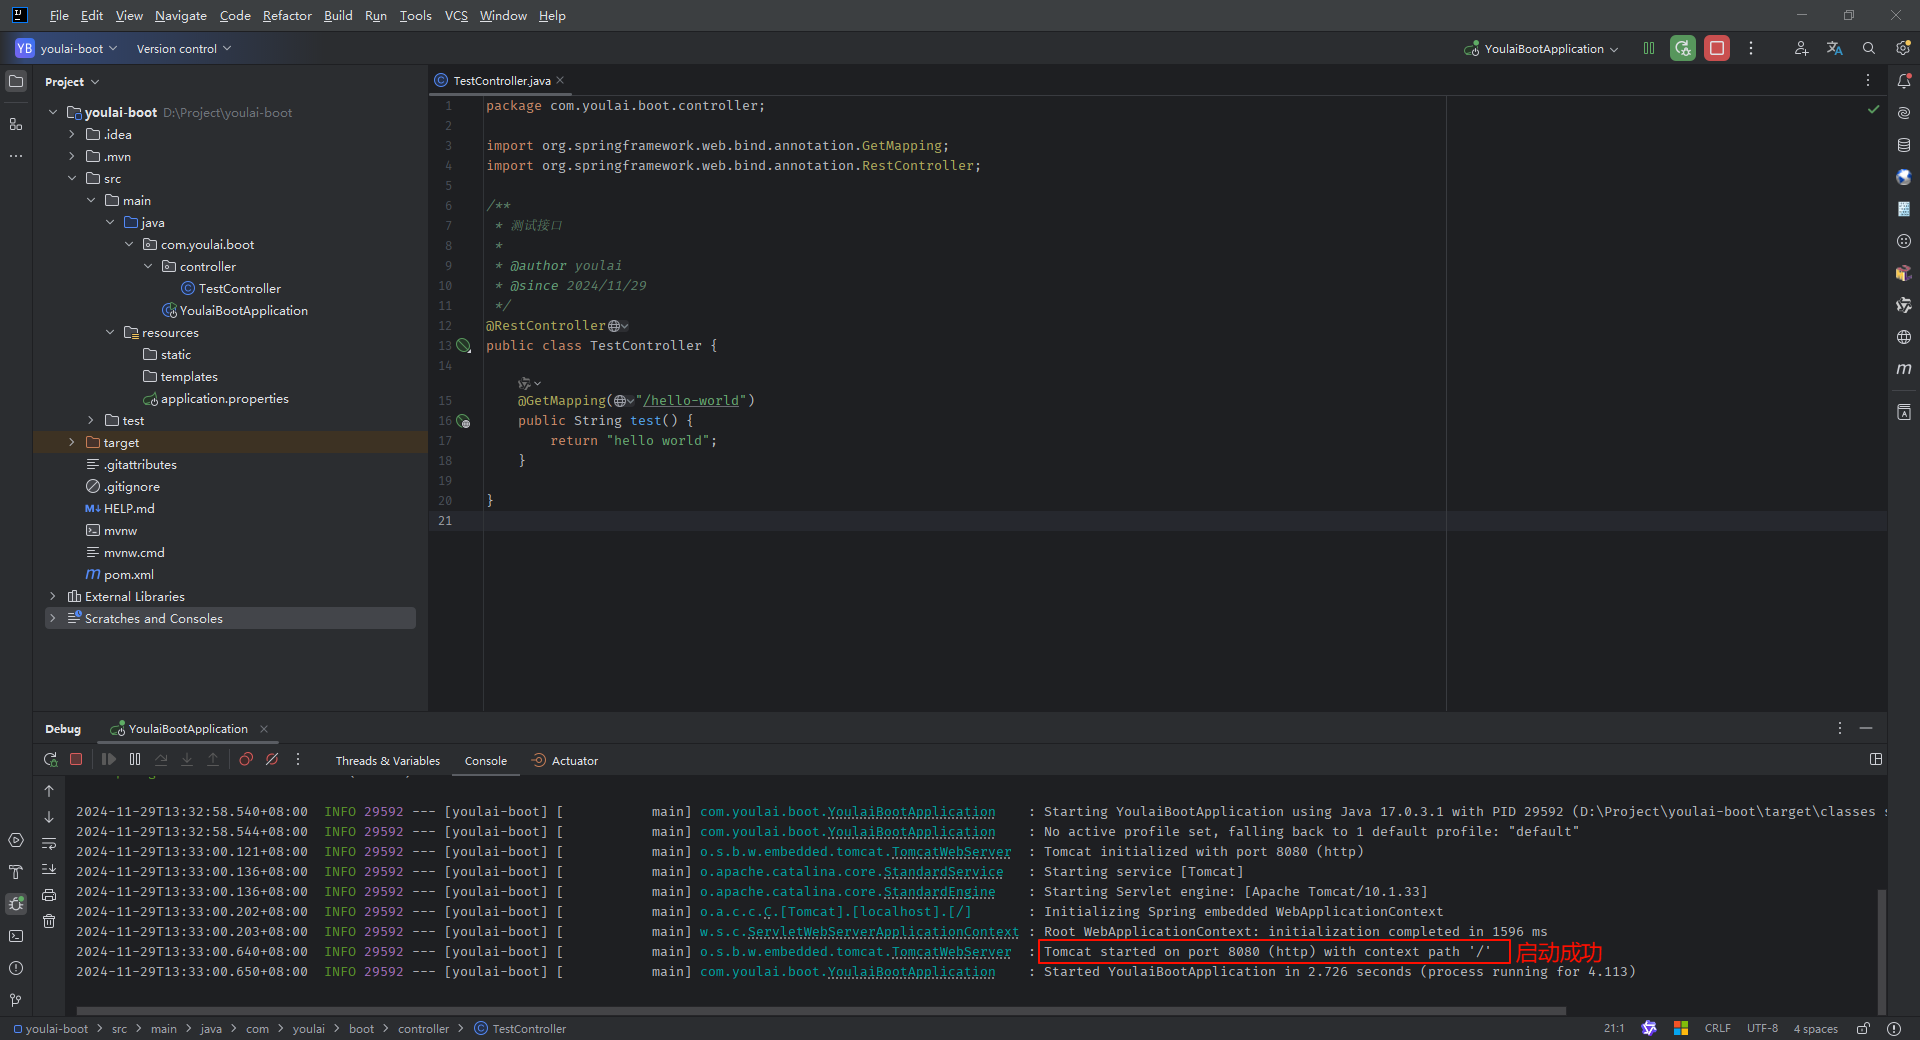
控制台显示 Tomcat 已在端口 8080 (http) ,表示应用成功启动
打开浏览器,访问 http://localhost:8080/hello-world,页面将显示 hello world,表示接口正常运行。
为实现应用与 MySQL 的连接与操作,整合 MyBatis-Plus 可简化数据库操作,减少重复的 CRUD 代码,提升开发效率,实现高效、简洁、可维护的持久层开发。
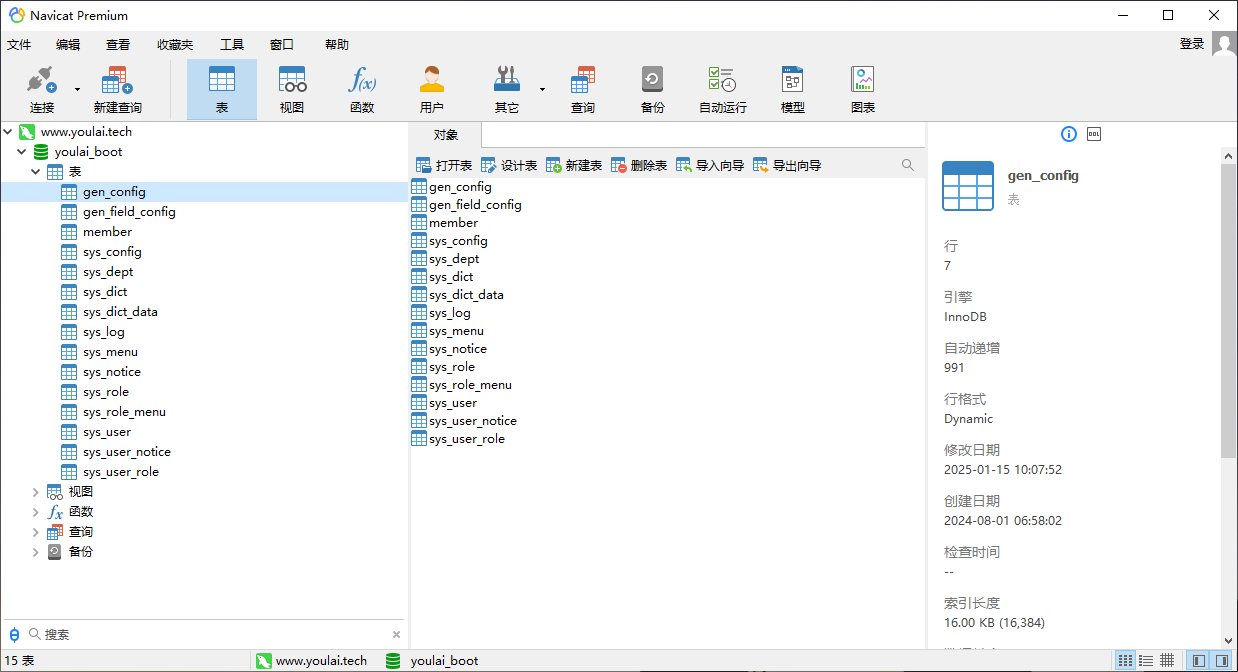
使用 MySQL 可视化工具 (Navicat) 执行下面脚本完成数据库的创建名为 youlai-boot 的数据库,其中包含测试的用户表
CREATE DATABASE IF NOT EXISTS youlai_boot DEFAULT CHARACTER SET utf8mb4 DEFAULT COLLATE utf8mb4_general_ci;
use youlai_boot;
DROP TABLE IF EXISTS ` sys_user` ;
CREATE TABLE ` sys_user` (
` id` int NOT NULL AUTO_INCREMENT ,
` username` varchar ( 64 ) NULL DEFAULT NULL COMMENT '用户名' ,
` nickname` varchar ( 64 ) NULL DEFAULT NULL COMMENT '昵称' ,
` gender` tinyint ( 1 ) NULL DEFAULT 1 COMMENT '性别(1-男 2-女 0-保密)' ,
` password` varchar ( 100 ) NULL DEFAULT NULL COMMENT '密码' ,
` dept_id` int NULL DEFAULT NULL COMMENT '部门ID' ,
` avatar` varchar ( 255 ) NULL DEFAULT '' COMMENT '用户头像' ,
` mobile` varchar ( 20 ) NULL DEFAULT NULL COMMENT '联系方式' ,
` status` tinyint ( 1 ) NULL DEFAULT 1 COMMENT '状态(1-正常 0-禁用)' ,
` email` varchar ( 128 ) NULL DEFAULT NULL COMMENT '用户邮箱' ,
` create_time` datetime NULL DEFAULT NULL COMMENT '创建时间' ,
` create_by` bigint NULL DEFAULT NULL COMMENT '创建人ID' ,
` update_time` datetime NULL DEFAULT NULL COMMENT '更新时间' ,
` update_by` bigint NULL DEFAULT NULL COMMENT '修改人ID' ,
` is_deleted` tinyint ( 1 ) NULL DEFAULT 0 COMMENT '逻辑删除标识(0-未删除 1-已删除)' ,
PRIMARY KEY ( ` id` ) USING BTREE
) ENGINE = InnoDB CHARACTER SET = utf8mb4 COLLATE = utf8mb4_general_ci COMMENT = '用户表' ROW_FORMAT = DYNAMIC;
INSERT INTO ` sys_user` VALUES ( 1 , 'root' , '有来技术' , 0 , '$2a$10$xVWsNOhHrCxh5UbpCE7/HuJ.PAOKcYAqRxD2CO2nVnJS.IAXkr5aq' , NULL , 'https://foruda.gitee.com/images/1723603502796844527/03cdca2a_716974.gif' , '18866668888' , 1 , '[email protected] ' , NULL , NULL , NULL , NULL , 0 ) ;
INSERT INTO ` sys_user` VALUES ( 2 , 'admin' , '系统管理员' , 1 , '$2a$10$xVWsNOhHrCxh5UbpCE7/HuJ.PAOKcYAqRxD2CO2nVnJS.IAXkr5aq' , 1 , 'https://foruda.gitee.com/images/1723603502796844527/03cdca2a_716974.gif' , '18866668887' , 1 , '' , now ( ) , NULL , now ( ) , NULL , 0 ) ;
INSERT INTO ` sys_user` VALUES ( 3 , 'websocket' , '测试小用户' , 1 , '$2a$10$xVWsNOhHrCxh5UbpCE7/HuJ.PAOKcYAqRxD2CO2nVnJS.IAXkr5aq' , 3 , 'https://foruda.gitee.com/images/1723603502796844527/03cdca2a_716974.gif' , '18866668886' , 1 , '[email protected] ' , now ( ) , NULL , now ( ) , NULL , 0 ) ;
class="hljs-button signin active" data-title="登录复制" data-report-click="{"spm":"1001.2101.3001.4334"}"> 1 2 3 4 5 6 7 8 9 10 11 12 13 14 15 16 17 18 19 20 21 22 23 24 25 26 27 28 29 30 31 32 33 34 35 36 37 38 39 40 项目 pom.xml 添加 MySQL 驱动和 Mybatis-Plus 依赖:
< dependency> < groupId> groupId > < artifactId> artifactId > < version> version > < scope> scope > dependency > < dependency> < groupId> groupId > < artifactId> artifactId > < version> version > dependency > < dependency> < groupId> groupId > < artifactId> artifactId > < version> version > dependency > 1 2 3 4 5 6 7 8 9 10 11 12 13 14 15 16 17 18 19 20 21 将 src/main/resources/application.properties 文件修改为 src/main/resources/application.yml,因为我们更倾向于使用 yml 格式。然后,在 yml 文件中添加以下内容:
server :
port : 8080
spring :
datasource :
driver-class-name : com.mysql.cj.jdbc.Driver
url : jdbc: mysql: //localhost: 3306/youlai_boot? useSSL=false&serverTimezone=Asia/Shanghai&&characterEncoding=utf8
username : root
password : 123456
mybatis-plus :
configuration :
map-underscore-to-camel-case : true
log-impl : org.apache.ibatis.logging.stdout.StdOutImpl
global-config :
db-config :
id-type : auto
logic-delete-field : is_deleted
class="hljs-button signin active" data-title="登录复制" data-report-click="{"spm":"1001.2101.3001.4334"}">1 2 3 4 5 6 7 8 9 10 11 12 13 14 15 16 17 18 19 20 在 IDEA 中依次点击 File → Settings (快捷键 Ctrl + Alt + S ),打开设置面板,切换到 Plugins 选项卡,搜索 MybatisX 并安装插件。
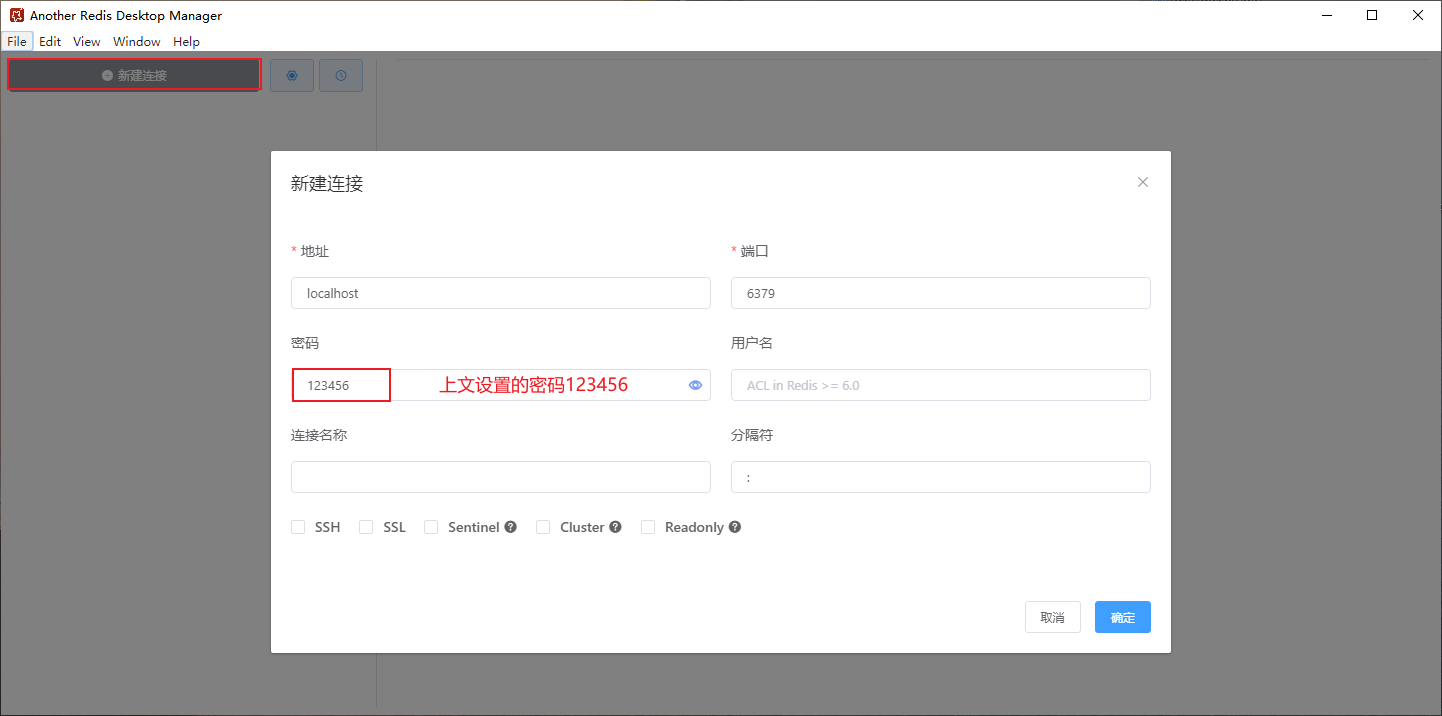
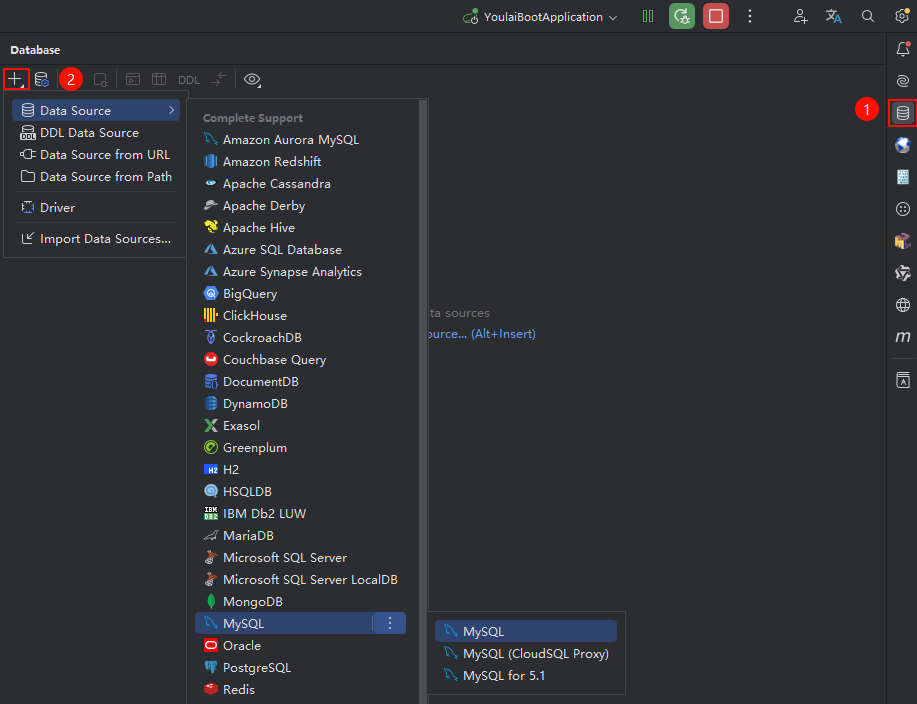
在 IDEA 右侧导航栏点击 Database ,打开数据库配置面板,选择新增数据源。
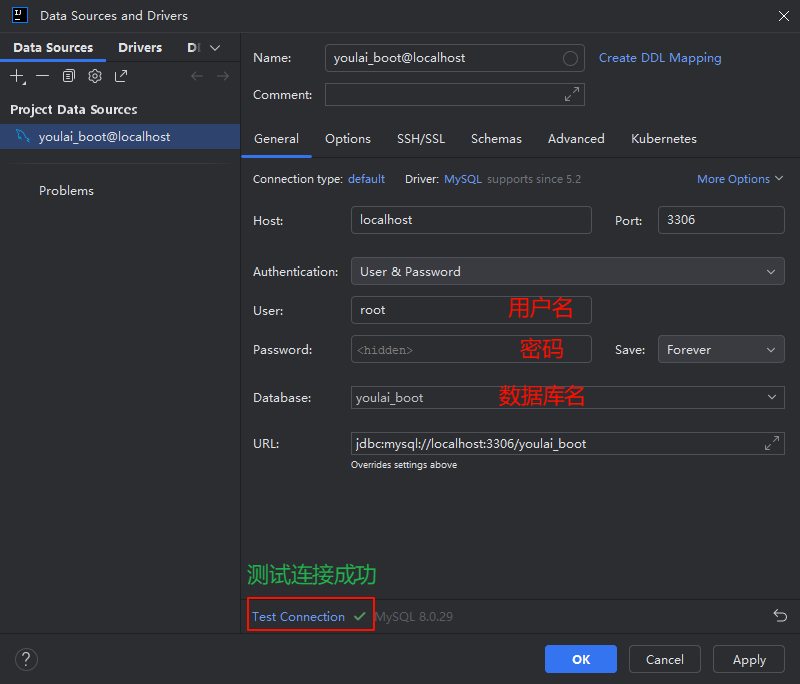
输入数据库的 主机地址 、用户名 和 密码 ,测试连接成功后点击 OK 保存。
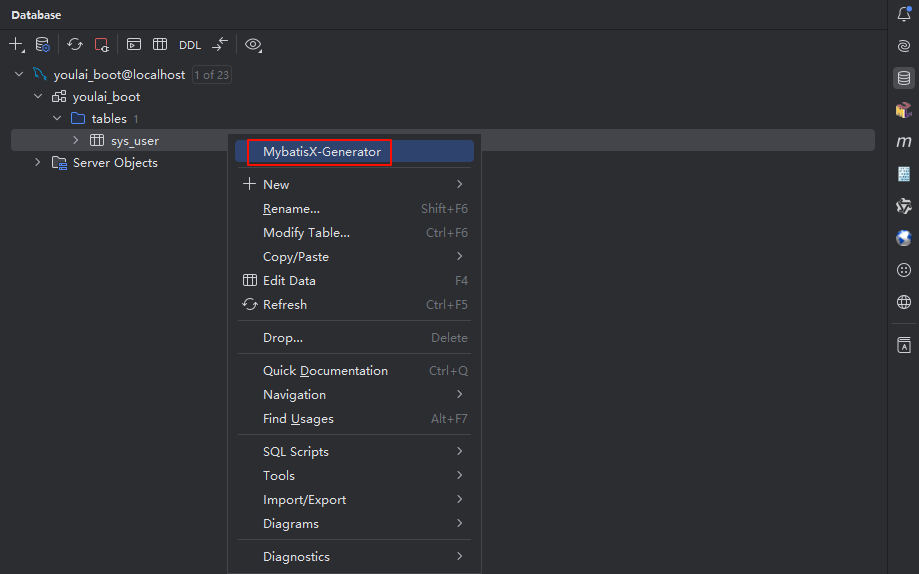
配置完数据源后,展开数据库中的表,右击 sys_user 表,选择 MybatisX-Generator 打开代码生成面板。
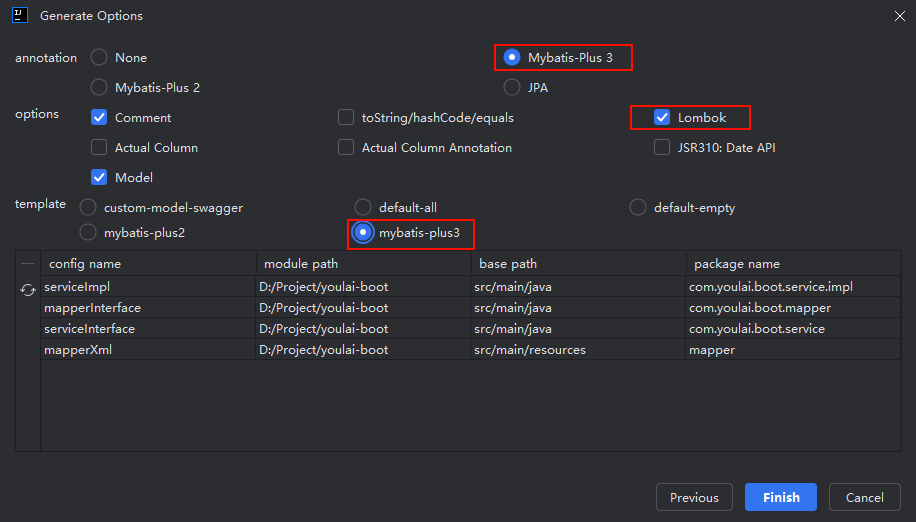
设置代码生成的目标路径,并选择 Mybatis-Plus 3 + Lombok 代码风格。
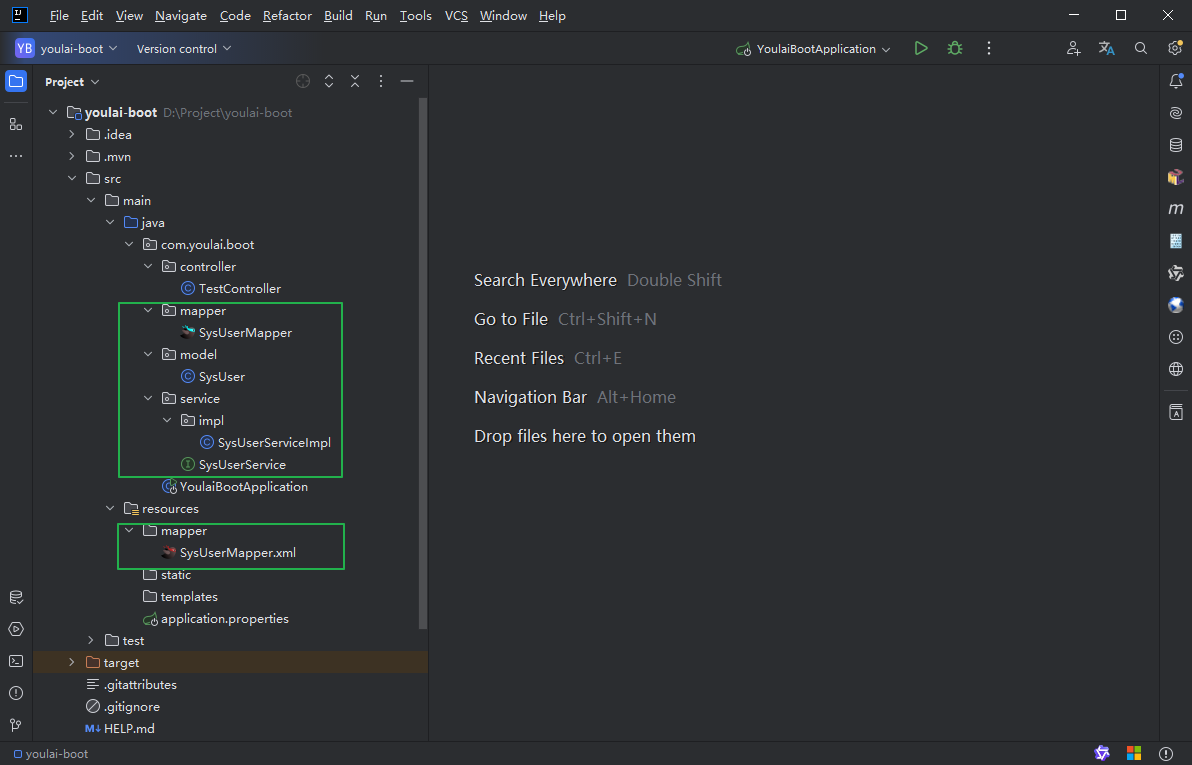
点击 Finish 生成,自动生成相关代码。
MybatisX 生成的代码存在以下问题:
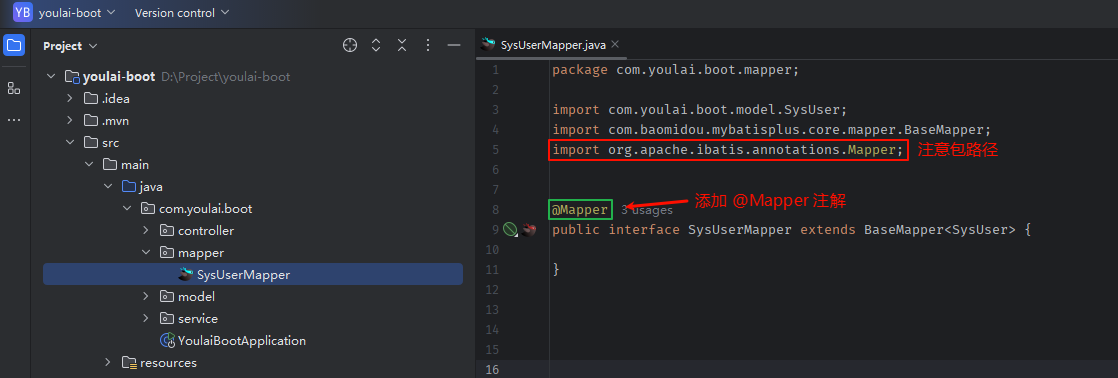
SysUserMapper.java 文件未标注 @Mapper 注解,导致无法被 Spring Boot 识别为 Mybatis 的 Mapper 接口。如果已配置 @MapperScan,可以省略此注解,但最简单的方法是直接在 SysUserMapper.java 文件中添加 @Mapper 注解。注意避免导入错误的包。
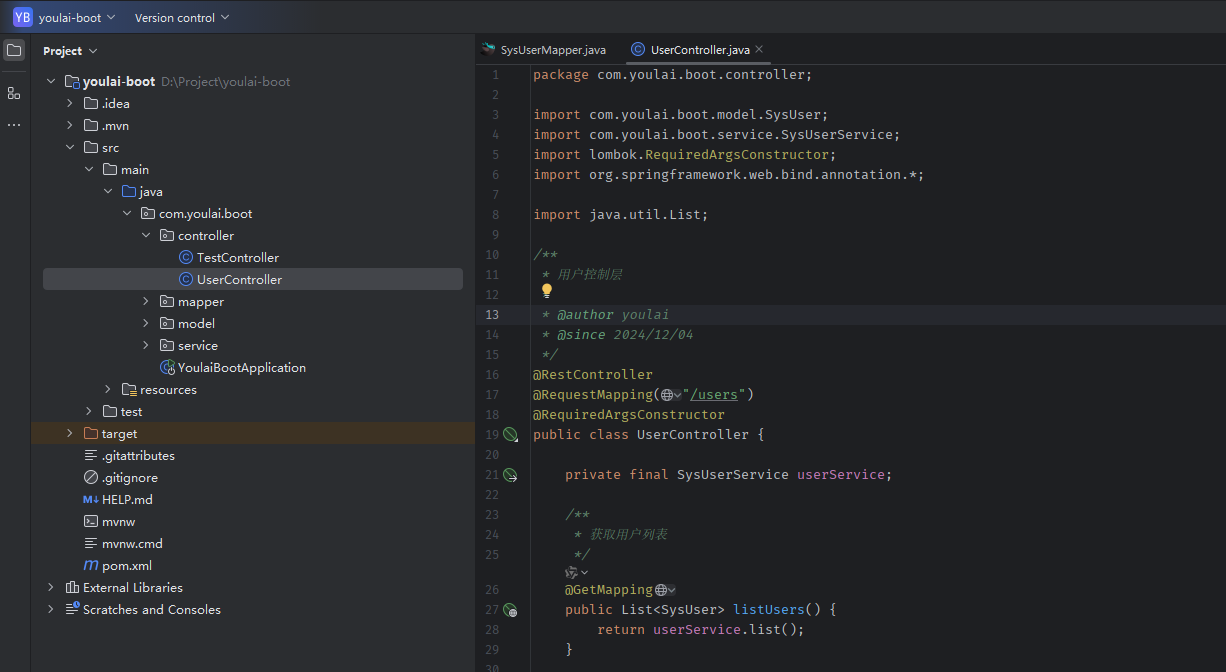
在 controller 包下创建 UserController.java,编写用户管理接口:
@RestController
@RequestMapping ( "/users" )
@RequiredArgsConstructor
public class UserController {
private final SysUserService userService;
@GetMapping
public List < SysUser > listUsers ( ) {
return userService. list ( ) ;
}
@GetMapping ( "/{id}" )
public SysUser getUserById ( @PathVariable Long id) {
return userService. getById ( id) ;
}
@PostMapping
public String createUser ( @RequestBody SysUser user) {
userService. save ( user) ;
return "用户创建成功" ;
}
@PutMapping ( "/{id}" )
public String updateUser ( @PathVariable Long id, @RequestBody SysUser user) {
userService. updateById ( user) ;
return "用户更新成功" ;
}
@DeleteMapping ( "/{id}" )
public String deleteUser ( @PathVariable Long id) {
userService. removeById ( id) ;
return "用户删除成功" ;
}
}
class="hljs-button signin active" data-title="登录复制" data-report-click="{"spm":"1001.2101.3001.4334"}">1 2 3 4 5 6 7 8 9 10 11 12 13 14 15 16 17 18 19 20 21 22 23 24 25 26 27 28 29 30 31 32 33 34 35 36 37 38 39 40 41 42 43 44 45 46 47 48 49 50 51 52 53 54 55 56 57 58
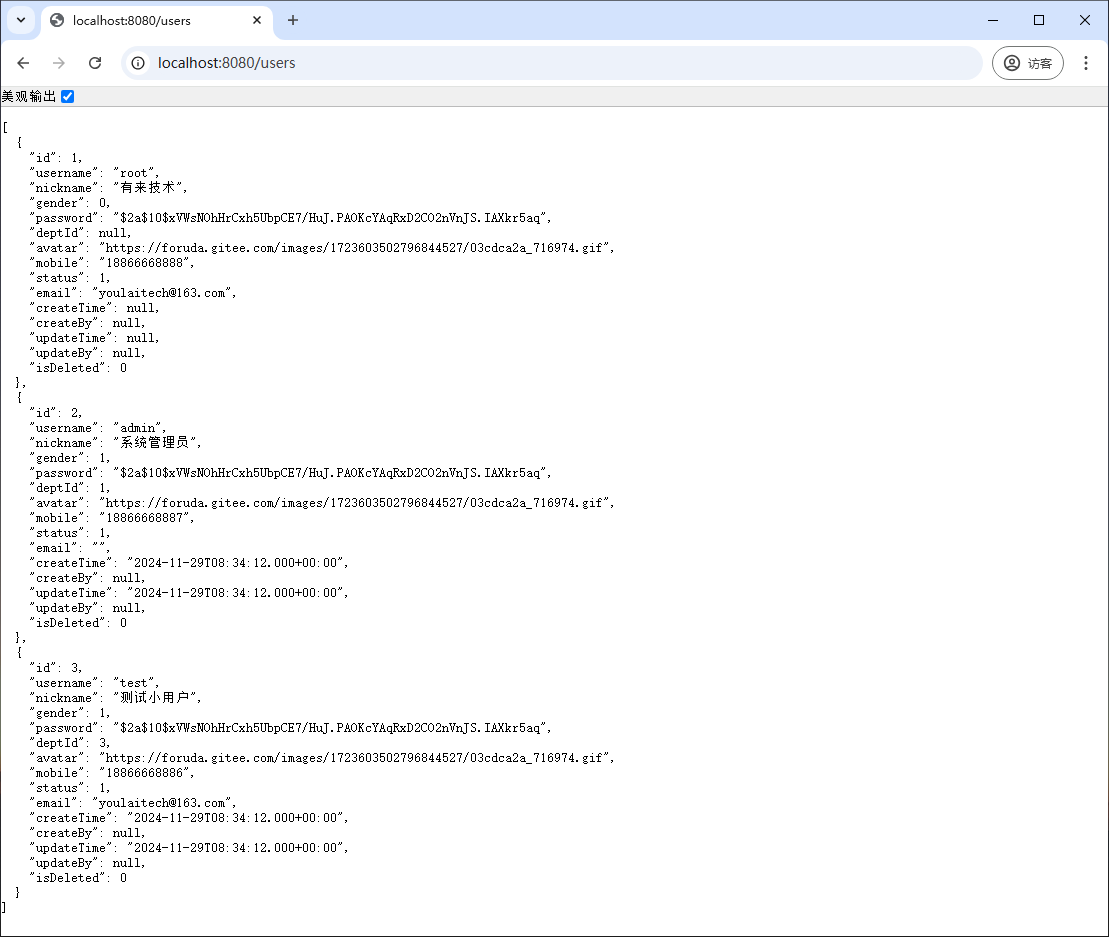
重新启动应用,在浏览器中访问 http://localhost:8080/users,查看用户数据。
其他增删改接口可以通过后续整合接口文档进行测试。
Knife4j 是基于 Swagger2 和 OpenAPI3 的增强解决方案,旨在提供更友好的界面和更多功能扩展,帮助开发者更便捷地调试和测试 API。以下是通过参考 Knife4j 官方文档 Spring Boot 3 整合 Knife4j 实现集成的过程。
在 pom.xml 文件中引入 Knife4j 的依赖:
< dependency> < groupId> groupId > < artifactId> artifactId > < version> version > dependency > 在 application.yml 文件中进行配置。注意,packages-to-scan 需要配置为项目的包路径,以确保接口能够被正确扫描,其他配置保持默认即可。
springdoc :
swagger-ui :
path : /swagger- ui.html
tags-sorter : alpha
operations-sorter : alpha
api-docs :
path : /v3/api- docs
group-configs :
- group : 'default'
paths-to-match : '/**'
packages-to-scan : com.youlai.boot.controller
knife4j :
enable : true
production : false
setting :
language : zh_cn
class="hljs-button signin active" data-title="登录复制" data-report-click="{"spm":"1001.2101.3001.4334"}">1 2 3 4 5 6 7 8 9 10 11 12 13 14 15 16 17 18 19 添加接口文档配置,在 com.youlai.boot.config 添加 OpenApiConfig 接口文档配置
package com. youlai. boot. config ;
import io. swagger. v3. oas. models. Components ;
import io. swagger. v3. oas. models. OpenAPI ;
import io. swagger. v3. oas. models. info. Info ;
import io. swagger. v3. oas. models. security. SecurityRequirement ;
import io. swagger. v3. oas. models. security. SecurityScheme ;
import lombok. RequiredArgsConstructor ;
import lombok. extern. slf4j. Slf4j ;
import org. springdoc. core. customizers. GlobalOpenApiCustomizer ;
import org. springframework. context. annotation. Bean ;
import org. springframework. context. annotation. Configuration ;
import org. springframework. core. env. Environment ;
import org. springframework. http. HttpHeaders ;
@Configuration
@RequiredArgsConstructor
@Slf4j
public class OpenApiConfig {
private final Environment environment;
@Bean
public OpenAPI openApi ( ) {
String appVersion = environment. getProperty ( "project.version" , "1.0.0" ) ;
return new OpenAPI ( )
. info ( new Info ( )
. title ( "系统接口文档" )
. version ( appVersion)
)
. components ( new Components ( )
. addSecuritySchemes ( HttpHeaders . AUTHORIZATION ,
new SecurityScheme ( )
. name ( HttpHeaders . AUTHORIZATION )
. type ( SecurityScheme. Type . APIKEY )
. in ( SecurityScheme. In . HEADER )
. scheme ( "Bearer" )
. bearerFormat ( "JWT" )
)
) ;
}
@Bean
public GlobalOpenApiCustomizer globalOpenApiCustomizer ( ) {
return openApi -> {
if ( openApi. getPaths ( ) != null ) {
openApi. getPaths ( ) . forEach ( ( s, pathItem) -> {
if ( "/api/v1/auth/login" . equals ( s) ) {
return ;
}
pathItem. readOperations ( )
. forEach ( operation ->
operation. addSecurityItem ( new SecurityRequirement ( ) . addList ( HttpHeaders . AUTHORIZATION ) )
) ;
} ) ;
}
} ;
}
}
class="hljs-button signin active" data-title="登录复制" data-report-click="{"spm":"1001.2101.3001.4334"}">1 2 3 4 5 6 7 8 9 10 11 12 13 14 15 16 17 18 19 20 21 22 23 24 25 26 27 28 29 30 31 32 33 34 35 36 37 38 39 40 41 42 43 44 45 46 47 48 49 50 51 52 53 54 55 56 57 58 59 60 61 62 63 64 65 66 67 68 69 70 71 72 73 74 75 76 77 78 79 80 81 82 完善接口描述
在已有的 REST 接口中,使用 OpenAPI 规范注解来描述接口的详细信息,以便通过 Knife4j 生成更加清晰的接口文档。以下是如何为用户的增删改查接口添加文档描述注解的示例:
@Tag ( name = "用户接口" )
@RestController
@RequestMapping ( "/users" )
@RequiredArgsConstructor
public class UserController {
private final SysUserService userService;
@Operation ( summary = "获取用户列表" )
@GetMapping
public List < SysUser > listUsers ( ) {
return userService. list ( ) ;
}
@Operation ( summary = "获取用户详情" )
@GetMapping ( "/{id}" )
public SysUser getUserById (
@Parameter ( description = "用户ID" ) @PathVariable Long id
) {
return userService. getById ( id) ;
}
@Operation ( summary = "新增用户" )
@PostMapping
public String createUser ( @RequestBody SysUser user) {
userService. save ( user) ;
return "新增用户成功" ;
}
@Operation ( summary = "修改用户" )
@PutMapping ( "/{id}" )
public String updateUser (
@Parameter ( description = "用户ID" ) @PathVariable Long id,
@RequestBody SysUser user
) {
userService. updateById ( user) ;
return "修改用户成功" ;
}
@Operation ( summary = "删除用户" )
@DeleteMapping ( "/{id}" )
public String deleteUser (
@Parameter ( description = "用户ID" ) @PathVariable Long id
) {
userService. removeById ( id) ;
return "用户删除成功" ;
}
}
class="hljs-button signin active" data-title="登录复制" data-report-click="{"spm":"1001.2101.3001.4334"}">1 2 3 4 5 6 7 8 9 10 11 12 13 14 15 16 17 18 19 20 21 22 23 24 25 26 27 28 29 30 31 32 33 34 35 36 37 38 39 40 41 42 43 44 45 46 47 48 49 完善实体类描述
在 SysUser 实体类中为每个字段添加 @Schema 注解,用于在接口文档中显示字段的详细说明及示例值:
@Schema ( description = "用户对象" )
@TableName ( value = "sys_user" )
@Data
public class SysUser implements Serializable {
@Schema ( description = "用户ID" , example = "1" )
@TableId ( type = IdType . AUTO )
private Integer id;
@Schema ( description = "用户名" , example = "admin" )
private String username;
@Schema ( description = "昵称" , example = "管理员" )
private String nickname;
@Schema ( description = "性别(1-男,2-女,0-保密)" , example = "1" )
private Integer gender;
@Schema ( description = "用户头像URL" , example = "https://example.com/avatar.png" )
private String avatar;
@Schema ( description = "联系方式" , example = "13800000000" )
private String mobile;
@Schema ( description = "用户邮箱" , example = "[email protected] " )
private String email;
}
class="hljs-button signin active" data-title="登录复制" data-report-click="{"spm":"1001.2101.3001.4334"}">1 2 3 4 5 6 7 8 9 10 11 12 13 14 15 16 17 18 19 20 21 22 23 24 25 26 27 28 29 完成以上步骤后,重新启动应用并访问生成的接口文档。
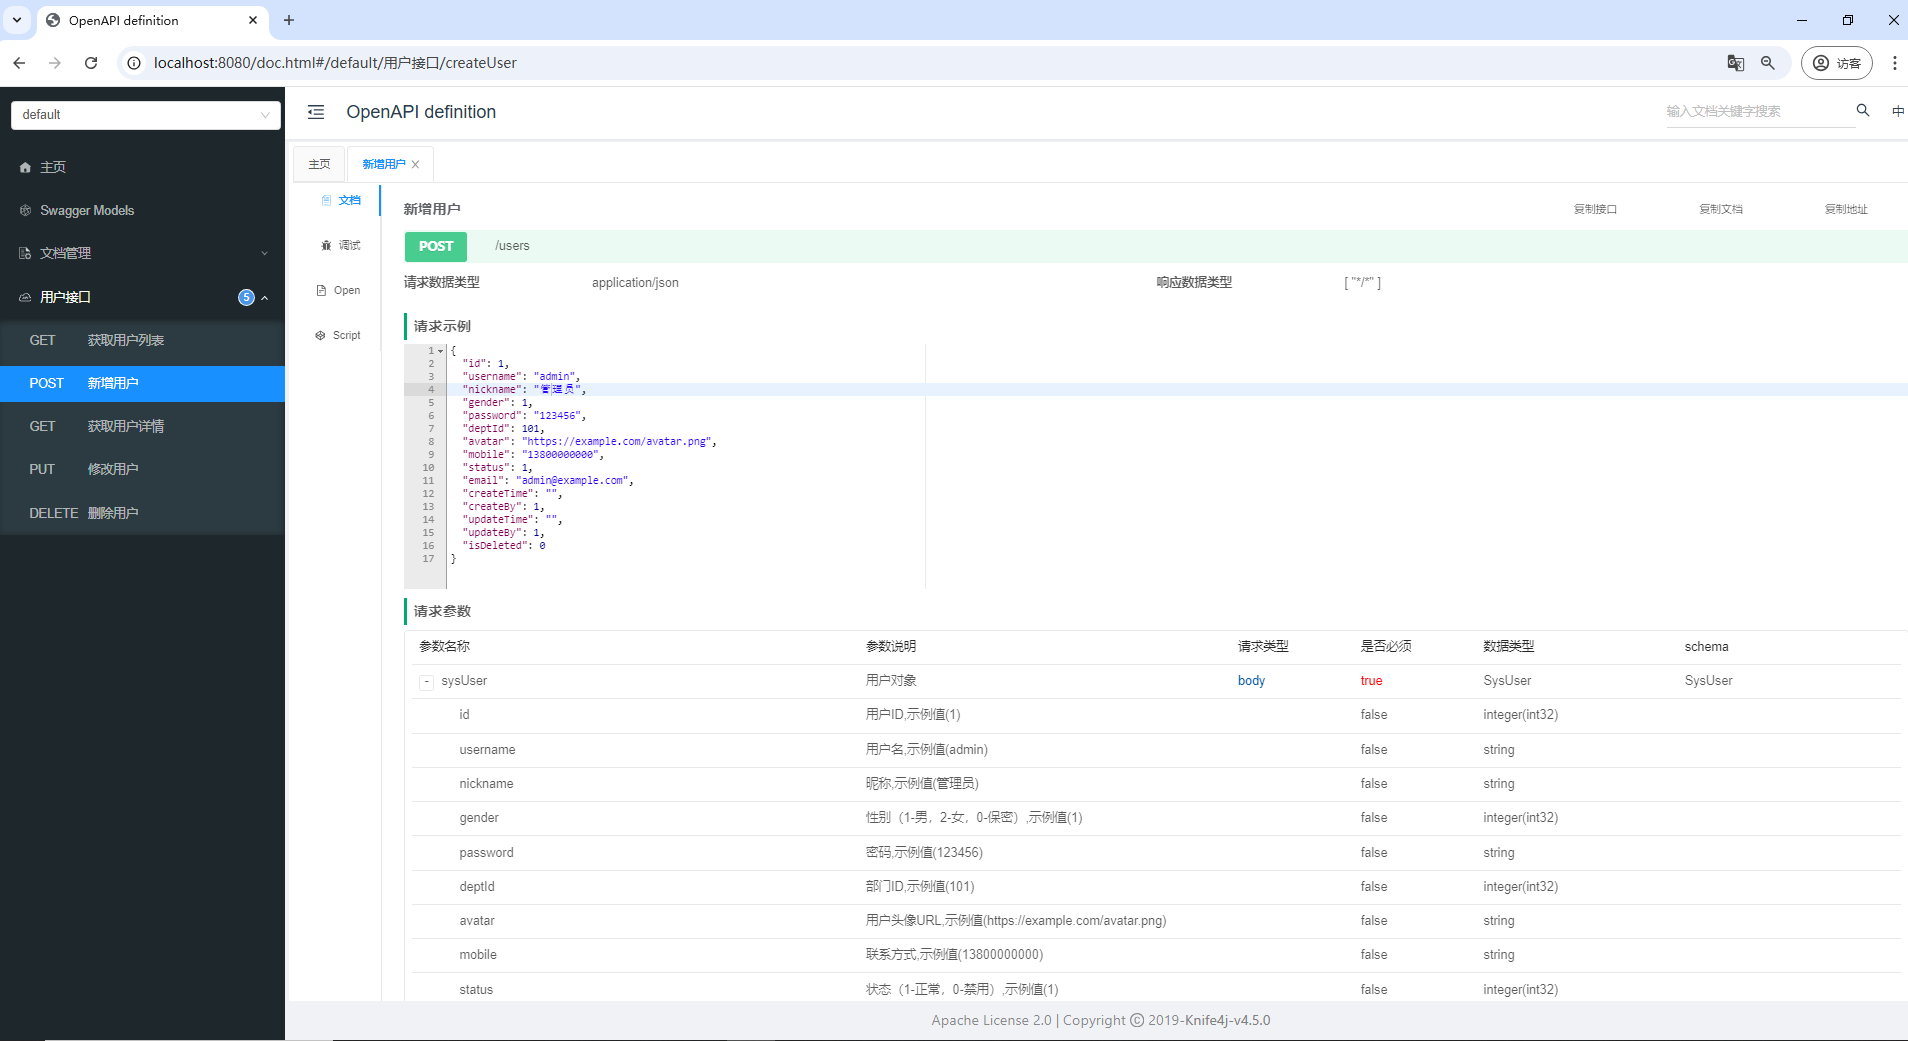
通过左侧的接口列表查看增删改查接口,并点击具体接口查看详细参数说明及示例值:
接着,可以通过接口文档新增用户,接口返回成功后,可以看到数据库表中新增了一条用户数据:
Redis 是当前广泛使用的高性能缓存中间件,能够显著提升系统性能,减轻数据库压力,几乎成为现代应用的标配。
在 pom.xml 文件中添加 Spring Boot Redis 依赖:
< dependency> < groupId> groupId > < artifactId> artifactId > dependency > 在 application.yml 文件中配置 Redis 连接信息:
spring :
data :
redis :
database : 0
host : localhost
port : 6379
password : 123456
timeout : 10s
class="hljs-button signin active" data-title="登录复制" data-report-click="{"spm":"1001.2101.3001.4334"}">Spring Boot 默认使用 JdkSerializationRedisSerializer 进行序列化。我们可以通过自定义 RedisTemplate,将其修改为更易读的 String 和 JSON 序列化方式:
@Configuration
public class RedisConfig {
@Bean
public RedisTemplate < String , Object > redisTemplate ( RedisConnectionFactory redisConnectionFactory) {
RedisTemplate < String , Object > = new RedisTemplate < > ( ) ;
redisTemplate. setConnectionFactory ( redisConnectionFactory) ;
redisTemplate. setKeySerializer ( RedisSerializer . string ( ) ) ;
redisTemplate. setValueSerializer ( RedisSerializer . json ( ) ) ;
redisTemplate. setHashKeySerializer ( RedisSerializer . string ( ) ) ;
redisTemplate. setHashValueSerializer ( RedisSerializer . json ( ) ) ;
redisTemplate. afterPropertiesSet ( ) ;
return redisTemplate;
}
}
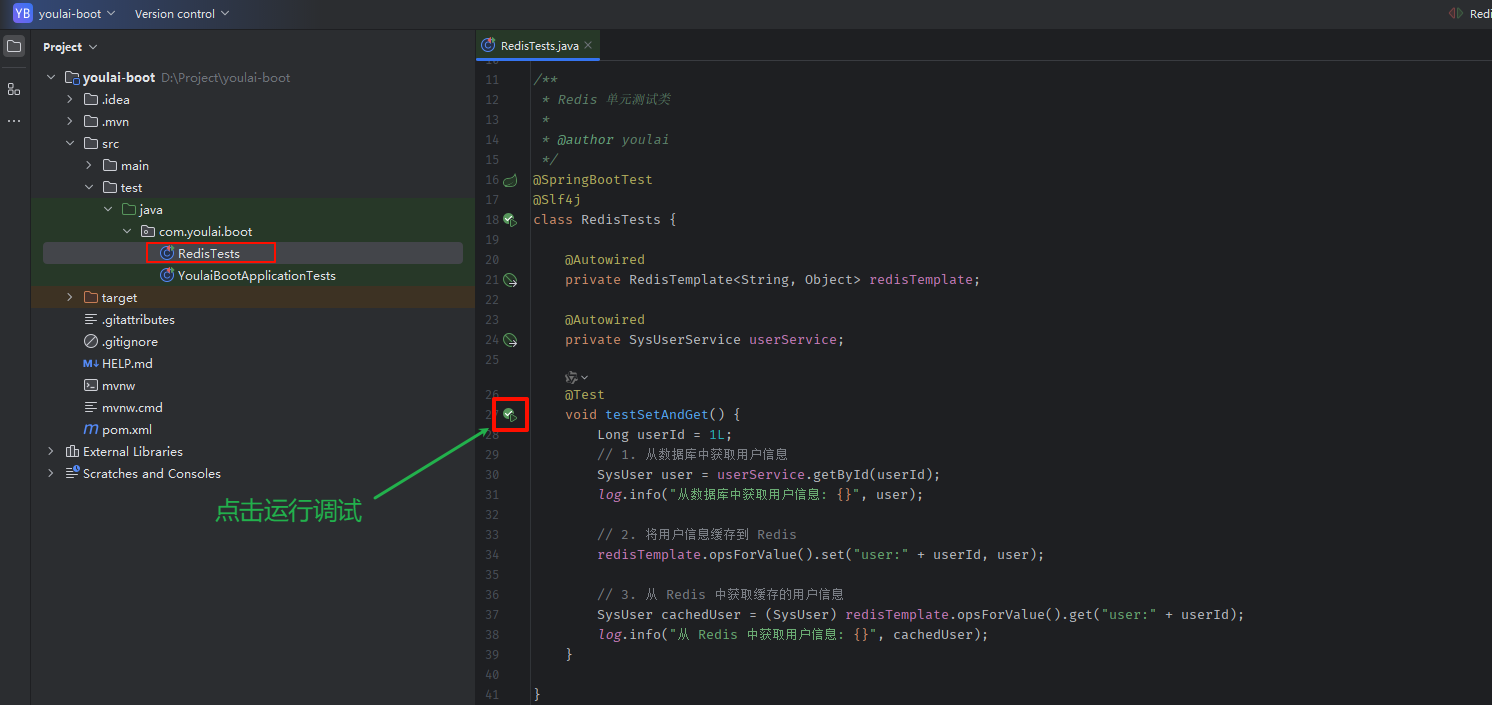
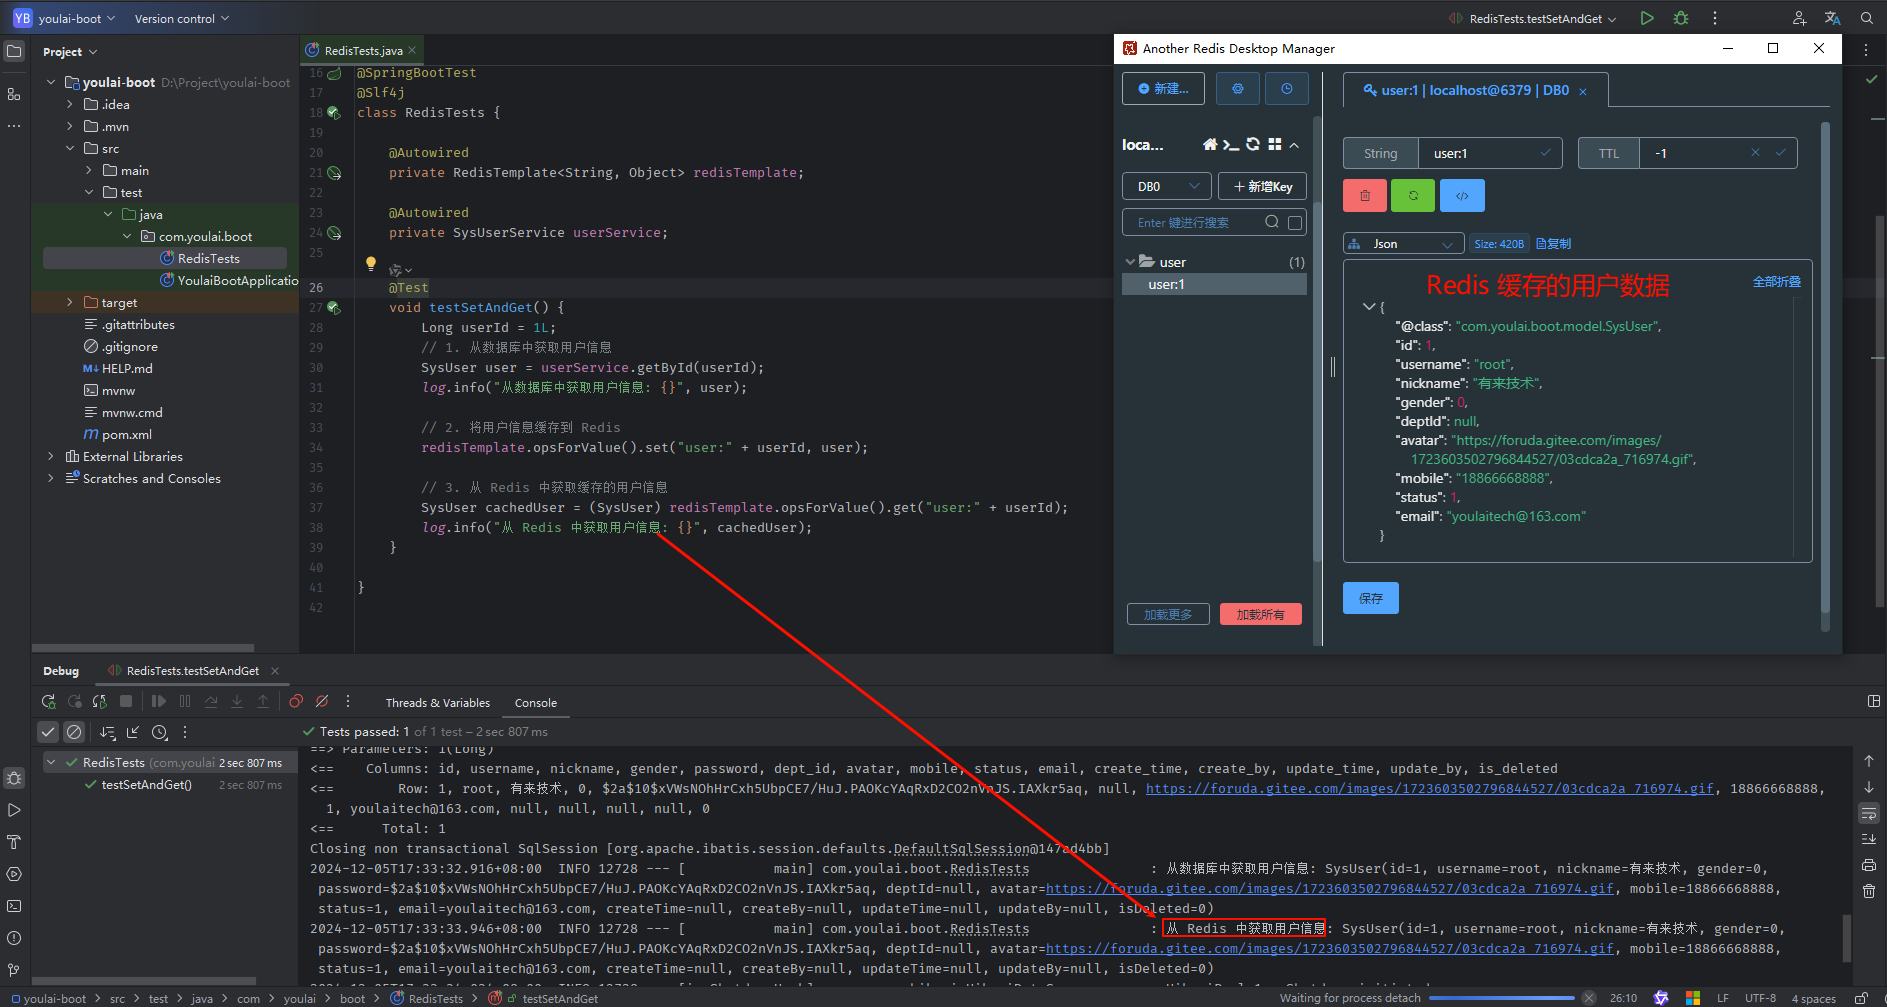
class="hljs-button signin active" data-title="登录复制" data-report-click="{"spm":"1001.2101.3001.4334"}">1 2 3 4 5 6 7 8 9 10 11 12 13 14 15 16 17 18 19 20 21 22 23 24 25 26 27 28 29 30 31 32 33 34 35 在 src/test/java 目录的 com.youlai.boot 包下创建 RedisTests 单元测试类,用于验证数据的存储与读取。
@SpringBootTest
@Slf4j
class RedisTests {
@Autowired
private RedisTemplate < String , Object > ;
@Autowired
private SysUserService userService;
@Test
void testSetAndGet ( ) {
Long userId = 1L ;
SysUser user = userService. getById ( userId) ;
log. info ( "从数据库中获取用户信息: {}" , user) ;
redisTemplate. opsForValue ( ) . set ( "user:" + userId, user) ;
SysUser cachedUser = ( SysUser ) redisTemplate. opsForValue ( ) . get ( "user:" + userId) ;
log. info ( "从 Redis 中获取用户信息: {}" , cachedUser) ;
}
}
class="hljs-button signin active" data-title="登录复制" data-report-click="{"spm":"1001.2101.3001.4334"}">1 2 3 4 5 6 7 8 9 10 11 12 13 14 15 16 17 18 19 20 21 22 23 24 25 点击测试类方法左侧的 ▶️ 图标运行单元测试。
运行后,稍等片刻,若控制台成功打印从 Redis 获取的用户信息,则表示 Spring Boot 已成功集成 Redis。
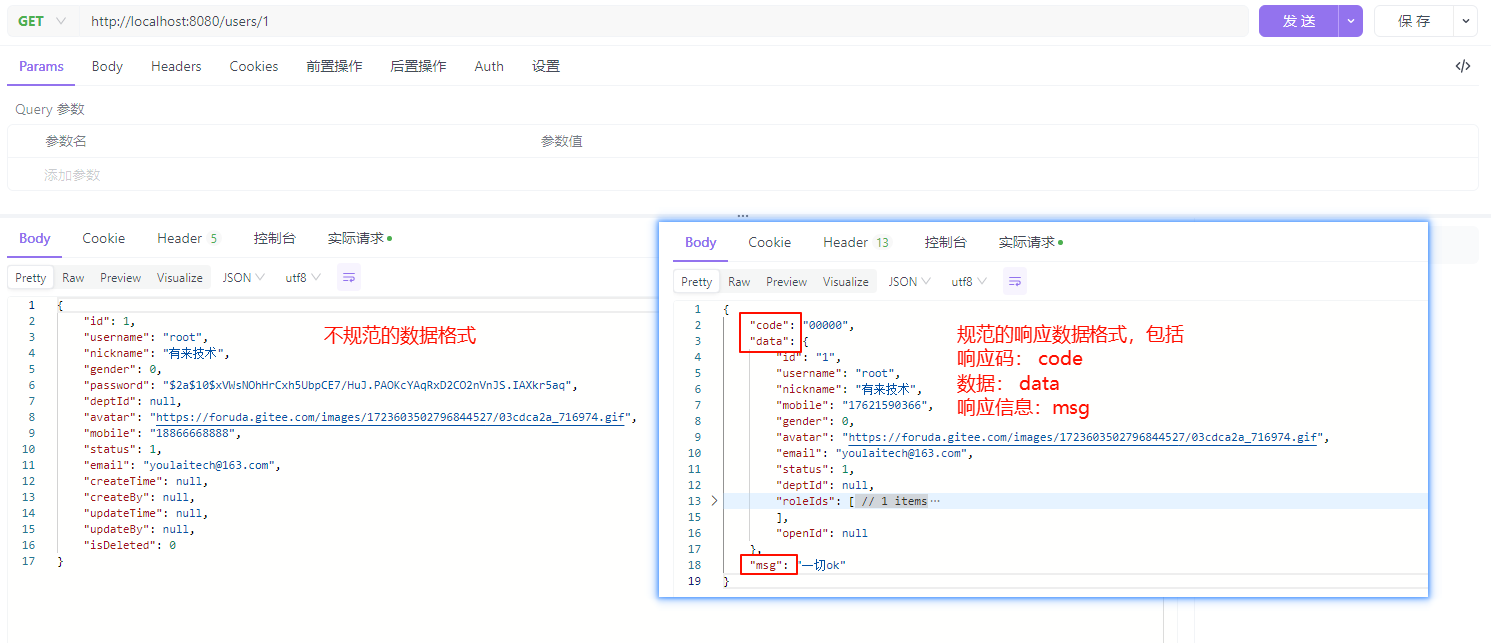
为什么需要统一响应?
默认接口返回的数据结构仅包含业务数据,缺少状态码和提示信息,无法清晰表达操作结果。通过统一封装响应结构,可以提升接口的规范性,便于前后端协同开发和快速定位问题。
下图展示了不规范与规范响应数据的对比:左侧是默认返回的非标准数据,右侧是统一封装后的规范数据。
定义统一业务状态码
在 com.youlai.boot.common.result 包下创建 ResultCode 枚举,错误码规范参考 阿里开发手册-错误码设计 。
package com. youlai. boot. common. result ;
import java. io. Serializable ;
import lombok. Getter ;
@Getter
public enum ResultCode implements Serializable {
SUCCESS ( "00000" , "操作成功" ) ,
TOKEN_INVALID ( "A0230" , "Token 无效或已过期" ) ,
ACCESS_UNAUTHORIZED ( "A0301" , "访问未授权" ) ,
SYSTEM_ERROR ( "B0001" , "系统错误" ) ;
private final String code;
private final String message;
ResultCode ( String code, String message) {
this . code = code;
this . message = message;
}
}
class="hljs-button signin active" data-title="登录复制" data-report-click="{"spm":"1001.2101.3001.4334"}">1 2 3 4 5 6 7 8 9 10 11 12 13 14 15 16 17 18 19 20 21 22 23 24 25 26 创建统一响应结构
定义 Result 类,封装响应码、消息和数据。
package com. youlai. boot. common. result ;
import lombok. Data ;
import java. io. Serializable ;
@Data
public class Result < T > implements Serializable {
private String code;
private T data;
private String msg;
public static < T > Result < T > success ( T data) {
Result < T > = new Result < > ( ) ;
result. setCode ( ResultCode . SUCCESS . getCode ( ) ) ;
result. setMsg ( ResultCode . SUCCESS . getMsg ( ) ) ;
result. setData ( data) ;
return result;
}
public static < T > Result < T > failed ( ResultCode resultCode) {
Result < T > = new Result < > ( ) ;
result. setCode ( resultCode. getCode ( ) ) ;
result. setMsg ( resultCode. getMsg ( ) ) ;
return result;
}
public static < T > Result < T > failed ( ) {
Result < T > = new Result < > ( ) ;
result. setCode ( ResultCode . SYSTEM_ERROR . getCode ( ) ) ;
result. setMsg ( ResultCode . SYSTEM_ERROR . getMsg ( ) ) ;
return result;
}
}
class="hljs-button signin active" data-title="登录复制" data-report-click="{"spm":"1001.2101.3001.4334"}">1 2 3 4 5 6 7 8 9 10 11 12 13 14 15 16 17 18 19 20 21 22 23 24 25 26 27 28 29 30 31 32 33 34 35 36 37 38 39 40 41 42 43 44 45 46 47 48 49 50 51 封装接口返回结果
调整接口代码,返回统一的响应格式。
@Operation ( summary = "获取用户详情" )
@GetMapping ( "/{id}" )
public Result < SysUser > getUserById (
@Parameter ( description = "用户ID" ) @PathVariable Long id
) {
SysUser user = userService. getById ( id) ;
return Result . success ( user) ;
}
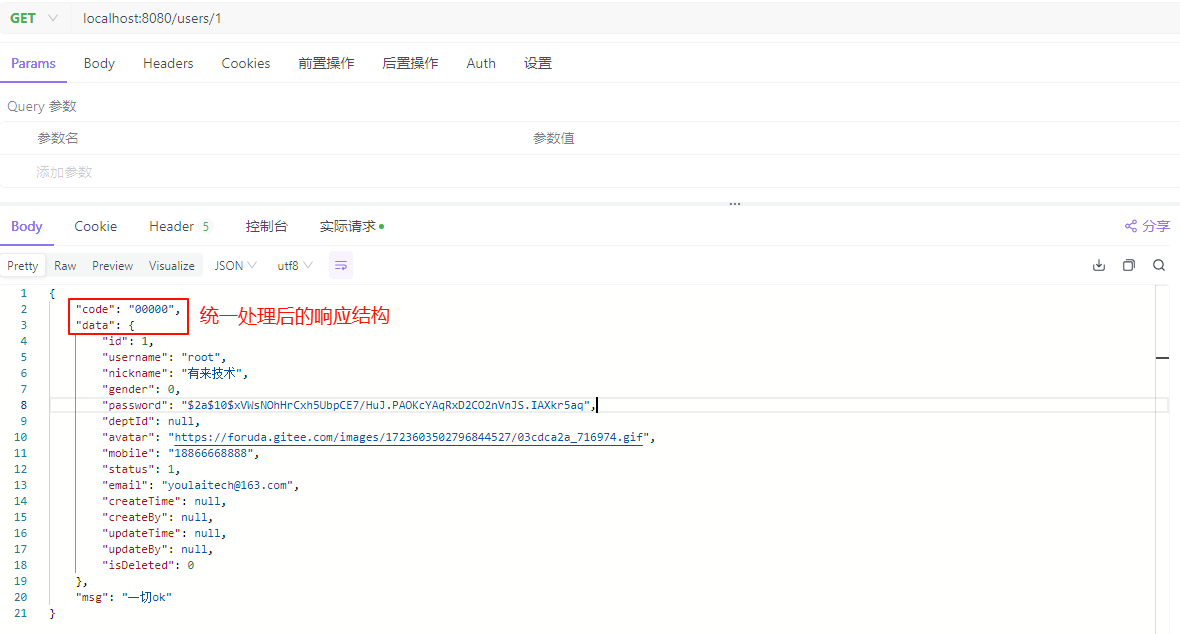
class="hljs-button signin active" data-title="登录复制" data-report-click="{"spm":"1001.2101.3001.4334"}">效果预览
接口返回结构变为标准格式:
通过以上步骤,接口响应数据已完成统一封装,具备良好的规范性和可维护性,有助于前后端协同开发与错误定位。
为什么需要全局异常处理
如果没有统一的异常处理机制,抛出的业务异常和系统异常会以非标准格式返回,给前端的数据处理和问题排查带来困难。为了规范接口响应数据格式,需要引入全局异常处理。
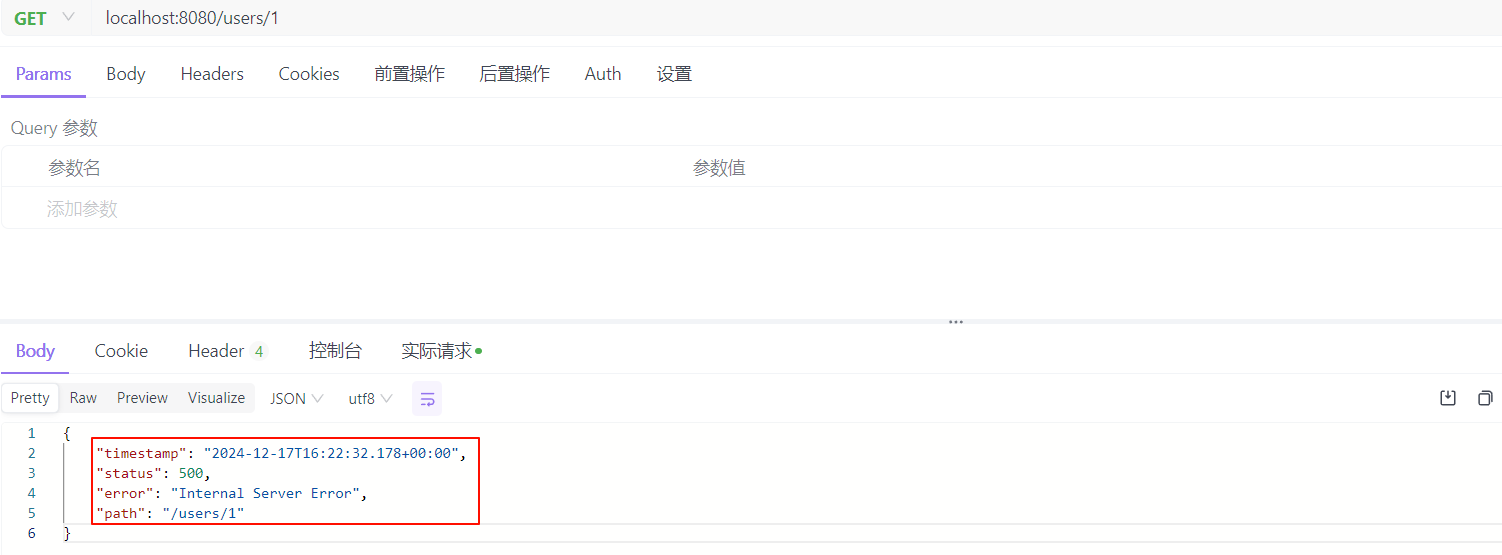
以下接口模拟了一个业务逻辑中的异常:
@Operation ( summary = "获取用户详情" )
@GetMapping ( "/{id}" )
public Result < SysUser > getUserById (
@Parameter ( description = "用户ID" ) @PathVariable Long id
) {
int i = 1 / 0 ;
SysUser user = userService. getById ( id) ;
return Result . success ( user) ;
}
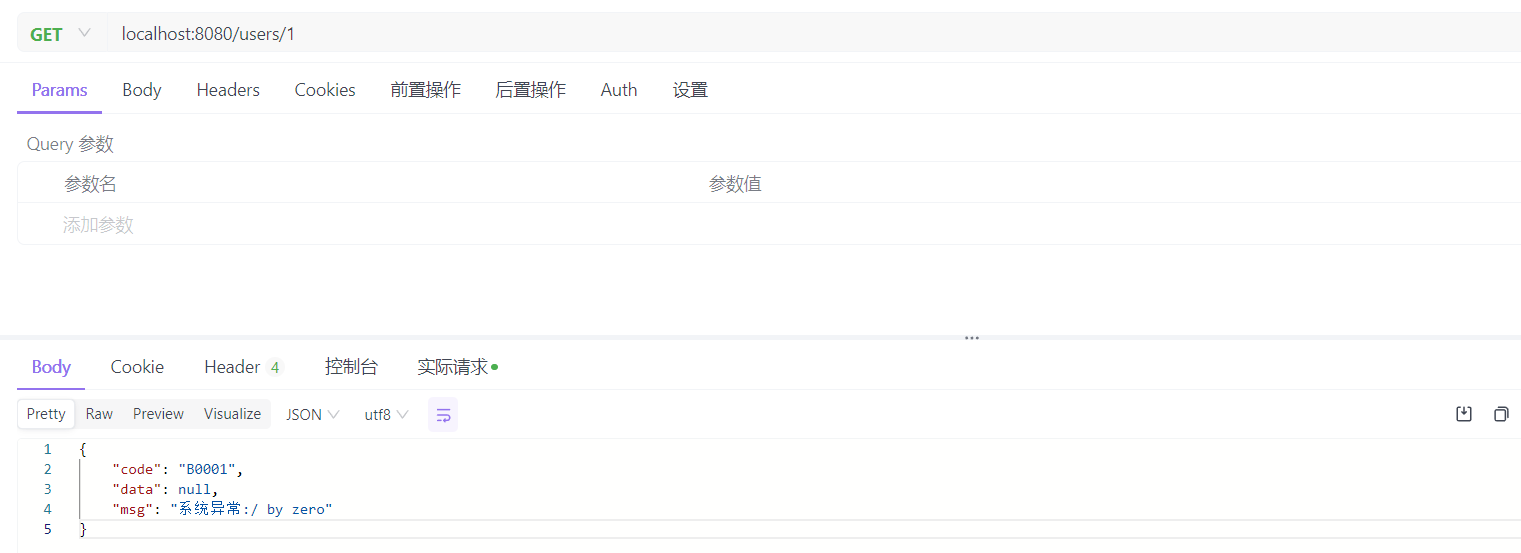
class="hljs-button signin active" data-title="登录复制" data-report-click="{"spm":"1001.2101.3001.4334"}">当发生异常时,默认返回的数据格式如下所示:
这类非标准的响应格式既不直观,也不利于前后端协作。
全局异常处理器
在 com.youlai.boot.common.exception 包下创建全局异常处理器,用于捕获和处理系统异常。
package com. youlai. boot. common. exception ;
import com. youlai. boot. common. result. Result ;
import lombok. extern. slf4j. Slf4j ;
import org. springframework. http. HttpStatus ;
import org. springframework. web. bind. annotation. ExceptionHandler ;
import org. springframework. web. bind. annotation. ResponseStatus ;
import org. springframework. web. bind. annotation. RestControllerAdvice ;
@RestControllerAdvice
@Slf4j
public class GlobalExceptionHandler {
@ExceptionHandler ( Exception . class )
@ResponseStatus ( HttpStatus . INTERNAL_SERVER_ERROR )
public < T > Result < T > handleNullPointerException ( Exception e) {
log. error ( e. getMessage ( ) , e) ;
return Result . failed ( "系统异常:" + e. getMessage ( ) ) ;
}
}
class="hljs-button signin active" data-title="登录复制" data-report-click="{"spm":"1001.2101.3001.4334"}">1 2 3 4 5 6 7 8 9 10 11 12 13 14 15 16 17 18 19 20 21 22 23 24 25 26 27 28 29 30 31 验证全局异常处理
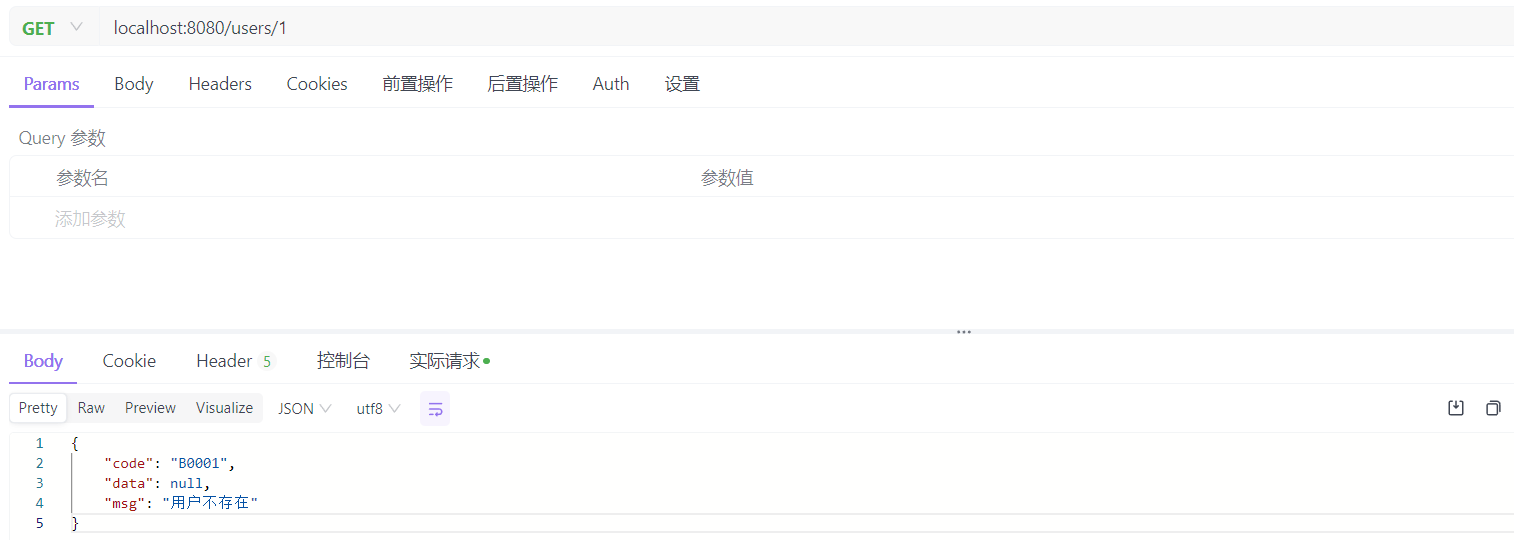
再次访问用户接口 localhost:8080/users/1 ,可以看到响应已经包含状态码和提示信息,数据格式变得更加规范:
自定义业务异常
在实际开发中,可能需要对特定的业务异常进行处理。通过自定义异常类 BusinessException,可以实现更灵活的异常处理机制。
package com. youlai. boot. common. exception ;
import com. youlai. boot. common. result. ResultCode ;
import lombok. Getter ;
@Getter
public class BusinessException extends RuntimeException {
public ResultCode resultCode;
public BusinessException ( ResultCode errorCode) {
super ( errorCode. getMsg ( ) ) ;
this . resultCode = errorCode;
}
public BusinessException ( String message) {
super ( message) ;
}
}
class="hljs-button signin active" data-title="登录复制" data-report-click="{"spm":"1001.2101.3001.4334"}">1 2 3 4 5 6 7 8 9 10 11 12 13 14 15 16 17 18 19 20 21 22 23 24 25 在全局异常处理器中添加业务异常处理逻辑
@RestControllerAdvice
@Slf4j
public class GlobalExceptionHandler {
@ExceptionHandler ( BusinessException . class )
public < T > Result < T > handleBusinessException ( BusinessException e) {
log. error ( e. getMessage ( ) , e) ;
if ( e. getResultCode ( ) != null ) {
return Result . failed ( e. getResultCode ( ) ) ;
}
return Result . failed ( e. getMessage ( ) ) ;
}
}
class="hljs-button signin active" data-title="登录复制" data-report-click="{"spm":"1001.2101.3001.4334"}">1 2 3 4 5 6 7 8 9 10 11 12 13 14 15 16 17 模拟业务异常
@Operation ( summary = "获取用户详情" )
@GetMapping ( "/{id}" )
public Result < SysUser > getUserById (
@Parameter ( description = "用户ID" ) @PathVariable Long id
) {
SysUser user = userService. getById ( - 1 ) ;
if ( user == null ) {
throw new BusinessException ( "用户不存在" ) ;
}
return Result . success ( user) ;
}
class="hljs-button signin active" data-title="登录复制" data-report-click="{"spm":"1001.2101.3001.4334"}">请求不存在的用户时,响应如下:
通过全局异常处理的引入和自定义业务异常的定义,接口的响应数据得以标准化,提升了前后端协作的效率和系统的可维护性。
日志作为企业级应用项目中的重要一环,不仅是调试问题的关键手段,更是用户问题排查和争议解决的强有力支持工具
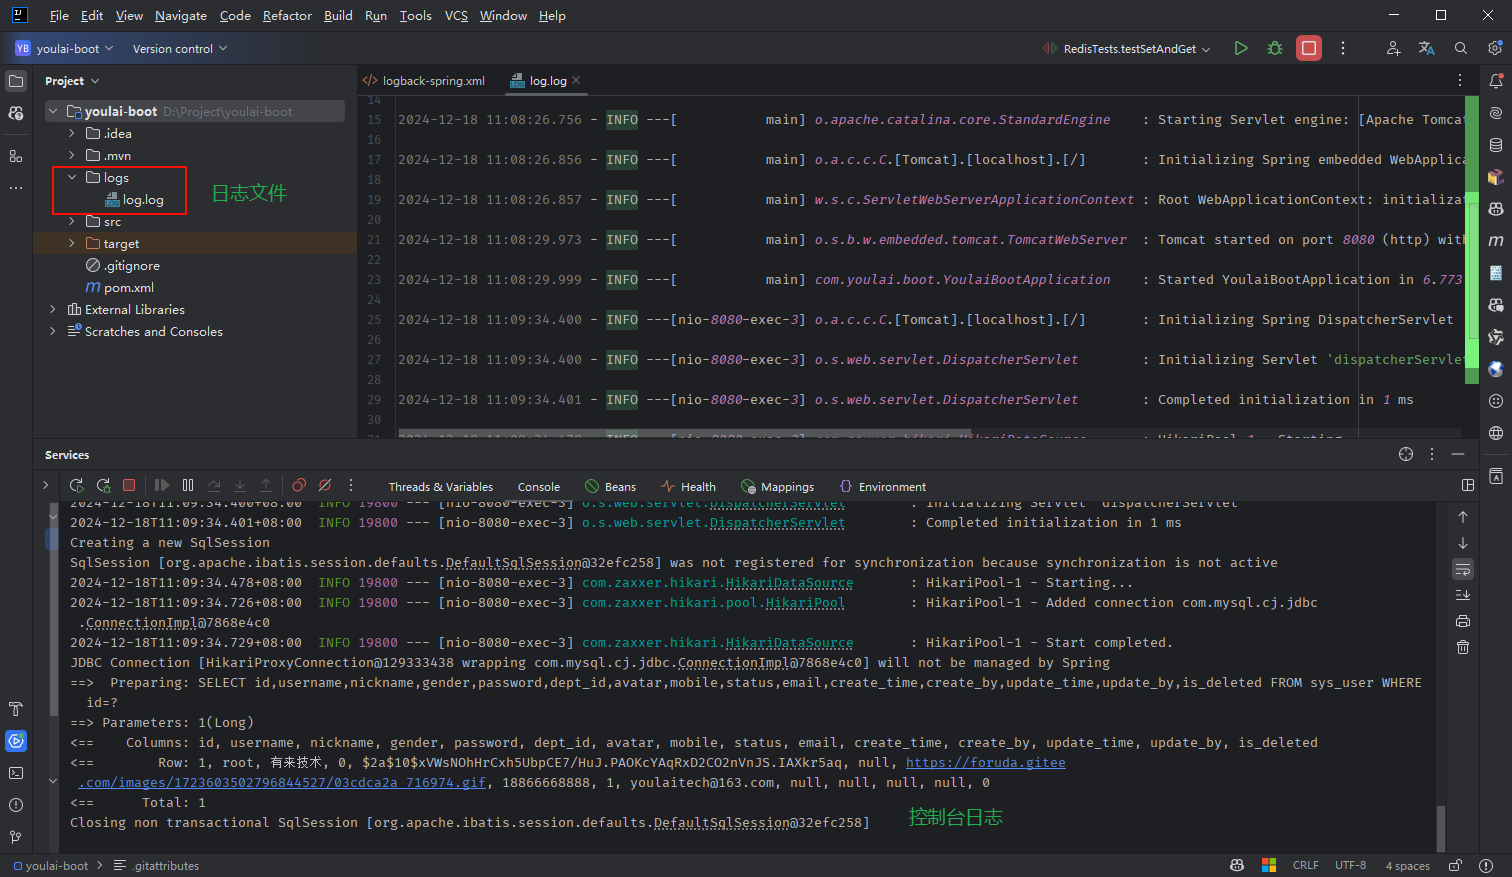
配置 logback-spring.xml 日志文件
在 src/main/resources 目录下,新增 logback-spring.xml 配置文件。基于 Spring Boot “约定优于配置” 的设计理念,项目默认会自动加载并使用该配置文件。
< configuration> < includeresource = " org/springframework/boot/logging/logback/defaults.xml" /> < springPropertyscope = " context" name = " APP_NAME" source = " spring.application.name" /> < propertyname = " LOG_HOME" value = " /logs/${APP_NAME}" /> < appendername = " CONSOLE" class = " ch.qos.logback.core.ConsoleAppender" > < filterclass = " ch.qos.logback.classic.filter.ThresholdFilter" > < level> level > filter > < encoder> < Pattern> Pattern > < charset> charset > encoder > appender > < appendername = " FILE" class = " ch.qos.logback.core.rolling.RollingFileAppender" > < file> file > < encoder> < pattern> pattern > < charset> charset > encoder > < rollingPolicyclass = " ch.qos.logback.core.rolling.SizeAndTimeBasedRollingPolicy" > < fileNamePattern> fileNamePattern > < maxFileSize> maxFileSize > < maxHistory> maxHistory > < totalSizeCap> totalSizeCap > rollingPolicy > < filterclass = " ch.qos.logback.classic.filter.ThresholdFilter" > < level> level > filter > appender > < rootlevel = " INFO" > < appender-refref = " CONSOLE" /> < appender-refref = " FILE" /> root > configuration > 1 2 3 4 5 6 7 8 9 10 11 12 13 14 15 16 17 18 19 20 21 22 23 24 25 26 27 28 29 30 31 32 33 34 35 36 37 38 39 40 41 42 43 44 45 46 47 48 49 50 51 52 53 54 55 56 查看日志输出效果
添加配置文件后,启动项目并触发相关日志行为,控制台和日志文件会同时输出日志信息:
Spring Security 是一个强大的安全框架,可用于身份认证和权限管理。
在 pom.xml 添加 Spring Security 依赖
< dependency> < groupId> groupId > < artifactId> artifactId > dependency > 从数据库获取用户信息(用户名、密码、角色),用于和前端输入的用户名密码做判读,如果认证成功,将角色权限信息绑定到用户会话,简单概括就是提供给认证授权的用户信息。
定义用户认证信息类 UserDetails
创建 com.youlai.boot.security.model 包,新建 SysUserDetails 用户认证信息对象,继承 Spring Security 的 UserDetails 接口
@Data
@NoArgsConstructor
public class SysUserDetails implements UserDetails {
private Integer userId;
private String username;
private String password;
private Boolean enabled;
private Collection < SimpleGrantedAuthority > ;
public SysUserDetails ( SysUser user) {
this . userId = user. getId ( ) ;
this . username = user. getUsername ( ) ;
this . password = user. getPassword ( ) ;
this . enabled = ObjectUtil . equal ( user. getStatus ( ) , 1 ) ;
this . authorities = CollectionUtil . isNotEmpty ( user. getRoles ( ) )
? user. getRoles ( ) . stream ( )
. map ( role -> new SimpleGrantedAuthority ( "ROLE_" + role) )
. collect ( Collectors . toSet ( ) )
: Collections . emptySet ( ) ;
}
@Override
public Collection < ? extends GrantedAuthority > getAuthorities ( ) {
return this . authorities;
}
@Override
public String getPassword ( ) {
return this . password;
}
@Override
public String getUsername ( ) {
return this . username;
}
@Override
public boolean isEnabled ( ) {
return this . enabled;
}
}
class="hljs-button signin active" data-title="登录复制" data-report-click="{"spm":"1001.2101.3001.4334"}">1 2 3 4 5 6 7 8 9 10 11 12 13 14 15 16 17 18 19 20 21 22 23 24 25 26 27 28 29 30 31 32 33 34 35 36 37 38 39 40 41 42 43 44 45 46 47 48 49 50 51 52 53 54 55 56 57 58 59 60 61 62 63 64 65 66 67 68 69 70 71 72 73 74 75 获取用户认证信息服务类
创建 com.youlai.boot.security.service 包,新建 SysUserDetailsService 用户认证信息加载服务类,继承 Spring Security 的 UserDetailsService 接口
@Service
@RequiredArgsConstructor
public class SysUserDetailsService implements UserDetailsService {
private final SysUserService userService;
@Override
public UserDetails loadUserByUsername ( String username) throws UsernameNotFoundException {
SysUser user = userService. getOne ( new LambdaQueryWrapper < SysUser > ( )
. eq ( SysUser :: getUsername , username)
) ;
if ( user == null ) {
throw new UsernameNotFoundException ( username) ;
}
Set < String > = Set . of ( "ADMIN" ) ;
user. setRoles ( roles) ;
Set < String > = Set . of ( "sys:user:query" ) ;
user. setPerms ( perms) ;
return new SysUserDetails ( user) ;
}
}
class="hljs-button signin active" data-title="登录复制" data-report-click="{"spm":"1001.2101.3001.4334"}">1 2 3 4 5 6 7 8 9 10 11 12 13 14 15 16 17 18 19 20 21 22 23 24 25 26 27 28 29 30 31 32 33 34 35 36 37 38 在 com.youlai.boot.common.util 添加响应工具类 ResponseUtils
@Slf4j
public class ResponseUtils {
public static void writeErrMsg ( HttpServletResponse response, ResultCode resultCode) {
int status = switch ( resultCode) {
case ACCESS_UNAUTHORIZED ,
ACCESS_TOKEN_INVALID
-> HttpStatus . UNAUTHORIZED . value ( ) ;
default -> HttpStatus . BAD_REQUEST . value ( ) ;
} ;
response. setStatus ( status) ;
response. setContentType ( MediaType . APPLICATION_JSON_VALUE ) ;
response. setCharacterEncoding ( StandardCharsets . UTF_8 . name ( ) ) ;
try ( PrintWriter writer = response. getWriter ( ) ) {
String jsonResponse = JSONUtil . toJsonStr ( Result . failed ( resultCode) ) ;
writer. print ( jsonResponse) ;
writer. flush ( ) ;
} catch ( IOException e) {
log. error ( "响应异常处理失败" , e) ;
}
}
}
class="hljs-button signin active" data-title="登录复制" data-report-click="{"spm":"1001.2101.3001.4334"}">1 2 3 4 5 6 7 8 9 10 11 12 13 14 15 16 17 18 19 20 21 22 23 24 25 26 27 28 29 30 31 32 功能 AuthenticationEntryPointAccessDeniedHandler对应异常 AuthenticationExceptionAccessDeniedException适用场景 用户未认证(无凭证或凭证无效) 用户已认证但无权限 返回 HTTP 状态码 401 Unauthorized403 Forbidden常见使用位置 用于处理身份认证失败的全局入口逻辑 用于处理权限不足时的逻辑
用户未认证处理器
@Slf4j
public class MyAuthenticationEntryPoint implements AuthenticationEntryPoint {
@Override
public void commence ( HttpServletRequest request, HttpServletResponse response, AuthenticationException authException) {
if ( authException instanceof BadCredentialsException ) {
ResponseUtils . writeErrMsg ( response, ResultCode . USER_PASSWORD_ERROR ) ;
} else {
ResponseUtils . writeErrMsg ( response, ResultCode . TOKEN_INVALID ) ;
}
}
}
class="hljs-button signin active" data-title="登录复制" data-report-click="{"spm":"1001.2101.3001.4334"}">1 2 3 4 5 6 7 8 9 10 11 12 13 14 15 16 17 18 19 20 无权限访问处理器
public class MyAccessDeniedHandler implements AccessDeniedHandler {
@Override
public void handle ( HttpServletRequest request, HttpServletResponse response, AccessDeniedException accessDeniedException) {
ResponseUtils . writeErrMsg ( response, ResultCode . ACCESS_UNAUTHORIZED ) ;
}
}
class="hljs-button signin active" data-title="登录复制" data-report-click="{"spm":"1001.2101.3001.4334"}">注意事项
在全局异常处理器中,认证异常(AuthenticationException)和授权异常(AccessDeniedException)不应被捕获,否则这些异常将无法交给 Spring Security 的异常处理机制进行处理。因此,当捕获到这类异常时,应该将其重新抛出,交给 Spring Security 来处理其特定的逻辑。
public class GlobalExceptionHandler {
@ExceptionHandler ( Exception . class )
@ResponseStatus ( HttpStatus . INTERNAL_SERVER_ERROR )
public < T > Result < T > handleNullPointerException ( Exception e) throws Exception {
if ( e instanceof AccessDeniedException
|| e instanceof AuthenticationException ) {
throw e;
}
log. error ( e. getMessage ( ) , e) ;
return Result . failed ( "系统异常,请联系管理员" ) ;
}
}
class="hljs-button signin active" data-title="登录复制" data-report-click="{"spm":"1001.2101.3001.4334"}">1 2 3 4 5 6 7 8 9 10 11 12 13 14 15 16 17 18 19 20 21 在 com.youlai.boot.config 包下新建 SecurityConfig 用来 Spring Security 安全配置
@Configuration
@EnableWebSecurity
@EnableMethodSecurity
public class SecurityConfig {
private final String [ ] IGNORE_URIS = { "/api/v1/auth/login" } ;
@Bean
public SecurityFilterChain securityFilterChain ( HttpSecurity http) throws Exception {
http
. authorizeHttpRequests ( requestMatcherRegistry ->
requestMatcherRegistry
. requestMatchers ( IGNORE_URIS ) . permitAll ( )
. anyRequest ( ) . authenticated ( )
)
. sessionManagement ( configurer ->
configurer. sessionCreationPolicy ( SessionCreationPolicy . STATELESS )
)
. csrf ( AbstractHttpConfigurer :: disable )
. formLogin ( AbstractHttpConfigurer :: disable )
. httpBasic ( AbstractHttpConfigurer :: disable )
. headers ( headers ->
headers. frameOptions ( HeadersConfigurer. FrameOptionsConfig :: disable )
)
. exceptionHandling ( configurer -> {
configurer
. authenticationEntryPoint ( new MyAuthenticationEntryPoint ( ) )
. accessDeniedHandler ( new MyAccessDeniedHandler ( ) ) ;
} ) ;
;
return http. build ( ) ;
}
@Bean
public PasswordEncoder passwordEncoder ( ) {
return new BCryptPasswordEncoder ( ) ;
}
@Bean
public WebSecurityCustomizer webSecurityCustomizer ( ) {
return ( web) -> {
web. ignoring ( ) . requestMatchers (
"/v3/api-docs/**" ,
"/swagger-ui/**" ,
"/swagger-ui.html" ,
"/webjars/**" ,
"/doc.html"
) ;
} ;
}
@Bean
public AuthenticationManager authenticationManager ( AuthenticationConfiguration configuration) throws Exception {
return configuration. getAuthenticationManager ( ) ;
}
}
class="hljs-button signin active" data-title="登录复制" data-report-click="{"spm":"1001.2101.3001.4334"}">1 2 3 4 5 6 7 8 9 10 11 12 13 14 15 16 17 18 19 20 21 22 23 24 25 26 27 28 29 30 31 32 33 34 35 36 37 38 39 40 41 42 43 44 45 46 47 48 49 50 51 52 53 54 55 56 57 58 59 60 61 62 63 64 65 66 67 68 69 70 71 72 73 74 75 76 77 78 79 80 81 82 83 84 85 86 87 88 89 在 com.youlai.boot.security.manager 包下新建 JwtTokenManager ,用于生成和解析 token
@Service
public class JwtTokenManager {
private final String secretKey = " SecretKey012345678901234567890123456789012345678901234567890123456789" ;
private final Integer accessTokenTimeToLive = 3600 ;
public String generateToken ( Authentication authentication) {
SysUserDetails userDetails = ( SysUserDetails ) authentication. getPrincipal ( ) ;
Map < String , Object > = new HashMap < > ( ) ;
payload. put ( "userId" , userDetails. getUserId ( ) ) ;
Set < String > = authentication. getAuthorities ( ) . stream ( )
. map ( GrantedAuthority :: getAuthority )
. collect ( Collectors . toSet ( ) ) ;
payload. put ( "authorities" , authorities) ;
Date now = new Date ( ) ;
payload. put ( JWTPayload . ISSUED_AT , now) ;
if ( accessTokenTimeToLive != - 1 ) {
Date expiresAt = DateUtil . offsetSecond ( now, accessTokenTimeToLive) ;
payload. put ( JWTPayload . EXPIRES_AT , expiresAt) ;
}
payload. put ( JWTPayload . SUBJECT , authentication. getName ( ) ) ;
payload. put ( JWTPayload . JWT_ID , IdUtil . simpleUUID ( ) ) ;
return JWTUtil . createToken ( payload, secretKey. getBytes ( ) ) ;
}
public Authentication parseToken ( String token) {
JWT jwt = JWTUtil . parseToken ( token) ;
JSONObject payloads = jwt. getPayloads ( ) ;
SysUserDetails userDetails = new SysUserDetails ( ) ;
userDetails. setUserId ( payloads. getInt ( "userId" ) ) ;
userDetails. setUsername ( payloads. getStr ( JWTPayload . SUBJECT ) ) ;
Set < SimpleGrantedAuthority > = payloads. getJSONArray ( "authorities" )
. stream ( )
. map ( authority -> new SimpleGrantedAuthority ( Convert . toStr ( authority) ) )
. collect ( Collectors . toSet ( ) ) ;
return new UsernamePasswordAuthenticationToken ( userDetails, "" , authorities) ;
}
public boolean validateToken ( String token) {
JWT jwt = JWTUtil . parseToken ( token) ;
return jwt. setKey ( secretKey. getBytes ( ) ) . validate ( 0 ) ;
}
}
class="hljs-button signin active" data-title="登录复制" data-report-click="{"spm":"1001.2101.3001.4334"}">1 2 3 4 5 6 7 8 9 10 11 12 13 14 15 16 17 18 19 20 21 22 23 24 25 26 27 28 29 30 31 32 33 34 35 36 37 38 39 40 41 42 43 44 45 46 47 48 49 50 51 52 53 54 55 56 57 58 59 60 61 62 63 64 65 66 67 68 69 70 71 72 73 74 75 76 77 78 79 80 81 82 83 84 85 86 在 com.youlai.boot.controller 包下新建 AuthController
@Tag ( name = "01.认证中心" )
@RestController
@RequestMapping ( "/api/v1/auth" )
@RequiredArgsConstructor
public class AuthController {
private final AuthenticationManager authenticationManager;
private final JwtTokenManager jwtTokenManager;
@Operation ( summary = "登录" )
@PostMapping ( "/login" )
public Result < String > login (
@Parameter ( description = "用户名" , example = "admin" ) @RequestParam String username,
@Parameter ( description = "密码" , example = "123456" ) @RequestParam String password
) {
UsernamePasswordAuthenticationToken authenticationToken =
new UsernamePasswordAuthenticationToken ( username. trim ( ) , password) ;
Authentication authentication = authenticationManager. authenticate ( authenticationToken) ;
String accessToken = jwtTokenManager. generateToken ( authentication) ;
return Result . success ( accessToken) ;
}
}
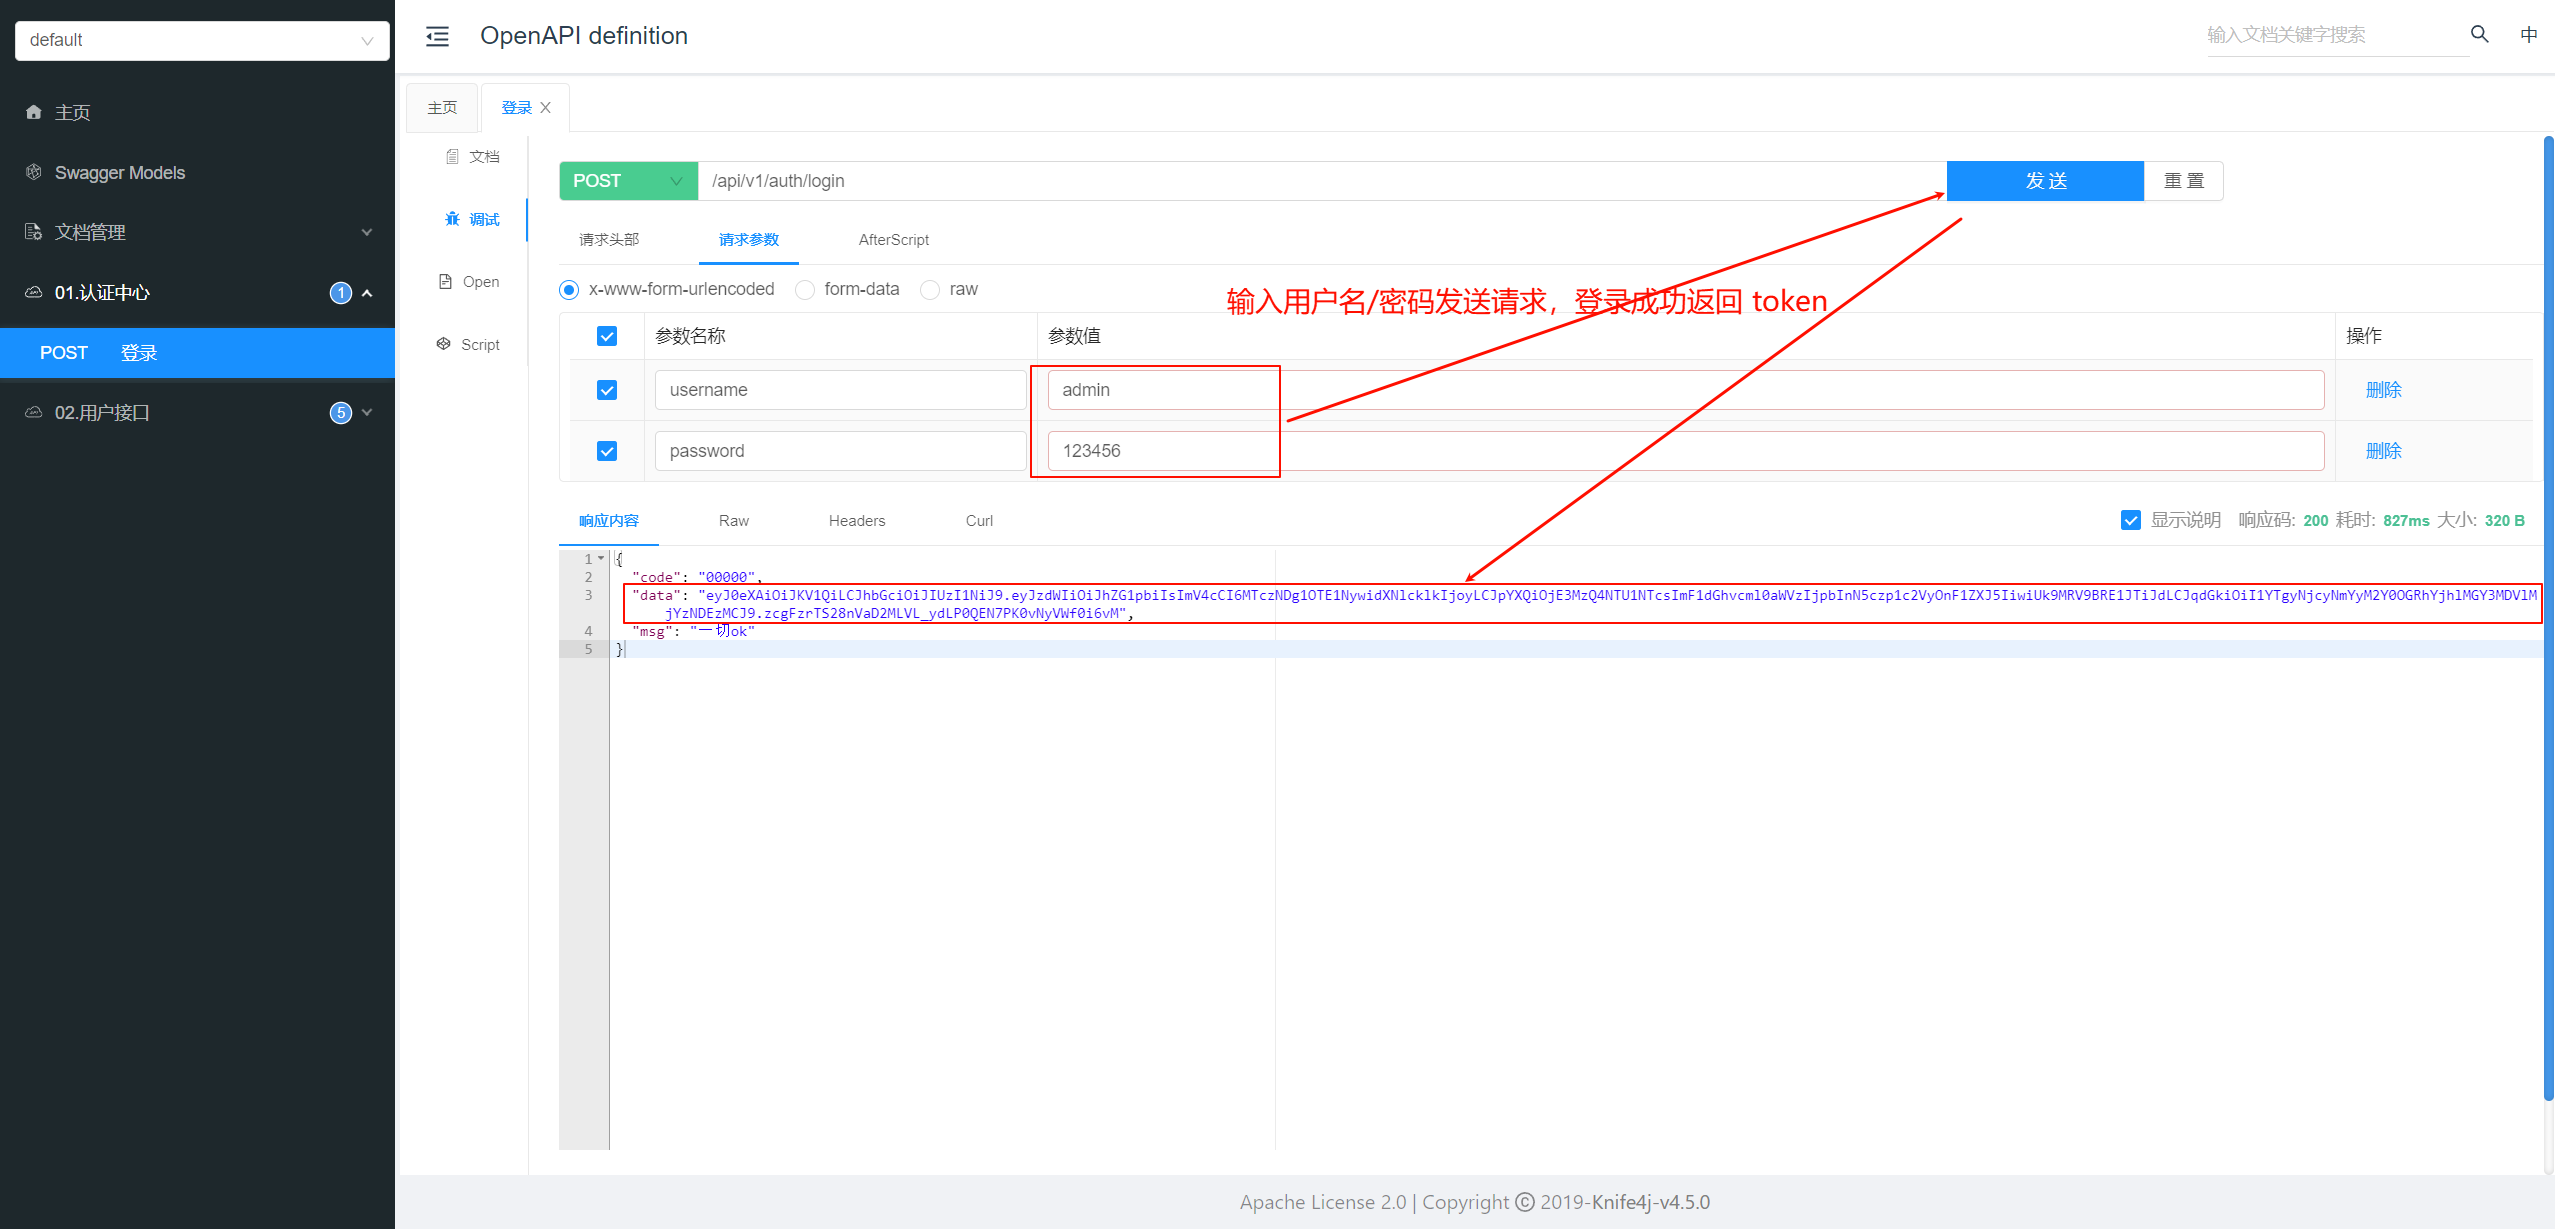
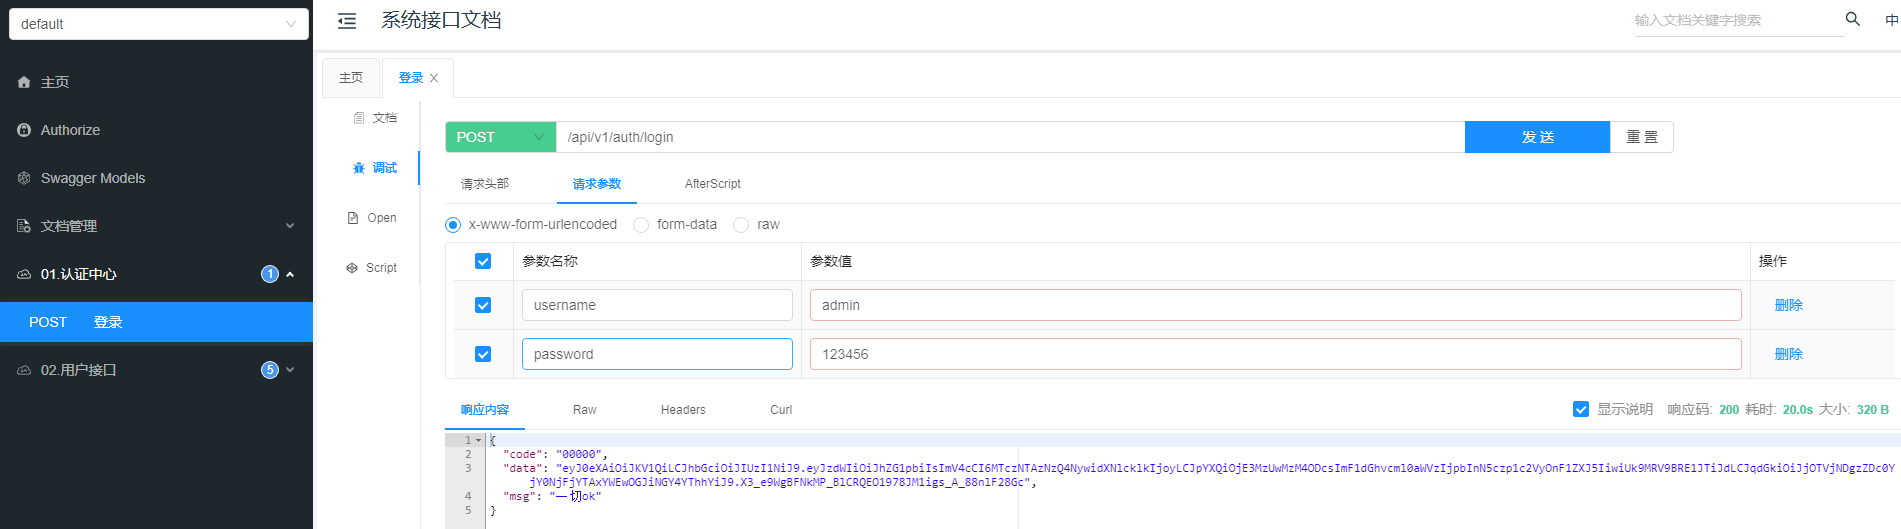
class="hljs-button signin active" data-title="登录复制" data-report-click="{"spm":"1001.2101.3001.4334"}">1 2 3 4 5 6 7 8 9 10 11 12 13 14 15 16 17 18 19 20 21 22 23 24 25 26 27 28 29 30 31 32 33 34 35 36 37 访问本地接口文档 http://localhost:8080/doc.html 选择登录接口进行调试发送请求,输入用户名和密码,如果登录成功返回访问令牌 token
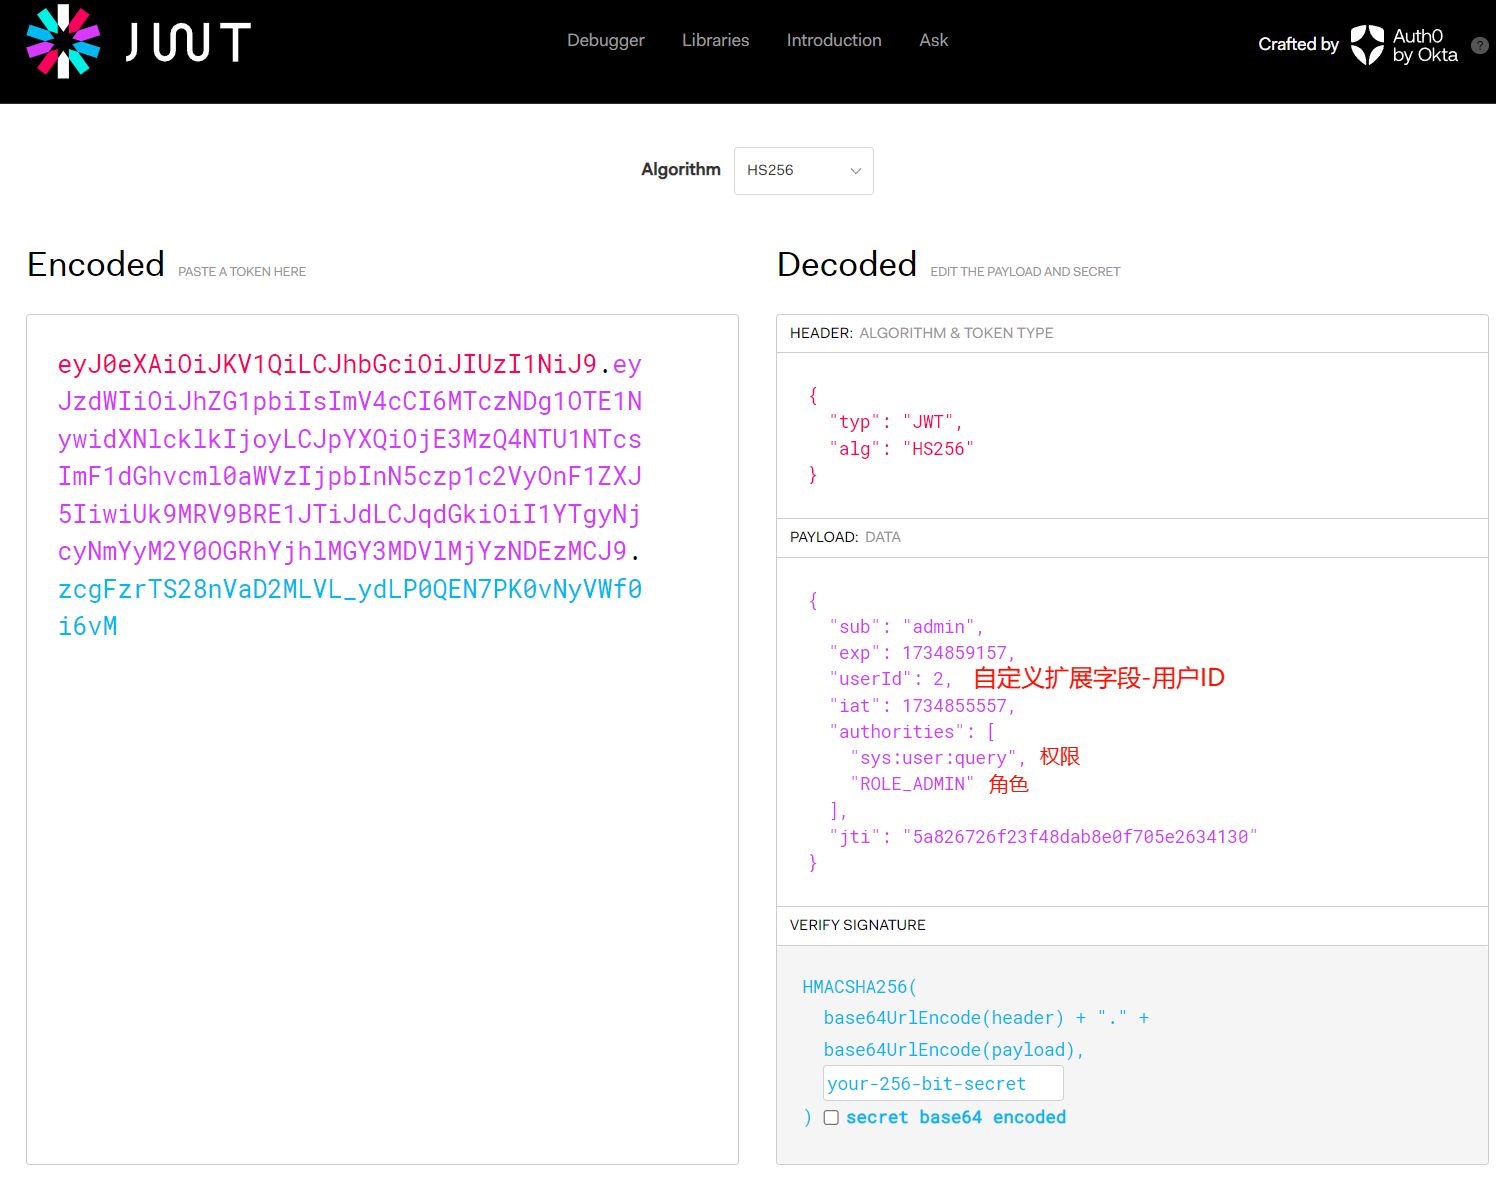
访问 https://jwt.io/ 解析返回的 token ,主要分为三部分 Header(头部) 、Payload(负载) 和 Signature(签名) ,其中负载除了固定字段之外,还出现自定义扩展的字段 userId。
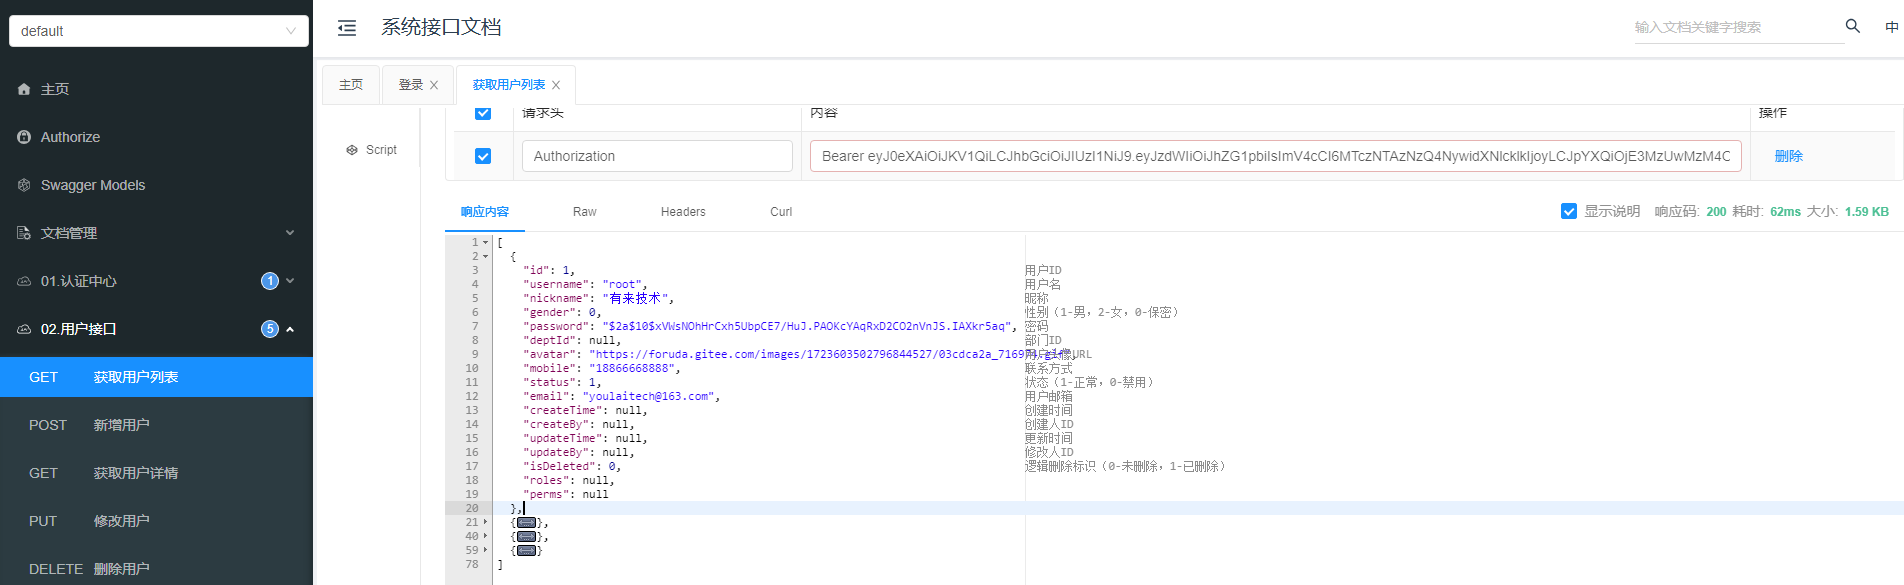
我们拿获取用户列表举例,首先需要验证我们在上一步登录拿到的访问令牌 token 是否有效(验签、是否过期等),然后需要校验该用户是否有访问接口的权限,本节就围绕以上问题展开。
验证解析 Token 过滤器
新建 com.youlai.boot.security.filter 添加 JwtValidationFilter 过滤器 用于验证和解析token
public class JwtAuthenticationFilter extends OncePerRequestFilter {
private static final String BEARER_PREFIX = "Bearer " ;
private final JwtTokenManager jwtTokenManager;
public JwtAuthenticationFilter ( JwtTokenManager jwtTokenManager) {
this . jwtTokenManager = jwtTokenManager;
}
@Override
protected void doFilterInternal ( HttpServletRequest request, HttpServletResponse response, FilterChain filterChain) throws ServletException , IOException {
String token = request. getHeader ( HttpHeaders . AUTHORIZATION ) ;
try {
if ( StrUtil . isNotBlank ( token) && token. startsWith ( BEARER_PREFIX ) ) {
token = token. substring ( BEARER_PREFIX . length ( ) ) ;
boolean isValidate = jwtTokenService. validateToken ( token) ;
if ( ! isValidate) {
writeErrMsg ( response, ResultCode . TOKEN_INVALID ) ;
return ;
}
Authentication authentication = jwtTokenManager. parseToken ( token) ;
SecurityContextHolder . getContext ( ) . setAuthentication ( authentication) ;
}
} catch ( Exception e) {
SecurityContextHolder . clearContext ( ) ;
writeErrMsg ( response, ResultCode . TOKEN_INVALID ) ;
return ;
}
filterChain. doFilter ( request, response) ;
}
public static void writeErrMsg ( HttpServletResponse response, ResultCode resultCode) {
int status = switch ( resultCode) {
case ACCESS_UNAUTHORIZED , TOKEN_INVALID -> HttpStatus . UNAUTHORIZED . value ( ) ;
default -> HttpStatus . BAD_REQUEST . value ( ) ;
} ;
response. setStatus ( status) ;
response. setContentType ( MediaType . APPLICATION_JSON_VALUE ) ;
response. setCharacterEncoding ( StandardCharsets . UTF_8 . name ( ) ) ;
try ( PrintWriter writer = response. getWriter ( ) ) {
String jsonResponse = JSONUtil . toJsonStr ( Result . failed ( resultCode) ) ;
writer. print ( jsonResponse) ;
writer. flush ( ) ;
} catch ( IOException e) {
}
}
}
class="hljs-button signin active" data-title="登录复制" data-report-click="{"spm":"1001.2101.3001.4334"}">1 2 3 4 5 6 7 8 9 10 11 12 13 14 15 16 17 18 19 20 21 22 23 24 25 26 27 28 29 30 31 32 33 34 35 36 37 38 39 40 41 42 43 44 45 46 47 48 49 50 51 52 53 54 55 56 57 58 59 60 61 62 63 64 65 66 67 68 69 70 71 72 73 74 75 76 77 78 添加 JWT 验证和解析过滤器
在 SecurityConfig 过滤器链添加 JWT token校验和解析成 Authentication 对象的过滤器。
@RequiredArgsConstructor
public class SecurityConfig {
private final JwtTokenManager jwtTokenManager;
@Bean
public SecurityFilterChain securityFilterChain ( HttpSecurity http) throws Exception {
return http
. addFilterBefore ( new JwtAuthenticationFilter ( jwtTokenManager) , UsernamePasswordAuthenticationFilter . class )
. build ( ) ;
}
}
class="hljs-button signin active" data-title="登录复制" data-report-click="{"spm":"1001.2101.3001.4334"}">1 2 3 4 5 6 7 8 9 10 11 12 13 14 15 16 17 18 19 20 21 22 23 获取用户列表接口
@RestController
@RequestMapping ( "/users" )
@RequiredArgsConstructor
public class UserController {
private final SysUserService userService;
@Operation ( summary = "获取用户列表" )
@GetMapping
@PreAuthorize ( "hasAuthority('sys:user:query')" )
public List < SysUser > listUsers ( ) {
return userService. list ( ) ;
}
}
class="hljs-button signin active" data-title="登录复制" data-report-click="{"spm":"1001.2101.3001.4334"}">访问一个主要测试访问凭据令牌是否认证以及对应的用户是否有访问该接口所需的权限,上面获取用户信息列表的接口未配置在security的白名单中,也就是需要认证,且被 @PreAuthorize(“hasAuthority(‘sys:user:query’)”) 标记说明用户需要有 sys:user:query的权限,也就是所谓的鉴权。
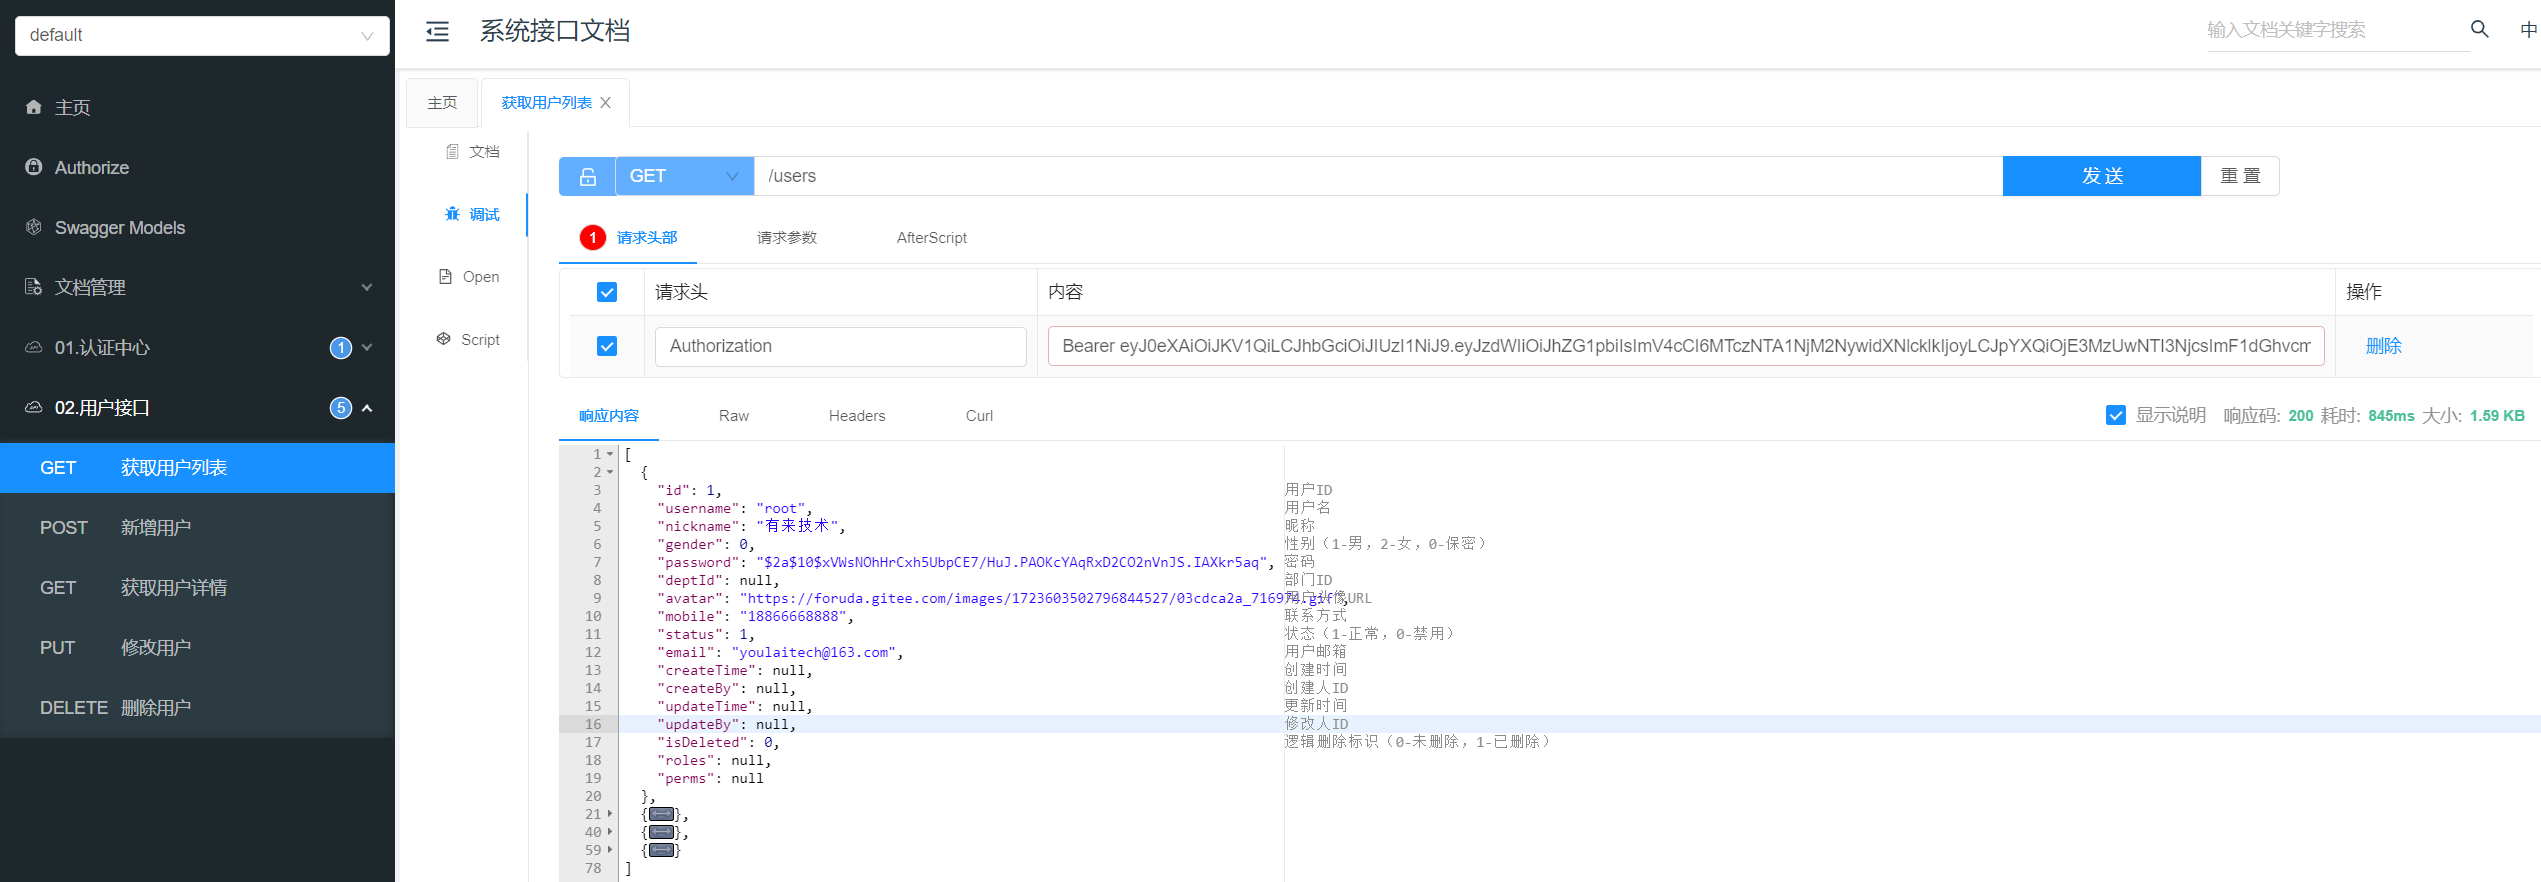
正常访问
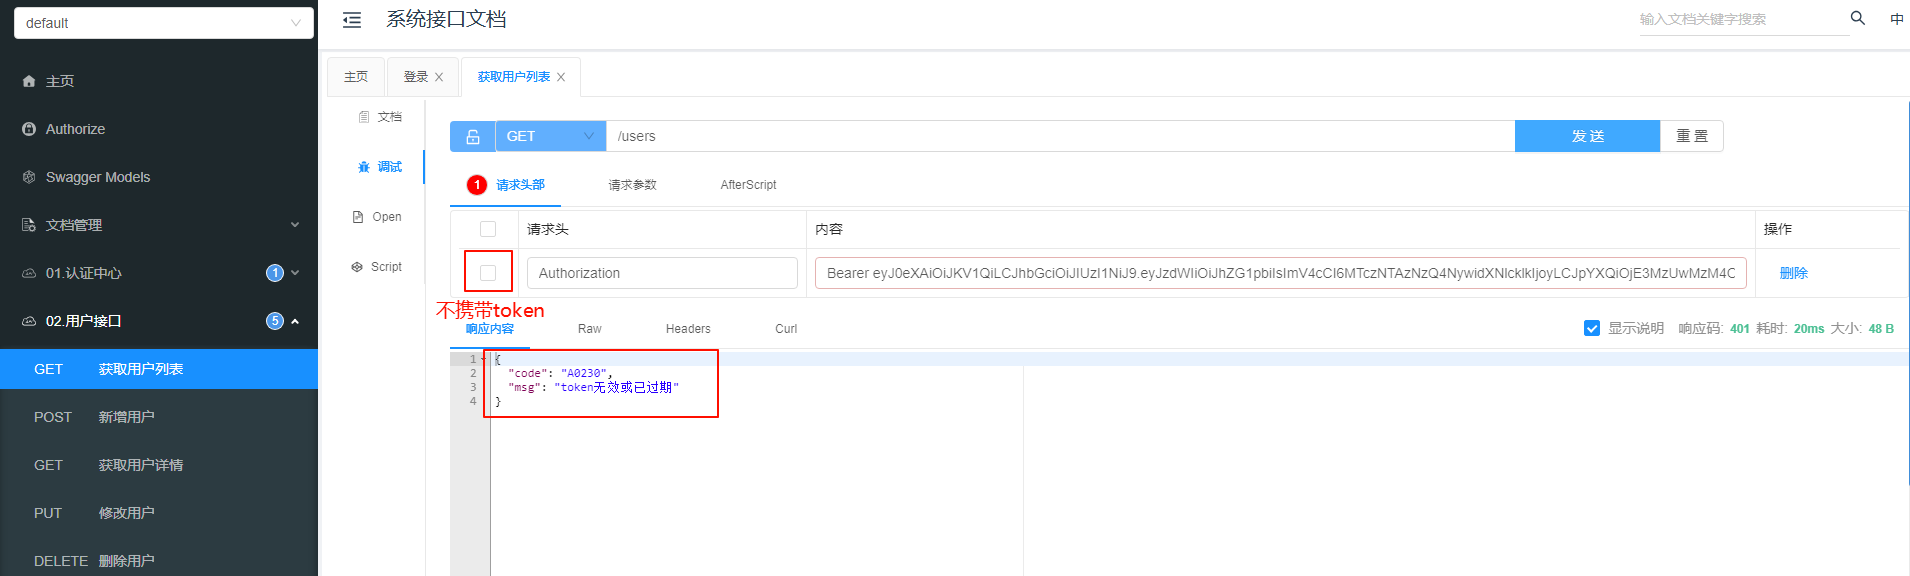
不携带 token 访问
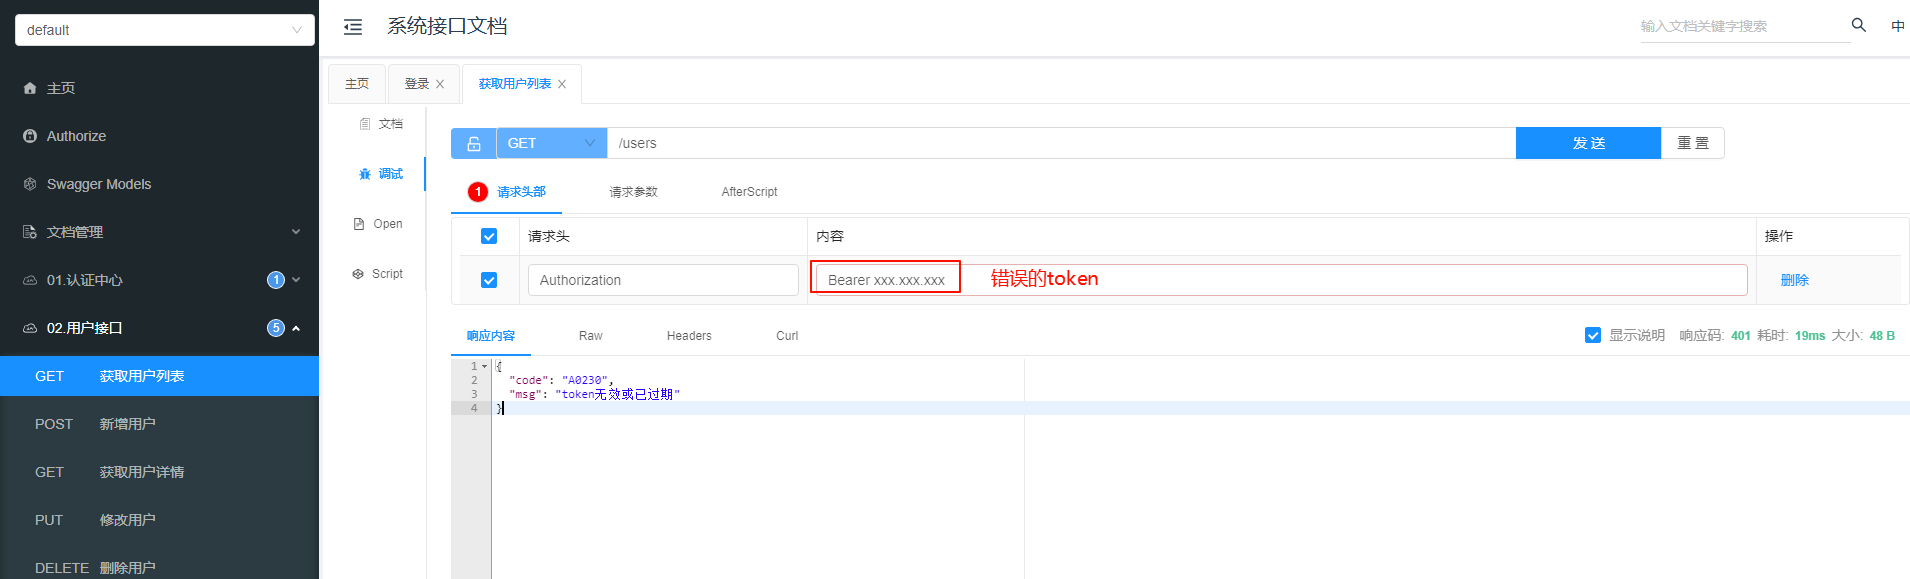
携带错误/过期的 token
有访问权限
用户拥有的权限 sys:user:query
public class UserController {
@Operation ( summary = "获取用户列表" )
@GetMapping
@PreAuthorize ( "hasAuthority('sys:user:query')" )
public List < SysUser > listUsers ( ) {
return userService. list ( ) ;
}
}
class="hljs-button signin active" data-title="登录复制" data-report-click="{"spm":"1001.2101.3001.4334"}">
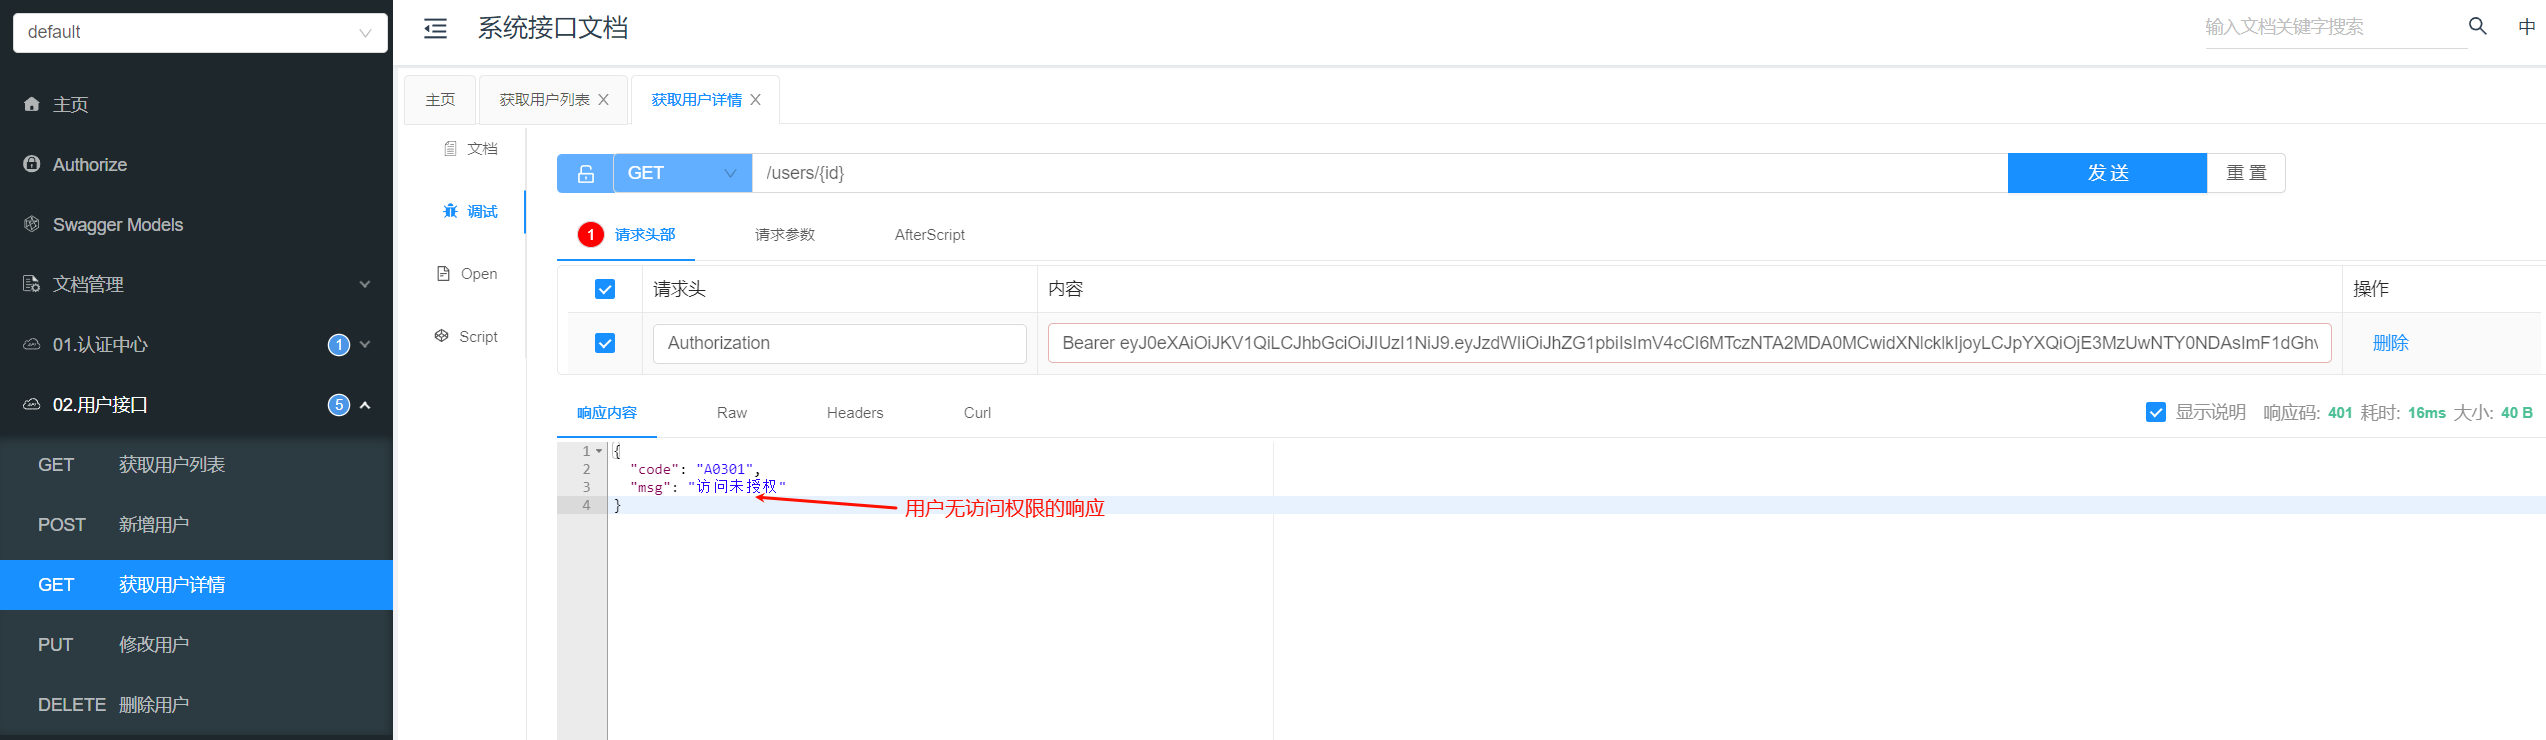
无访问权限
用户没有拥有的权限 sys:user:info
public class UserController {
@Operation ( summary = "获取用户详情" )
@GetMapping ( "/{id}" )
@PreAuthorize ( "hasAuthority('sys:user:info')" )
public Result < SysUser > getUserById (
@Parameter ( description = "用户ID" ) @PathVariable Long id
) {
SysUser user = userService. getById ( id) ;
}
}
class="hljs-button signin active" data-title="登录复制" data-report-click="{"spm":"1001.2101.3001.4334"}">
通过本文,您将了解企业级后端开发的核心技能和项目从搭建到部署的完整流程。如有兴趣,欢迎访问开源项目:https://gitee.com/youlaiorg ,关注公众号【有来技术】,或添加微信(微信号:haoxianrui)参与开源交流。
有来技术
class="blog_extension_card_cont_r">
微信公众号
无广告,佛系公众号,随缘更新团队成员技术


 class="blog_extension_card_cont">
class="blog_extension_card_cont_l">
class="blog_extension_card_cont">
class="blog_extension_card_cont_l">


评论记录:
回复评论: