前言
FFmpegKit 是一套在 Android、iOS、Linux、macOS、tvOS、Flutter 和 React Native 应用中使用 FFmpeg 的工具集。
它包括用于构建 FFmpeg 原生库的脚本,一个用于在应用中运行 FFmpeg/FFprobe 命令的封装库,以及 8 个预构建的二进制包,能够在 Github、Maven Central、CocoaPods、pub 和 npm 上获取。
本文介绍如何自行编译Android平台的so库文件。
环境配置
- Ubuntu 20.04 实体机或虚拟机
- Android SDK、NDK
- CMake
- GLIBC(系统自带)
安装构建工具
先执行这个,会安装一大坨东西。
bash代码解读复制代码sudo apt install build-essential autoconf automake libtool pkg-config curl git doxygen nasm cmake gcc gperf texinfo yasm bison autogen wget autopoint meson ninja ragel groff gtk-doc-tools libtasn1
如果有apt装不了可以先忽略,只要没报错就不管,或者自己找其他方式自行解决。
根据官方文档的建议,推荐使用ndk r22b版本。
ndk、CMake、GLIBC这三个东西的版本要配套,如果拿不准用哪个版本就照我的抄。
GLIBC是系统自带的,在控制台执行ldd --version可以查看GLIBC的版本
bash代码解读复制代码ldd --version ldd (Ubuntu GLIBC 2.31-0ubuntu9) 2.31 Copyright (C) 2020 自由软件基金会。 这是一个自由软件;请见源代码的授权条款。本软件不含任何没有担保;甚至不保证适销性 或者适合某些特殊目的。 由 Roland McGrath 和 Ulrich Drepper 编写。
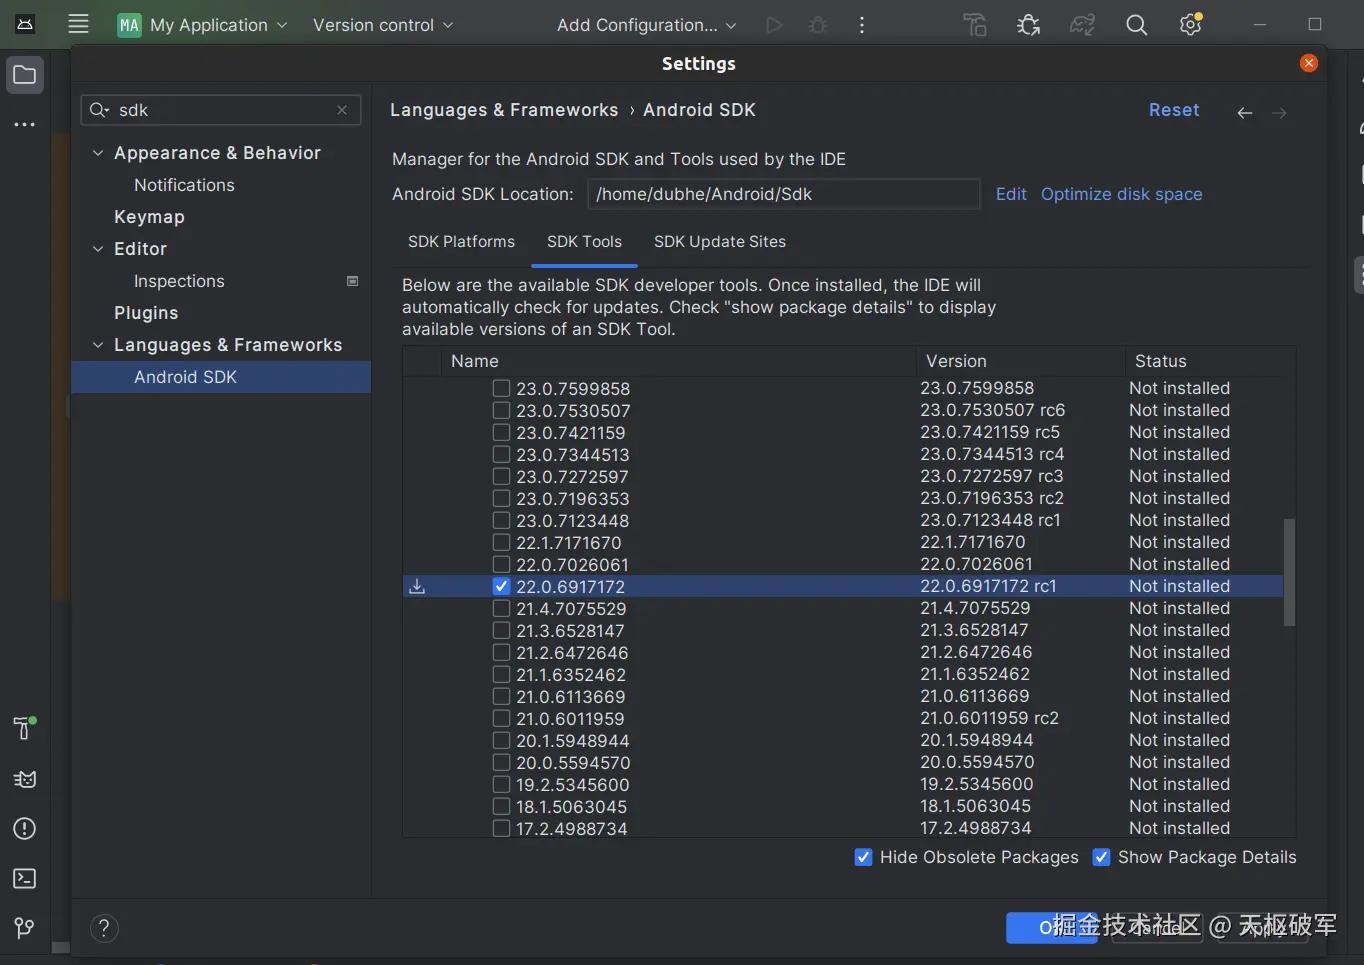
打开Android Studio的设置,搜索SDK,切换到SDK Tools选项卡,勾选右下角的Show Packages Details,展开ndk,勾选22.0.6917172rc1
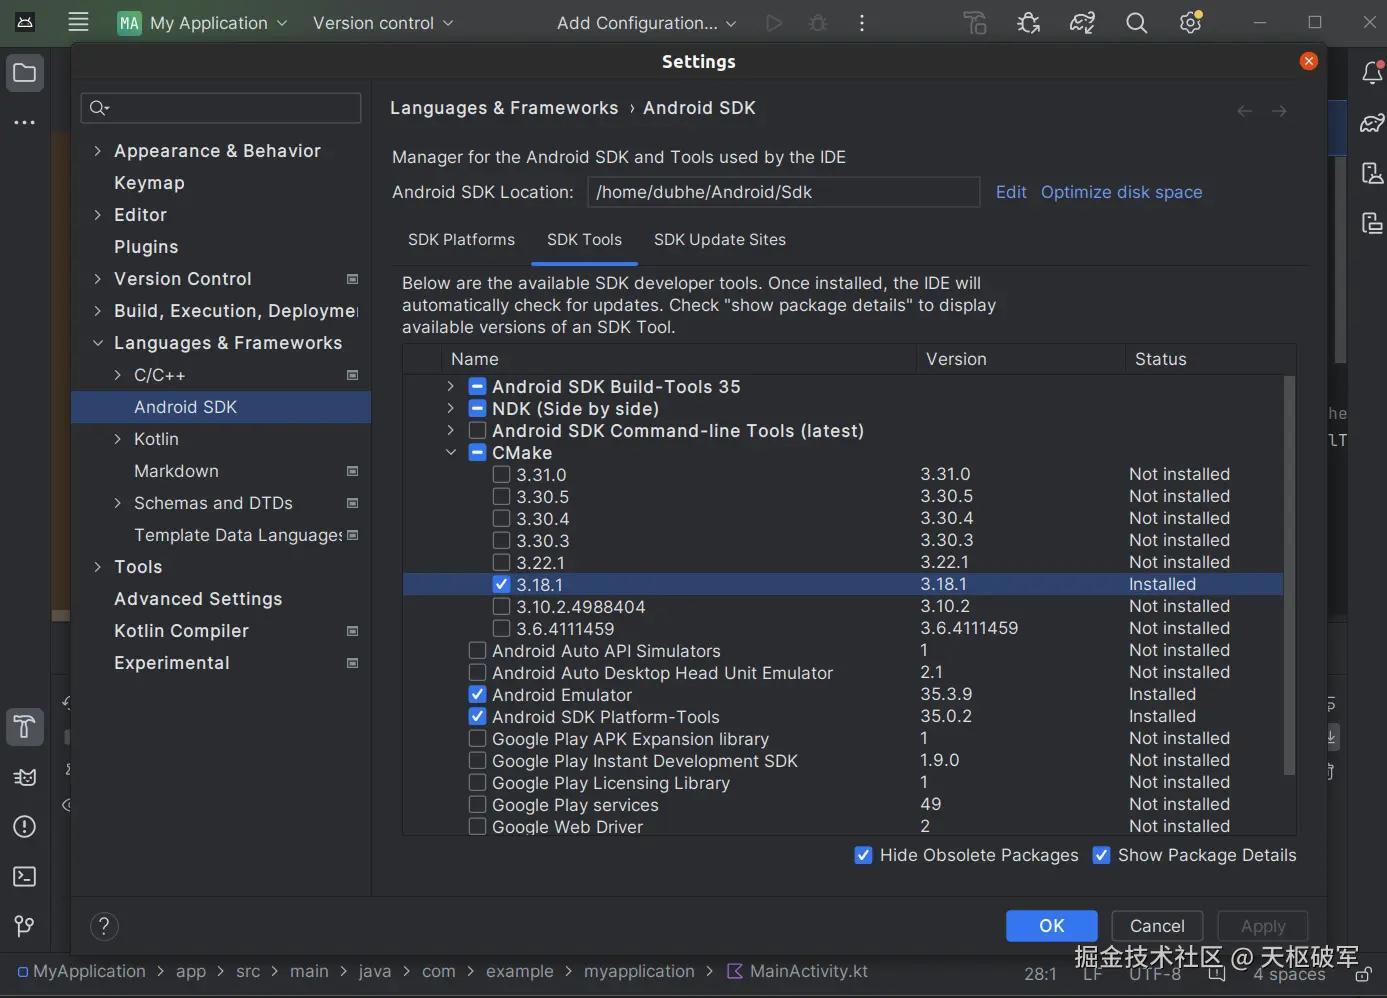
 往下拉,展开
CMake,勾选3.18.1
 点
点ok,下载ndk和CMake
然后Android Studio就可以关了。
克隆源码
bash 代码解读复制代码git clone https://github.com/arthenica/ffmpeg-kit.git
配置环境变量
需要配置SDK目录和NDK目录,SDK目录是最外层的,也就是Android Studio的设置里显示的那个。
NDK目录是内部的写着版本号的那层。
环境变量直接控制台运行或者写进~/.bachrc里都可以。
bash 代码解读复制代码export ANDROID_SDK_ROOT=~/Android/Sdk
export ANDROID_NDK_ROOT=$ANDROID_SDK_ROOT/ndk/22.0.6917172
编译
先在控制台开启魔法,某个步骤需要克隆来自谷歌的库。
然后进入克隆下来的目录,直接执行android.sh
bash代码解读复制代码./android.sh
默认编译5个架构:arm-v7a, arm-v7a-neon, arm64-v8a, x86, x86-64
可以加参数来跳过一些架构,比如说我不要arm-v7a-neon,那就执行
bash代码解读复制代码./android.sh --disable-arm-v7a-neon
编译时间会很长,具体用时看CPU性能,我的7840HS只给虚拟机15个核心,5个架构全部编译一遍大概要20分钟左右。
是的,每个架构都需要单独编译一遍,所以不需要的架构就统统去掉,节约时间。
编译结束后会生成一个aar文件在ffmpeg-kit/prebuilt/bundle-android-aar/ffmpeg-kit目录下
编译参数
方括号里面是默认值
bash 代码解读复制代码./android.sh --help

'android.sh' builds FFmpegKit for Android platform. By default five Android architectures (armeabi-v7a, armeabi-v7a-neon, arm64-v8a, x86 and x86_64) are built without any external libraries enabled. Options can be used to disable architectures and/or enable external libraries. Please note that GPL libraries (external libraries with GPL license) need --enable-gpl flag to be set explicitly. When compilation ends an Android Archive (AAR) file is created under the prebuilt folder.

Usage: ./android.sh [OPTION]... [VAR=VALUE]...

Specify environment variables as VARIABLE=VALUE to override default build options.

Options:
  -h, --help			display this help and exit
  -v, --version			display version information and exit
  -d, --debug			build with debug information
  -s, --speed			optimize for speed instead of size
  -f, --force			ignore warnings
  -l, --lts			build lts packages to support API 16+ devices
      --api-level=api		override Android api level
      --no-ffmpeg-kit-protocols	disable custom ffmpeg-kit protocols (saf)

Licensing options:
  --enable-gpl			allow building GPL libraries, created libs will be licensed under the GPLv3.0 [no]

Architectures:
  --disable-arm-v7a		do not build arm-v7a architecture [yes]
  --disable-arm-v7a-neon	do not build arm-v7a-neon architecture [yes]
  --disable-arm64-v8a		do not build arm64-v8a architecture [yes]
  --disable-x86			do not build x86 architecture [yes]
  --disable-x86-64		do not build x86-64 architecture [yes]

Libraries:
  --full			enables all external libraries
  --enable-android-media-codec	build with built-in Android MediaCodec support [no]
  --enable-android-zlib		build with built-in zlib support [no]
  --enable-chromaprint		build with chromaprint [no]
  --enable-dav1d		build with dav1d [no]
  --enable-fontconfig		build with fontconfig [no]
  --enable-freetype		build with freetype [no]
  --enable-fribidi		build with fribidi [no]
  --enable-gmp			build with gmp [no]
  --enable-gnutls		build with gnutls [no]
  --enable-kvazaar		build with kvazaar [no]
  --enable-lame			build with lame [no]
  --enable-libaom		build with libaom [no]
  --enable-libass		build with libass [no]
  --enable-libiconv		build with libiconv [no]
  --enable-libilbc		build with libilbc [no]
  --enable-libtheora		build with libtheora [no]
  --enable-libvorbis		build with libvorbis [no]
  --enable-libvpx		build with libvpx [no]
  --enable-libwebp		build with libwebp [no]
  --enable-libxml2		build with libxml2 [no]
  --enable-opencore-amr		build with opencore-amr [no]
  --enable-openh264		build with openh264 [no]
  --enable-openssl		build with openssl [no]
  --enable-opus			build with opus [no]
  --enable-sdl			build with sdl [no]
  --enable-shine		build with shine [no]
  --enable-snappy		build with snappy [no]
  --enable-soxr			build with soxr [no]
  --enable-speex		build with speex [no]
  --enable-srt			build with srt [no]
  --enable-tesseract		build with tesseract [no]
  --enable-twolame		build with twolame [no]
  --enable-vo-amrwbenc		build with vo-amrwbenc [no]
  --enable-zimg			build with zimg [no]

GPL libraries:
  --enable-libvidstab		build with libvidstab [no]
  --enable-rubberband		build with rubber band [no]
  --enable-x264			build with x264 [no]
  --enable-x265			build with x265 [no]
  --enable-xvidcore		build with xvidcore [no]

Custom libraries:
  --enable-custom-library-[n]-name=value			name of the custom library []
  --enable-custom-library-[n]-repo=value			git repository of the source code []
  --enable-custom-library-[n]-repo-commit=value			git commit to download the source code from []
  --enable-custom-library-[n]-repo-tag=value			git tag to download the source code from []
  --enable-custom-library-[n]-package-config-file-name=value	package config file installed by the build script []
  --enable-custom-library-[n]-ffmpeg-enable-flag=value	library name used in ffmpeg configure script to enable the library []
  --enable-custom-library-[n]-license-file=value		licence file path relative to the library source folder []
  --enable-custom-library-[n]-uses-cpp				flag to specify that the library uses libc++ []

Advanced options:
  --reconf-LIBRARY		run autoreconf before building LIBRARY [no]
  --redownload-LIBRARY		download LIBRARY even if it is detected as already downloaded [no]
  --rebuild-LIBRARY		build LIBRARY even if it is detected as already built [no]
  --no-archive			do not build Android archive [no]
常见问题和解决方案
编译日志会输出在项目根目录下的build.log文件里,并且这个log的内容是累加的,如果你不手动删除,每次编译的日志都会揉进这一个文件里面,按照时间顺序排列。一般如果报错了的话直接拉到最后一行就是原因。
无法访问git仓库
报错信息像这样
bash 代码解读复制代码正克隆到 'googletest-src'...
fatal: 无法访问 'https://github.com/google/googletest.git/':Failed to connect to github.com port 443: 拒绝连接
解决办法:给控制台开魔法、给git开魔法
CMake版本不对
报错信息像这样
bash代码解读复制代码CMake Error at /home/dubhe/ffmpeg-kit/.tmp/cmake/build/android-arm/cpu-features/googletest-src/CMakeLists.txt:4 (cmake_minimum_required): CMake 3.13 or higher is required. You are running version 3.10.2
解决办法:去Android Studio的SDK Tools设置里面把CMake删到只剩一个,剩下的这个要满足它要求的版本即可。
未设置Java环境变量,打包aar失败
报错信息
bash 代码解读复制代码Creating Android archive under prebuilt: failed

ERROR: JAVA_HOME is not set and no 'java' command could be found in your PATH.

Please set the JAVA_HOME variable in your environment to match the
location of your Java installation.
解决办法:安装Java环境
bash代码解读复制代码sudo apt-get install openjdk-17-jre openjdk-17-jdk
GLIBC版本不对
报错信息
bash 代码解读复制代码/home/dubhe/Android/Sdk/cmake/3.31.0/bin/cmake: /lib/x86_64-linux-gnu/libc.so.6: version ` GLIBC_2.28' not found (required by /home/dubhe/Android/Sdk/cmake/3.31.0/bin/cmake) `/home/dubhe/Android/Sdk/cmake/3.31.0/bin/cmake: /lib/x86_64-linux-gnu/libc.so.6: version `GLIBC_2.25' not found (required by /home/dubhe/Android/Sdk/cmake/3.31.0/bin/cmake)`
CMake的版本和GLIBC不匹配,要么换CMake的版本,要么换GLIBC的版本。
具体匹配关系我也不清楚,我问的GPT
找不到SDK/NDK
报错信息
perl 代码解读复制代码(*) ANDROID_SDK_ROOT not defined

(*) ANDROID_NDK_ROOT not defined
原因:前面配置环境变量那步有问题,编译脚本没找到SDK和NDK的路径。
无法下载Gradle
报错信息
php 代码解读复制代码Downloading https://services.gradle.org/distributions/gradle-8.2.1-bin.zip

Exception in thread "main" java.io.IOException: Downloading from https://services.gradle.org/distributions/gradle-8.2.1-bin.zip failed: timeout
	at org.gradle.wrapper.Download.downloadInternal(Download.java:110)
	at org.gradle.wrapper.Download.download(Download.java:67)
	at org.gradle.wrapper.Install$1.call(Install.java:68)
	at org.gradle.wrapper.Install$1.call(Install.java:48)
	at org.gradle.wrapper.ExclusiveFileAccessManager.access(ExclusiveFileAccessManager.java:69)
	at org.gradle.wrapper.Install.createDist(Install.java:48)
	at org.gradle.wrapper.WrapperExecutor.execute(WrapperExecutor.java:107)
	at org.gradle.wrapper.GradleWrapperMain.main(GradleWrapperMain.java:63)
Caused by: java.net.SocketTimeoutException: connect timed out
	at java.base/java.net.PlainSocketImpl.socketConnect(Native Method)
	at java.base/java.net.AbstractPlainSocketImpl.doConnect(AbstractPlainSocketImpl.java:412)
	at java.base/java.net.AbstractPlainSocketImpl.connectToAddress(AbstractPlainSocketImpl.java:255)
	at java.base/java.net.AbstractPlainSocketImpl.connect(AbstractPlainSocketImpl.java:237)
	at java.base/java.net.SocksSocketImpl.connect(SocksSocketImpl.java:392)
	at java.base/java.net.Socket.connect(Socket.java:609)
	at java.base/sun.security.ssl.SSLSocketImpl.connect(SSLSocketImpl.java:305)
	at java.base/sun.net.NetworkClient.doConnect(NetworkClient.java:177)
	at java.base/sun.net.www.http.HttpClient.openServer(HttpClient.java:509)
解决办法:去报错的链接手动下载Gradle,放到~/.gradle/wrapper/dists/gradle-[版本号]/[一串随机字符串]这个目录下,把目录里其他的文件删掉。
未找到命令
报错信息
bash 代码解读复制代码INFO: Running full autoreconf for fribidi

/home/dubhe/ffmpeg-kit/scripts/function.sh: 行 1854: autoreconf:未找到命令

DEBUG: Full autoreconf failed. Running full autoreconf with include for fribidi
原因:最开始安装依赖库和工具那一步有东西缺了,缺啥就装啥。有可能会出现前面那一步没有提到的工具,毕竟外部依赖库自己也在更新。手动安装一下需要的工具再编译。
Java和Gradle版本不匹配
报错信息
bash 代码解读复制代码Welcome to Gradle 8.2.1!

Here are the highlights of this release:
 - Kotlin DSL: new reference documentation, assignment syntax by default
 - Kotlin DSL is now the default with Gradle init
 - Improved suggestions to resolve errors in console output
 - Reduced sync memory consumption

For more details see https://docs.gradle.org/8.2.1/release-notes.html

Starting a Gradle Daemon (subsequent builds will be faster)

FAILURE: Build failed with an exception.

* Where:
Build file '/home/dubhe/ffmpeg-kit/android/ffmpeg-kit-android-lib/build.gradle' line: 1

* What went wrong:
A problem occurred evaluating project ':ffmpeg-kit-android-lib'.
> Failed to apply plugin 'com.android.internal.library'.
   > Android Gradle plugin requires Java 17 to run. You are currently using Java 11.
      Your current JDK is located in /usr/lib/jvm/java-11-openjdk-amd64
      You can try some of the following options:
       - changing the IDE settings.
       - changing the JAVA_HOME environment variable.
       - changing `org.gradle.java.home` in `gradle.properties`.

* Try:
> Run with --stacktrace option to get the stack trace.
> Run with --info or --debug option to get more log output.
> Run with --scan to get full insights.
> Get more help at https://help.gradle.org.
解决办法:替换Java版本和Gradle的要求保持一致
libiconv编译失败
报错信息
bash 代码解读复制代码libiconv: failed

./configure: line 8648: gl_HOST_CPU_C_ABI_32BIT: command not found checking for shared library path variable... LD_LIBRARY_PATH checking whether to activate relocatable installation... no
./configure: line 8693: syntax error near unexpected token ` reloc_final_prefix'  `
./configure: line 8693: ` gl_BUILD_TO_HOST(reloc_final_prefix)'  `configure: error: ./configure failed for libcharset
原因是GNU gettext依赖的某些宏工具未正确安装或未配置
解决办法:
bash代码解读复制代码sudo apt update sudo apt install -y autoconf automake libtool gettext build-essential
- 删除已有的configure
bash 代码解读复制代码rm -f ~/ffmpeg-kit/src/libiconv/libcharset/configure
- 手动配置
gettext
bash 代码解读复制代码sudo apt install gettext
cd ~
git clone https://git.savannah.gnu.org/git/gnulib.git
cd ~/ffmpeg-kit/src/libiconv
~/gnulib/gnulib-tool --add-import
如果一切正常,会提示
bash 代码解读复制代码~/gnulib/gnulib-tool --add-import
Module list with included dependencies (indented):
File list:
  lib/dummy.c
  m4/00gnulib.m4
  m4/gnulib-common.m4
  m4/zzgnulib.m4
Copying file lib/dummy.c
Copying file m4/00gnulib.m4
Copying file m4/gnulib-common.m4
Copying file m4/gnulib-tool.m4
Copying file m4/zzgnulib.m4
Creating m4/gnulib-cache.m4
Creating m4/gnulib-comp.m4
Creating lib/Makefile.am
Finished.

You may need to add #include directives for the following .h files.

Don't forget to
  - add "lib/Makefile" to AC_CONFIG_FILES in ./configure.ac,
  - mention "lib" in SUBDIRS in Makefile.am,
  - mention "-I m4" in ACLOCAL_AMFLAGS in Makefile.am
    or add an AC_CONFIG_MACRO_DIRS([m4]) invocation in ./configure.ac,
  - mention "m4/gnulib-cache.m4" in EXTRA_DIST in Makefile.am,
  - invoke gl_EARLY in ./configure.ac, right after AC_PROG_CC,
  - invoke gl_INIT in ./configure.ac.
-
按照提示的信息的
Don't forget to修改configure.ac这个文件和lib/Makefile.am文件 -
重新生成
configure文件
bash代码解读复制代码autoreconf -fiv
- 重新执行
.android.sh
运行Demo(可选)
克隆这个项目github.com/arthenica/f…
bash 代码解读复制代码git clone https://github.com/arthenica/ffmpeg-kit-test.git
用Android Studio打开android这个目录,里面有两个项目
test-app-local-dependency是使用本地aar
test-app-maven-central是使用云端的aar
(就尼玛有病,只有一行implementation不一样,还建俩项目)
不要直接运行,要改点东西
-
打开
test-app-local-dependency的build.gradle
把targetSdk和compileSdk改成28 -
找到这句话
bash 代码解读复制代码implementation files('../../../ffmpeg-kit/prebuilt/bundle-android-aar/ffmpeg-kit/ffmpeg-kit.aar')
两个选择,要么把我们编译出来的那个aar改个名字放到这个路径,要么把我们的aar放到libs或者其他什么地方,然后把这条导包语句改为指向我们的aar
- 打开
AndroidManifest.xml,在权限里面加一行写入权限
xml 代码解读复制代码<uses-permission android:name="android.permission.WRITE_EXTERNAL_STORAGE" />
- 打开
MainActivity.java,也加上写入权限
java 代码解读复制代码public static String[] PERMISSIONS_ALL = {
        Manifest.permission.READ_EXTERNAL_STORAGE,
        Manifest.permission.WRITE_EXTERNAL_STORAGE,   //加一行这个
        Manifest.permission.CAMERA
};
- 可以编译运行了,运行之后在输入框里输指令参数就可以了,不需要加
ffmpeg的开头,文件路径直接用绝对路径即可,例如:
bash代码解读复制代码-i /storage/emulated/0/DCIM/Camera/VID-20241116_143728.MP4 -c:v hevc_v4l2m2m -b:v 15M -c:a copy /storage/emulated/0/DCIM/Camera/VID-20241116_143728_hevc.MP4
参考资料
github.com/arthenica/f…
github.com/arthenica/f…
github.com/arthenica/f…

评论记录:
回复评论: