
前言
之前写过一个基于opencv2.x中findContours函数的最大连通域标记方法,但该程序会受各个contours之间hierarchy的影响而出错。本文给出一种基于连通域标记的最大连通域提取方法,在已知的图像上验证了python和c++版本的有效性。
Python版
最近发现图像处理库skimage很好用,因此用skimage写了一个函数用于标记最大连通域:
from skimage.measure import label

def largestConnectComponent(bw_img, ):
    '''
    compute largest Connect component of a binary image

    Parameters:
    ---

    bw_img: ndarray
        binary image

	Returns:
	---

	lcc: ndarray
		largest connect component.

    Example:
    ---
        >>> lcc = largestConnectComponent(bw_img)

    '''

    labeled_img, num = label(bw_img, background=0, return_num=True)
    # plt.figure(), plt.imshow(labeled_img, 'gray')

    max_label = 0
    max_num = 0
    for i in range(1, num+1): # 这里从1开始,防止将背景设置为最大连通域
        if np.sum(labeled_img == i) > max_num:
            max_num = np.sum(labeled_img == i)
            max_label = i
    lcc = (labeled_img == max_label)

    return lcc
- 1
- 2
- 3
- 4
- 5
- 6
- 7
- 8
- 9
- 10
- 11
- 12
- 13
- 14
- 15
- 16
- 17
- 18
- 19
- 20
- 21
- 22
- 23
- 24
- 25
- 26
- 27
- 28
- 29
- 30
- 31
- 32
- 33
- 34
- 35
- 36
- 37
c++版
由于opencv3中增加了连通域标记函数,因此使得查找最大连通域变得更加容易。代码如下:
void DefectsDetector::LargestConnecttedComponent(Mat srcImage, Mat &dstImage)
{
    Mat temp;
    Mat labels;
    srcImage.copyTo(temp);

    //1. 标记连通域
    int n_comps = connectedComponents(temp, labels, 4, CV_16U);
    vector histogram_of_labels;
    for (int i = 0; i < n_comps; i++)//初始化labels的个数为0
    {
        histogram_of_labels.push_back(0);
    }

    int rows = labels.rows;
    int cols = labels.cols;
    for (int row = 0; row < rows; row++) //计算每个labels的个数
    {
        for (int col = 0; col < cols; col++)
        {
            histogram_of_labels.at(labels.at(row, col)) += 1;
        }
    }
    histogram_of_labels.at(0) = 0; //将背景的labels个数设置为0

    //2. 计算最大的连通域labels索引
    int maximum = 0;
    int max_idx = 0;
    for (int i = 0; i < n_comps; i++)
    {
        if (histogram_of_labels.at(i) > maximum)
        {
            maximum = histogram_of_labels.at(i);
            max_idx = i;
        }
    }

    //3. 将最大连通域标记为1
    for (int row = 0; row < rows; row++)
    {
        for (int col = 0; col < cols; col++)
        {
            if (labels.at(row, col) == max_idx)
            {
                labels.at(row, col) = 255;
            }
            else
            {
                labels.at(row, col) = 0;
            }
        }
    }

    //4. 将图像更改为CV_8U格式
    labels.convertTo(dstImage, CV_8U);
}
- 1
- 2
- 3
- 4
- 5
- 6
- 7
- 8
- 9
- 10
- 11
- 12
- 13
- 14
- 15
- 16
- 17
- 18
- 19
- 20
- 21
- 22
- 23
- 24
- 25
- 26
- 27
- 28
- 29
- 30
- 31
- 32
- 33
- 34
- 35
- 36
- 37
- 38
- 39
- 40
- 41
- 42
- 43
- 44
- 45
- 46
- 47
- 48
- 49
- 50
- 51
- 52
- 53
- 54
- 55
- 56
以下是我之前写的错误版本,读者可以忽略,也可以一起分析下为什么会出错
错误的版本
先贴出错误的版本,这个版本的想法是使用findContours函数找到各个连通域的contours,然后选取contours面积最大的那个作为目标区域,并将其填充。findContours使用的是EXTERNAL的方式标记边缘。显然这种方法如果是一个大的连通域里面是中空的,则标记后的最大连通域会将中间空的部分填充上,因此出错。
Python版
之前的python版主要实现功能是利用opencv获取最大连通区域并去除。将之前在印象笔记里写的记录摘抄下来如下:
主要使用了如下方法:
- 首先通过findContours函数找到二值图像中的所有边界(这块看需要调节里面的参数)
- 然后通过contourArea函数计算每个边界内的面积
- 最后通过fillConvexPoly函数将面积最大的边界内部涂成背景
import cv2
import numpy as np
import matplotlib.pyplot as plt
if __name__ == '__main__':
img = cv2.imread('bw.bmp')
gray = cv2.cvtColor(img, cv2.COLOR_BGR2GRAY)
#find contours of all the components and holes
gray_temp = gray.copy() #copy the gray image because function
#findContours will change the imput image into another
contours, hierarchy = cv2.findContours(gray_temp, cv2.RETR_TREE, cv2.CHAIN_APPROX_NONE)
#show the contours of the imput image
cv2.drawContours(img, contours, -1, (0, 255, 255), 2)
plt.figure('original image with contours'), plt.imshow(img, cmap = 'gray')
#find the max area of all the contours and fill it with 0
area = []
for i in xrange(len(contours)):
area.append(cv2.contourArea(contours[i]))
max_idx = np.argmax(area)
cv2.fillConvexPoly(gray, contours[max_idx], 0)
#show image without max connect components
plt.figure('remove max connect com'), plt.imshow(gray, cmap = 'gray')
plt.show()
- 1
- 2
- 3
- 4
- 5
- 6
- 7
- 8
- 9
- 10
- 11
- 12
- 13
- 14
- 15
- 16
- 17
- 18
- 19
- 20
- 21
- 22
- 23
- 24
- 25
- 26
- 27
- 28
结果如下:

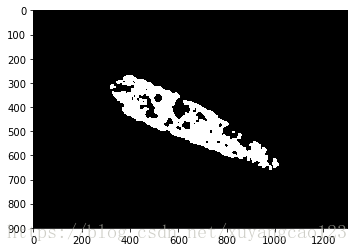
分析上述结果可以发现存在两个问题:
- 使用findContours函数检测边缘时如果最大连通域出现中空情况,则结果会将中空的部分填充上,得到错误的结果,本图因为中间没空,所以看起来效果是对的。
- 使用fillConvexPoly这个函数是有缺陷的,如果最大连通域不是凸的,则会得到错误的填充结果。
c++版
void findLargesrArea(Mat srcImage, Mat &dstImage)
{
    vector>	contours;
    vector			hierarchy;

    findContours(srcImage.clone(), contours, hierarchy, CV_RETR_EXTERNAL, CV_CHAIN_APPROX_NONE);

    double max_area = 0;
    int index = 0;
    for(int i = 0; i < contours.size(); i++)
    {
        if(contourArea(contours[i]) > max_area)
        {
            max_area = contourArea(contours[i]);
            index = i;
        }
    }
    //cout << "max_index: " << index << endl;

    dstImage =  Mat::zeros(srcImage.rows, srcImage.cols, srcImage.type());
    drawContours(dstImage, contours, index, Scalar(255));
    imfill(dstImage, dstImage);
}

void imfill(Mat srcimage, Mat &dstimage)
{
    Size m_Size = srcimage.size();
    Mat temimage = Mat::zeros(m_Size.height + 2, m_Size.width + 2, srcimage.type());

    srcimage.copyTo(temimage(Range(1, m_Size.height + 1), Range(1, m_Size.width + 1)));
    floodFill(temimage, Point(0,0), Scalar(255));
    Mat cutImg;
    temimage(Range(1, m_Size.height + 1), Range(1, m_Size.width + 1)).copyTo(cutImg);
    dstimage = srcimage | (~cutImg);
}
- 1
- 2
- 3
- 4
- 5
- 6
- 7
- 8
- 9
- 10
- 11
- 12
- 13
- 14
- 15
- 16
- 17
- 18
- 19
- 20
- 21
- 22
- 23
- 24
- 25
- 26
- 27
- 28
- 29
- 30
- 31
- 32
- 33
- 34
- 35
- 36
c++这个版本存在上述第1个问题,但是不存在第2个问题,原因是其使用了自定义的imfill函数,避免了图像非凸出现错误的情况。
评论记录:
回复评论: