
Elasticsearch 高级
建议阅读顺序:
- Elasticsearch 入门
- Elasticsearch 搜索
- Elasticsearch 搜索高级
- Elasticsearch高级(本文)
1. nested 类型
1.1 介绍
Elasticsearch 中的 nested 类型允许你在文档内存储复杂的数据结构,比如一个用户可能有多个地址,或者一个博客文章可能有多个标签等。nested 类型可以让你索引这些复杂数据,并且允许你对嵌套的数据进行查询。
1.2 添加 nested 文档
向商品映射中添加 nested 类型的字段 attr_list
- attr_list 表示商品属性
- attr_list 有两个字段:color、memory
PUT /items/_mapping
{
  "properties":{
    "attr_list":{
      "type":"nested",
      "properties":{
        "name":{ "type":"keyword" },
        "value":{ "type":"keyword" }
      }
    }
  }
}
- 1
- 2
- 3
- 4
- 5
- 6
- 7
- 8
- 9
- 10
- 11
- 12
由于添加了字段,所以需要对 items 索引进行更新,但是建议先删后加:
DELETE /items
- 1
PUT /items
{
  "mappings" : {
    "properties" : {
      "brand" : { "type" : "keyword" },
      "category" : { "type" : "keyword" },
      "commentCount" : { "type" : "integer", "index" : false },
      "id" : { "type" : "keyword" },
      "image" : { "type" : "keyword", "index" : false },
      "isAD" : { "type" : "boolean" },
      "name" : {
        "type" : "text",
        "analyzer" : "ik_max_word",
        "search_analyzer" : "ik_smart"
      },
      "price" : { "type" : "integer" },
      "sold" : { "type" : "integer" },
      "stock" : { "type" : "integer" },
      "updateTime" : { "type" : "date" },
      "location" : { "type" : "geo_point" },
      "attr_list":{
        "type":"nested",
        "properties":{
          "name":{ "type":"keyword" },
          "value":{ "type":"keyword" }
        }
      }
    }
  }
}

- 1
- 2
- 3
- 4
- 5
- 6
- 7
- 8
- 9
- 10
- 11
- 12
- 13
- 14
- 15
- 16
- 17
- 18
- 19
- 20
- 21
- 22
- 23
- 24
- 25
- 26
- 27
- 28
- 29
- 30
在实体类上添加属性:
// 商品属性
@ApiModelProperty("商品规格")
private List<Spec> attr_list;

@Data
public static class Spec {
  private String name;
  private String value;
}
- 1
- 2
- 3
- 4
- 5
- 6
- 7
- 8
- 9
向索引添加文档,可以添加单个文档也可以批量添加文档,添加文档时指定商品属性:
@Test
void testAddDocument2() throws Exception {
  // 商品id
  Long id = 317578L;
  // 根据id查询商品
  Item item = itemService.getById(id);

  // 转为ItemDoc
  ItemDoc itemDoc = BeanUtils.copyBean(item, ItemDoc.class);
  ItemDoc.Spec spec_1 = new ItemDoc.Spec();
  spec_1.setName("大小");
  spec_1.setValue("60*40");
  // 再设置一个新规格
  ItemDoc.Spec spec_2 = new ItemDoc.Spec();
  spec_2.setName("颜色");
  spec_2.setValue("白色");
  itemDoc.setAttr_list(List.of(spec_1, spec_2));

  // 使用esClient添加文档
  IndexResponse response = esClient.index(
    i -> i.index("items").id(id.toString()).document(itemDoc)
  );

  // 打印结果
  String s = response.result().jsonValue();
  log.info("添加文档结果:{}", s);
}
- 1
- 2
- 3
- 4
- 5
- 6
- 7
- 8
- 9
- 10
- 11
- 12
- 13
- 14
- 15
- 16
- 17
- 18
- 19
- 20
- 21
- 22
- 23
- 24
- 25
- 26
- 27
查询文档:GET /items/_doc/{id}
1.3 搜索 nested
查询商品颜色是白色的商品:
GET /items/_search
{
  "query": {
    "nested": {
      "path": "attr_list",
      "query": {
        "bool": {
          "must": [
            { "term": { "attr_list.name": { "value": "颜色" } } },
            { "term": { "attr_list.value": { "value": "白色" } } }
          ]
        }
      }
    }
  }
}
- 1
- 2
- 3
- 4
- 5
- 6
- 7
- 8
- 9
- 10
- 11
- 12
- 13
- 14
- 15
- 16
"nested":这是一个嵌套查询,用于查询嵌套对象。它允许你在嵌套对象中执行更复杂的查询。
"path": "attr_list":指定了要查询哪个嵌套对象字段。在这个例子中,嵌套对象的字段名是attr_list
1.4 聚合 nested
先按商品属性名称聚合,再按属性值聚合:
GET /items/_search
{
  "size": 0,
  "aggs": {
    "attr_aggs": {
      "nested": { "path": "attr_list" },
      "aggs": {
        "attr_name_aggs": {
          "terms": { "field": "attr_list.name", "size": 10 },
          "aggs": {
            "attr_value_aggs": {
              "terms": { "field": "attr_list.value", "size": 10 }
            }
          }
        }
      }
    }
  }
}
- 1
- 2
- 3
- 4
- 5
- 6
- 7
- 8
- 9
- 10
- 11
- 12
- 13
- 14
- 15
- 16
- 17
- 18
- 19
1.5 Java Client
1.5.1 nested 查询
将 “查询商品颜色是白色的商品” 的 DSL 转为对应代码:
@Test
void testNested() throws Exception {
  SearchRequest.Builder builder = new SearchRequest.Builder();
  builder.index("items");

  builder.query(
    q -> q.nested(
      n -> n.path("attr_list").query(
        q1 -> q1.bool(
          b -> b.must(
            a -> a.term(
              t -> t.field("attr_list.name").value("颜色")
            )
          ).must(
            a1 -> a1.term(
              t -> t.field("attr_list.value").value("白色")
            )
          )
        )
      )
    )
  );
  SearchRequest build = builder.build();
  SearchResponse<ItemDoc> response = esClient.search(build, ItemDoc.class);
  // 解析结果
  List<Hit<ItemDoc>> hits = response.hits().hits();
  hits.forEach(hit -> {
    ItemDoc source = hit.source();
    log.info("查询结果:{}", source);
  });
}
- 1
- 2
- 3
- 4
- 5
- 6
- 7
- 8
- 9
- 10
- 11
- 12
- 13
- 14
- 15
- 16
- 17
- 18
- 19
- 20
- 21
- 22
- 23
- 24
- 25
- 26
- 27
- 28
- 29
- 30
- 31
1.5.2 nested 聚合
将 “先按商品属性名称聚合,再按属性值聚合” 的 DSL 转为对应代码:
@Test
void testNestedAggs() throws Exception {

  SearchRequest.Builder builder = new SearchRequest.Builder();
  builder.index("items2");
  builder.size(0);
  builder.aggregations(
    "attr_aggs",
    a -> a.nested(
      n -> n.path("attr_list")
    ).aggregations(
      "attr_name_aggs",
      a1 -> a1.terms(
        t -> t.field("attr_list.name").size(10)
      ).aggregations(
        "attr_value_aggs",
        a2 -> a2.terms(
          t -> t.field("attr_list.value")
        )
      )
    )
  );
  SearchRequest build = builder.build();
  SearchResponse<ItemDoc> response = esClient.search(build, ItemDoc.class);
  Map<String, Aggregate> aggregations = response.aggregations();
  Aggregate attrAggs = aggregations.get("attr_aggs");
  //解析结果
  NestedAggregate nested = attrAggs.nested();
  Map<String, Aggregate> attrNameAggs = nested.aggregations();
  Aggregate aggregate = attrNameAggs.get("attr_name_aggs");

  aggregate.sterms().buckets().array().forEach(bucket -> {
    String key = bucket.key().stringValue();
    Long docCount = bucket.docCount();
    log.info("属性名:{},属性值数量:{}", key, docCount);
    Map<String, Aggregate> aggregations1 = bucket.aggregations();
    Aggregate attrValueAggs = aggregations1.get("attr_value_aggs");
    attrValueAggs.sterms().buckets().array().forEach(bucket1 -> {
      String key1 = bucket1.key().stringValue();
      Long docCount1 = bucket1.docCount();
      log.info("属性值:{},属性值数量:{}", key1, docCount1);
    });
  });
}
- 1
- 2
- 3
- 4
- 5
- 6
- 7
- 8
- 9
- 10
- 11
- 12
- 13
- 14
- 15
- 16
- 17
- 18
- 19
- 20
- 21
- 22
- 23
- 24
- 25
- 26
- 27
- 28
- 29
- 30
- 31
- 32
- 33
- 34
- 35
- 36
- 37
- 38
- 39
- 40
- 41
- 42
- 43
- 44
2. 同义词
2.1 设置同义词
搜索中同义词的需求:在搜索时输入一个关键字,包含关键字同义词的文档应该也可以搜索出来。
比如:输入“电脑”,会搜索出包含 “计算机” 的文档,输入 “黑马” 搜索出 “黑马程序员”、“传智播客” 的文章。
elasticsearch 的同义词有如下两种形式:
-
单向同义词:
heima,黑马=>黑马程序员,黑马、传智播客- 1
箭头左侧的词都会映射成箭头右侧的词。
输入箭头左侧的词可以搜索出箭头右侧的词。
-
双向同义词:
马铃薯, 土豆, potato- 1
双向同义词可以互相映射。
输入 “土豆” 可以搜索出 “potato”,输入 “potato” 可以搜索出 “土豆”
怎么设置同义词?
首先在同义词加到 synonyms.txt 文件中,synonyms.txt 文件在 es 的 config 目录下。
在 synonyms.txt 中加入:
中国,中华人民共和国,china
heima,黑马=>黑马程序员,黑马、传智播客
...
- 1
- 2
- 3
2.2 定义同义词分词器
在设置索引映射时自定义同义词分词器 my_synonyms_analyzer,并且用于 “title” 字段的搜索。
PUT /test_index
{
  "settings": {
    "analysis": {
      "filter": {
        "my_synonym_filter": {
          "type": "synonym",
          "updateable": true,
          "synonyms_path": "synonyms.txt"
        }
      },
      "analyzer": {
        "my_synonyms_analyzer": {
          "tokenizer": "ik_smart",
          "filter": [ "my_synonym_filter" ]
        }
      }
    }
  },
  "mappings": {
    "properties": {
      "title": {
        "type": "text",
        "analyzer": "ik_max_word",
        "search_analyzer": "my_synonyms_analyzer"
      }
    }
  }
}
- 1
- 2
- 3
- 4
- 5
- 6
- 7
- 8
- 9
- 10
- 11
- 12
- 13
- 14
- 15
- 16
- 17
- 18
- 19
- 20
- 21
- 22
- 23
- 24
- 25
- 26
- 27
- 28
- 29
参数说明:
my_synonym_filter是自定义的词汇过滤器;my_synonyms_analyzer是自定义的分析器,my_synonyms_analyzer包含并引用了my_synonym_filter;updateable指示能否动态更新,必须为true才能动态更新同义词;synonyms_path指示同义词文件的位置;my_synonyms_analyzer分析器里用ik_smart的分词器,my_synonyms_analyzer 的分词流程是原始文本先经过ik_smart分词的结果再用 my_synonym_filter 处理;mappings.properties.title.search_analyzer指示title字段在搜索时使用my_synonyms_analyzer分析器。
2.3 测试
先向 test_index 索引中添加数据:
POST /_bulk
{"index": {"_index":"test_index", "_id": "5"}}
{"title": "china你好"}
{"index": {"_index":"test_index", "_id": "4"}}
{"title": "中国你好"}
{"index": {"_index":"test_index", "_id": "6"}}
{"title": "中华人民共和国你好"}
{"index": {"_index":"test_index", "_id": "7"}}
{"title": "China你好"}
{"index": {"_index":"test_index", "_id": "8"}}
{"title": "这是一匹黑马"}
{"index": {"_index":"test_index", "_id": "9"}}
{"title": "黑马是中国良心培训机构"}
{"index": {"_index":"test_index", "_id": "10"}}
{"title": "黑马程序员是中国良心培训机构"}
{"index": {"_index":"test_index", "_id": "11"}}
{"title": "传智播客一所IT培训机构"}
- 1
- 2
- 3
- 4
- 5
- 6
- 7
- 8
- 9
- 10
- 11
- 12
- 13
- 14
- 15
- 16
- 17
搜索关键字 “china”:
GET /test_index/_search
{
  "query": {
    "match": { "title": "china" }
  }
}
- 1
- 2
- 3
- 4
- 5
- 6
分析查询到的结果,会发现,查询到的结果只有包含关键字的值,很显然同义词并没有生效,此时就要开启同义词生效,执行 POST /test_index/_reload_search_analyzers。
3. 自动补全
3.1 介绍
当在搜索框输入字符时提示出与该字符有关的搜索项,这个效果就是自动补全。
Elasticsearch 如何实现自动补全?
要实现上述自动补全的需求需要完成两个功能:
- 拼音搜索
- 前缀搜索
3.2 拼音分词器
3.2.1 安装拼音分词器
与 IK 分词器一样,拼音分词器也有插件,在 GitHub 上有 elasticsearch 的拼音分词插件。
地址:https://github.com/medcl/elasticsearch-analysis-pinyin
找到与 Elasticsearch 版本一致的插件下载包。
安装方式与IK分词器一样,分三步:
- 解压 elasticsearch-analysis-pinyin-7.17.7.zip
- 上传到虚拟机中 elasticsearch 的 plugin 目录
- 重启 elasticsearch
- 测试
测试
POST /_analyze
{
  "text": "黑马程序员",
  "analyzer": "pinyin"
}
- 1
- 2
- 3
- 4
- 5
3.2.2 自定义分词器
默认的拼音分词器会将每个汉字单独分为拼音,而我们希望的是每个词条形成一组拼音,需要对拼音分词器做个性化定制,形成自定义分词器。
elasticsearch 中分词器(analyzer)的组成包含三部分:
character filters:在 tokenizer 之前对文本进行处理。例如删除字符、替换字符tokenizer:将文本按照一定的规则切割成词条(term)。例如 keyword,就是不分词;还有 ik_smarttokenizer filter:将 tokenizer 输出的词条做进一步处理。例如大小写转换、同义词处理、拼音处理等
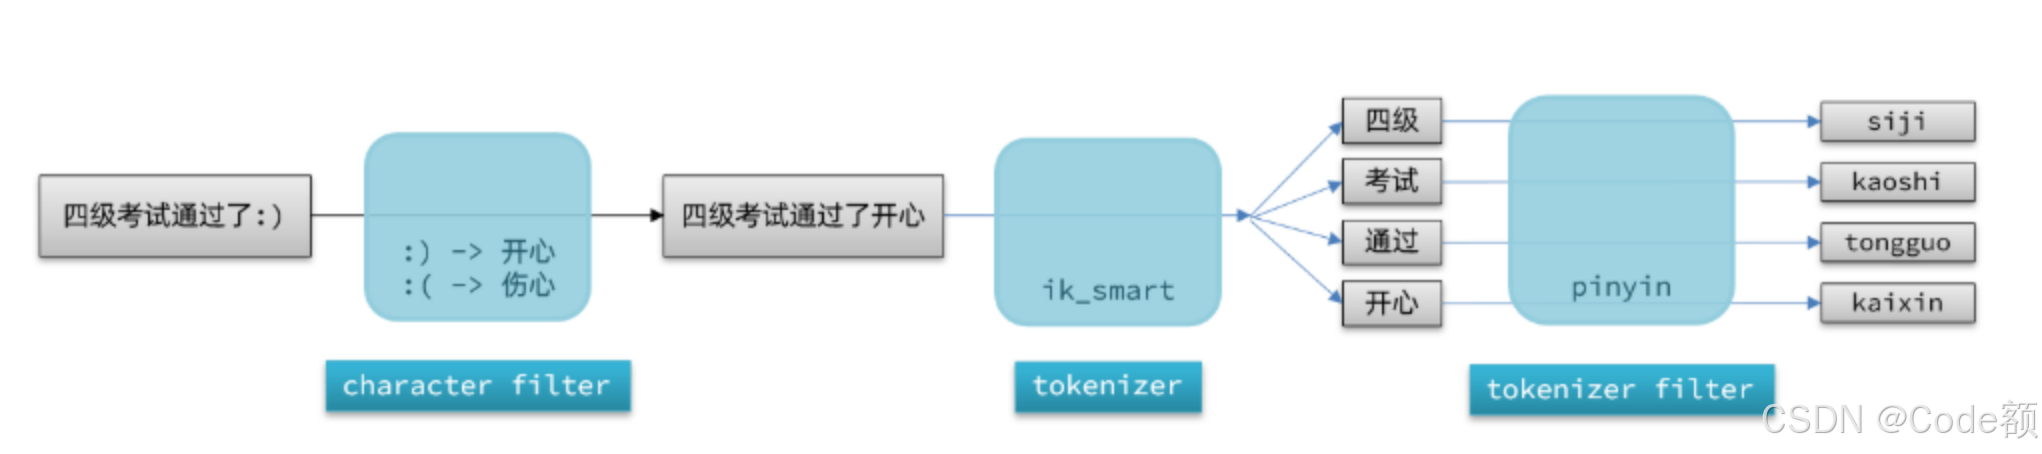
声明自定义分词器的语法如下:
PUT /test_index2
{
  "settings": {
    "analysis": {
      // 自定义分词器
      "analyzer": {
        // 分词器名称
        "my_analyzer": { "tokenizer": "ik_max_word", "filter": "py" }
      },
      // 自定义tokenizer filter
      "filter": {
        // 过滤器名称
        "py": {
          // 过滤器类型,这里是pinyin
          "type": "pinyin",
          "keep_full_pinyin": true,
          "keep_joined_full_pinyin": true,
          "keep_original": true,
          "limit_first_letter_length": 16,
          "remove_duplicated_term": true,
          "none_chinese_pinyin_tokenize": false
        }
      }
    }
  },
  "mappings": {
    "properties": {
      "name": {
        "type": "text",
        "analyzer": "my_analyzer",
        "search_analyzer": "ik_smart"
      }
    }
  }
}
- 1
- 2
- 3
- 4
- 5
- 6
- 7
- 8
- 9
- 10
- 11
- 12
- 13
- 14
- 15
- 16
- 17
- 18
- 19
- 20
- 21
- 22
- 23
- 24
- 25
- 26
- 27
- 28
- 29
- 30
- 31
- 32
- 33
- 34
- 35
属性说明:
-
type: "pinyin":这指定了过滤器的类型为
pinyin,即使用拼音分词器。 -
keep_full_pinyin: false:控制是否保留完整的拼音形式。设置为
false表示不保留完整的拼音形式。 -
keep_joined_full_pinyin: true:控制是否保留连接的完整拼音形式。设置为
true表示保留连接的完整拼音形式,例如 “你好” 可能会被转换为 “nihao”。 -
keep_original: true:控制是否保留原文本。设置为
true表示保留原文本,这在某些情况下很有用,例如需要同时支持拼音和原文本的搜索。 -
limit_first_letter_length: 16:控制首字母的最大长度。例如,“你好” 的首字母形式为 “n h”,这个值控制了首字母的最大长度。
-
remove_duplicated_term: true:控制是否移除重复的词条。设置为
true表示移除重复的词条,这有助于减少索引大小。 -
none_chinese_pinyin_tokenize: false:控制是否对非中文文本也进行拼音分词。设置为
false表示不对非中文文本进行拼音分词。
测试自定义分词器:
POST /test_index2/_analyze
{
  "text": "黑马程序员",
  "analyzer": "my_analyzer"
}
- 1
- 2
- 3
- 4
- 5
3.3 自动补全查询
3.3.1 completion
Elasticsearch 专门设计 completion 查询用于自动补全,completion 查询可以实现前缀搜索的效果,性能比前缀搜索更快。
completion 查询会匹配以用户输入内容开头的词条并返回,使用 completion 查询对文档中字段的类型有一些约束:
- 参与补全查询的字段必须是 completion 类型。
- 字段的内容一般是用来补全的多个词条形成的数组。
在 test_index2 索引中添加 suggestion 字段并且设置为 completion 类型:
PUT /test_index2/_mapping
{
  "properties": {
    "suggestion": { "type":"completion" }
  }
}
- 1
- 2
- 3
- 4
- 5
- 6
3.3.2 测试
更新原有文档,文档中指定了自动补全的内容:
POST /test_index2/_update/100
{
  "doc": { "suggestion": ["拉杆箱","托运箱"] }
}


POST /test_index2/_update/101
{
  "doc": { "suggestion": ["拉杆箱","旅行箱","莎米特"] }
}
- 1
- 2
- 3
- 4
- 5
- 6
- 7
- 8
- 9
- 10
测试:
GET /test_index2/_search
{
  "suggest" : {
    "suggestion_suggest" : {
      "completion" : {
        "field": "suggestion",
        "size": 10,
        "skip_duplicates": true
      },
      "text" : "旅"
    }
  }
}
- 1
- 2
- 3
- 4
- 5
- 6
- 7
- 8
- 9
- 10
- 11
- 12
- 13
参数说明:
-
suggest:这是建议器的顶级对象,用于配置建议器。 -
suggestion_suggest:这是建议器的名称,可以自定义。它用于标识建议器。 -
completion:这是指定建议器类型的部分。在这里,我们使用的是
completion类型,它是专门为自动补全设计的建议器。 -
field:这是用于建议的字段名称。在这个例子中,我们使用名为
suggestion的字段,该字段应该已经被配置为completion类型的字段。 -
size:这个参数控制返回的建议数量。在这个例子中,我们设置了
size为10,意味着最多返回10个建议。 -
skip_duplicates:这个参数用于控制是否在返回的建议中跳过重复的条目。在这个例子中,我们设置为
true,意味着如果某个建议在多个文档中出现,只会返回一次。 -
text:这是用户输入的文本,用于生成建议。
3.3.3 Java Client
@Test
void testSuggest() throws IOException {
  SearchRequest.Builder builder = new SearchRequest.Builder();
  builder.index("test_index2");
  builder.suggest(
    s -> s.suggesters(
      "suggestion_suggest",
      ss -> ss.completion(
        c -> c.field("suggestion").size(10).skipDuplicates(true)
      ).text("拉")
    )
  );
  SearchRequest request = builder.build();
  SearchResponse<Index2> response = esClient.search(request, Index2.class);
  Map<String, List<Suggestion<Index2>>> suggest = response.suggest();
  List<Suggestion<Index2>> suggestion_suggest = suggest.get("suggestion_suggest");
  suggestion_suggest.stream().forEach(suggestion -> {
    suggestion.completion().options().forEach(option -> {
      String text = option.text();
      System.out.println(text);
    });
  });
}

/**
  * 测试自动补全模型类
  */
@Data
public static class Index2 {
  //id
  private Long id;
  //name
  private String name;
  private List<String> suggestion;

}
- 1
- 2
- 3
- 4
- 5
- 6
- 7
- 8
- 9
- 10
- 11
- 12
- 13
- 14
- 15
- 16
- 17
- 18
- 19
- 20
- 21
- 22
- 23
- 24
- 25
- 26
- 27
- 28
- 29
- 30
- 31
- 32
- 33
- 34
- 35
- 36
3.4 拼音自动补全
3.4.1 创建自动补全字段
自定义分词器:
PUT /test_index3
{
  "settings": {
    "analysis": {
      "analyzer": {
        "completion_analyzer": { "tokenizer": "keyword", "filter": "py" }
      },
      "filter": {
        "py": {
          "type": "pinyin",
          "keep_full_pinyin": true,
          "keep_joined_full_pinyin": true,
          "keep_original": true,
          "limit_first_letter_length": 16,
          "remove_duplicated_term": true,
          "none_chinese_pinyin_tokenize": false
        }
      }
    }
  },
  "mappings": {
    "properties": {
      "id": { "type": "keyword" },
      "name":{
        "type": "text",
        "analyzer": "ik_max_word",
        "search_analyzer": "ik_smart"
      },
      "suggestion":{ "type": "completion", "analyzer": "completion_analyzer" }
    }
  }
}
- 1
- 2
- 3
- 4
- 5
- 6
- 7
- 8
- 9
- 10
- 11
- 12
- 13
- 14
- 15
- 16
- 17
- 18
- 19
- 20
- 21
- 22
- 23
- 24
- 25
- 26
- 27
- 28
- 29
- 30
- 31
- 32
3.4.2 更新/新增文档
POST test_index3/_doc/100
{
"id":100,
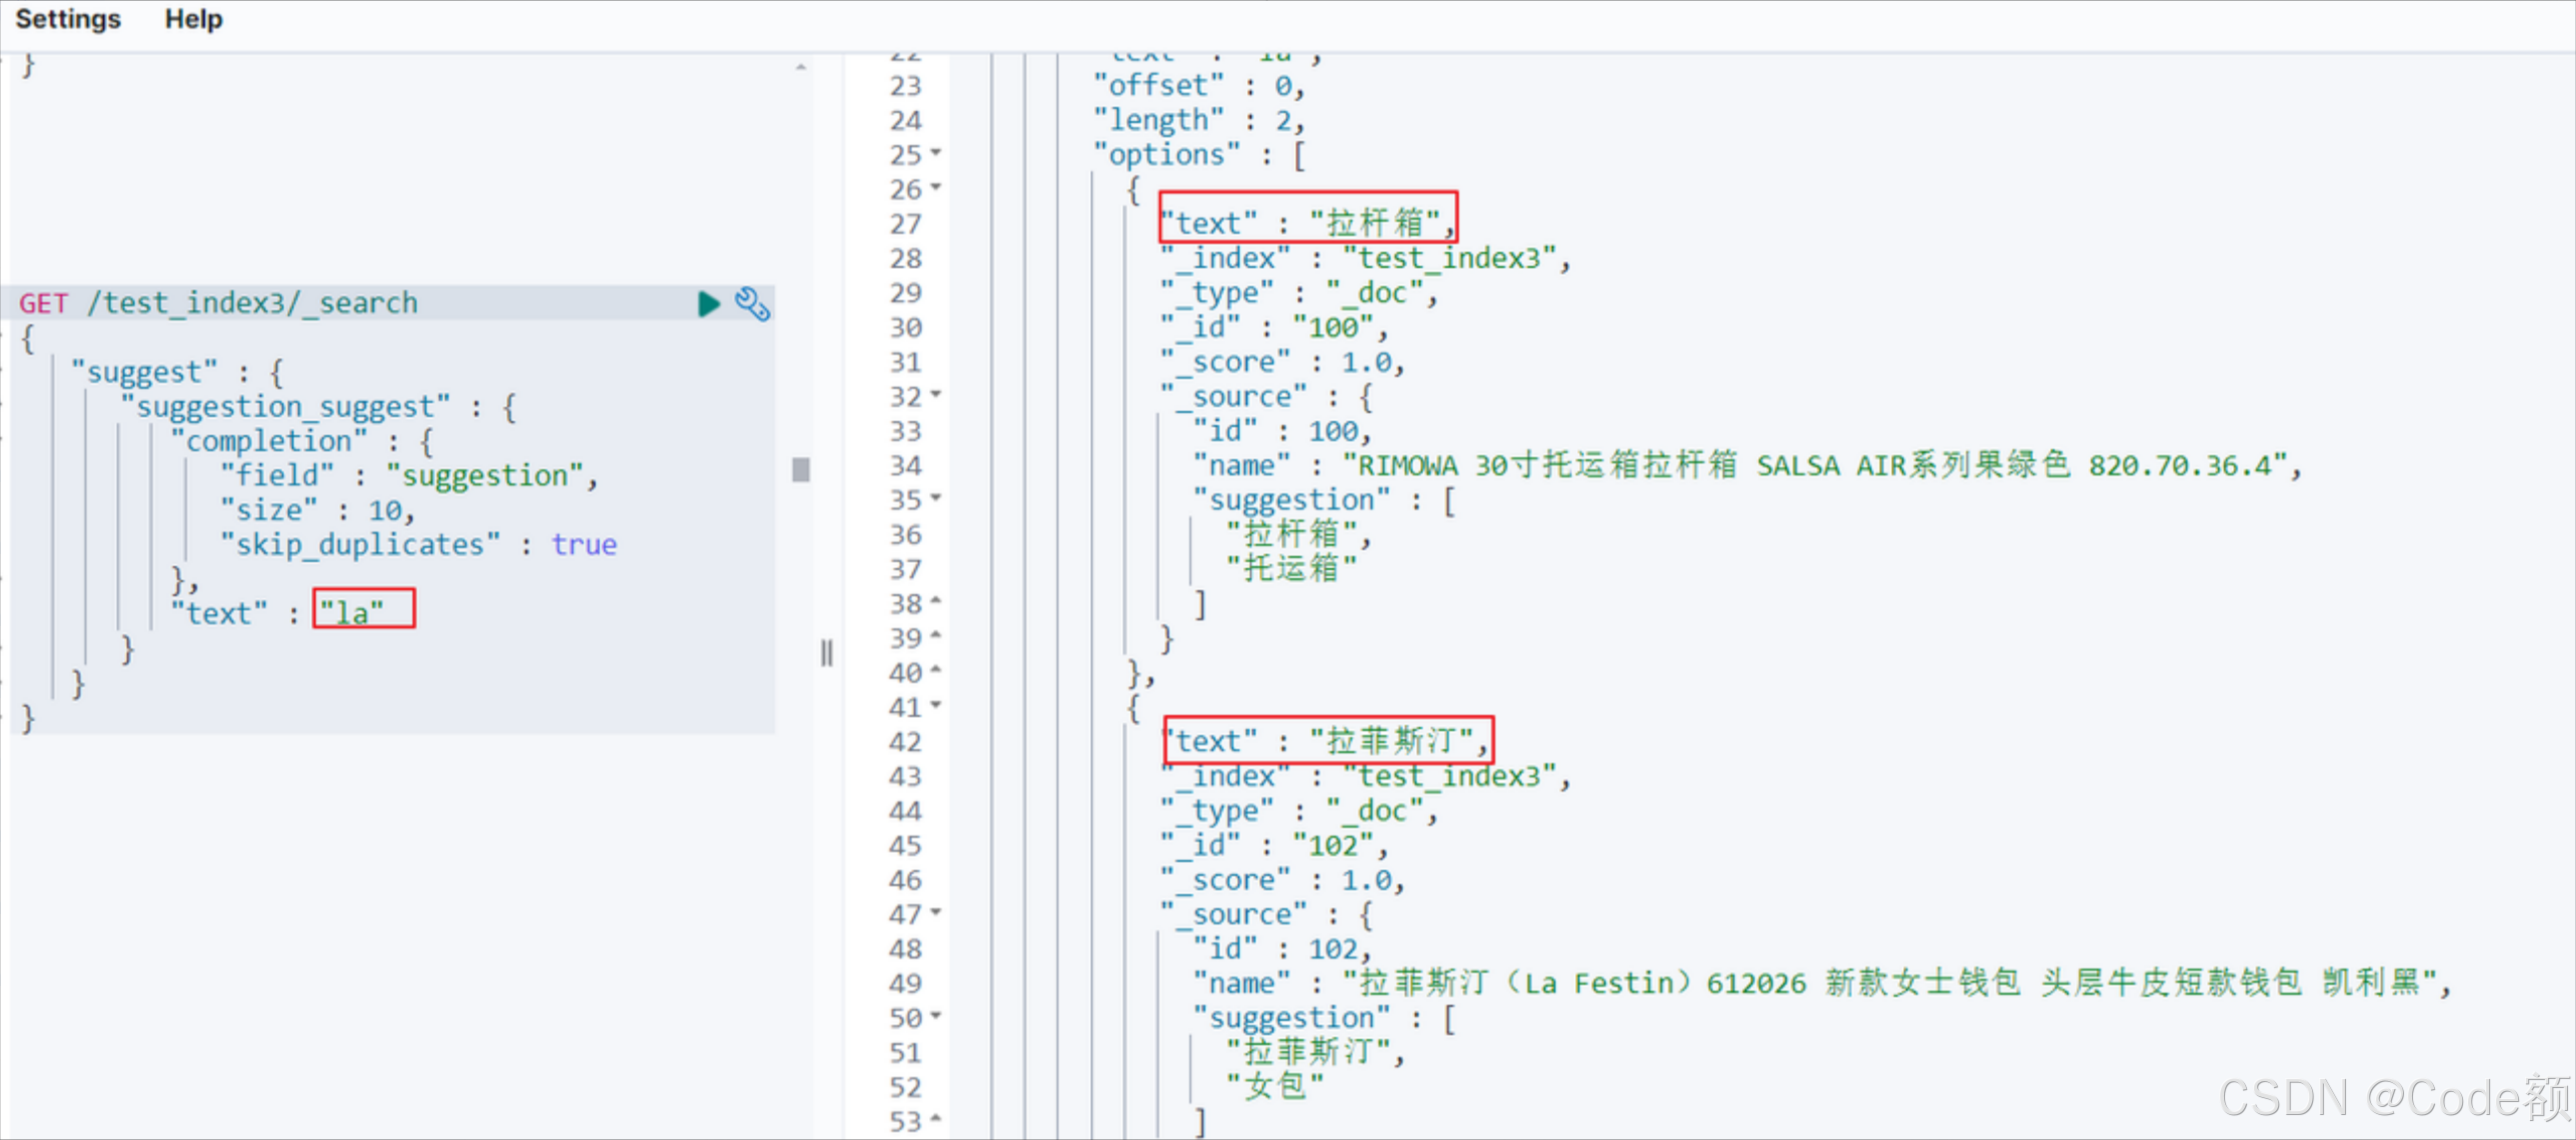
"name":"RIMOWA 30寸托运箱拉杆箱 SALSA AIR系列果绿色 820.70.36.4",
"suggestion": ["拉杆箱","托运箱"]
}
POST test_index3/_doc/101
{
"id":101,
"name":"莎米特SUMMIT 旅行拉杆箱28英寸PC材质大容量旅行行李箱PC154 黑色",
"suggestion": ["拉杆箱","旅行箱","莎米特"]
}
POST test_index3/_doc/102
{
"id":102,
"name":"拉菲斯汀(La Festin)612026 新款女士钱包 头层牛皮短款钱包 凯利黑",
"suggestion": ["拉菲斯汀","女包"]
}
- 1
- 2
- 3
- 4
- 5
- 6
- 7
- 8
- 9
- 10
- 11
- 12
- 13
- 14
- 15
- 16
- 17
- 18
- 19
- 20
- 21
3.4.3 测试
GET /test_index3/_search
{
  "suggest": {
    "suggestion_suggest": {
      "completion": {
        "field": "suggestion",
        "size": 2,
        "skip_duplicates": true
      },
      "text": "la"
    }
  }
}
- 1
- 2
- 3
- 4
- 5
- 6
- 7
- 8
- 9
- 10
- 11
- 12
- 13
评论记录:
回复评论: