
一、VSCode简介
Visual Studio Code (简称 VS Code / VSC) 是一款免费开源的现代化轻量级代码编辑器,支持几乎所有主流的开发语言的语法高亮、智能代码补全、自定义热键、括号匹配、代码片段、代码对比 Diff、GIT 等特性,支持插件扩展,并针对网页开发和云端应用开发做了优化。软件跨平台支持 Win、Mac 以及 Linux。教程见链接:Visual Studio Code官方教程。
二、GCC环境配置
GCC 编译器是 Linux 下默认的 C/C++ 编译器,大部分 Linux 发行版中都是默认安装的,通常以 Linux 命令的形式在终端(Shell)中使用。GCC编译命令参数详见博客:GCC参数详解。
Windows下如果也想使用GCC编译器(开源软件最常用的编译器之一),推荐安装MinGW,安装教程见博客:在Windows中安装MinGW-w64。
三、VSCode编译调试C++程序
VSCode配置C/C++环境并编译运行调试的过程在网上找到一篇不错的博客:整理VSC配置C++环境并编译运行,这里不再重复详述,只做一点补充。
下面分别贴出launch.json与tasks.json的配置项供参考:
// launch.json:

{
    // Use IntelliSense to learn about possible attributes.
    // Hover to view descriptions of existing attributes.
    // For more information, visit: https://go.microsoft.com/fwlink/?linkid=830387
    "version": "0.2.0",
    "configurations": [
        {
            "name": "C++(gdb) Launch",  //DEBUG中出现的名字
            "preLaunchTask": "cppdbg",  //在launch之前运行的任务名,要跟tasks.json中的"label"大小写一致
            "type": "cppdbg",
            "request": "launch",
            "program": "${fileDirname}/${fileBasenameNoExtension}.exe", //需要运行的是当前打开文件的目录中,名字和当前文件相同,但扩展名为exe的程序
            "args": [],
            "stopAtEntry": false,           //选为true则会在打开控制台后停滞,暂时不执行程序
            "cwd": "${workspaceFolder}",    //当前工作路径:当前文件所在的工作空间
            "environment": [],
            "externalConsole": true,        //是否使用外部控制台
            "MIMode": "gdb",
            "miDebuggerPath": "C:/MinGW/bin/gdb.exe",
            "setupCommands": [
                {
                    "description": "Enable pretty-printing for gdb",
                    "text": "-enable-pretty-printing",
                    "ignoreFailures": true
                }
            ]
        }
    ]
}

- 1
- 2
- 3
- 4
- 5
- 6
- 7
- 8
- 9
- 10
- 11
- 12
- 13
- 14
- 15
- 16
- 17
- 18
- 19
- 20
- 21
- 22
- 23
- 24
- 25
- 26
- 27
- 28
- 29
- 30
- 31
// tasks.json:

{
    // See https://go.microsoft.com/fwlink/?LinkId=733558
    // for the documentation about the tasks.json format
    "version": "2.0.0",
    "tasks": [
        {
            "label": "cppdbg",  //launch中"preLaunchTask"调用的任务名,需要大小写保持一致
            "type": "shell",    //任务执行的是shell命令,也可以是process程序
            "command": "g++",   //执行的命令是g++
            "args": [
                "-Wall",        //生成所有警告信息
                "-std=c++11",   //使用c++11标准编译
                "-g",           //生成调试信息
                "${file}",      //当前文件名
                "-o",           //生成指定的输出文件
                "${fileDirname}\\${fileBasenameNoExtension}.exe",
            ],
            "group": {
                "kind": "build",    //任务分组名,可以通过在Command Palette(F1) 输入run build task来运行
                "isDefault": true
            },
            "problemMatcher": [
                "$gcc", // 使用gcc捕获错误
            ],
        }
    ]
}
- 1
- 2
- 3
- 4
- 5
- 6
- 7
- 8
- 9
- 10
- 11
- 12
- 13
- 14
- 15
- 16
- 17
- 18
- 19
- 20
- 21
- 22
- 23
- 24
- 25
- 26
- 27
- 28
- 29
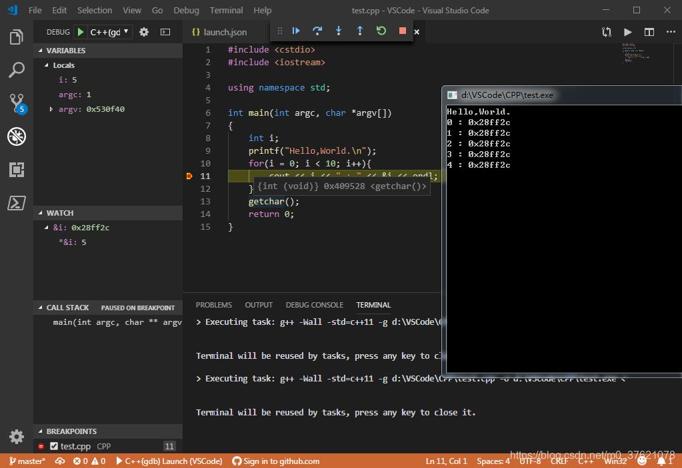
VSCode的DEBUG功能也挺方便,可以追踪监视变量及地址的变化、堆栈调用、多种断点分析等功能,比如下面给出一段案例代码,并插入一个条件断点,调试界面见下图示:
// test.cpp:
#include - 1
- 2
- 3
- 4
- 5
- 6
- 7
- 8
- 9
- 10
- 11
- 12
- 13
- 14
- 15
- 16
- 17
四、代码与GitHub同步
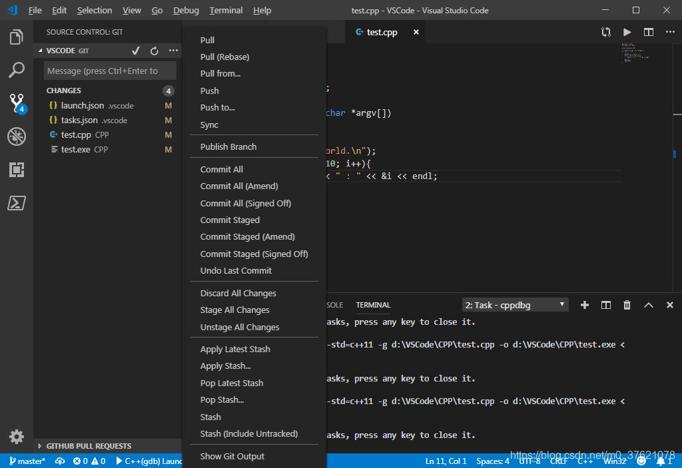
之前我写过一篇GitHub社会化编程的博文,养成社会化编程的习惯让自己嵌入到全球软件工程师的协作网络中,提高自己的开发效率和能力名片。VSCode原生支持Git倒是提供了不少便利,从下图Source Control(Ctrl + Shift + G)可以看到VSC原生支持的命令主要是保持本地与远程代码同步的,新建或切换工作分支、向工作分支增加新文件等操作还是需要借助Git完成,命令参考如下:
λ git init							#初始化仓库
Initialized empty Git repository in D:/VSCode/.git/

λ git checkout -b master			#新建master工作分支并切换到该分支
Switched to a new branch 'master'
#将已新建好的远程仓库添加为本地仓库的远程仓库,并将该远程仓库在本地的标识符设为test
λ git remote add test [email protected]:StreamAI/VSCode.git

λ git add --all						#将默认的master工作分支内的文件添加到index暂存区

λ git status						#查看仓库的状态
On branch master

No commits yet

Changes to be committed:
  (use "git rm --cached ..." to unstage)

        new file:   .vscode/launch.json
        new file:   .vscode/tasks.json
        new file:   CPP/test.cpp
        new file:   CPP/test.exe
        new file:   README.md

λ git commit -m "Add test c++ script"		#将当前暂存区内的文件实际保存到本地仓库的历史记录中
[master (root-commit) c88d983] Add test c++ script
 5 files changed, 75 insertions(+)
 create mode 100644 .vscode/launch.json
 create mode 100644 .vscode/tasks.json
 create mode 100644 CPP/test.cpp
 create mode 100644 CPP/test.exe
 create mode 100644 README.md

λ git push test master						#将当前分支下本地仓库的内容推送给远程仓库的master分支
Enumerating objects: 9, done.
Counting objects: 100% (9/9), done.
Delta compression using up to 4 threads
Compressing objects: 100% (8/8), done.
Writing objects: 100% (9/9), 19.58 KiB | 2.80 MiB/s, done.
Total 9 (delta 0), reused 0 (delta 0)
To github.com:StreamAI/VSCode.git
 * [new branch]      master -> master
- 1
- 2
- 3
- 4
- 5
- 6
- 7
- 8
- 9
- 10
- 11
- 12
- 13
- 14
- 15
- 16
- 17
- 18
- 19
- 20
- 21
- 22
- 23
- 24
- 25
- 26
- 27
- 28
- 29
- 30
- 31
- 32
- 33
- 34
- 35
- 36
- 37
- 38
- 39
- 40
- 41
- 42
GitHub示例代码见链接:https://github.com/StreamAI/VSCode
五、Makefile管理项目
在软件开发中,make通常被视为一种软件构建工具。该工具主要经由读取一种名为“makefile”或“Makefile”的文件来实现软件的自动化建构。它会通过一种被称之为“target”概念来检查相关文件之间的依赖关系,这种依赖关系的检查系统非常简单,主要通过对比文件的修改时间来实现。在大多数情况下,我们主要用它来编译源代码,生成结果代码,然后把结果代码链接起来生成可执行文件或者库文件。
GCC自带make.exe工具,在MinGW中名字变成了mingw32-make.exe,如果想方便的话可以复制一个改名为make.exe,makefile的教程可参考博客:Linux基础-makefile
下面给出通过Makefile管理C/C++项目的launch.json与tasks.json配置项如下:
// launch.json:

{
    // Use IntelliSense to learn about possible attributes.
    // Hover to view descriptions of existing attributes.
    // For more information, visit: https://go.microsoft.com/fwlink/?linkid=830387
    "version": "0.2.0",
    "configurations": [
        {
            "name": "Makefile Launch(GDB)",     //DEBUG中出现的名字
            "preLaunchTask": "build",          //在launch之前运行的任务名,要跟tasks.json中的"label"大小写一致
            "type": "cppdbg",
            "request": "launch",
            "program": "${fileDirname}/main.exe",     //需要运行的是当前打开文件的目录中,名字和当前文件相同,但扩展名为exe的程序
            "args": [],
            "stopAtEntry": false,               //选为true则会在打开控制台后停滞,暂时不执行程序
            "cwd": "${workspaceFolder}",        //当前工作路径:当前文件所在的工作空间
            "environment": [],
            "externalConsole": true,            //是否使用外部控制台
            "MIMode": "gdb",
            "miDebuggerPath": "C:\\MinGW\\bin\\gdb.exe",
            "setupCommands": [
                {
                    "description": "Enable pretty-printing for gdb",
                    "text": "-enable-pretty-printing",
                    "ignoreFailures": true
                }
            ]
        }
    ]
}
- 1
- 2
- 3
- 4
- 5
- 6
- 7
- 8
- 9
- 10
- 11
- 12
- 13
- 14
- 15
- 16
- 17
- 18
- 19
- 20
- 21
- 22
- 23
- 24
- 25
- 26
- 27
- 28
- 29
- 30
- 31
// tasks.json:

{
    // See https://go.microsoft.com/fwlink/?LinkId=733558
    // for the documentation about the tasks.json format
    "version": "2.0.0",
    "tasks": [
        {
            "label": "build",           //launch中"preLaunchTask"调用的任务名,需要大小写保持一致
            "type": "shell",            //任务执行的是shell命令,也可以是process程序
            "command": "mingw32-make",  //执行的命令是mingw32-make
            "args": [
                "-C",                   //跳转到指定目录去读取目标目录下的Makefile文件
                "./Makefile",           //要跳转的目标目录
                "clean",                //要执行的任务
                "default",              //要执行的下一个任务
            ],
            "group": {
                "kind": "build",    //任务分组名,可以通过在Command Palette(F1) 输入run build task来运行
                "isDefault": true
            },
            "problemMatcher": [
                "$gcc", // 使用gcc捕获错误
            ],
        }
    ]
}
- 1
- 2
- 3
- 4
- 5
- 6
- 7
- 8
- 9
- 10
- 11
- 12
- 13
- 14
- 15
- 16
- 17
- 18
- 19
- 20
- 21
- 22
- 23
- 24
- 25
- 26
- 27
下面给出C++项目的代码,示例代码比较简单,重点看Makefile代码如下:
#Makefile

#自定义变量
MAKE	= mingw32-make
CC		= g++
#编译选项,生成所有警告、不优化、采用c++11标准、输出调试信息、只编译并生成目标文件
CFLAGS	= -Wall -O0 -std=c++11 -g -c
#wildcard为Makefile模式匹配关键字,获取目标目录符合匹配模式的所有文件名
SRCS	= $(wildcard ./*.cpp)
#patsubst为Makefile模式替换关键字,查找字符串SRCS中按空格分开的单词,并将符合模式%.cpp的字符串全部替换成%.o
OBJS	= $(patsubst ./%.cpp, ./%.o, $(SRCS))
EXES	= main.exe
RM		= rm -f

#默认任务
default:
#默认任务要执行的命令,按上面的变量名替换为变量值后执行,前面必须有一个Tab符
	$(MAKE) $(EXES)

#模式匹配,冒号前者为目标项,冒号后面为依赖项
$(EXES): $(OBJS)
#$^表示规则中所有的依赖项,$@表示规则中的目标
	$(CC) $^ -o $@

# %模式自动匹配符
%.o: %.cpp
# $<表示规则中的第一个依赖项
	$(CC) $(CFLAGS) $< -o $@

#伪目标,声明clean为伪目标或标签,为了避免该清理任务与文件名相同而被错识别
.PHONY: clean
clean:
#清理之前的目标文件,以便下次完整的重新编译
	$(RM) $(OBJS) $(EXES)
- 1
- 2
- 3
- 4
- 5
- 6
- 7
- 8
- 9
- 10
- 11
- 12
- 13
- 14
- 15
- 16
- 17
- 18
- 19
- 20
- 21
- 22
- 23
- 24
- 25
- 26
- 27
- 28
- 29
- 30
- 31
- 32
- 33
- 34
// test.cpp:
#include "test.h"
#include - 1
- 2
- 3
- 4
- 5
- 6
- 7
- 8
- 9
- 10
- 11
- 12
- 13
- 14
- 15
- 16
- 17
- 18
- 19
- 20
- 21
- 22
- 23
- 24
- 25
- 26
- 27
- 28
- 29
- 30
- 31
- 32
- 33
- 34
- 35
- 36
- 37
- 38
- 39
- 40
- 41
- 42
- 43
- 44
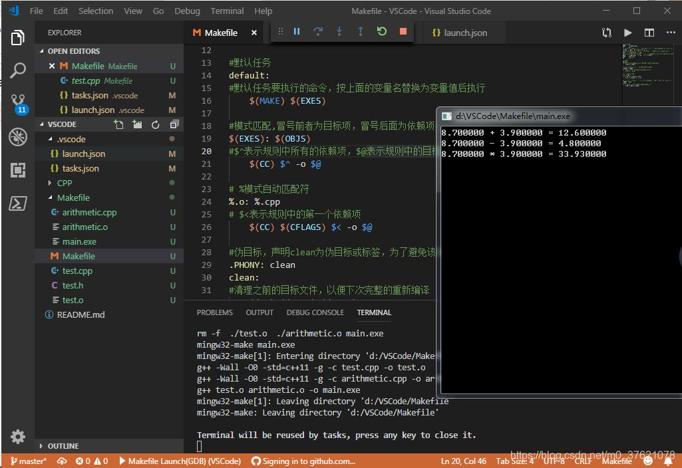
配置文件中涉及到目录相对关系,下面给出工作空间的目录层级关系及程序执行结果,具体代码可参考GitHub:https://github.com/StreamAI/VSCode,前面调试单个源文件的配置文件.vscode挪到了VSCode\CPP目录下,如果想复现结果只需替换配置文件即可。
评论记录:
回复评论: