
鸿蒙开发往期必看:
一分钟了解”纯血版!鸿蒙HarmonyOS Next应用开发!
“非常详细的” 鸿蒙HarmonyOS Next应用开发学习路线!(从零基础入门到精通)
“一杯冰美式的时间” 了解鸿蒙HarmonyOS Next应用开发路径!
样例简介
智能加湿器具有实时监控其所处环境温度、湿度,并通过数字管家设置日程,自动打开加湿器控制湿度功能。显示界面使用DevEco Studio 编写的js应用,具有很好的兼容和移植特性。硬件上采用了带有HDF框架的驱动模型,通过GPIO和IIC分别来控制电机开关和采集湿度信息,还可以通过语音模块识别语音命令,再通过串口跟主板通信来控制加湿器电机开关。

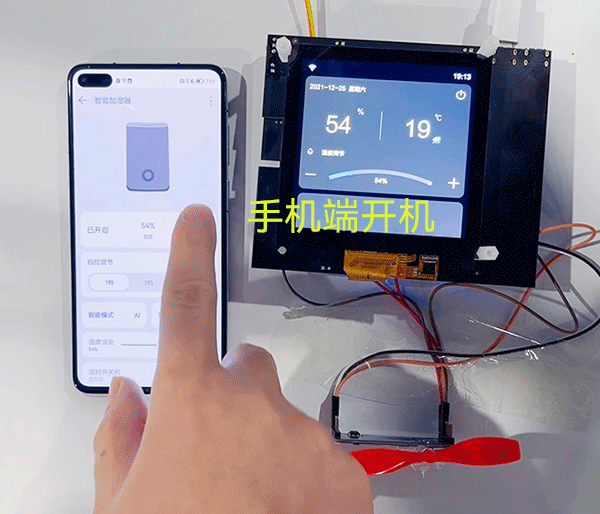
运行效果
当设备应用启动之后,操作效果如下

样例原理

如上图所示,智能加湿器整体方案原理图可以大致分成:智能加湿器设备、数字管家应用、云平台三部分。智能加湿器通过MQTT协议连接华为IOT物联网平台,从而实现命令的接收和属性上报。 关于智能设备接入华为云IoT平台的细节可以参考 连接IOT云平台指南;智能设备同数字管家应用之间的设备模型定义可以参考profile 。
工程版本
- 系统版本/API版本:OpenHarmony 3.1 Beta
- hb版本:0.4.4
- 工具链版本:gcc-arm-none-eabi-10.3-2021.10
快速上手
准备硬件环境
-
V200Z-R蓝牙WIFI语音AIoT模组恒玄BES2600WM开发板
-
BearPi-HM Nano套件中的E53_IA1拓展板
-
机芯智能语音模块
-
预装HarmonyOS手机一台
注:HarmonyOS是华为基于开源项目OpenHarmony开发的面向多种全场景智能设备的商用版本
准备开发环境
安装必备软件
开发基础环境由 windows 工作台和 Linux 编译服务器组成。windows 工作台可以通过 samba 服务或 ssh 方式访问 Linux编译服务器。其中 windows 工作台用来烧录和代码编辑,Linux 编译服务器用来编译 OpenHarmony 代码,为了简化步骤,Linux 编译服务器推荐安装 Ubuntu20.04 64位。
安装编译依赖基础软件
sudo apt-get install -y build-essential gcc g++ make zlib* libffi-dev git git-lfs
安装和配置Python
-
打开Linux终端。
-
输入如下命令,查看python版本号,需要使用python3.7以上版本 。
python3 --version
- 安装并升级Python包管理工具(pip3)。
- sudo apt-get install python3-setuptools python3-pip -y
- sudo pip3 install --upgrade pip
- 设置pip的国内镜像
pip3 install -i https://pypi.tuna.tsinghua.edu.cn/simple requests
安装hb
- 输入如下命令确认hb是否为version 0.4.4
hb -v
a. 若提示如下内容,则表示未安装可以从第2步开始操作。
bash: /home/***/.local/bin/hb: No such file or directory
b.若提示如下内容,需要先卸载该版本,然后再执行第2步操作步骤。
[OHOS INFO] hb version 0.4.3
卸载命令:
pip3 uninstall ohos-build
- 运行如下命令安装hb
pip3 install build/lite // 该命令需在OpenHarmony源码根目录下执行
- 设置环境变量
vim ~/.bashrc
将以下命令拷贝到.bashrc文件的最后一行,保存并退出。
export PATH=~/.local/bin:PATH
执行如下命令更新环境变量。
source ~/.bashrc
- 再次执行”hb -v“,有以下版本显示则表示安装的hb版本正确。
[OHOS INFO] hb version 0.4.4
安装交叉编译环境
在Linux编译服务器上搭建好基础开发环境后,需要安装OpenHarmony 编译V200Z-R平台特有的开发环境。
安装arm-none-eabi-gcc
-
打开Linux终端。
-
下载arm-none-eabi-gcc编译工具。
解压 gcc-arm-none-eabi-10.3-2021.10-x86_64-linux.tar.bz2 安装包至~/toolchain/路径下。
- mkdir -p ~/toolchain/
- tar -jxvf gcc-arm-none-eabi-10.3-2021.10-x86_64-linux.tar.bz2 -C ~/toolchain/
设置环境变量。
vim ~/.bashrc
将以下命令拷贝到.bashrc文件的最后一行,保存并退出。
export PATH=~/toolchain/gcc-arm-none-eabi-10.3-2021.10/bin:PATH
生效环境变量。
source ~/.bashrc
- 在命令行中输入如下命令,如果能正确显示编译器版本号,表明编译器安装成功。
arm-none-eabi-gcc -v
准备工程
本用例采用repo的方式从码云官仓下载系统系统源码以及开发板适配代码,使用git从gitee的sig仓库拉取设备应用代码。
配置git
-
提前注册准备码云gitee账号。
-
git工具下载安装
- sudo apt install git
- sudo apt install git-lfs
-
生成/添加SSH密钥:生成密钥
使用gitee账号绑定的邮箱生成密钥对
ssh-keygen -t ed25519 -C "[email protected]" -
查看生成的密钥
cat ~/.ssh/id_ed25519.pub -
复制生成后的 ssh key,返回gitee个人主页,通过主页 「个人设置」->「安全设置」->「SSH 公钥」 ,将生成的“SSH密钥”添加到仓库中。
-
配置git用户信息
- git config --global user.name "yourname"
- git config --global user.email "your-email-address"
- git config --global credential.helper store
准备repo
- sudo curl https://gitee.com/oschina/repo/raw/fork_flow/repo-py3 > /usr/local/bin/repo
- chmod a+x /usr/local/bin/repo
- pip3 install -i https://pypi.tuna.tsinghua.edu.cn/simple requests
准备系统源码
- #特别注意:请下载OpenHarmony 3.1 Beta版本
- mkdir ~/OpenHarmony_3.1_Beta
- cd ~/OpenHarmony_3.1_Beta
- repo init -u [email protected]:openharmony/manifest.git -b refs/tags/OpenHarmony-v3.1-Beta --no-repo-verify
- repo sync -c
- repo forall -c 'git lfs pull'
注意:
-
权限问题请参考生成/添加SSH公钥。
-
若在已安装python3.8后,执行repo init 时,仍显示如下错误:
/usr/bin/env: ‘python’: No such file or directory
执行如下命令后,进行重试:
sudo ln -s /usr/bin/python3.8 /usr/bin/python
准备设备侧应用代码
使用git 命令下载。
git clone [email protected]:openharmony-sig/knowledge_demo_smart_home.git --depth=1
编译前准备
- 代码拷贝
- mkdir ~/OpenHarmony_3.1_Beta/vendor/team_x/
- 主代码拷贝:
- cp -rfa ~/knowledge_demo_smart_home/dev/team_x/smart_humidifier ~/OpenHarmony_3.1_Beta/vendor/team_x/
- iot_link三方库拷贝:
- cp -rfa ~/knowledge_demo_smart_home/dev/third_party/iot_link ~/OpenHarmony_3.1_Beta/third_party/
- common库拷贝:
- cp -rfa ~/knowledge_demo_smart_home/dev/team_x/common ~/OpenHarmony_3.1_Beta/vendor/team_x
- iot_link库拷贝:
- cp -rfa ~/knowledge_demo_smart_home/dev/third_party/iot_link ~/OpenHarmony_3.1_Beta/third_party/
- kernel/liteos_m 修改
步骤1. 下载patch 地址
点击上述链接进入浏览器,将该网页中内容全部复制。
本地创建一个名为***.patch文件,并将已经复制的内容粘贴到该文件中。
步骤2. 打上步骤1中的patch
- cd ~/OpenHarmony_3.1_Beta/kernel/liteos_m
- patch -p1 < ***.patch
- device/soc/bestechnic 修改
步骤1. 下载patch 地址
点击上述链接进入浏览器,将该网页中内容全部复制。
本地创建一个名为***.patch文件,并将已经复制的内容粘贴到该文件中。
步骤2. 打上步骤1中的patch
- cd ~/OpenHarmony_3.1_Beta/device/soc/bestechnic
- patch -p1 < ***.patch
- third_party/mbedtls 修改
参考如下代码段修改 platform.c 和BUILD.gn
- diff --git a/library/platform.c b/library/platform.c
- index c4c3fd3..214173b 100755
- --- a/library/platform.c
- +++ b/library/platform.c
- @@ -86,9 +86,24 @@ static void platform_free_uninit( void *ptr )
- static void * (*mbedtls_calloc_func)( size_t, size_t ) = MBEDTLS_PLATFORM_STD_CALLOC;
- static void (*mbedtls_free_func)( void * ) = MBEDTLS_PLATFORM_STD_FREE;
-
- +#include "los_memory.h"
- +
- void * mbedtls_calloc( size_t nmemb, size_t size )
- {
- - return (*mbedtls_calloc_func)( nmemb, size );
- + //return (*mbedtls_calloc_func)( nmemb, size );
- + size_t real_size;
- + void *ptr = NULL;
- +
- + if (nmemb == 0 || size == 0) {
- + return NULL;
- + }
- +
- + real_size = (size_t)(nmemb * size);
- + ptr = LOS_MemAlloc(OS_SYS_MEM_ADDR, real_size);
- + if (ptr != NULL) {
- + (void)memset_s(ptr, real_size, 0, real_size);
- + }
- + return ptr;
- }
- diff --git a/BUILD.gn b/BUILD.gn
- index 9ecb37a..30dbb2e 100755
- --- a/BUILD.gn
- +++ b/BUILD.gn
- @@ -124,6 +124,7 @@ if (defined(ohos_lite)) {
- "//kernel/liteos_m/kernel/include",
- "//kernel/liteos_m/utils",
- "//third_party/musl/porting/liteos_m/kernel/include/",
- + "//kernel/liteos_m/kernel/include/",
- ]
- }
- output_name = "mbedtls"
-

- third_party/lwip 修改
修改src/api/netdb.c 文件
- diff --git a/src/api/netdb.c b/src/api/netdb.c
- index 52a6fdf..2043636 100644
- --- a/src/api/netdb.c
- +++ b/src/api/netdb.c
- @@ -100,7 +100,7 @@ lwip_gethostbyname(const char *name)
- err = netconn_gethostbyname(name, &addr);
- if (err != ERR_OK) {
- LWIP_DEBUGF(DNS_DEBUG, ("lwip_gethostbyname(%s) failed, err=%d\n", name, err));
- - h_errno = HOST_NOT_FOUND;
- + //h_errno = HOST_NOT_FOUND;
- return NULL;
- }
-
- 修改iot_link中的部分文件
步骤1. third_party/iot_link/network/mqtt/paho_mqtt/port/paho_mqtt_port.c
测试发现,当fd为0的时候,在执行recv时会立马返回-1,因此做下面规避操作。
- static int __socket_connect(Network *n, const char *host, int port)
- {
- ...
- int tmpfd = socket(AF_INET,SOCK_STREAM,0); // to skip fd = 0;
- fd = socket(AF_INET,SOCK_STREAM,0);
- if(fd == -1) {
- return ret;
- }
- close(tmpfd); // to skip fd = 0;
- ...
- }
系统setsockopt函数未适配,因此需要做下面的修改:
- static int __socket_read(void *ctx, unsigned char *buf, int len, int timeout)
- {
- int fd;
- int ret = 0;
- #if 0
- struct timeval timedelay = {timeout / 1000, (timeout % 1000) * 1000};
- if(NULL== buf)
- {
- return ret;
- }
-
- fd = (int)(intptr_t)ctx; ///< socket could be zero
-
- if (timedelay.tv_sec < 0 || (timedelay.tv_sec == 0 && timedelay.tv_usec <= 0))
- {
- timedelay.tv_sec = 0;
- timedelay.tv_usec = 100;
- }
-
- if(0 != setsockopt(fd,SOL_SOCKET,SO_RCVTIMEO,&timedelay,sizeof(struct timeval)))
- {
- return ret; //could not support the rcv timeout
- }
- int bytes = 0;
- while (bytes < len) {
- int rc = recv(fd, &buf[bytes], (size_t)(len - bytes), 0);
- printf("[%s|%s|%d]fd = %d, rc = %d\n", __FILE__,__func__,__LINE__, fd, rc);
- if (rc == -1) {
- if (errno != EAGAIN && errno != EWOULDBLOCK) {
- bytes = -1;
- }
- break;
- } else if (rc == 0) {
- bytes = 0;
- break;
- } else {
- bytes += rc;
- }
- }
- return bytes;
- #else
- int bytes = 0;
- fd_set fdset;
-
- struct timeval timedelay = {timeout / 1000, (timeout % 1000) * 1000};
- if(NULL== buf)
- {
- return ret;
- }
-
- fd = (int)(intptr_t)ctx; ///< socket could be zero
-
- if (timedelay.tv_sec < 0 || (timedelay.tv_sec == 0 && timedelay.tv_usec <= 0))
- {
- timedelay.tv_sec = 0;
- timedelay.tv_usec = 100;
- }
- timedelay.tv_sec = 2;
- FD_ZERO(&fdset);
- FD_SET(fd, &fdset);
-
- ret = select(fd + 1, &fdset, NULL, NULL, &timedelay);
- if (ret > 0) {
- while (bytes < len) {
- int rc = recv(fd, &buf[bytes], (size_t)(len - bytes), 0);
- // printf("[%s|%s|%d]fd = %d, rc = %d, errno=%d(%s)\n", __FILE__,__func__,__LINE__, fd, rc,errno, strerror(errno));
- if (rc == -1) {
- if (errno != EAGAIN && errno != EWOULDBLOCK) {
- bytes = -1;
- }
- break;
- } else if (rc == 0) {
- bytes = 0;
- break;
- } else {
- bytes += rc;
- }
- }
- }
-
- return bytes;
- #endif
- }
步骤2. third_party/iot_link/network/dtls/mbedtls/mbedtls_port/dtls_interface.c
系统部分mbedtls接口不一致,固需要注释部分接口代码:
- mbedtls_ssl_context dtls_ssl_new(dtls_establish_info_s *info, char plat_type)
- {
- ...
- if (info->psk_or_cert == VERIFY_WITH_PSK)
- {
- /*
- if ((ret = mbedtls_ssl_conf_psk(conf,
- info->v.p.psk,
- info->v.p.psk_len,
- info->v.p.psk_identity,
- strlen((const char *)info->v.p.psk_identity))) != 0)
- {
- MBEDTLS_LOG("mbedtls_ssl_conf_psk failed: -0x%x", -ret);
- goto exit_fail;
- }
- */
- }
- ...
- }
-
- int dtls_shakehand(mbedtls_ssl_context *ssl, const dtls_shakehand_info_s *info)
- {
- ...
- if (MBEDTLS_SSL_IS_CLIENT == info->client_or_server)
- {
- ret = mbedtls_net_connect(server_fd, info->u.c.host, info->u.c.port, info->udp_or_tcp);
- if( 0 != ret)
- {
- ret = MBEDTLS_ERR_NET_CONNECT_FAILED;
- goto exit_fail;
- }
- }
- else
- {
- //server_fd = (mbedtls_net_context*)atiny_net_bind(NULL, info->u.s.local_port, MBEDTLS_NET_PROTO_UDP);
- ///< --TODO ,not implement yet
- }
- ...
- }
-
- void dtls_init(void)
- {
- (void)mbedtls_platform_set_calloc_free(calloc, free);
- (void)mbedtls_platform_set_snprintf(snprintf);
- // (void)mbedtls_platform_set_printf(printf);
- }
步骤3. 修改dtls下的BUILD.gn因为弱引用导致无法链接相关符号
- diff --git a/dev/third_party/iot_link/network/dtls/BUILD.gn b/dev/third_party/iot_link/network/dtls/BUILD.gn
- index 035805d7..05188295 100755
- --- a/dev/third_party/iot_link/network/dtls/BUILD.gn
- +++ b/dev/third_party/iot_link/network/dtls/BUILD.gn
- @@ -17,6 +17,7 @@ dtls_inc = [
- "../../link_misc",
- "//kernel/liteos_m/components/cmsis/2.0",
- "//third_party/mbedtls/include/",
- + "//base/hiviewdfx/hilog_lite/interfaces/native/innerkits/",^M
- ]
-
-
- @@ -41,7 +42,8 @@ dtls_cflags = [
- "-Wno-unused-parameter",
- ]
-
- -static_library("dtls") {
- +#static_library("dtls") {^M
- +source_set("dtls") {^M
- cflags = dtls_cflags
- defines = dtls_def
- sources = dtls_src
步骤4. 修改mqtt下的BUILD.gn因为弱引用导致无法链接相关符号
- diff --git a/dev/third_party/iot_link/network/mqtt/BUILD.gn b/dev/third_party/iot_link/network/mqtt/BUILD.gn
- index 5a4a8e0d..f56f4ae6 100755
- --- a/dev/third_party/iot_link/network/mqtt/BUILD.gn
- +++ b/dev/third_party/iot_link/network/mqtt/BUILD.gn
- @@ -16,8 +16,10 @@ mqtt_paho_inc = [
- "paho_mqtt/paho/MQTTPacket/src",
- "paho_mqtt/port",
- "../../inc",
- + "//third_party/musl/porting/liteos_m/kernel/include/",^M
- "//kernel/liteos_m/components/cmsis/2.0",
- "//vendor/hisi/hi3861/hi3861/third_party/lwip_sack/include/",
- + "//base/hiviewdfx/hilog_lite/interfaces/native/innerkits/",^M
- ]
-
-
- @@ -50,7 +52,8 @@ mqtt_cflags = [
- "-Wno-unused-function",
- ]
-
- -static_library("mqtt") {
- +#static_library("mqtt") {^M
- +source_set("mqtt") {^M
- cflags = mqtt_cflags
- defines = mqtt_paho_defs
- sources = mqtt_paho_src
-
步骤5. 修改时间编译问题:
- iff --git a/dev/third_party/iot_link/network/mqtt/paho_mqtt/port/paho_osdepends.h b/dev/third_party/iot_link/network/mqtt/paho_mqtt/port/paho_osdepends.h
- index 2c6cab1b..38e3dce3 100755
- --- a/dev/third_party/iot_link/network/mqtt/paho_mqtt/port/paho_osdepends.h
- +++ b/dev/third_party/iot_link/network/mqtt/paho_mqtt/port/paho_osdepends.h
- @@ -84,6 +84,7 @@
-
- #include "ohos_init.h"
- #include "cmsis_os2.h"
- +#include "sys/time.h"
- #include <mqtt_al.h>
-
- #define MQTT_TASK 1
- @@ -117,6 +118,13 @@ typedef struct Thread
- int ThreadStart(Thread*, void (*fn)(void*), void* arg);
-
-
- +#define timeradd(s,t,a) (void) ( (a)->tv_sec = (s)->tv_sec + (t)->tv_sec, \^M
- + ((a)->tv_usec = (s)->tv_usec + (t)->tv_usec) >= 1000000 && \^M
- + ((a)->tv_usec -= 1000000, (a)->tv_sec++) )^M
- +#define timersub(s,t,a) (void) ( (a)->tv_sec = (s)->tv_sec - (t)->tv_sec, \^M
- + ((a)->tv_usec = (s)->tv_usec - (t)->tv_usec) < 0 && \^M
- + ((a)->tv_usec += 1000000, (a)->tv_sec--) )^M
- +^M
- typedef struct Network
- {
- void *ctx; ///< if it is tls, then it is tls context, else it is socket fd
-
- 配置相关的修改
步骤1. gpio hdf框架相关修改。
根据下方代码修改drivers/adapter/platform/gpio/gpio_bes.c
- diff --git a/platform/gpio/gpio_bes.c b/platform/gpio/gpio_bes.c
- index ed4d18b..890d528 100755
- --- a/platform/gpio/gpio_bes.c
- +++ b/platform/gpio/gpio_bes.c
- @@ -257,7 +257,7 @@ static int32_t GpioDriverBind(struct HdfDeviceObject *device)
- }
-
- gpioCntlr.device.hdfDev = device;
- - device->service = gpioCntlr.device.service;
- + device->service = &(gpioCntlr.device);
-
- return HDF_SUCCESS;
- }
步骤2 . uart相关配置,本实例使用uart1接口,相对应的GPIO为gpio20,gpio21。电机控制使用的gpio11,相关的配置如下所示,文件路径:/home/water/OpenHarmony_3.1_Beta/device/board/fnlink/shields/v200zr-evb-t1/v200zr-evb-t1.hcs
- diff --git a/shields/v200zr-evb-t1/v200zr-evb-t1.hcs b/shields/v200zr-evb-t1/v200zr-evb-t1.hcs
- index 44212eb..f8d0985 100644
- --- a/shields/v200zr-evb-t1/v200zr-evb-t1.hcs
- +++ b/shields/v200zr-evb-t1/v200zr-evb-t1.hcs
- @@ -1,6 +1,6 @@
- #include "../../hcs/v200zr.hcs"
- root {
- - /*device_info {
- + device_info {
- platform :: host {
- device_uart :: device {
- uart2 :: deviceNode {
- @@ -8,21 +8,21 @@ root {
- priority = 40;
- permission = 0644;
- moduleName = "BES_UART_MODULE_HDF";
- - serviceName = "HDF_PLATFORM_UART_2";
- + serviceName = "HDF_PLATFORM_UART_1";
- deviceMatchAttr = "uart2_config";
- }
- }
- }
- - }*/
- + }
- platform {
- gpio_config {
- match_attr = "gpio_config";
- - pin = [0, 1];
- + pin = [0, 1, 2];
- // touch_ztw523: TSP_RST - GPIO12, TSP_INT-GPIO27
- // touch_fts: TSP_RST - GPIO05, TSP_INT-GPIO27
- - realPin = [5, 27];
- - config = [5, 2];
- - pinNum = 2;
- + realPin = [5, 27, 11];
- + config = [5, 2, 2];
- + pinNum = 3;
- }
- i2c_config {
- i2c0 {
- @@ -52,7 +52,7 @@ root {
- mode = 0;
- }
- }
- - /*uart_config {
- + uart_config {
- template uart_controller {
- match_attr = "";
- num = 0;
- @@ -65,9 +65,9 @@ root {
- }
- uart2 :: uart_controller {
- match_attr = "uart2_config";
- - num = 2;
- + num = 1;
- }
- - }*/
- + }
- }
- display {
- panel_config {
- (END)
步骤3. iic相关的配置,使i2c1通道和芯片管脚gpio6,gpio7相关的配置如下:
- i2c_config {
- i2c1 {
- match_attr = "i2c1_config";
- port = 1;
- speed = 200000;
- // TSP_SCL/SDA - I2C1 = GPIO06/GPIO07
- sclPin = 6;
- sdaPin = 7;
- useDma = 0;
- useSync = 1;
- asMaster = 1;
- address_width = 8;
- mode = 0;
- }
- }
- 将JS应用合入工程。
关于JS应用开发请参考从零开始学习L0: JS开发系列。本节为可选章节,忽略本节内容不影响本项目的展示和运行。但若想要在本项目的基础上进行涉及到显示的内容修改与新规开发,则需完整的阅读本节及链接内容。
1.下载并安装DevEco Studio。
2.新建一个js工程。
工程名为:smart_humidifier/FA

3.在DevEco Studio的SDK中添加@system.communicationkit.d.ts文件。
将@system.communicationkit.d.ts文件(源文件目录:~/knowledge_demo_smart_home/dev/interface/sdk-js/api/common/@system.communicationkit.d.ts)拷贝到DevEco Studio的SDK中(目标目录:HarmonyOS Legacy SDK/js/3.0.0.0/api/common)。HarmonyOS Legacy SDK目录在DevEco Studio安装时,由用户配置,该目录位置可在设置(ctrl+alt+s)中查找。

4.编译hap包。
依次选择构建 -> Build Hap(s)/APP(s) -> Build Hap(s)进行hap包编译。

5.使用预览功能得到 js 包: entry\.preview\intermediates\res\debug\lite\assets\js\default

将 js 包放到文件系统里面:
default目录中除app.js.map外的的数据全部拷贝到OpenHarmonySDK中的//vendor/team_x/smart_humidifier/fs/data/data/js目录下:
需要注意:FA的bundleName必须和工程代码//vendor/team_x/smart_humidifier/demo_smart_humidifier/ability/ability_device.cpp文件里面定义的JS_BUNDLE_NAME一致。
#define JS_BUNDLE_NAME "com.example.control_panel2.hmservice"
FA中的bundleName:

工程效果
整合并修改完成后的代码目录结构如下图:

编译
编译命令:
hb set // 如果是第一次编译,Input code path 命令行中键入"./" 指定OpenHarmony工程编译根目录后 回车,
如下图所示,使用键盘上下键选中智能加湿器 “smart_humidifier”,(注:工程名字根据实际要编译的工程来)如图:

hb build // 如果需要全量编译,可以添加-f 选项
编译通过,生成固件成功,如图:

烧录/安装
-
安装CP2102驱动
-
固件编译完成以后拷贝./out/v200zr/smart_door_bell/write_flash_gui文件夹到windows下,并点击Wifi_download_main.exe

- 点击工具上的文件夹图标

- 选择List按钮

- 在显示出来的串口列表中选择需要烧录的串口,并点击开始按钮。

- 在开发板上点击reset按键,或者重新上电。

- 进入烧录状态

- 烧录成功

操作体验
设备配网
-
在设备上电前需准备好安装了数字管家应用的HarmonyOS手机,并在设置中开启手机的NFC功能;
-
写设备NFC标签,详细操作见设备NFC标签指导文档;
-
烧录完成后,上电,将手机上半部靠近NFC标签;
-
无需任何操作手机将自动拉起数字管家应用并进入配网界面,输入热点密码。

设备操作

 微信名片
微信名片

评论记录:
回复评论: