
一、使用
spring事务开启和使用比较简单,需要有数据源和事务管理器,然后在启动门面类上开启事务,在需要使用事务的地方添加注解就可以了,我们简单做一下回顾。
1.配置数据源
spring.datasource.driverClassName=com.mysql.jdbc.Driver
spring.datasource.url=jdbc:mysql://host:3306/test?useUnicode=true&characterEncoding=utf8&autoReconnect=true&useSSL=true
spring.datasource.username=aaa
spring.datasource.password=bbb
- 1
- 2
- 3
- 4
2.开启事务能力
@SpringBootApplication(exclude = {DataSourceAutoConfiguration.class},scanBasePackages = "xxx")
@EnableTransactionManagement
public class Application {

    public static void main(String[] args) {
        SpringApplication.run(Application.class, args);
    }
}
- 1
- 2
- 3
- 4
- 5
- 6
- 7
- 8
3.使用事务
@Transactional
public void evaluateSatisfaction(Req req) {
	//do business
}
- 1
- 2
- 3
- 4
这样我们就可以在业务中使用事务了。
那么我们就要思考一个问题,为什么通过简单的配置和两个注解我们就能便捷的使用事务了,spring框架层面做了哪些能力支撑,接下来我们将从原理和源码维度对spring的事务原理进行分析。
二、原理分析
首先,spring事务管理之所以能生效,得有数据库吧,得有数据源吧,得有事务管理器吧,我们先看一下spring对于数据源和事务管理器的处理和配置。
1.数据源与事务管理器
先看一个配置类DataSourceConfiguration:
abstract class DataSourceConfiguration {


	/**
	 * Tomcat Pool DataSource configuration.
	 */

	/**
	 * Hikari DataSource configuration.
	 */

	/**
	 * DBCP DataSource configuration.
	 */

	/**
	 * Generic DataSource configuration.
	 */
	@ConditionalOnMissingBean(DataSource.class)
	@ConditionalOnProperty(name = "spring.datasource.type")
	static class Generic {

		@Bean
		public DataSource dataSource(DataSourceProperties properties) {
			return properties.initializeDataSourceBuilder().build();
		}

	}
}

- 1
- 2
- 3
- 4
- 5
- 6
- 7
- 8
- 9
- 10
- 11
- 12
- 13
- 14
- 15
- 16
- 17
- 18
- 19
- 20
- 21
- 22
- 23
- 24
- 25
- 26
- 27
- 28
- 29
省略掉的是Tomcat、Hikari、DBCP数据源配置,国内使用率最高的Druid数据源通过spring.datasource.type指定类型并且自定义配置,然后使用DataSourceProperties和DataSourceBuilder构造。
然后我们看另外一个配置类DataSourceAutoConfiguration:
@Configuration
@ConditionalOnClass({ DataSource.class, EmbeddedDatabaseType.class })
@EnableConfigurationProperties(DataSourceProperties.class)
@Import({ DataSourcePoolMetadataProvidersConfiguration.class,
		DataSourceInitializationConfiguration.class })
public class DataSourceAutoConfiguration {

	//...省略

	@Configuration
	@Conditional(PooledDataSourceCondition.class)
	@ConditionalOnMissingBean({ DataSource.class, XADataSource.class })
	@Import({ DataSourceConfiguration.Hikari.class, DataSourceConfiguration.Tomcat.class,
			DataSourceConfiguration.Dbcp2.class, DataSourceConfiguration.Generic.class,
			DataSourceJmxConfiguration.class })
	protected static class PooledDataSourceConfiguration {

	}
}
- 1
- 2
- 3
- 4
- 5
- 6
- 7
- 8
- 9
- 10
- 11
- 12
- 13
- 14
- 15
- 16
- 17
- 18
- 19
此处PooledDataSourceConfiguration通过@Import注解导入了支持的数据源配置,应用启动时ConfigurationClassPostProcessor会将@Configuration扫描并根据配置数据源类型注册BeanDefinition供后续实例化,这里我们暂且理解为DataSource已经配置好了。
再看另外一个配置类DataSourceTransactionManagerAutoConfiguration:
@Configuration
@ConditionalOnClass({ JdbcTemplate.class, PlatformTransactionManager.class })
@AutoConfigureOrder(Ordered.LOWEST_PRECEDENCE)
@EnableConfigurationProperties(DataSourceProperties.class)
public class DataSourceTransactionManagerAutoConfiguration {

	@Configuration
	@ConditionalOnSingleCandidate(DataSource.class)
	static class DataSourceTransactionManagerConfiguration {

		private final DataSource dataSource;

		private final TransactionManagerCustomizers transactionManagerCustomizers;

		DataSourceTransactionManagerConfiguration(DataSource dataSource,
				ObjectProvider<TransactionManagerCustomizers> transactionManagerCustomizers) {
			this.dataSource = dataSource;
			this.transactionManagerCustomizers = transactionManagerCustomizers
					.getIfAvailable();
		}
		@Bean
		@ConditionalOnMissingBean(PlatformTransactionManager.class)
		public DataSourceTransactionManager transactionManager(
				DataSourceProperties properties) {
			DataSourceTransactionManager transactionManager = new DataSourceTransactionManager(
					this.dataSource);
			if (this.transactionManagerCustomizers != null) {
				this.transactionManagerCustomizers.customize(transactionManager);
			}
			return transactionManager;
		}
	}
}
- 1
- 2
- 3
- 4
- 5
- 6
- 7
- 8
- 9
- 10
- 11
- 12
- 13
- 14
- 15
- 16
- 17
- 18
- 19
- 20
- 21
- 22
- 23
- 24
- 25
- 26
- 27
- 28
- 29
- 30
- 31
- 32
- 33
该类是数据源事务管理配置类,根据前边的数据源创建事务管理器DataSourceTransactionManager,从继承关系可以看出它是一个PlatformTransactionManager(后边会用到此概念):
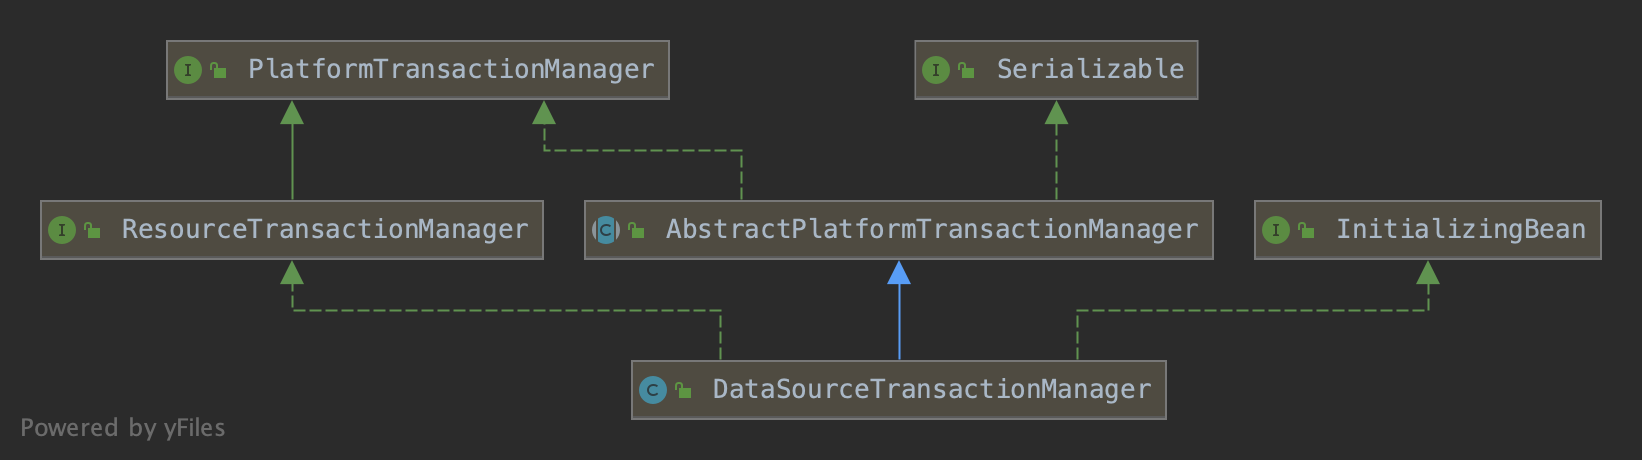
spring的事务管理也就是使用事务管理器通过数据源和连接来实现开启、提交和回滚操作。
2.开启事务能力
通过@EnableTransactionManagement来开启spring事务能力:
@Target(ElementType.TYPE)
@Retention(RetentionPolicy.RUNTIME)
@Documented
@Import(TransactionManagementConfigurationSelector.class)
public @interface EnableTransactionManagement {

	boolean proxyTargetClass() default false;

	AdviceMode mode() default AdviceMode.PROXY;

	int order() default Ordered.LOWEST_PRECEDENCE;

}
- 1
- 2
- 3
- 4
- 5
- 6
- 7
- 8
- 9
- 10
- 11
- 12
- 13
注解有三个属性
- proxyTargetClass:true表示基于CGLIB创建代理,false表示使用jdk动态代理。默认值为false。仅当mode()设置为AdviceMode时适用。
- mode:表示事务通知实现方式,proxy表示通过代理的当时拦截处理事务,同类级别的方法调用将无法拦截;ASPECTJ表示使用aspectj织入的方式拦截处理事务,功能比proxy模式强大。
- order:在调用链中有多个通知,事务通知的执行优先级,默认最低。
@EnableTransactionManagement开启的能力委托给TransactionManagementConfigurationSelector来实现:
public class TransactionManagementConfigurationSelector extends AdviceModeImportSelector<EnableTransactionManagement> {
	@Override
	protected String[] selectImports(AdviceMode adviceMode) {
		switch (adviceMode) {
			case PROXY:
				return new String[] {AutoProxyRegistrar.class.getName(),
						ProxyTransactionManagementConfiguration.class.getName()};
			case ASPECTJ:
				return new String[] {determineTransactionAspectClass()};
			default:
				return null;
		}
	}
	private String determineTransactionAspectClass() {
		return (ClassUtils.isPresent("javax.transaction.Transactional", getClass().getClassLoader()) ?
				TransactionManagementConfigUtils.JTA_TRANSACTION_ASPECT_CONFIGURATION_CLASS_NAME :
				TransactionManagementConfigUtils.TRANSACTION_ASPECT_CONFIGURATION_CLASS_NAME);
	}
}
- 1
- 2
- 3
- 4
- 5
- 6
- 7
- 8
- 9
- 10
- 11
- 12
- 13
- 14
- 15
- 16
- 17
- 18
- 19
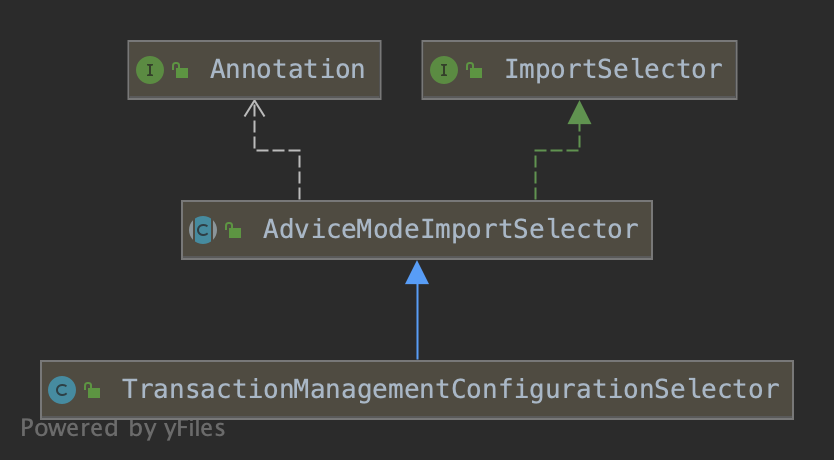
它是一个ImportSelector,ConfigurationClassPostProcessor会将其初始化并将selectImports返回的类列注册BeanDefinition然后实例化(可参考《ConfigurationClassPostProcessor原理详解》),父类AdviceModeImportSelector的selectImports方法解析EnableTransactionManagement注解属性,然后调用子类selectImports方法返回导入类列表,我们的分析针对mode=proxy展开,可以看到TransactionManagementConfigurationSelector导入了两个类,AutoProxyRegistrar和ProxyTransactionManagementConfiguration,逐个分析一下,先看AutoProxyRegistrar:
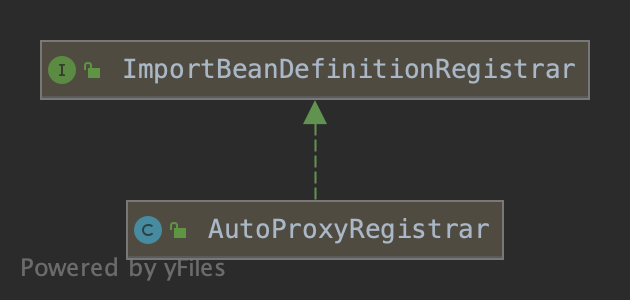
它是一个ImportBeanDefinitionRegistrar,实例化后被调用其registerBeanDefinitions方法:
@Override
public void registerBeanDefinitions(AnnotationMetadata importingClassMetadata, BeanDefinitionRegistry registry) {
	boolean candidateFound = false;
	Set<String> annoTypes = importingClassMetadata.getAnnotationTypes();
	for (String annoType : annoTypes) {
		AnnotationAttributes candidate = AnnotationConfigUtils.attributesFor(importingClassMetadata, annoType);
		if (candidate == null) {
			continue;
		}
		Object mode = candidate.get("mode");
		Object proxyTargetClass = candidate.get("proxyTargetClass");
		if (mode != null && proxyTargetClass != null && AdviceMode.class == mode.getClass() &&
				Boolean.class == proxyTargetClass.getClass()) {
			candidateFound = true;
			if (mode == AdviceMode.PROXY) {
				AopConfigUtils.registerAutoProxyCreatorIfNecessary(registry);
				if ((Boolean) proxyTargetClass) {
					AopConfigUtils.forceAutoProxyCreatorToUseClassProxying(registry);
					return;
				}
			}
		}
	}
}
- 1
- 2
- 3
- 4
- 5
- 6
- 7
- 8
- 9
- 10
- 11
- 12
- 13
- 14
- 15
- 16
- 17
- 18
- 19
- 20
- 21
- 22
- 23
- 24
会调用AopConfigUtils注册一个类InfrastructureAdvisorAutoProxyCreator,并且需要注意的是,如果有多次调用,只要有任一次proxyTargetClass为true,就会把其该属性设置为true,影响是全局,比如应用中同时开启了事务和异步能力,如果@EnableAsync把proxyTargetClass设置为true那么也会影响到事务以及其他aop能力。
@Nullable
public static BeanDefinition registerAutoProxyCreatorIfNecessary(
		BeanDefinitionRegistry registry, @Nullable Object source) {

	return registerOrEscalateApcAsRequired(InfrastructureAdvisorAutoProxyCreator.class, registry, source);
}
- 1
- 2
- 3
- 4
- 5
- 6
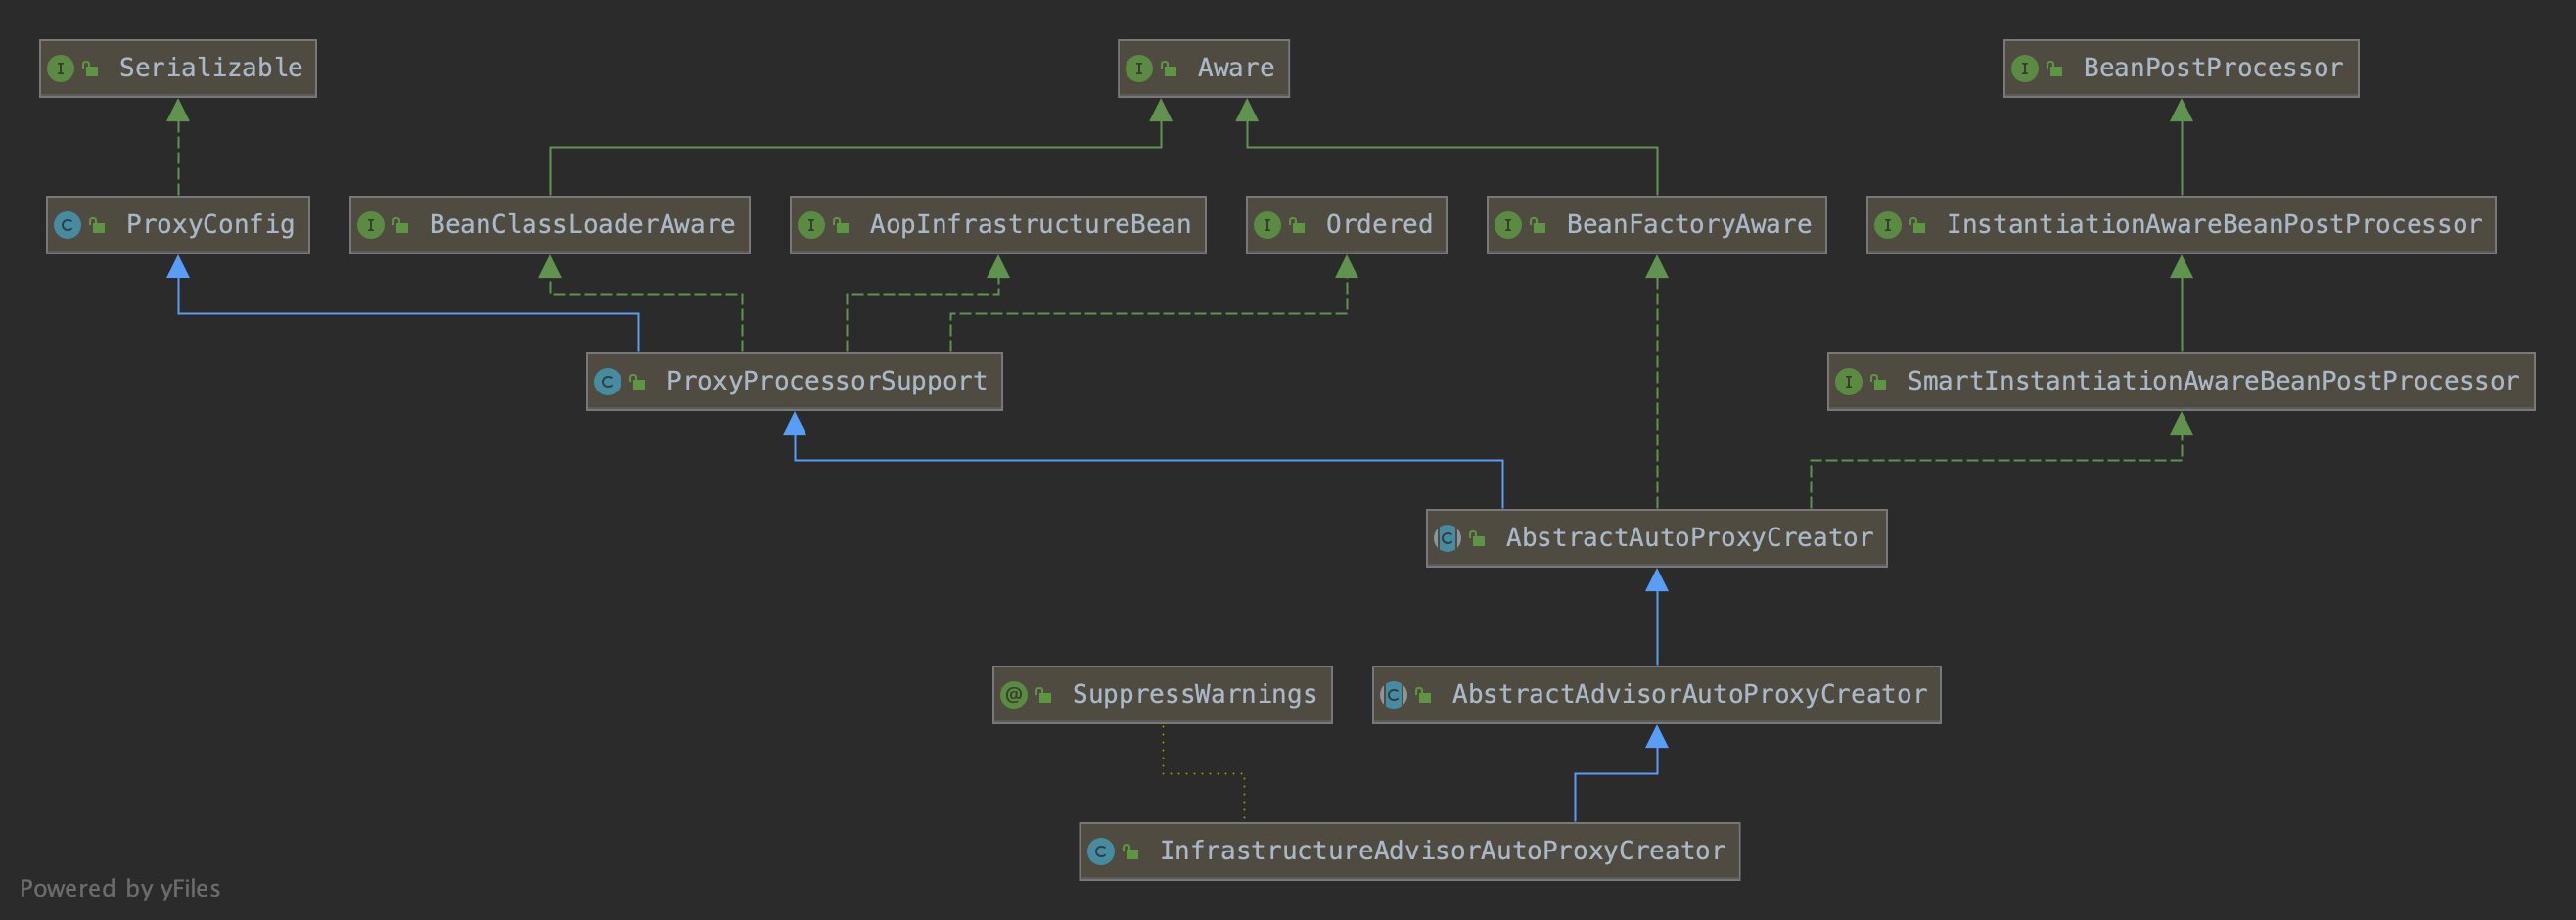
这个类非常重要,是实现代理和AOP能力的核心组件,拥有处理代理逻辑的能力,本质上又是一个BeanPostProcessor,他的实现比较简单,核心逻辑在其父类AbstractAdvisorAutoProxyCreator和AbstractAutoProxyCreator中,父类实现了InstantiationAwareBeanPostProcessor接口,其postProcessBeforeInstantiation方法会在bean初始化之前调用,如果返回不为null,那么就不在执行bean的初始化,框架设计的目的就是给出扩展能力来做一些代理和bean实例化短路的事情。从spring事务场景来说,就是对使用了事务的类做代理实现,加入事务能力。
那么我们就看一下AbstractAutoProxyCreator的postProcessBeforeInstantiation实现:
@Override
public Object postProcessBeforeInstantiation(Class<?> beanClass, String beanName) {
	Object cacheKey = getCacheKey(beanClass, beanName);

	//...省略

	// Create proxy here if we have a custom TargetSource.
	// Suppresses unnecessary default instantiation of the target bean:
	// The TargetSource will handle target instances in a custom fashion.
	TargetSource targetSource = getCustomTargetSource(beanClass, beanName);
	if (targetSource != null) {
		if (StringUtils.hasLength(beanName)) {
			this.targetSourcedBeans.add(beanName);
		}
		Object[] specificInterceptors = getAdvicesAndAdvisorsForBean(beanClass, beanName, targetSource);
		Object proxy = createProxy(beanClass, beanName, specificInterceptors, targetSource);
		this.proxyTypes.put(cacheKey, proxy.getClass());
		return proxy;
	}

	return null;
}
- 1
- 2
- 3
- 4
- 5
- 6
- 7
- 8
- 9
- 10
- 11
- 12
- 13
- 14
- 15
- 16
- 17
- 18
- 19
- 20
- 21
- 22
先创建TargetSource,然后获取适用于当前bean的通知,然后创建代理并返回。因为TargetSource是spring框架的复杂代理,针对代理只能单个类代理做出的扩展,我们暂时没有用到该能力,所以此处targetSource为null,这里不会执行创建代理操作。从AbstractAutoProxyCreator中看到重写BeanPostProcessor的一个方法postProcessAfterInitialization,这个方法的作用是目标bean实例化之后,初始化的时候可以对齐进行包装甚至替换掉,对于事务来说,可以用把事务能力包装进去,或者用具有事务能力的bean实例替换掉原来的,看一下实现:
@Override
public Object postProcessAfterInitialization(@Nullable Object bean, String beanName) {
	if (bean != null) {
		Object cacheKey = getCacheKey(bean.getClass(), beanName);
		if (this.earlyProxyReferences.remove(cacheKey) != bean) {
			return wrapIfNecessary(bean, beanName, cacheKey);
		}
	}
	return bean;
}
- 1
- 2
- 3
- 4
- 5
- 6
- 7
- 8
- 9
- 10
如果给定的bean有资格被代理,那么调用wrapIfNecessary包装并返回:
protected Object wrapIfNecessary(Object bean, String beanName, Object cacheKey) {
	//...省略
    // Create proxy if we have advice.
	Object[] specificInterceptors = getAdvicesAndAdvisorsForBean(bean.getClass(), beanName, null);
	if (specificInterceptors != DO_NOT_PROXY) {
		this.advisedBeans.put(cacheKey, Boolean.TRUE);
		Object proxy = createProxy(
				bean.getClass(), beanName, specificInterceptors, new SingletonTargetSource(bean));
		this.proxyTypes.put(cacheKey, proxy.getClass());
		return proxy;
	}
	this.advisedBeans.put(cacheKey, Boolean.FALSE);
	return bean;
}
- 1
- 2
- 3
- 4
- 5
- 6
- 7
- 8
- 9
- 10
- 11
- 12
- 13
- 14
获取bean使用的通知,然后创建代理,并将通知能力织入进去。因为获取适用当前bean的通知涉及到前边我们说的selectImports导入的另外一个配置类ProxyTransactionManagementConfiguration,所以我们这里只分析创建代理,获取通知和通知拦截逻辑后边分析。先看一下创建代理逻辑:
protected Object createProxy(Class<?> beanClass, @Nullable String beanName,
		@Nullable Object[] specificInterceptors, TargetSource targetSource) {

	ProxyFactory proxyFactory = new ProxyFactory();
	proxyFactory.copyFrom(this);

	if (!proxyFactory.isProxyTargetClass()) {
		if (shouldProxyTargetClass(beanClass, beanName)) {
			proxyFactory.setProxyTargetClass(true);
		}
		else {
			evaluateProxyInterfaces(beanClass, proxyFactory);
		}
	}

	Advisor[] advisors = buildAdvisors(beanName, specificInterceptors);
	proxyFactory.addAdvisors(advisors);
	proxyFactory.setTargetSource(targetSource);
	customizeProxyFactory(proxyFactory);

	proxyFactory.setFrozen(this.freezeProxy);
	if (advisorsPreFiltered()) {
		proxyFactory.setPreFiltered(true);
	}

	return proxyFactory.getProxy(getProxyClassLoader());
}
- 1
- 2
- 3
- 4
- 5
- 6
- 7
- 8
- 9
- 10
- 11
- 12
- 13
- 14
- 15
- 16
- 17
- 18
- 19
- 20
- 21
- 22
- 23
- 24
- 25
- 26
- 27
先创建代理工厂,然后填充通知器、设置要代理的目标类,然后创建代理。
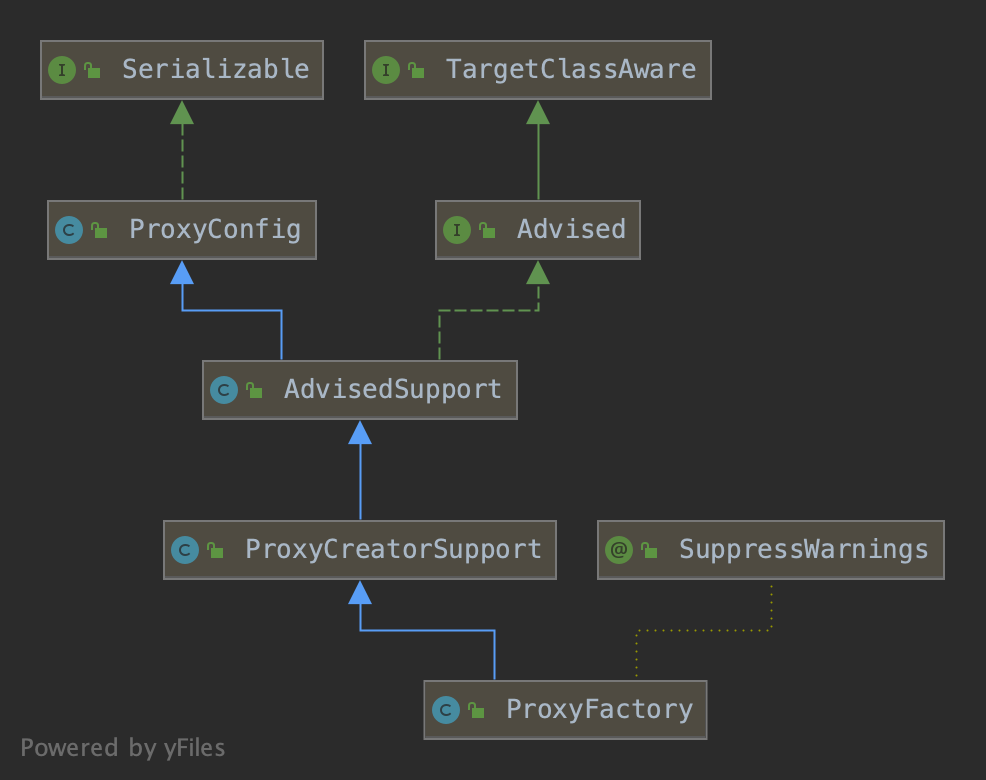
从代理工厂的继承关系可以看到其实现了Advised接口,并且拥有创建代理的能力,创建代理工厂的时候使用默认无参构造器,会调用父类ProxyCreatorSupport的无参构造器:
public ProxyCreatorSupport() {
	this.aopProxyFactory = new DefaultAopProxyFactory();
}
- 1
- 2
- 3
创建代理的任务会委托给DefaultAopProxyFactory执行,会先调用createAopProxy创建生成代理的工具:
@Override
public AopProxy createAopProxy(AdvisedSupport config) throws AopConfigException {
	if (config.isOptimize() || config.isProxyTargetClass() || hasNoUserSuppliedProxyInterfaces(config)) {
		Class<?> targetClass = config.getTargetClass();
		if (targetClass.isInterface() || Proxy.isProxyClass(targetClass)) {
			return new JdkDynamicAopProxy(config);
		}
		return new ObjenesisCglibAopProxy(config);
	}
	else {
		return new JdkDynamicAopProxy(config);
	}
}
- 1
- 2
- 3
- 4
- 5
- 6
- 7
- 8
- 9
- 10
- 11
- 12
- 13
根据proxyTargetClass和接口特性决定使用jdk的动态代理JdkDynamicAopProxy还是cglib的动态代理ObjenesisCglibAopProxy。
两者都实现了AopProxy接口用于创建代理,jdk动态代理也实现了InvocationHandler接口,将其本身也定义成一个代理执行器,代理目标类逻辑执行的时候对调用其invoke方法。jdk动态代理的生成逻辑如下:
@Override
public Object getProxy(@Nullable ClassLoader classLoader) {
	if (logger.isTraceEnabled()) {
		logger.trace("Creating JDK dynamic proxy: " + this.advised.getTargetSource());
	}
	Class<?>[] proxiedInterfaces = AopProxyUtils.completeProxiedInterfaces(this.advised, true);
	findDefinedEqualsAndHashCodeMethods(proxiedInterfaces);
	return Proxy.newProxyInstance(classLoader, proxiedInterfaces, this);
}
- 1
- 2
- 3
- 4
- 5
- 6
- 7
- 8
- 9
- 10
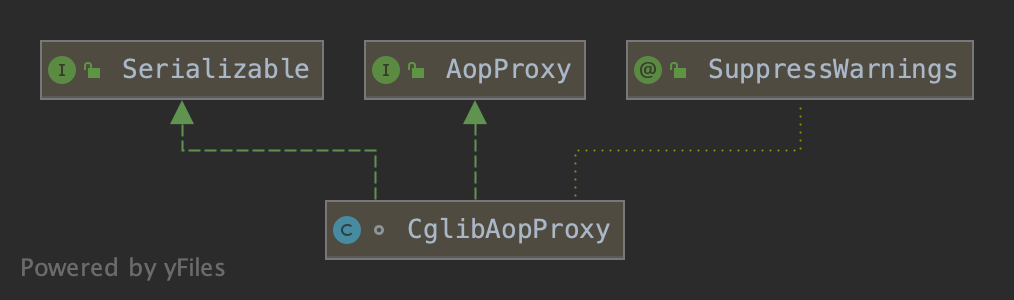
而cglib则根据目标类生成增强类,并嵌入拦截逻辑,本篇可以理解为把事务能力嵌入:
@Override
public Object getProxy(@Nullable ClassLoader classLoader) {
	try {
		Class<?> rootClass = this.advised.getTargetClass();
		Class<?> proxySuperClass = rootClass;
		if (ClassUtils.isCglibProxyClass(rootClass)) {
			proxySuperClass = rootClass.getSuperclass();
			Class<?>[] additionalInterfaces = rootClass.getInterfaces();
			for (Class<?> additionalInterface : additionalInterfaces) {
				this.advised.addInterface(additionalInterface);
			}
		}
		// Configure CGLIB Enhancer...
		Enhancer enhancer = createEnhancer();
		if (classLoader != null) {
			enhancer.setClassLoader(classLoader);
			if (classLoader instanceof SmartClassLoader &&
					((SmartClassLoader) classLoader).isClassReloadable(proxySuperClass)) {
				enhancer.setUseCache(false);
			}
		}
		enhancer.setSuperclass(proxySuperClass);
		enhancer.setInterfaces(AopProxyUtils.completeProxiedInterfaces(this.advised));
		enhancer.setNamingPolicy(SpringNamingPolicy.INSTANCE);
		enhancer.setStrategy(new ClassLoaderAwareUndeclaredThrowableStrategy(classLoader));

		Callback[] callbacks = getCallbacks(rootClass);
		Class<?>[] types = new Class<?>[callbacks.length];
		for (int x = 0; x < types.length; x++) {
			types[x] = callbacks[x].getClass();
		}
		// fixedInterceptorMap only populated at this point, after getCallbacks call above
		enhancer.setCallbackFilter(new ProxyCallbackFilter(
				this.advised.getConfigurationOnlyCopy(), this.fixedInterceptorMap, this.fixedInterceptorOffset));
		enhancer.setCallbackTypes(types);

		// Generate the proxy class and create a proxy instance.
		return createProxyClassAndInstance(enhancer, callbacks);
	}
	catch (CodeGenerationException | IllegalArgumentException ex) {
		throw new AopConfigException("Could not generate CGLIB subclass of " + this.advised.getTargetClass() +
				": Common causes of this problem include using a final class or a non-visible class",
				ex);
	}
	catch (Throwable ex) {
		// TargetSource.getTarget() failed
		throw new AopConfigException("Unexpected AOP exception", ex);
	}
}
- 1
- 2
- 3
- 4
- 5
- 6
- 7
- 8
- 9
- 10
- 11
- 12
- 13
- 14
- 15
- 16
- 17
- 18
- 19
- 20
- 21
- 22
- 23
- 24
- 25
- 26
- 27
- 28
- 29
- 30
- 31
- 32
- 33
- 34
- 35
- 36
- 37
- 38
- 39
- 40
- 41
- 42
- 43
- 44
- 45
- 46
- 47
- 48
- 49
两种代理方式的逻辑执行此处不做分析,后边执行事务能力的时候分析。
前边有提到生成代理的时候寻找合适的通知会用到另外一个配置类ProxyTransactionManagementConfiguration,我们也分析一下它做了什么事情。
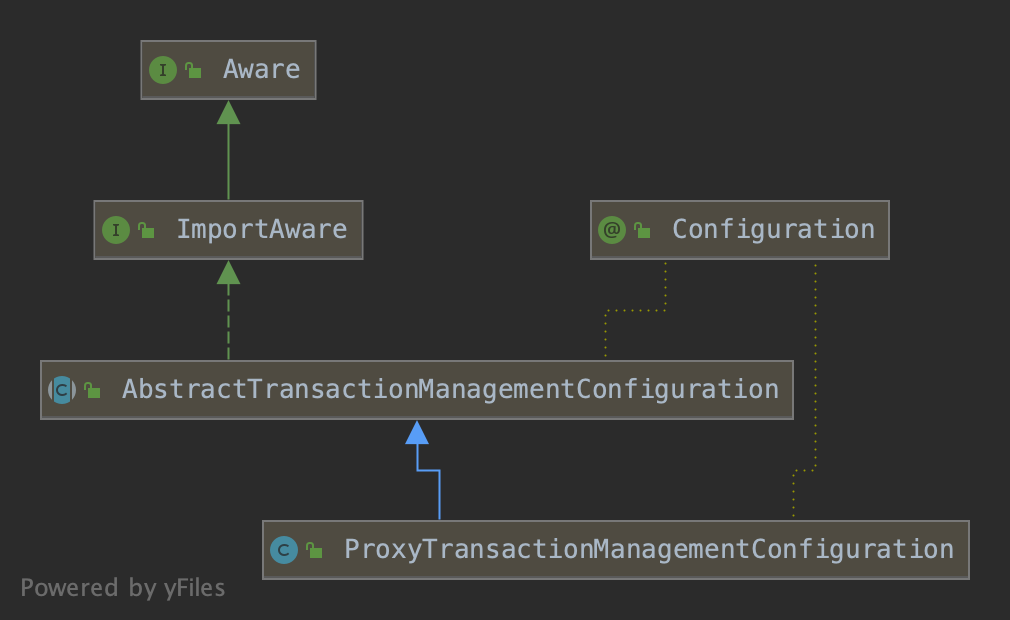
@Configuration
public class ProxyTransactionManagementConfiguration extends AbstractTransactionManagementConfiguration {

	@Bean(name = TransactionManagementConfigUtils.TRANSACTION_ADVISOR_BEAN_NAME)
	@Role(BeanDefinition.ROLE_INFRASTRUCTURE)
	public BeanFactoryTransactionAttributeSourceAdvisor transactionAdvisor() {
		BeanFactoryTransactionAttributeSourceAdvisor advisor = new BeanFactoryTransactionAttributeSourceAdvisor();
		advisor.setTransactionAttributeSource(transactionAttributeSource());
		advisor.setAdvice(transactionInterceptor());
		if (this.enableTx != null) {
			advisor.setOrder(this.enableTx.<Integer>getNumber("order"));
		}
		return advisor;
	}

	@Bean
	@Role(BeanDefinition.ROLE_INFRASTRUCTURE)
	public TransactionAttributeSource transactionAttributeSource() {
		return new AnnotationTransactionAttributeSource();
	}

	@Bean
	@Role(BeanDefinition.ROLE_INFRASTRUCTURE)
	public TransactionInterceptor transactionInterceptor() {
		TransactionInterceptor interceptor = new TransactionInterceptor();
		interceptor.setTransactionAttributeSource(transactionAttributeSource());
		if (this.txManager != null) {
			interceptor.setTransactionManager(this.txManager);
		}
		return interceptor;
	}
}
- 1
- 2
- 3
- 4
- 5
- 6
- 7
- 8
- 9
- 10
- 11
- 12
- 13
- 14
- 15
- 16
- 17
- 18
- 19
- 20
- 21
- 22
- 23
- 24
- 25
- 26
- 27
- 28
- 29
- 30
- 31
- 32
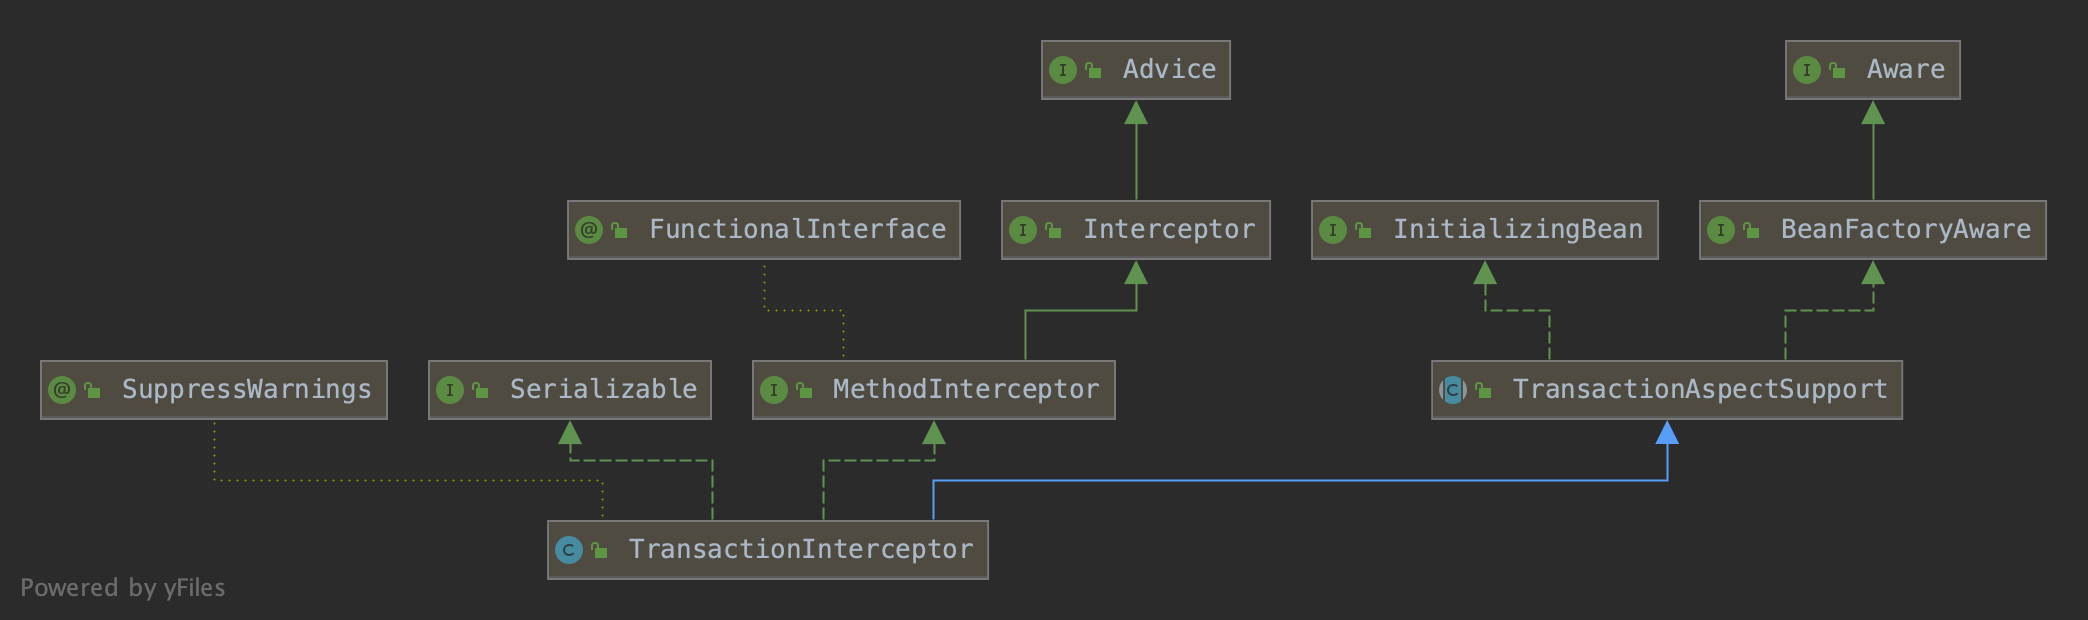
它定义了事务属性、事务拦截器和事务通知器等三个bean,并且将事务管理器注入了进来(也可能此刻没有注入),这里重要的是BeanFactoryTransactionAttributeSourceAdvisor和TransactionInterceptor。
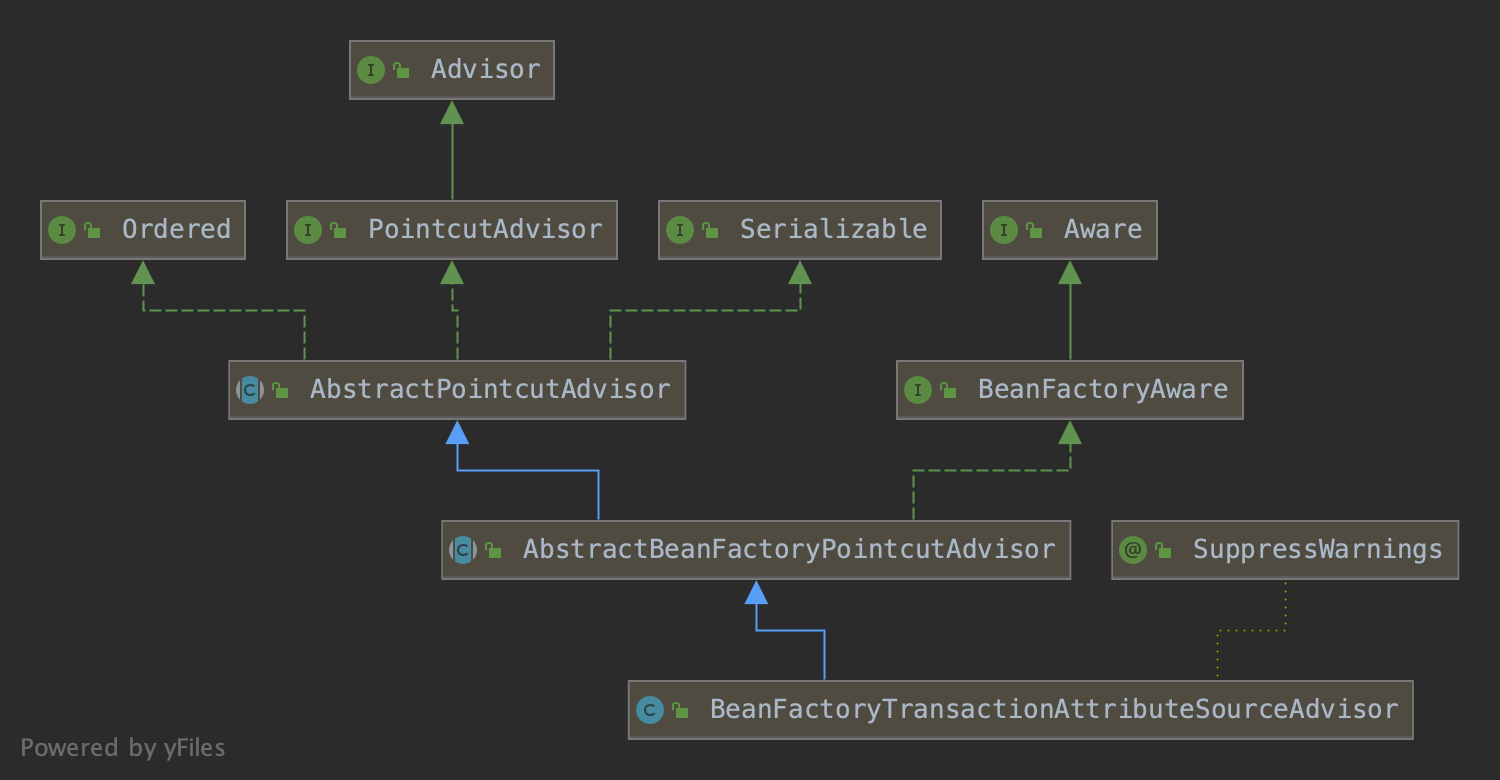
它是一个Advisor,持有切入点(TransactionAttributeSourcePointcut)、事务属性和拦截器。拦截逻辑由TransactionInterceptor实现。
结合前边生成代理的逻辑,我们可以初步猜测,根据通知器中的切入点是否匹配拦截类的方法,如果匹配则将拦截器逻辑嵌入到生成的代理类中。
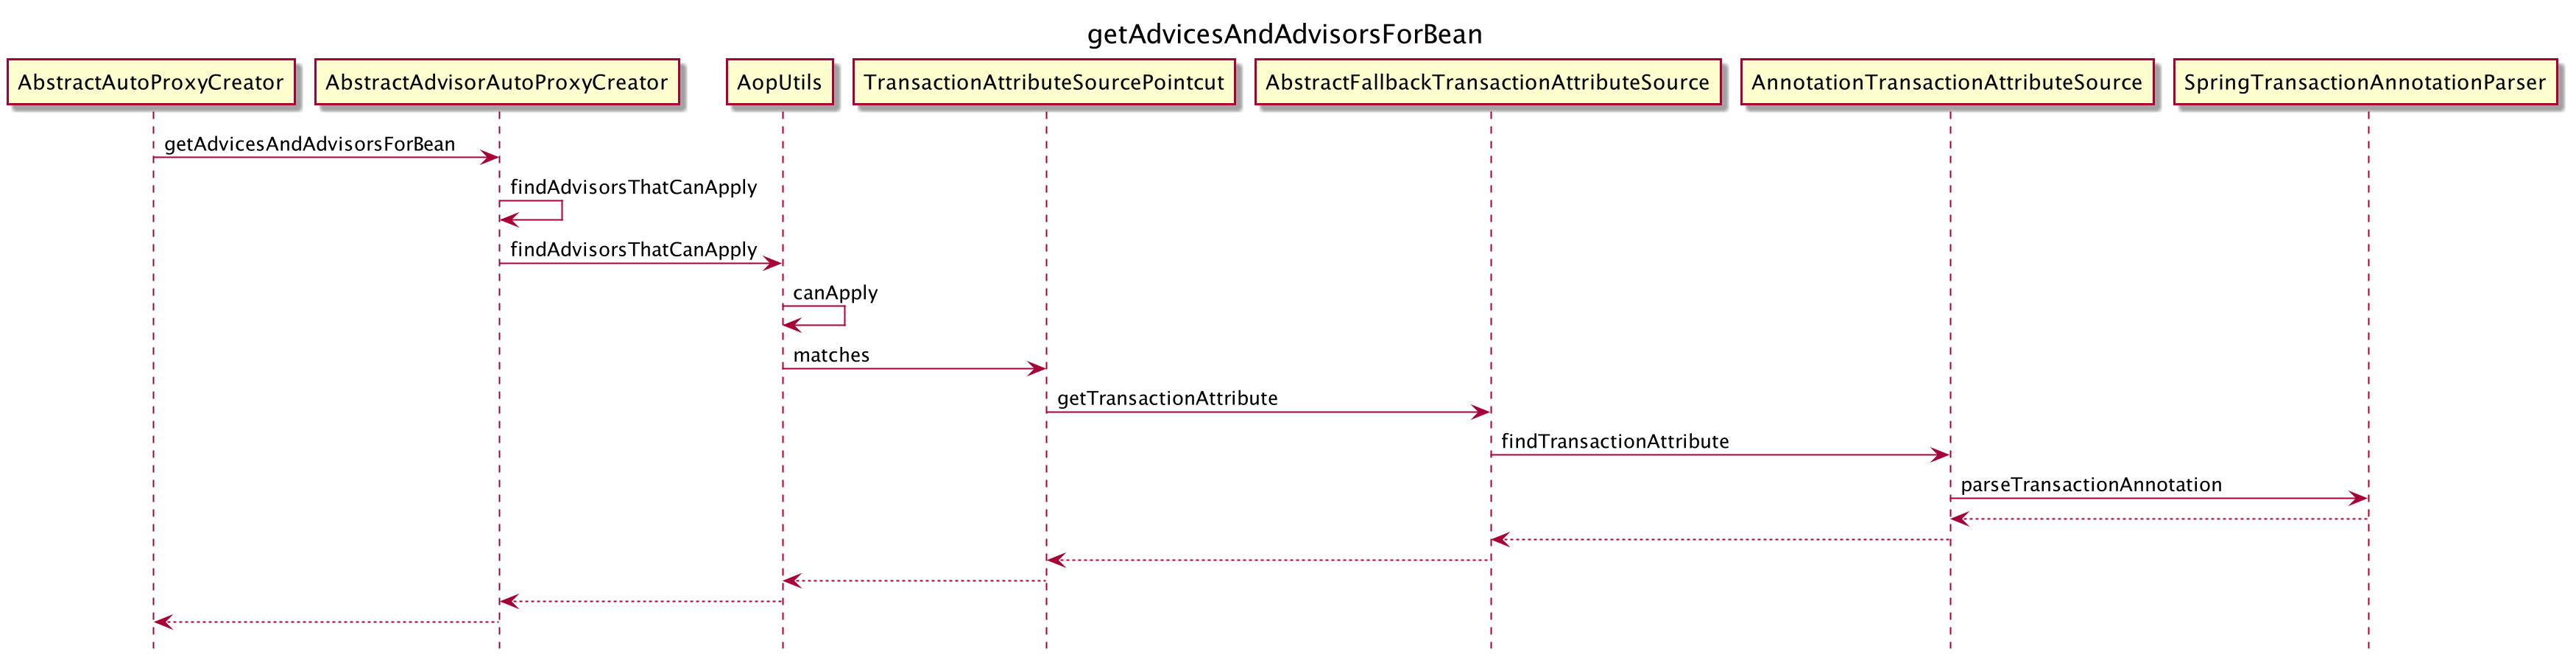
我们看一下前边提到的创建代理之前,有调用getAdvicesAndAdvisorsForBean方法获取目标bean适用的通知,会调用子类AbstractAdvisorAutoProxyCreator的实现:
@Override
@Nullable
protected Object[] getAdvicesAndAdvisorsForBean(
		Class<?> beanClass, String beanName, @Nullable TargetSource targetSource) {

	List<Advisor> advisors = findEligibleAdvisors(beanClass, beanName);
	if (advisors.isEmpty()) {
		return DO_NOT_PROXY;
	}
	return advisors.toArray();
}
- 1
- 2
- 3
- 4
- 5
- 6
- 7
- 8
- 9
- 10
- 11
调用链比较长,省略中间步骤,最终调用到AopUtils的canApply方法来做过滤:
public static boolean canApply(Pointcut pc, Class<?> targetClass, boolean hasIntroductions) {
	if (!pc.getClassFilter().matches(targetClass)) {
		return false;
	}
    //...省略
	Set<Class<?>> classes = new LinkedHashSet<>();
	classes.addAll(ClassUtils.getAllInterfacesForClassAsSet(targetClass));
	for (Class<?> clazz : classes) {
		Method[] methods = ReflectionUtils.getAllDeclaredMethods(clazz);
		for (Method method : methods) {
			if (introductionAwareMethodMatcher != null ?
					introductionAwareMethodMatcher.matches(method, targetClass, hasIntroductions) :
					methodMatcher.matches(method, targetClass)) {
				return true;
			}
		}
	}
	return false;
}
- 1
- 2
- 3
- 4
- 5
- 6
- 7
- 8
- 9
- 10
- 11
- 12
- 13
- 14
- 15
- 16
- 17
- 18
- 19
由于我们的通知器不是Introduction类型,然后会使用BeanFactoryTransactionAttributeSourceAdvisor持有的TransactionAttributeSourcePointcut来做过滤:
@Override
public boolean matches(Method method, Class<?> targetClass) {
	if (TransactionalProxy.class.isAssignableFrom(targetClass) ||
			PlatformTransactionManager.class.isAssignableFrom(targetClass) ||
			PersistenceExceptionTranslator.class.isAssignableFrom(targetClass)) {
		return false;
	}
	TransactionAttributeSource tas = getTransactionAttributeSource();
	return (tas == null || tas.getTransactionAttribute(method, targetClass) != null);
}
- 1
- 2
- 3
- 4
- 5
- 6
- 7
- 8
- 9
- 10
然后委托给TransactionAttributeSource来提取目标方法和类是否具有事务标注,如果有@Transactional就认为适用,其实就是用通知器的Pointcut来和方法对比是否匹配适用。上述方法会调用到SpringTransactionAnnotationParser的方法:
@Override
@Nullable
public TransactionAttribute parseTransactionAnnotation(AnnotatedElement element) {
	AnnotationAttributes attributes = AnnotatedElementUtils.findMergedAnnotationAttributes(
			element, Transactional.class, false, false);
	if (attributes != null) {
		return parseTransactionAnnotation(attributes);
	}
	else {
		return null;
	}
}
- 1
- 2
- 3
- 4
- 5
- 6
- 7
- 8
- 9
- 10
- 11
- 12
其实就是为了提取方法上是否有@Transactional注解。
先看一下寻找合适通知器的时序图:
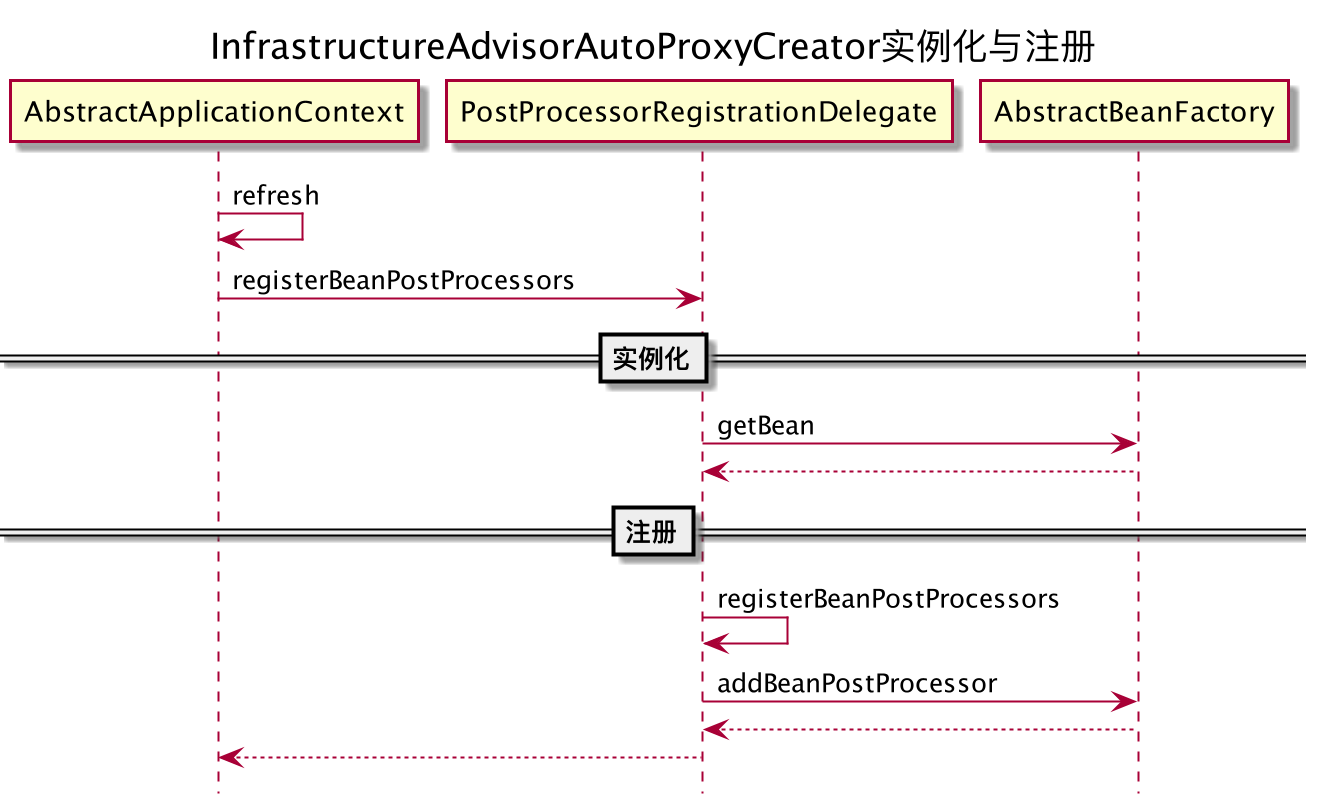
InfrastructureAdvisorAutoProxyCreator处理器注册与实例化:
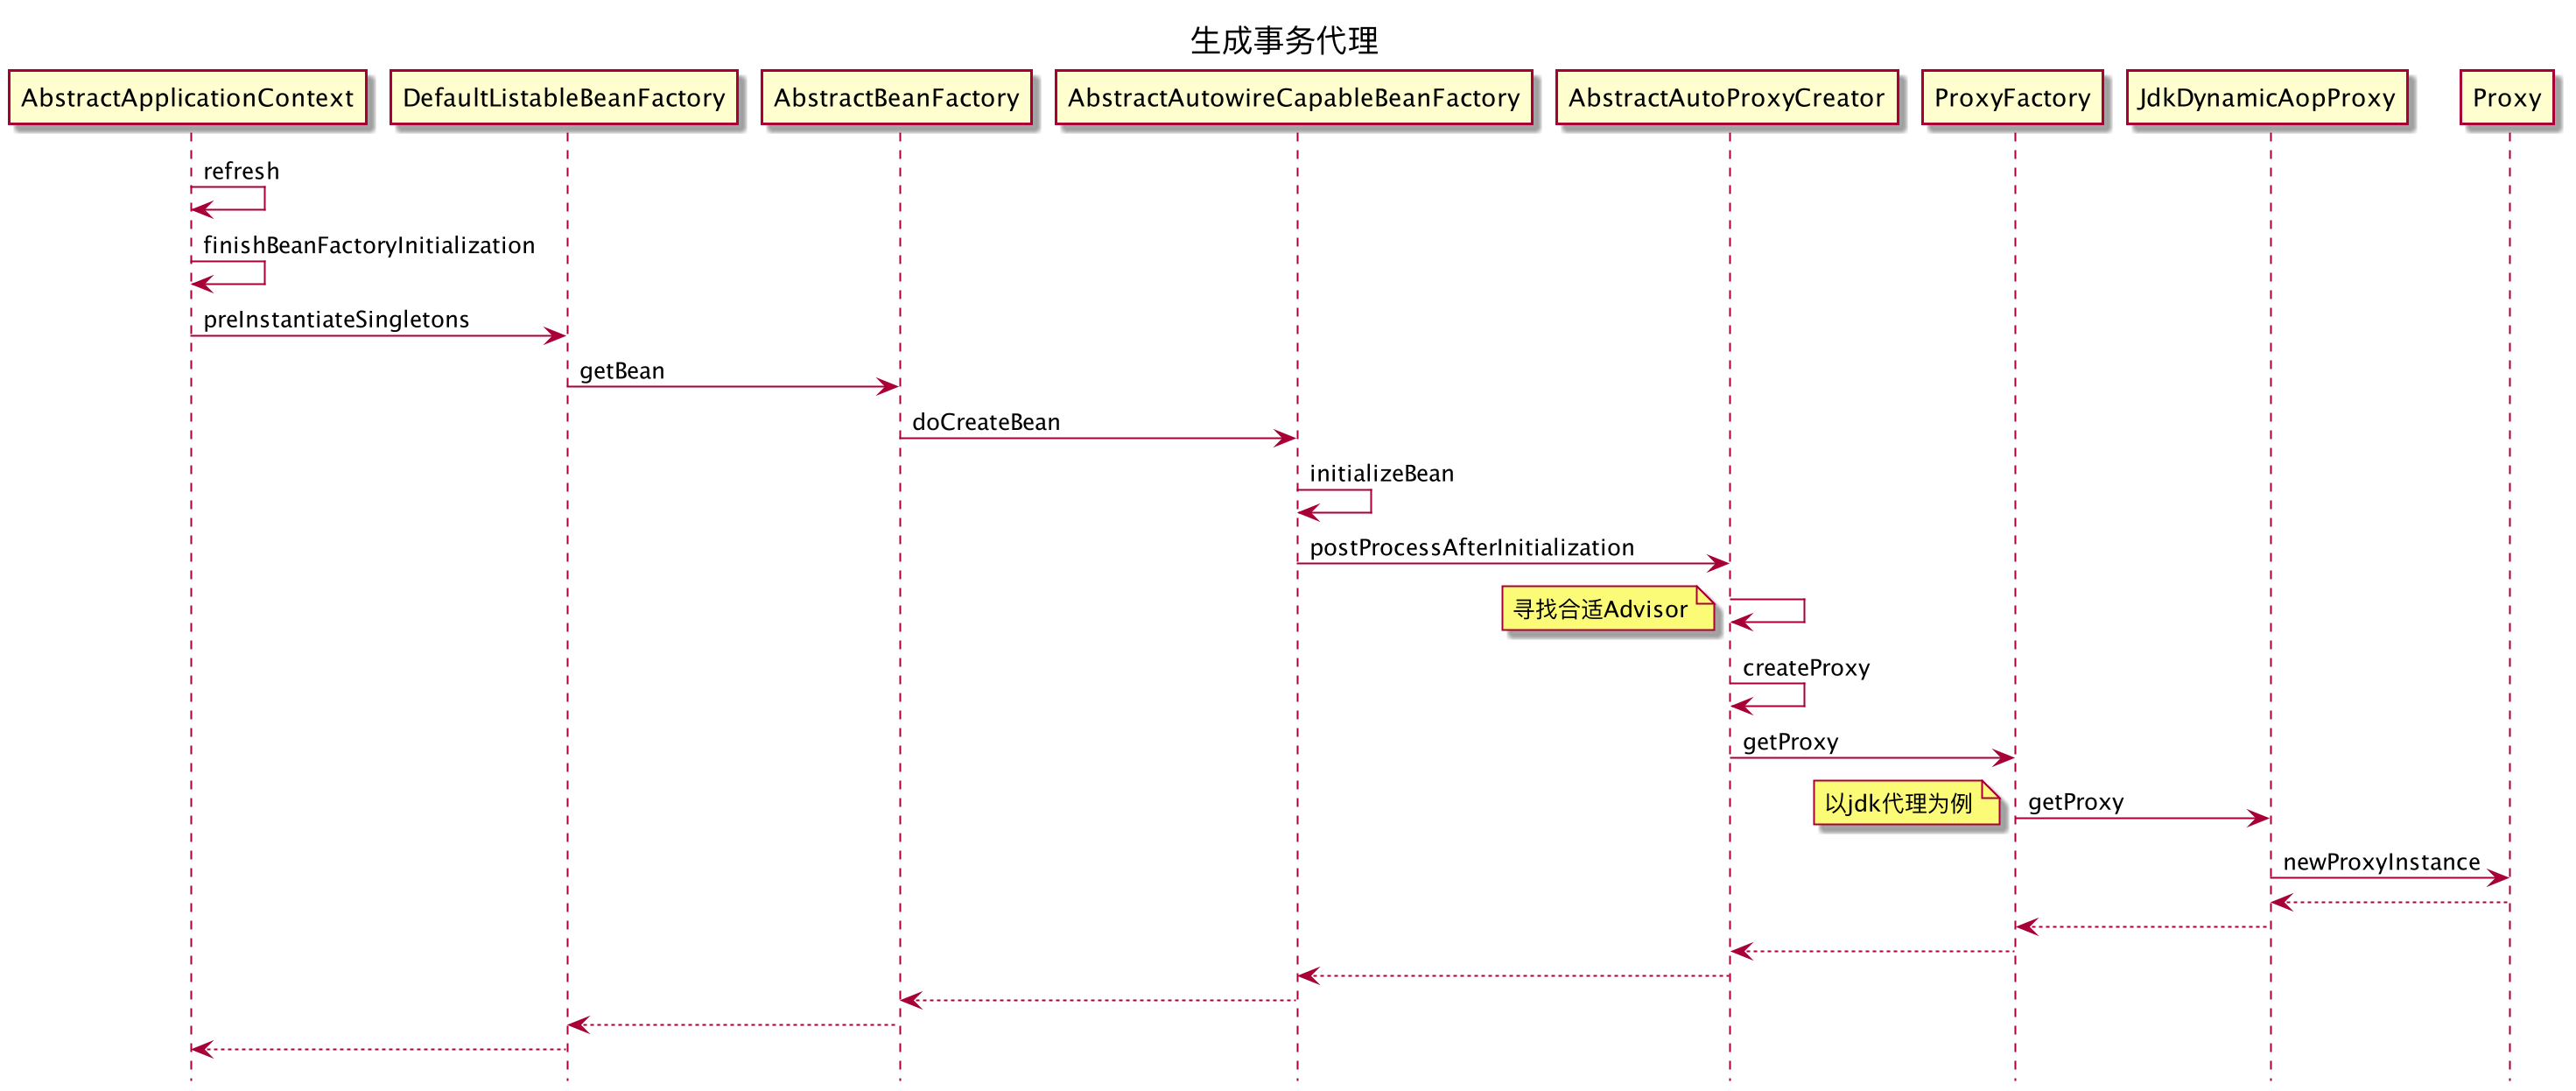
为使用事务的目标类生成代理的时序图如下:
3.执行事务逻辑
根据前边的分析,基于@EnableTransactionManagement和@Transactional注解,应用启动后会将目标类生成代理,并将事务能力织入进去,生成代理的方式有两种,分别是jdk动态代理和cglib动态代理,由于编写事务逻辑的方法所属类大多不实现接口,所以对于事务,生成代理的方式是cglib。
cglib生成代理类的方式是继承目标类,重写目标方法,然后把拦截器逻辑嵌入进去,对于事务能力,会调用到TransactionInterceptor拦截器的invoke方法:
@Override
@Nullable
public Object invoke(MethodInvocation invocation) throws Throwable {
	// Work out the target class: may be {@code null}.
	// The TransactionAttributeSource should be passed the target class
	// as well as the method, which may be from an interface.
	Class<?> targetClass = (invocation.getThis() != null ? AopUtils.getTargetClass(invocation.getThis()) : null);

	// Adapt to TransactionAspectSupport's invokeWithinTransaction...
	return invokeWithinTransaction(invocation.getMethod(), targetClass, invocation::proceed);
}
- 1
- 2
- 3
- 4
- 5
- 6
- 7
- 8
- 9
- 10
- 11
寻找到目标类,然后执行事务调用invokeWithinTransaction:
@Nullable
protected Object invokeWithinTransaction(Method method, @Nullable Class<?> targetClass,
		final InvocationCallback invocation) throws Throwable {

	// If the transaction attribute is null, the method is non-transactional.
	TransactionAttributeSource tas = getTransactionAttributeSource();
	final TransactionAttribute txAttr = (tas != null ? tas.getTransactionAttribute(method, targetClass) : null);
	final PlatformTransactionManager tm = determineTransactionManager(txAttr);
	final String joinpointIdentification = methodIdentification(method, targetClass, txAttr);

	if (txAttr == null || !(tm instanceof CallbackPreferringPlatformTransactionManager)) {
		// Standard transaction demarcation with getTransaction and commit/rollback calls.
		TransactionInfo txInfo = createTransactionIfNecessary(tm, txAttr, joinpointIdentification);
		Object retVal = null;
		try {
			// This is an around advice: Invoke the next interceptor in the chain.
			// This will normally result in a target object being invoked.
			retVal = invocation.proceedWithInvocation();
		}
		catch (Throwable ex) {
			// target invocation exception
			completeTransactionAfterThrowing(txInfo, ex);
			throw ex;
		}
		finally {
			cleanupTransactionInfo(txInfo);
		}
		commitTransactionAfterReturning(txInfo);
		return retVal;
	}

	else {
		//...省略
	}
}
- 1
- 2
- 3
- 4
- 5
- 6
- 7
- 8
- 9
- 10
- 11
- 12
- 13
- 14
- 15
- 16
- 17
- 18
- 19
- 20
- 21
- 22
- 23
- 24
- 25
- 26
- 27
- 28
- 29
- 30
- 31
- 32
- 33
- 34
- 35
前边有说到,创建的事务管理器DataSourceTransactionManager是PlatformTransactionManager类型,txAttr是从方法上提取的事务注解属性,所以满足if分支,逻辑大概意思是如果需要,则创建事务,然后执行代理类的目标方法逻辑调用,然后如果有异常则做异常回滚并抛出,如果没有异常则提交事务。
先看一下创建事务createTransactionIfNecessary:
protected TransactionInfo createTransactionIfNecessary(@Nullable PlatformTransactionManager tm,
		@Nullable TransactionAttribute txAttr, final String joinpointIdentification) {
    //...省略
	TransactionStatus status = null;
	if (txAttr != null) {
		if (tm != null) {
			status = tm.getTransaction(txAttr);
		}
	}
	return prepareTransactionInfo(tm, txAttr, joinpointIdentification, status);
}
- 1
- 2
- 3
- 4
- 5
- 6
- 7
- 8
- 9
- 10
- 11
从事务管理器中获取事务状态,然后准备事务信息,获取事务状态使用DataSourceTransactionManager的父类重写方法getTransaction:
@Override
public final TransactionStatus getTransaction(@Nullable TransactionDefinition definition) throws TransactionException {
	Object transaction = doGetTransaction();

	if (isExistingTransaction(transaction)) {
		// Existing transaction found -> check propagation behavior to find out how to behave.
		return handleExistingTransaction(definition, transaction, debugEnabled);
	}

	// Check definition settings for new transaction.
	if (definition.getTimeout() < TransactionDefinition.TIMEOUT_DEFAULT) {
		throw new InvalidTimeoutException("Invalid transaction timeout", definition.getTimeout());
	}

	// No existing transaction found -> check propagation behavior to find out how to proceed.
	if (definition.getPropagationBehavior() == TransactionDefinition.PROPAGATION_MANDATORY) {
		throw new IllegalTransactionStateException(
				"No existing transaction found for transaction marked with propagation 'mandatory'");
	}
	else if (definition.getPropagationBehavior() == TransactionDefinition.PROPAGATION_REQUIRED ||
			definition.getPropagationBehavior() == TransactionDefinition.PROPAGATION_REQUIRES_NEW ||
			definition.getPropagationBehavior() == TransactionDefinition.PROPAGATION_NESTED) {
		SuspendedResourcesHolder suspendedResources = suspend(null);
		if (debugEnabled) {
			logger.debug("Creating new transaction with name [" + definition.getName() + "]: " + definition);
		}
		try {
			boolean newSynchronization = (getTransactionSynchronization() != SYNCHRONIZATION_NEVER);
			DefaultTransactionStatus status = newTransactionStatus(
					definition, transaction, true, newSynchronization, debugEnabled, suspendedResources);
			doBegin(transaction, definition);
			prepareSynchronization(status, definition);
			return status;
		}
		catch (RuntimeException | Error ex) {
			resume(null, suspendedResources);
			throw ex;
		}
	}
	else {
		// Create "empty" transaction: no actual transaction, but potentially synchronization.
		boolean newSynchronization = (getTransactionSynchronization() == SYNCHRONIZATION_ALWAYS);
		return prepareTransactionStatus(definition, null, true, newSynchronization, debugEnabled, null);
	}
}
- 1
- 2
- 3
- 4
- 5
- 6
- 7
- 8
- 9
- 10
- 11
- 12
- 13
- 14
- 15
- 16
- 17
- 18
- 19
- 20
- 21
- 22
- 23
- 24
- 25
- 26
- 27
- 28
- 29
- 30
- 31
- 32
- 33
- 34
- 35
- 36
- 37
- 38
- 39
- 40
- 41
- 42
- 43
- 44
- 45
先检查当前线程调用是否处于事务中,如果是则处理线程传播并返回;然后检查事务超时属性,如果事务传播配置是PROPAGATION_MANDATORY且当前无事务,则报错返回;如果事务传播级别是PROPAGATION_REQUIRED、PROPAGATION_REQUIRES_NEW或PROPAGATION_NESTED则开启事务并返回事务状态。补充一下事务传播级别的概念:
- PROPAGATION_REQUIRED:_支持当前事务;如果不存在,则创建一个新的。默认配置
- PROPAGATION_SUPPORTS:_支持当前事务;如果不存在,则以非事务方式执行
- PROPAGATION_MANDATORY:_支持当前事务;如果当前不存在事务,则引发异常
- PROPAGATION_REQUIRES_NEW:_创建一个新事务,如果当前事务存在,则挂起当前事务
- PROPAGATION_NOT_SUPPORTED:_不支持当前事务;而是始终以非事务方式执行
- PROPAGATION_NEVER:_不支持事务;如果当前事务存在,则引发异常
- PROPAGATION_NESTED:_如果存在当前事务,则在嵌套事务中执行
我们看一下开启事务的实现:
@Override
protected void doBegin(Object transaction, TransactionDefinition definition) {
	DataSourceTransactionObject txObject = (DataSourceTransactionObject) transaction;
	Connection con = null;
	try {
		if (!txObject.hasConnectionHolder() ||
				txObject.getConnectionHolder().isSynchronizedWithTransaction()) {
			Connection newCon = obtainDataSource().getConnection();
			txObject.setConnectionHolder(new ConnectionHolder(newCon), true);
		}
		txObject.getConnectionHolder().setSynchronizedWithTransaction(true);
		con = txObject.getConnectionHolder().getConnection();
		Integer previousIsolationLevel = DataSourceUtils.prepareConnectionForTransaction(con, definition);
		txObject.setPreviousIsolationLevel(previousIsolationLevel);

		if (con.getAutoCommit()) {
			txObject.setMustRestoreAutoCommit(true);
			con.setAutoCommit(false);
		}
		prepareTransactionalConnection(con, definition);
		txObject.getConnectionHolder().setTransactionActive(true);

		int timeout = determineTimeout(definition);
		if (timeout != TransactionDefinition.TIMEOUT_DEFAULT) {
			txObject.getConnectionHolder().setTimeoutInSeconds(timeout);
		}
		if (txObject.isNewConnectionHolder()) {
			TransactionSynchronizationManager.bindResource(obtainDataSource(), txObject.getConnectionHolder());
		}
	}
	catch (Throwable ex) {
		if (txObject.isNewConnectionHolder()) {
			DataSourceUtils.releaseConnection(con, obtainDataSource());
			txObject.setConnectionHolder(null, false);
		}
		throw new CannotCreateTransactionException("Could not open JDBC Connection for transaction", ex);
	}
}
- 1
- 2
- 3
- 4
- 5
- 6
- 7
- 8
- 9
- 10
- 11
- 12
- 13
- 14
- 15
- 16
- 17
- 18
- 19
- 20
- 21
- 22
- 23
- 24
- 25
- 26
- 27
- 28
- 29
- 30
- 31
- 32
- 33
- 34
- 35
- 36
- 37
- 38
如果没有数据库连接则先获取连接,然后将自动提交设置false,配置超时时间,然后把数据库连接绑定到线程上。
回到事务拦截器的invokeWithinTransaction方法,拿到事务信息后,执行业务逻辑,如果发生异常则调用执行回滚和后续逻辑,如果执行成功则提交事务。
看一下异常执行逻辑:
protected void completeTransactionAfterThrowing(@Nullable TransactionInfo txInfo, Throwable ex) {
	if (txInfo != null && txInfo.getTransactionStatus() != null) {
		if (txInfo.transactionAttribute != null && txInfo.transactionAttribute.rollbackOn(ex)) {
			try {
				txInfo.getTransactionManager().rollback(txInfo.getTransactionStatus());
			}
			catch (TransactionSystemException ex2) {
				ex2.initApplicationException(ex);
				throw ex2;
			}
			catch (RuntimeException | Error ex2) {
				throw ex2;
			}
		}
		else {
			try {
				txInfo.getTransactionManager().commit(txInfo.getTransactionStatus());
			}
			catch (TransactionSystemException ex2) {
				ex2.initApplicationException(ex);
				throw ex2;
			}
			catch (RuntimeException | Error ex2) {
				throw ex2;
			}
		}
	}
}
- 1
- 2
- 3
- 4
- 5
- 6
- 7
- 8
- 9
- 10
- 11
- 12
- 13
- 14
- 15
- 16
- 17
- 18
- 19
- 20
- 21
- 22
- 23
- 24
- 25
- 26
- 27
- 28
如果存在事务,且异常类型符合回滚规则,那么调用事务管理器的回滚逻辑,否则执行提交。回滚最终会调用数据库连接的回滚方法:
protected void doRollback(DefaultTransactionStatus status) {
	DataSourceTransactionObject txObject = (DataSourceTransactionObject) status.getTransaction();
	Connection con = txObject.getConnectionHolder().getConnection();
	try {
		con.rollback();
	}
	catch (SQLException ex) {
		throw new TransactionSystemException("Could not roll back JDBC transaction", ex);
	}
}
- 1
- 2
- 3
- 4
- 5
- 6
- 7
- 8
- 9
- 10
然后会调用后续的一些操作,比如之前我们分析过的《TransactionalEventListener使用场景与原理分析》。
如果业务执行成功,那么执行事务提交,事务提交有事务管理器最终委托给数据库连接操作,并且也会触发一些依赖事务执行状态的操作,比如TransactionalEventListener依赖的是事务提交。
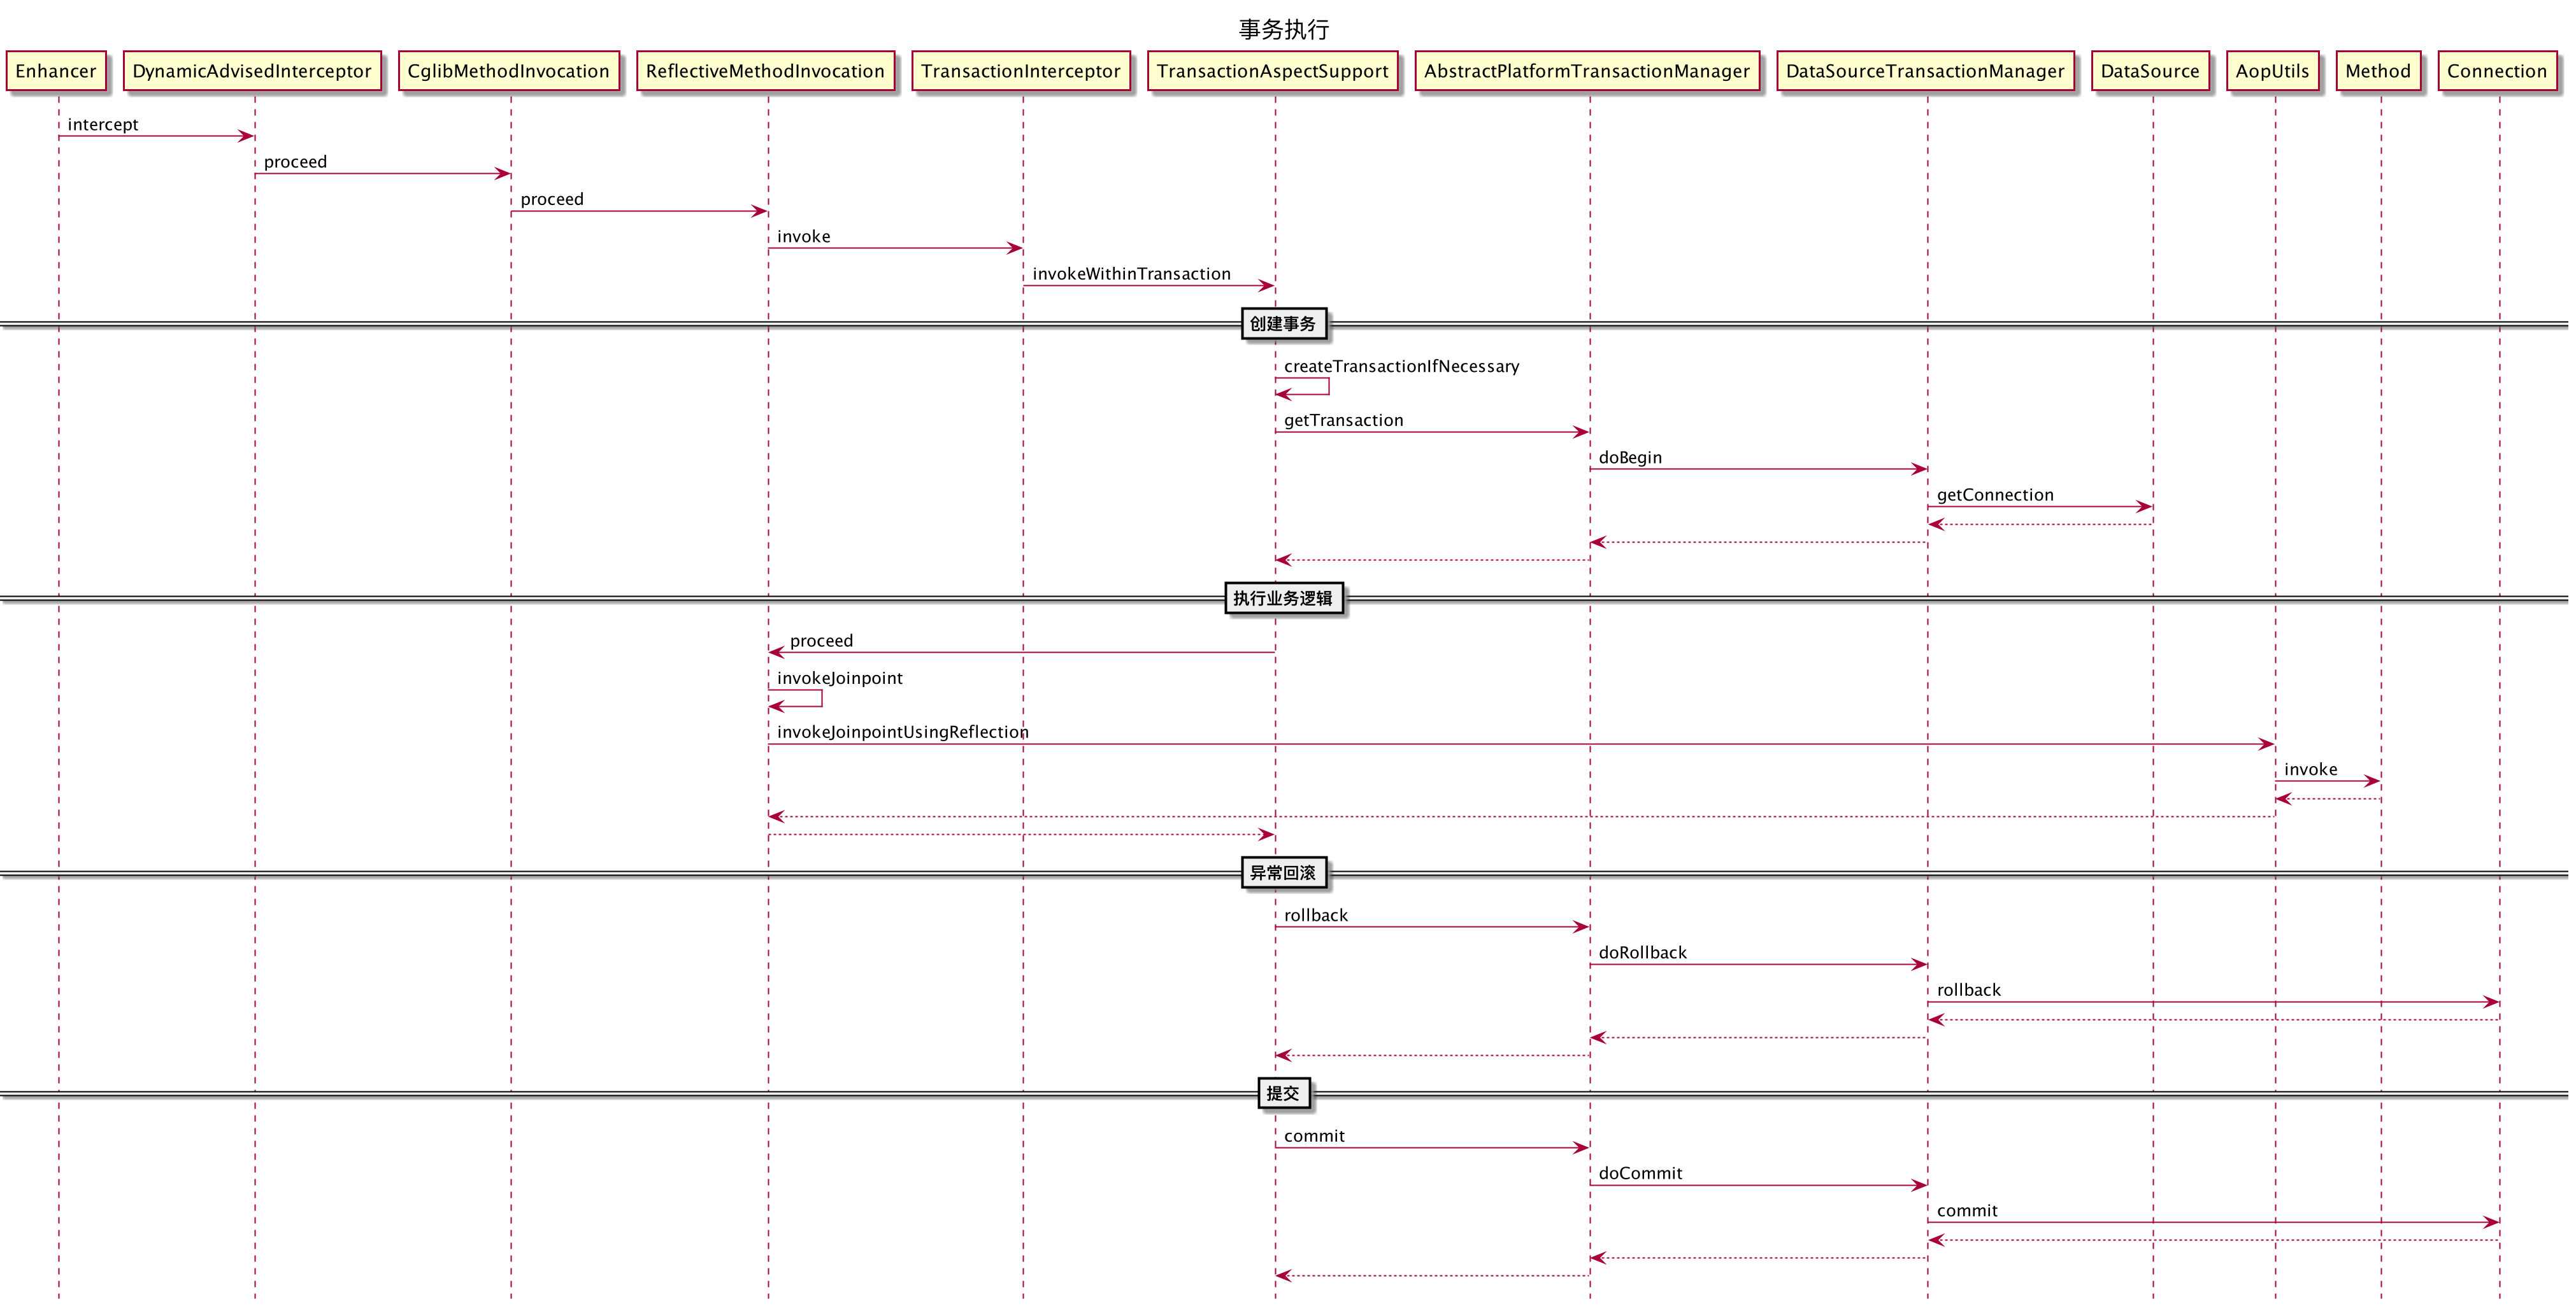
到这里事务的执行逻辑分析完了,我们看一下执行时序图:
总结
spring事务能力的支撑用到了很多知识,动态代理、AOP、反射、后置处理器等等,总的来说就是应用启动时为需要使用事务的类生成代理类,以及将事务能力(拦截逻辑)织入进去,在实例化的时候调用后置处理器的逻辑,将代理类实例化替代目标类,并放入上下文容器中,在实际调用目标类事务方法的时候,被代理类中ReflectiveMethodInvocation拦截,然后先调用拦截器中的事务逻辑,然后再调用目标类的业务逻辑,最后处理异常回滚和提交,看起来比较简单,但是框架层面提供了非常庞大的基础组件来支撑和实现事务能力,当然这些基础组件大部分都会复用,比如AOP和动态代理,在异步和缓存场景下都会用到,包括我们自己扩展一些能力出来的时候也会用到。
评论记录:
回复评论: