
窗口模块的定义
窗口模块用于在同一块物理屏幕上,提供多个应用界面显示、交互的机制。
-
对应用开发者而言,窗口模块提供了界面显示和交互能力。
-
对终端用户而言,窗口模块提供了控制应用界面的方式。
-
对整个操作系统而言,窗口模块提供了不同应用界面的组织管理逻辑。
窗口模块的用途
在HarmonyOS中,窗口模块主要负责以下职责:
-
提供应用和系统界面的窗口对象。 应用开发者通过窗口加载UI界面,实现界面显示功能。
-
组织不同窗口的显示关系,即维护不同窗口间的叠加层次和位置属性。 应用和系统的窗口具有多种类型,不同类型的窗口具有不同的默认位置和叠加层次(Z轴高度)。同时,用户操作也可以在一定范围内对窗口的位置和叠加层次进行调整。
-
提供窗口装饰。窗口装饰指窗口标题栏和窗口边框。 窗口标题栏通常包括窗口最大化、最小化及关闭按钮等界面元素,具有默认的点击行为,方便用户进行操作;窗口边框则方便用户对窗口进行拖拽缩放等行为。窗口装饰是系统的默认行为,开发者可选择启用/禁用,无需关注UI代码层面的实现。
-
提供窗口动效。 在窗口显示、隐藏及窗口间切换时,窗口模块通常会添加动画效果,以使各个交互过程更加连贯流畅。在HarmonyOS中,应用窗口的动效为默认行为,不需要开发者进行设置或者修改。
-
指导输入事件分发。 即根据当前窗口的状态或焦点,进行事件的分发。触摸和鼠标事件根据窗口的位置和尺寸进行分发,而键盘事件会被分发至焦点窗口。应用开发者可以通过窗口模块提供的接口设置窗口是否可以触摸和是否可以获焦。
基本概念
窗口类型
HarmonyOS的窗口模块将窗口界面分为系统窗口、应用窗口两种基本类型。
- 系统窗口:系统窗口指完成系统特定功能的窗口。如音量条、壁纸、通知栏、状态栏、导航栏等。
- 应用窗口:应用窗口区别于系统窗口,指与应用显示相关的窗口。根据显示内容的不同,应用窗口又分为应用主窗口、应用子窗口两种类型。
- 应用主窗口:应用主窗口用于显示应用界面,会在"任务管理界面"显示。
- 应用子窗口:应用子窗口用于显示应用的弹窗、悬浮窗等辅助窗口,不会在"任务管理界面"显示。应用子窗口的生命周期跟随应用主窗口。
应用窗口模式
应用窗口模式指应用主窗口启动时的显示方式。HarmonyOS目前支持全屏、分屏、自由窗口三种应用窗口模式。这种对多种应用窗口模式的支持能力,也称为操作系统的“多窗口能力”。
- 全屏:应用主窗口启动时铺满整个屏幕。
- 分屏:应用主窗口启动时占据屏幕的某个部分,当前支持二分屏。两个分屏窗口之间具有分界线,可通过拖拽分界线调整两个部分的窗口尺寸。
- 自由窗口:自由窗口的大小和位置可自由改变。同一个屏幕上可同时显示多个自由窗口,这些自由窗口按照打开或者获取焦点的顺序在Z轴排布。当自由窗口被点击或触摸时,将导致其Z轴高度提升,并获取焦点。

实现原理
当前窗口的实现和开发与应用开发模型相关联,不同模型下的接口功能略有区别。当前应用开发模型分为FA模型和Stage模型。
两个模型的整体架构和设计思想,详见[应用模型解读] 。
针对窗口开发,推荐使用Stage模型进行相关开发。
约束与限制
-
在FA模型下,不支持系统窗口的相关开发。
-
应用主窗口与子窗口存在大小限制,宽度范围:[320, 2560],高度范围:[240, 2560],单位为vp。
-
系统窗口存在大小限制,宽度范围:[0, 2560],高度范围:[0, 2560],单位为vp。
管理应用窗口(Stage模型)
基本概念
-
窗口沉浸式能力:指对状态栏、导航栏等系统窗口进行控制,减少状态栏导航栏等系统界面的突兀感,从而使用户获得最佳体验的能力。
沉浸式能力只在应用主窗口作为全屏窗口时生效。通常情况下,应用子窗口(弹窗、悬浮窗口等辅助窗口)和处于自由窗口下的应用主窗口无法使用沉浸式能力。
-
悬浮窗:全局悬浮窗口是一种特殊的应用窗口,具备在应用主窗口和对应Ability退至后台后仍然可以在前台显示的能力。
悬浮窗口可以用于应用退至后台后,使用小窗继续播放视频,或者为特定的应用创建悬浮球等快速入口。应用在创建悬浮窗口前,需要申请对应的权限。
场景介绍
在Stage模型下,管理应用窗口的典型场景有:
- 设置应用主窗口属性及目标页面
- 设置应用子窗口属性及目标页面
- 体验窗口沉浸式能力
- 设置悬浮窗
- 监听窗口不可交互与可交互事件
以下分别介绍具体开发方式。
接口说明
上述场景涉及的常用接口如下表所示。
| 实例名 | 接口名 | 描述 |
|---|---|---|
| WindowStage | getMainWindow(callback: AsyncCallback): void | 获取WindowStage实例下的主窗口。 此接口仅可在Stage模型下使用。 |
| WindowStage | loadContent(path: string, callback: AsyncCallback): void | 为当前WindowStage的主窗口加载具体页面。 其中path为要加载到窗口中的页面内容的路径,该路径需添加到工程的main_pages.json文件中。 此接口仅可在Stage模型下使用。 |
| WindowStage | createSubWindow(name: string, callback: AsyncCallback): void | 创建子窗口。 此接口仅可在Stage模型下使用。 |
| WindowStage | on(type: ‘windowStageEvent’, callback: Callback): void | 开启WindowStage生命周期变化的监听。 此接口仅可在Stage模型下使用。 |
| window静态方法 | createWindow(config: Configuration, callback: AsyncCallback): void | 创建子窗口或者系统窗口。 -config:创建窗口时的参数。 |
| Window | setUIContent(path: string, callback: AsyncCallback): void | 根据当前工程中某个页面的路径为窗口加载具体的页面内容。 其中path为要加载到窗口中的页面内容的路径,在Stage模型下该路径需添加到工程的main_pages.json文件中。 |
| Window | setWindowBrightness(brightness: number, callback: AsyncCallback): void | 设置屏幕亮度值。 |
| Window | setWindowTouchable(isTouchable: boolean, callback: AsyncCallback): void | 设置窗口是否为可触状态。 |
| Window | moveWindowTo(x: number, y: number, callback: AsyncCallback): void | 移动当前窗口位置。 |
| Window | resize(width: number, height: number, callback: AsyncCallback): void | 改变当前窗口大小。 |
| Window | setWindowLayoutFullScreen(isLayoutFullScreen: boolean, callback: AsyncCallback): void | 设置窗口布局是否为全屏布局。 |
| Window | setWindowSystemBarEnable(names: Array<‘status’ | ‘navigation’>): Promise |
| Window | setWindowSystemBarProperties(systemBarProperties: SystemBarProperties, callback: AsyncCallback): void | 设置窗口内导航栏、状态栏属性。 systemBarProperties:导航栏、状态栏的属性集合。 |
| Window | showWindow(callback: AsyncCallback): void | 显示当前窗口。 |
| Window | on(type: ‘touchOutside’, callback: Callback): void | 开启本窗口区域外的点击事件的监听。 |
| Window | destroyWindow(callback: AsyncCallback): void | 销毁当前窗口。 |
设置应用主窗口
在Stage模型下,应用主窗口由UIAbility创建并维护生命周期。在UIAbility的onWindowStageCreate回调中,通过WindowStage获取应用主窗口,即可对其进行属性设置等操作。还可以在应用配置文件中设置应用主窗口的属性,如最大窗口宽度maxWindowWidth等 。
开发步骤
- 获取应用主窗口。
通过getMainWindow接口获取应用主窗口。
- 设置主窗口属性。
可设置主窗口的背景色、亮度值、是否可触等多个属性,开发者可根据需要选择对应的接口。本示例以设置“是否可触”属性为例。
-
为主窗口加载对应的目标页面。
通过loadContent接口加载主窗口的目标页面。
import { UIAbility } from '@kit.AbilityKit';
import { window } from '@kit.ArkUI';
import { BusinessError } from '@kit.BasicServicesKit';

export default class EntryAbility extends UIAbility {
  onWindowStageCreate(windowStage: window.WindowStage) {
    // 1.获取应用主窗口。
    let windowClass: window.Window | null = null;
    windowStage.getMainWindow((err: BusinessError, data) => {
      let errCode: number = err.code;
      if (errCode) {
        console.error('Failed to obtain the main window. Cause: ' + JSON.stringify(err));
        return;
      }
      windowClass = data;
      console.info('Succeeded in obtaining the main window. Data: ' + JSON.stringify(data));
      // 2.设置主窗口属性。以设置"是否可触"属性为例。
      let isTouchable: boolean = true;
      windowClass.setWindowTouchable(isTouchable, (err: BusinessError) => {
        let errCode: number = err.code;
        if (errCode) {
          console.error('Failed to set the window to be touchable. Cause:' + JSON.stringify(err));
          return;
        }
        console.info('Succeeded in setting the window to be touchable.');
      })
    })
    // 3.为主窗口加载对应的目标页面。
    windowStage.loadContent("pages/page2", (err: BusinessError) => {
      let errCode: number = err.code;
      if (errCode) {
        console.error('Failed to load the content. Cause:' + JSON.stringify(err));
        return;
      }
      console.info('Succeeded in loading the content.');
    });
  }
};

- 1
- 2
- 3
- 4
- 5
- 6
- 7
- 8
- 9
- 10
- 11
- 12
- 13
- 14
- 15
- 16
- 17
- 18
- 19
- 20
- 21
- 22
- 23
- 24
- 25
- 26
- 27
- 28
- 29
- 30
- 31
- 32
- 33
- 34
- 35
- 36
- 37
- 38
设置应用子窗口
开发者可以按需创建应用子窗口,如弹窗等,并对其进行属性设置等操作。
开发步骤
- 创建应用子窗口。
通过createSubWindow接口创建应用子窗口。
- 设置子窗口属性。
子窗口创建成功后,可以改变其大小、位置等,还可以根据应用需要设置窗口背景色、亮度等属性。
- 加载显示子窗口的具体内容。
通过setUIContent和showWindow接口加载显示子窗口的具体内容。
- 销毁子窗口。
当不再需要某些子窗口时,可根据具体实现逻辑,使用destroyWindow接口销毁子窗口。
直接在onWindowStageCreate里面创建子窗口的整体示例代码如下:
import { UIAbility } from '@kit.AbilityKit';
import { window } from '@kit.ArkUI';
import { BusinessError } from '@kit.BasicServicesKit';

let windowStage_: window.WindowStage | null = null;
let sub_windowClass: window.Window | null = null;

export default class EntryAbility extends UIAbility {
  showSubWindow() {
    // 1.创建应用子窗口。
    if (windowStage_ == null) {
      console.error('Failed to create the subwindow. Cause: windowStage_ is null');
    }
    else {
      windowStage_.createSubWindow("mySubWindow", (err: BusinessError, data) => {
        let errCode: number = err.code;
        if (errCode) {
          console.error('Failed to create the subwindow. Cause: ' + JSON.stringify(err));
          return;
        }
        sub_windowClass = data;
        console.info('Succeeded in creating the subwindow. Data: ' + JSON.stringify(data));
        // 2.子窗口创建成功后,设置子窗口的位置、大小及相关属性等。
        sub_windowClass.moveWindowTo(300, 300, (err: BusinessError) => {
          let errCode: number = err.code;
          if (errCode) {
            console.error('Failed to move the window. Cause:' + JSON.stringify(err));
            return;
          }
          console.info('Succeeded in moving the window.');
        });
        sub_windowClass.resize(500, 500, (err: BusinessError) => {
          let errCode: number = err.code;
          if (errCode) {
            console.error('Failed to change the window size. Cause:' + JSON.stringify(err));
            return;
          }
          console.info('Succeeded in changing the window size.');
        });
        // 3.为子窗口加载对应的目标页面。
        sub_windowClass.setUIContent("pages/page3", (err: BusinessError) => {
          let errCode: number = err.code;
          if (errCode) {
            console.error('Failed to load the content. Cause:' + JSON.stringify(err));
            return;
          }
          console.info('Succeeded in loading the content.');
          // 3.显示子窗口。
          (sub_windowClass as window.Window).showWindow((err: BusinessError) => {
            let errCode: number = err.code;
            if (errCode) {
              console.error('Failed to show the window. Cause: ' + JSON.stringify(err));
              return;
            }
            console.info('Succeeded in showing the window.');
          });
        });
      })
    }
  }

  destroySubWindow() {
    // 4.销毁子窗口。当不再需要子窗口时,可根据具体实现逻辑,使用destroy对其进行销毁。
    (sub_windowClass as window.Window).destroyWindow((err: BusinessError) => {
      let errCode: number = err.code;
      if (errCode) {
        console.error('Failed to destroy the window. Cause: ' + JSON.stringify(err));
        return;
      }
      console.info('Succeeded in destroying the window.');
    });
  }

  onWindowStageCreate(windowStage: window.WindowStage) {
    windowStage_ = windowStage;
    // 开发者可以在适当的时机,如主窗口上按钮点击事件等,创建子窗口。并不一定需要在onWindowStageCreate调用,这里仅作展示
    this.showSubWindow();
  }

  onWindowStageDestroy() {
    // 开发者可以在适当的时机,如子窗口上点击关闭按钮等,销毁子窗口。并不一定需要在onWindowStageDestroy调用,这里仅作展示
    this.destroySubWindow();
  }
};
- 1
- 2
- 3
- 4
- 5
- 6
- 7
- 8
- 9
- 10
- 11
- 12
- 13
- 14
- 15
- 16
- 17
- 18
- 19
- 20
- 21
- 22
- 23
- 24
- 25
- 26
- 27
- 28
- 29
- 30
- 31
- 32
- 33
- 34
- 35
- 36
- 37
- 38
- 39
- 40
- 41
- 42
- 43
- 44
- 45
- 46
- 47
- 48
- 49
- 50
- 51
- 52
- 53
- 54
- 55
- 56
- 57
- 58
- 59
- 60
- 61
- 62
- 63
- 64
- 65
- 66
- 67
- 68
- 69
- 70
- 71
- 72
- 73
- 74
- 75
- 76
- 77
- 78
- 79
- 80
- 81
- 82
- 83
- 84
另外,也可以在某个page页面通过点击按钮创建子窗口,整体示例代码如下:
// EntryAbility.ets
onWindowStageCreate(windowStage: window.WindowStage) {
  windowStage.loadContent('pages/Index', (err) => {
    if (err.code) {
      console.error('Failed to load the content. Cause:' + JSON.stringify(err));
      return;
    }
    console.info('Succeeded in loading the content.');
  })

  // 给Index页面传递windowStage
  AppStorage.setOrCreate('windowStage', windowStage);
}
- 1
- 2
- 3
- 4
- 5
- 6
- 7
- 8
- 9
- 10
- 11
- 12
- 13
// Index.ets
import { window } from '@kit.ArkUI';
import { BusinessError } from '@kit.BasicServicesKit';

let windowStage_: window.WindowStage | undefined = undefined;
let sub_windowClass: window.Window | undefined = undefined;
@Entry
@Component
struct Index {
  @State message: string = 'Hello World';
  private CreateSubWindow(){
    // 获取windowStage
    windowStage_ = AppStorage.get('windowStage');
    // 1.创建应用子窗口。
    if (windowStage_ == null) {
      console.error('Failed to create the subwindow. Cause: windowStage_ is null');
    }
    else {
      windowStage_.createSubWindow("mySubWindow", (err: BusinessError, data) => {
        let errCode: number = err.code;
        if (errCode) {
          console.error('Failed to create the subwindow. Cause: ' + JSON.stringify(err));
          return;
        }
        sub_windowClass = data;
        console.info('Succeeded in creating the subwindow. Data: ' + JSON.stringify(data));
        // 2.子窗口创建成功后,设置子窗口的位置、大小及相关属性等。
        sub_windowClass.moveWindowTo(300, 300, (err: BusinessError) => {
          let errCode: number = err.code;
          if (errCode) {
            console.error('Failed to move the window. Cause:' + JSON.stringify(err));
            return;
          }
          console.info('Succeeded in moving the window.');
        });
        sub_windowClass.resize(500, 500, (err: BusinessError) => {
          let errCode: number = err.code;
          if (errCode) {
            console.error('Failed to change the window size. Cause:' + JSON.stringify(err));
            return;
          }
          console.info('Succeeded in changing the window size.');
        });
        // 3.为子窗口加载对应的目标页面。
        sub_windowClass.setUIContent("pages/subWindow", (err: BusinessError) => {
          let errCode: number = err.code;
          if (errCode) {
            console.error('Failed to load the content. Cause:' + JSON.stringify(err));
            return;
          }
          console.info('Succeeded in loading the content.');
          // 3.显示子窗口。
          (sub_windowClass as window.Window).showWindow((err: BusinessError) => {
            let errCode: number = err.code;
            if (errCode) {
              console.error('Failed to show the window. Cause: ' + JSON.stringify(err));
              return;
            }
            console.info('Succeeded in showing the window.');
          });
        });
      })
    }
  }
  private destroySubWindow(){
    // 4.销毁子窗口。当不再需要子窗口时,可根据具体实现逻辑,使用destroy对其进行销毁。
    (sub_windowClass as window.Window).destroyWindow((err: BusinessError) => {
      let errCode: number = err.code;
      if (errCode) {
        console.error('Failed to destroy the window. Cause: ' + JSON.stringify(err));
        return;
      }
      console.info('Succeeded in destroying the window.');
    });
  }
  build() {
    Row() {
      Column() {
        Text(this.message)
          .fontSize(50)
          .fontWeight(FontWeight.Bold)
        Button(){
          Text('CreateSubWindow')
          .fontSize(24)
          .fontWeight(FontWeight.Normal)
        }.width(220).height(68)
        .margin({left:10, top:60})
        .onClick(() => {
          this.CreateSubWindow()
        })
        Button(){
          Text('destroySubWindow')
          .fontSize(24)
          .fontWeight(FontWeight.Normal)
        }.width(220).height(68)
        .margin({left:10, top:60})
        .onClick(() => {
          this.destroySubWindow()
        })
      }
      .width('100%')
    }
    .height('100%')
  }
}
- 1
- 2
- 3
- 4
- 5
- 6
- 7
- 8
- 9
- 10
- 11
- 12
- 13
- 14
- 15
- 16
- 17
- 18
- 19
- 20
- 21
- 22
- 23
- 24
- 25
- 26
- 27
- 28
- 29
- 30
- 31
- 32
- 33
- 34
- 35
- 36
- 37
- 38
- 39
- 40
- 41
- 42
- 43
- 44
- 45
- 46
- 47
- 48
- 49
- 50
- 51
- 52
- 53
- 54
- 55
- 56
- 57
- 58
- 59
- 60
- 61
- 62
- 63
- 64
- 65
- 66
- 67
- 68
- 69
- 70
- 71
- 72
- 73
- 74
- 75
- 76
- 77
- 78
- 79
- 80
- 81
- 82
- 83
- 84
- 85
- 86
- 87
- 88
- 89
- 90
- 91
- 92
- 93
- 94
- 95
- 96
- 97
- 98
- 99
- 100
- 101
- 102
- 103
- 104
- 105
// subWindow.ets
@Entry
@Component
struct SubWindow {
  @State message: string = 'Hello subWindow';
  build() {
    Row() {
      Column() {
        Text(this.message)
          .fontSize(50)
          .fontWeight(FontWeight.Bold)
      }
      .width('100%')
    }
    .height('100%')
  }
}
- 1
- 2
- 3
- 4
- 5
- 6
- 7
- 8
- 9
- 10
- 11
- 12
- 13
- 14
- 15
- 16
- 17
体验窗口沉浸式能力
在看视频、玩游戏等场景下,用户往往希望隐藏状态栏、导航栏等不必要的系统窗口,从而获得更佳的沉浸式体验。此时可以借助窗口沉浸式能力(窗口沉浸式能力都是针对应用主窗口而言的),达到预期效果。从API version 10开始,沉浸式窗口默认配置为全屏大小并由组件模块控制布局,状态栏、导航栏背景颜色为透明,文字颜色为黑色;应用窗口调用setWindowLayoutFullScreen接口,设置为true表示由组件模块控制忽略状态栏、导航栏的沉浸式全屏布局,设置为false表示由组件模块控制避让状态栏、导航栏的非沉浸式全屏布局。
说明
当前沉浸式界面开发仅支持window级别的配置,暂不支持Page级别的配置。若有Page级别切换的需要,可以在页面生命周期开始,例如onPageShow中设置沉浸模式,然后在页面退出,例如onPageHide中恢复默认设置来实现。
开发步骤
- 获取应用主窗口。
通过getMainWindow接口获取应用主窗口。
- 实现沉浸式效果。有以下两种方式:
- 方式一:应用主窗口为全屏窗口时,调用setWindowSystemBarEnable接口,设置导航栏、状态栏不显示,从而达到沉浸式效果。
- 方式二:调用setWindowLayoutFullScreen接口,设置应用主窗口为全屏布局;然后调用setWindowSystemBarProperties接口,设置导航栏、状态栏的透明度、背景/文字颜色以及高亮图标等属性,使之保持与主窗口显示协调一致,从而达到沉浸式效果。
- 加载显示沉浸式窗口的具体内容。
通过loadContent接口加载沉浸式窗口的具体内容。
import { UIAbility } from '@kit.AbilityKit';
import { window } from '@kit.ArkUI';
import { BusinessError } from '@kit.BasicServicesKit';

export default class EntryAbility extends UIAbility {
  onWindowStageCreate(windowStage: window.WindowStage) {
    // 1.获取应用主窗口。
    let windowClass: window.Window | null = null;
    windowStage.getMainWindow((err: BusinessError, data) => {
      let errCode: number = err.code;
      if (errCode) {
        console.error('Failed to obtain the main window. Cause: ' + JSON.stringify(err));
        return;
      }
      windowClass = data;
      console.info('Succeeded in obtaining the main window. Data: ' + JSON.stringify(data));

      // 2.实现沉浸式效果。方式一:设置导航栏、状态栏不显示。
      let names: Array<'status' | 'navigation'> = [];
      windowClass.setWindowSystemBarEnable(names, (err: BusinessError) => {
        let errCode: number = err.code;
        if (errCode) {
          console.error('Failed to set the system bar to be visible. Cause:' + JSON.stringify(err));
          return;
        }
        console.info('Succeeded in setting the system bar to be visible.');
      });
      // 2.实现沉浸式效果。方式二:设置窗口为全屏布局,配合设置导航栏、状态栏的透明度、背景/文字颜色及高亮图标等属性,与主窗口显示保持协调一致。
      let isLayoutFullScreen = true;
      windowClass.setWindowLayoutFullScreen(isLayoutFullScreen, (err: BusinessError) => {
        let errCode: number = err.code;
        if (errCode) {
          console.error('Failed to set the window layout to full-screen mode. Cause:' + JSON.stringify(err));
          return;
        }
        console.info('Succeeded in setting the window layout to full-screen mode.');
      });
      let sysBarProps: window.SystemBarProperties = {
        statusBarColor: '#ff00ff',
        navigationBarColor: '#00ff00',
        // 以下两个属性从API Version 8开始支持
        statusBarContentColor: '#ffffff',
        navigationBarContentColor: '#ffffff'
      };
      windowClass.setWindowSystemBarProperties(sysBarProps, (err: BusinessError) => {
        let errCode: number = err.code;
        if (errCode) {
          console.error('Failed to set the system bar properties. Cause: ' + JSON.stringify(err));
          return;
        }
        console.info('Succeeded in setting the system bar properties.');
      });
    })
    // 3.为沉浸式窗口加载对应的目标页面。
    windowStage.loadContent("pages/page2", (err: BusinessError) => {
      let errCode: number = err.code;
      if (errCode) {
        console.error('Failed to load the content. Cause:' + JSON.stringify(err));
        return;
      }
      console.info('Succeeded in loading the content.');
    });
  }
};
- 1
- 2
- 3
- 4
- 5
- 6
- 7
- 8
- 9
- 10
- 11
- 12
- 13
- 14
- 15
- 16
- 17
- 18
- 19
- 20
- 21
- 22
- 23
- 24
- 25
- 26
- 27
- 28
- 29
- 30
- 31
- 32
- 33
- 34
- 35
- 36
- 37
- 38
- 39
- 40
- 41
- 42
- 43
- 44
- 45
- 46
- 47
- 48
- 49
- 50
- 51
- 52
- 53
- 54
- 55
- 56
- 57
- 58
- 59
- 60
- 61
- 62
- 63
- 64
##设置悬浮窗(受限开放)
悬浮窗可以在已有的任务基础上,创建一个始终在前台显示的窗口。即使创建悬浮窗的任务退至后台,悬浮窗仍然可以在前台显示。通常悬浮窗位于所有应用窗口之上;开发者可以创建悬浮窗,并对悬浮窗进行属性设置等操作。
开发步骤
前提条件: 创建WindowType.TYPE_FLOAT即悬浮窗类型的窗口,需要申请ohos.permission.SYSTEM_FLOAT_WINDOW权限,该权限为受控开放权限,仅符合 指定场景 的在2in1设备上的应用可申请该权限。
在其他设备或场景下,请使用画中画功能,使用方式参考:
注意
如果应用未在应用市场(AGC)申请相应的权限证书,却试图在配置文件中声明此类权限,将会导致应用安装失败。
- 创建悬浮窗。
通过window.createWindow接口创建悬浮窗类型的窗口。
- 对悬浮窗进行属性设置等操作。
悬浮窗窗口创建成功后,可以改变其大小、位置等,还可以根据应用需要设置悬浮窗背景色、亮度等属性。
- 加载显示悬浮窗的具体内容。
通过setUIContent和showWindow接口加载显示悬浮窗的具体内容。
- 销毁悬浮窗。
当不再需要悬浮窗时,可根据具体实现逻辑,使用destroyWindow接口销毁悬浮窗。
import { UIAbility } from '@kit.AbilityKit';
import { window } from '@kit.ArkUI';
import { BusinessError } from '@kit.BasicServicesKit';

export default class EntryAbility extends UIAbility {
  onWindowStageCreate(windowStage: window.WindowStage) {
    // 1.创建悬浮窗。
    let windowClass: window.Window | null = null;
    let config: window.Configuration = {
      name: "floatWindow", windowType: window.WindowType.TYPE_FLOAT, ctx: this.context
    };
    window.createWindow(config, (err: BusinessError, data) => {
      let errCode: number = err.code;
      if (errCode) {
        console.error('Failed to create the floatWindow. Cause: ' + JSON.stringify(err));
        return;
      }
      console.info('Succeeded in creating the floatWindow. Data: ' + JSON.stringify(data));
      windowClass = data;
      // 2.悬浮窗窗口创建成功后,设置悬浮窗的位置、大小及相关属性等。
      windowClass.moveWindowTo(300, 300, (err: BusinessError) => {
        let errCode: number = err.code;
        if (errCode) {
          console.error('Failed to move the window. Cause:' + JSON.stringify(err));
          return;
        }
        console.info('Succeeded in moving the window.');
      });
      windowClass.resize(500, 500, (err: BusinessError) => {
        let errCode: number = err.code;
        if (errCode) {
          console.error('Failed to change the window size. Cause:' + JSON.stringify(err));
          return;
        }
        console.info('Succeeded in changing the window size.');
      });
      // 3.为悬浮窗加载对应的目标页面。
      windowClass.setUIContent("pages/page4", (err: BusinessError) => {
        let errCode: number = err.code;
        if (errCode) {
          console.error('Failed to load the content. Cause:' + JSON.stringify(err));
          return;
        }
        console.info('Succeeded in loading the content.');
        // 3.显示悬浮窗。
        (windowClass as window.Window).showWindow((err: BusinessError) => {
          let errCode: number = err.code;
          if (errCode) {
            console.error('Failed to show the window. Cause: ' + JSON.stringify(err));
            return;
          }
          console.info('Succeeded in showing the window.');
        });
      });
      // 4.销毁悬浮窗。当不再需要悬浮窗时,可根据具体实现逻辑,使用destroy对其进行销毁。
      windowClass.destroyWindow((err: BusinessError) => {
        let errCode: number = err.code;
        if (errCode) {
          console.error('Failed to destroy the window. Cause: ' + JSON.stringify(err));
          return;
        }
        console.info('Succeeded in destroying the window.');
      });
    });
  }
};
- 1
- 2
- 3
- 4
- 5
- 6
- 7
- 8
- 9
- 10
- 11
- 12
- 13
- 14
- 15
- 16
- 17
- 18
- 19
- 20
- 21
- 22
- 23
- 24
- 25
- 26
- 27
- 28
- 29
- 30
- 31
- 32
- 33
- 34
- 35
- 36
- 37
- 38
- 39
- 40
- 41
- 42
- 43
- 44
- 45
- 46
- 47
- 48
- 49
- 50
- 51
- 52
- 53
- 54
- 55
- 56
- 57
- 58
- 59
- 60
- 61
- 62
- 63
- 64
- 65
- 66
监听窗口不可交互与可交互事件
应用在前台显示过程中可能会进入某些不可交互的场景,比较典型的是进入多任务界面。此时,对于一些应用可能需要选择暂停某个与用户正在交互的业务,如视频类应用暂停正在播放的视频或者相机暂停预览流等。而当该应用从多任务又切回前台时,又变成了可交互的状态,此时需要恢复被暂停中断的业务,如恢复视频播放或相机预览流等。
开发步骤
在创建WindowStage对象后可通过监听’windowStageEvent’事件类型,监听到窗口进入前台、后台、前台可交互、前台不可交互等事件,应用可根据这些上报的事件状态进行相应的业务处理。
import { UIAbility } from '@kit.AbilityKit';
import { window } from '@kit.ArkUI';

export default class EntryAbility extends UIAbility {
  onWindowStageCreate(windowStage: window.WindowStage) {
    try {
      windowStage.on('windowStageEvent', (data) => {
        console.info('Succeeded in enabling the listener for window stage event changes. Data: ' +
          JSON.stringify(data));

        // 根据事件状态类型选择进行相应的处理
        if (data == window.WindowStageEventType.SHOWN) {
          console.info('current window stage event is SHOWN');
          // 应用进入前台,默认为可交互状态
          // ...
        } else if (data == window.WindowStageEventType.HIDDEN) {
          console.info('current window stage event is HIDDEN');
          // 应用进入后台,默认为不可交互状态
          // ...
        } else if (data == window.WindowStageEventType.PAUSED) {
          console.info('current window stage event is PAUSED');
          // 前台应用进入多任务,转为不可交互状态
          // ...
        } else if (data == window.WindowStageEventType.RESUMED) {
          console.info('current window stage event is RESUMED');
          // 进入多任务后又继续返回前台时,恢复可交互状态
          // ...
        }

        // ...
      });
    } catch (exception) {
      console.error('Failed to enable the listener for window stage event changes. Cause:' +
        JSON.stringify(exception));
    }
  }
}
- 1
- 2
- 3
- 4
- 5
- 6
- 7
- 8
- 9
- 10
- 11
- 12
- 13
- 14
- 15
- 16
- 17
- 18
- 19
- 20
- 21
- 22
- 23
- 24
- 25
- 26
- 27
- 28
- 29
- 30
- 31
- 32
- 33
- 34
- 35
- 36
- 37
鸿蒙全栈开发全新学习指南
有很多小伙伴不知道学习哪些鸿蒙开发技术?不知道需要重点掌握哪些鸿蒙应用开发知识点?而且学习时频繁踩坑,最终浪费大量时间。所以要有一份实用的鸿蒙(HarmonyOS NEXT)学习路线与学习文档用来跟着学习是非常有必要的。
针对一些列因素,整理了一套纯血版鸿蒙(HarmonyOS Next)全栈开发技术的学习路线,包含了鸿蒙开发必掌握的核心知识要点,内容有(ArkTS、ArkUI开发组件、Stage模型、多端部署、分布式应用开发、WebGL、元服务、OpenHarmony多媒体技术、Napi组件、OpenHarmony内核、OpenHarmony驱动开发、系统定制移植等等)鸿蒙(HarmonyOS NEXT)技术知识点。
本路线共分为四个阶段:
第一阶段:鸿蒙初中级开发必备技能
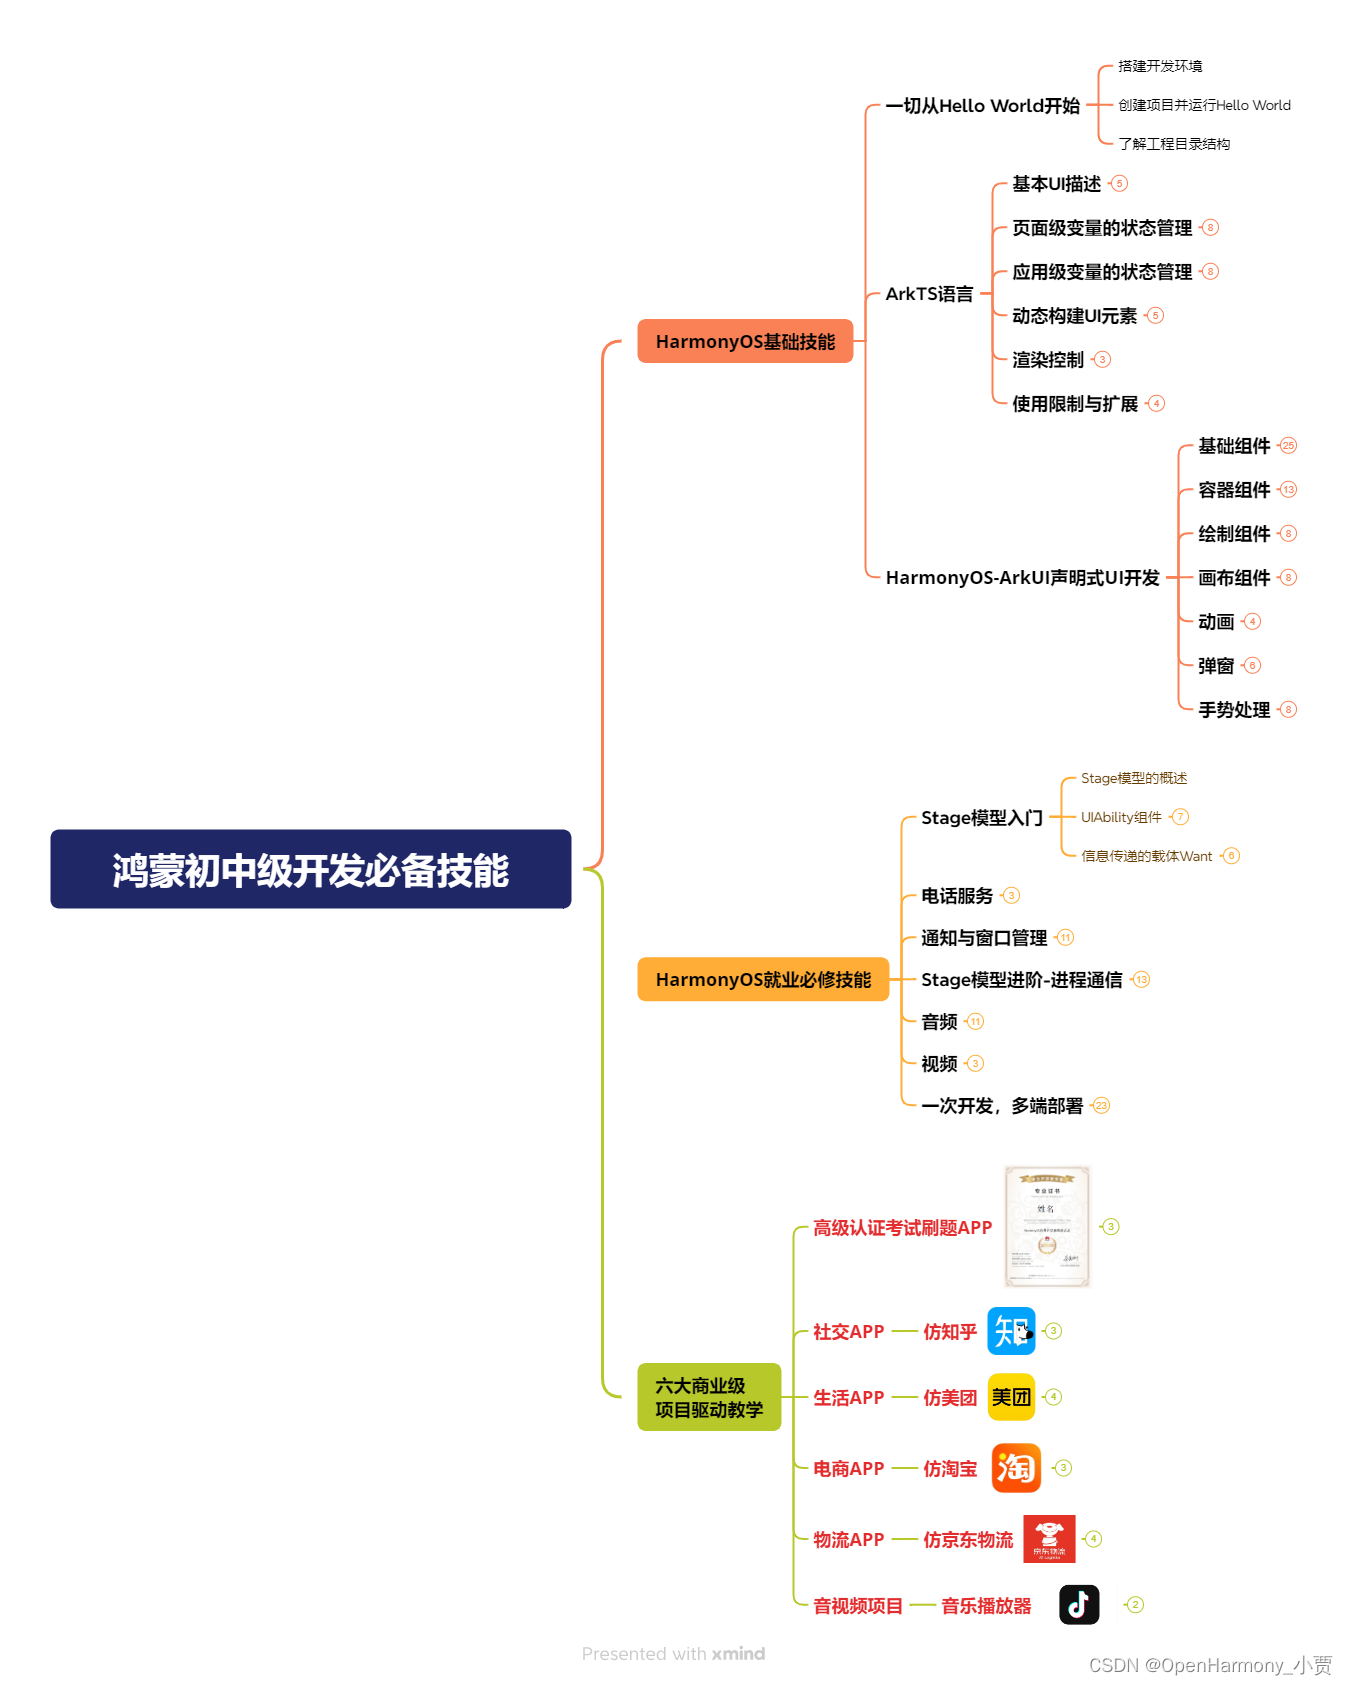
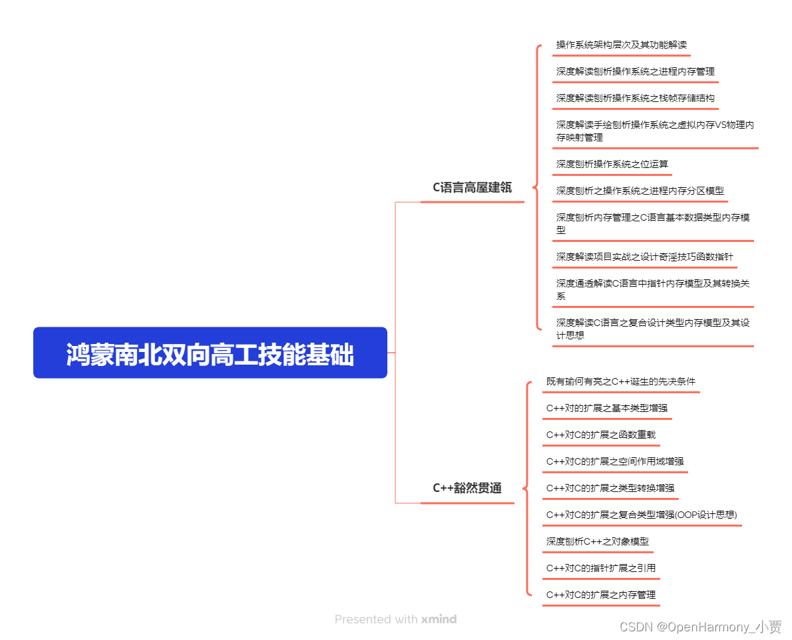
第二阶段:鸿蒙南北双向高工技能基础:gitee.com/MNxiaona/733GH
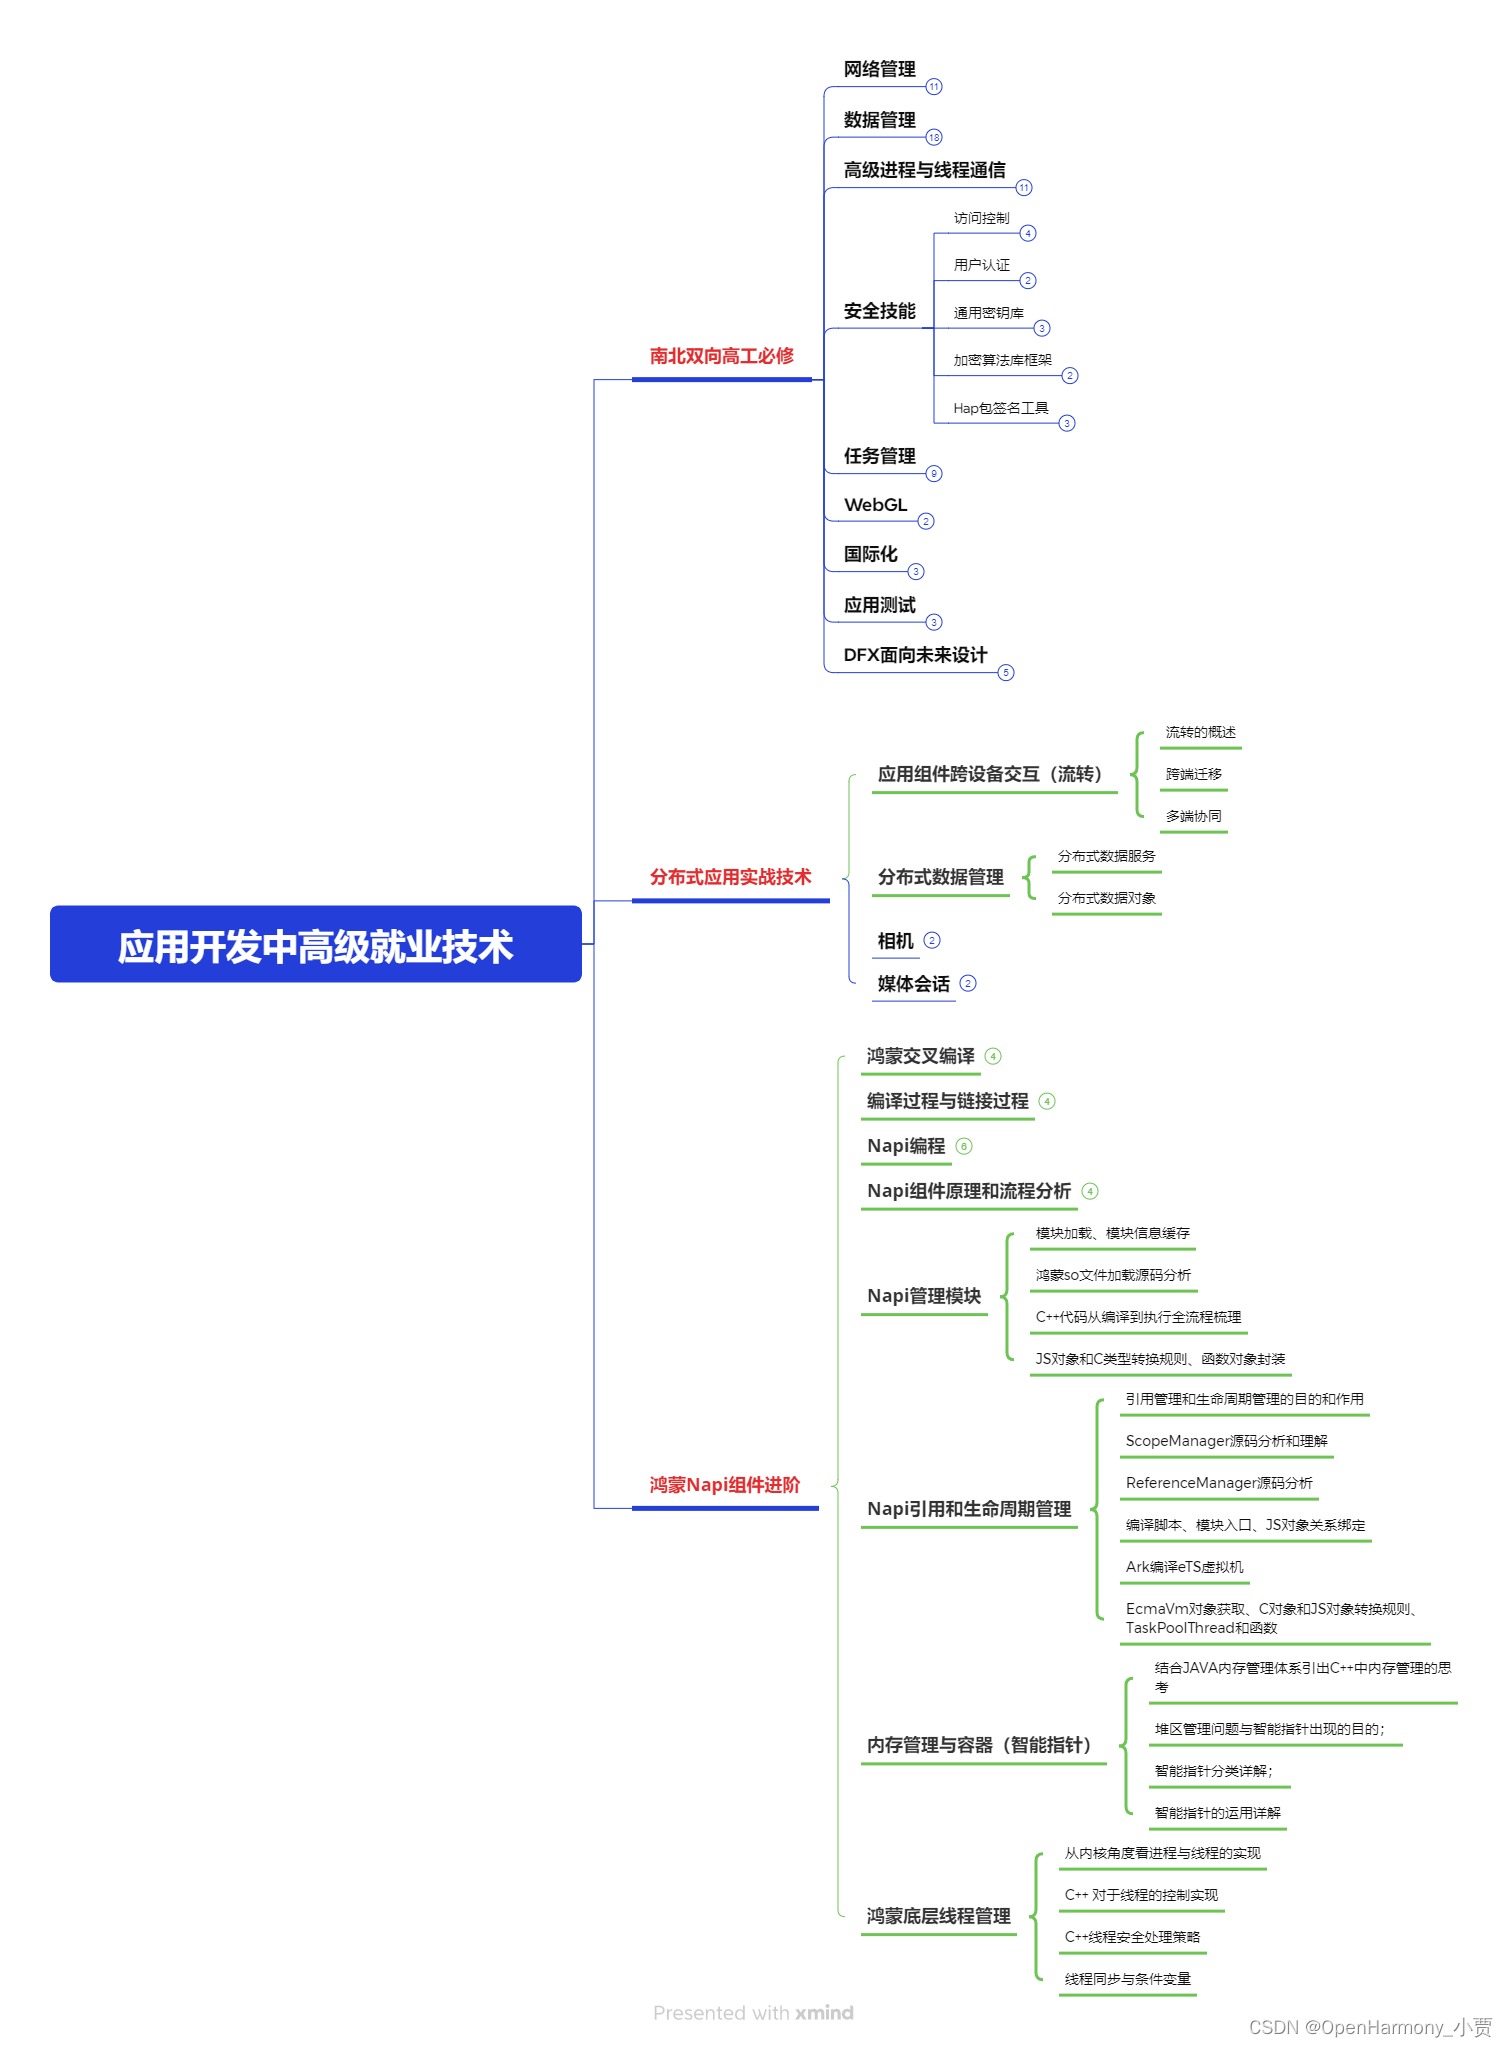
第三阶段:应用开发中高级就业技术
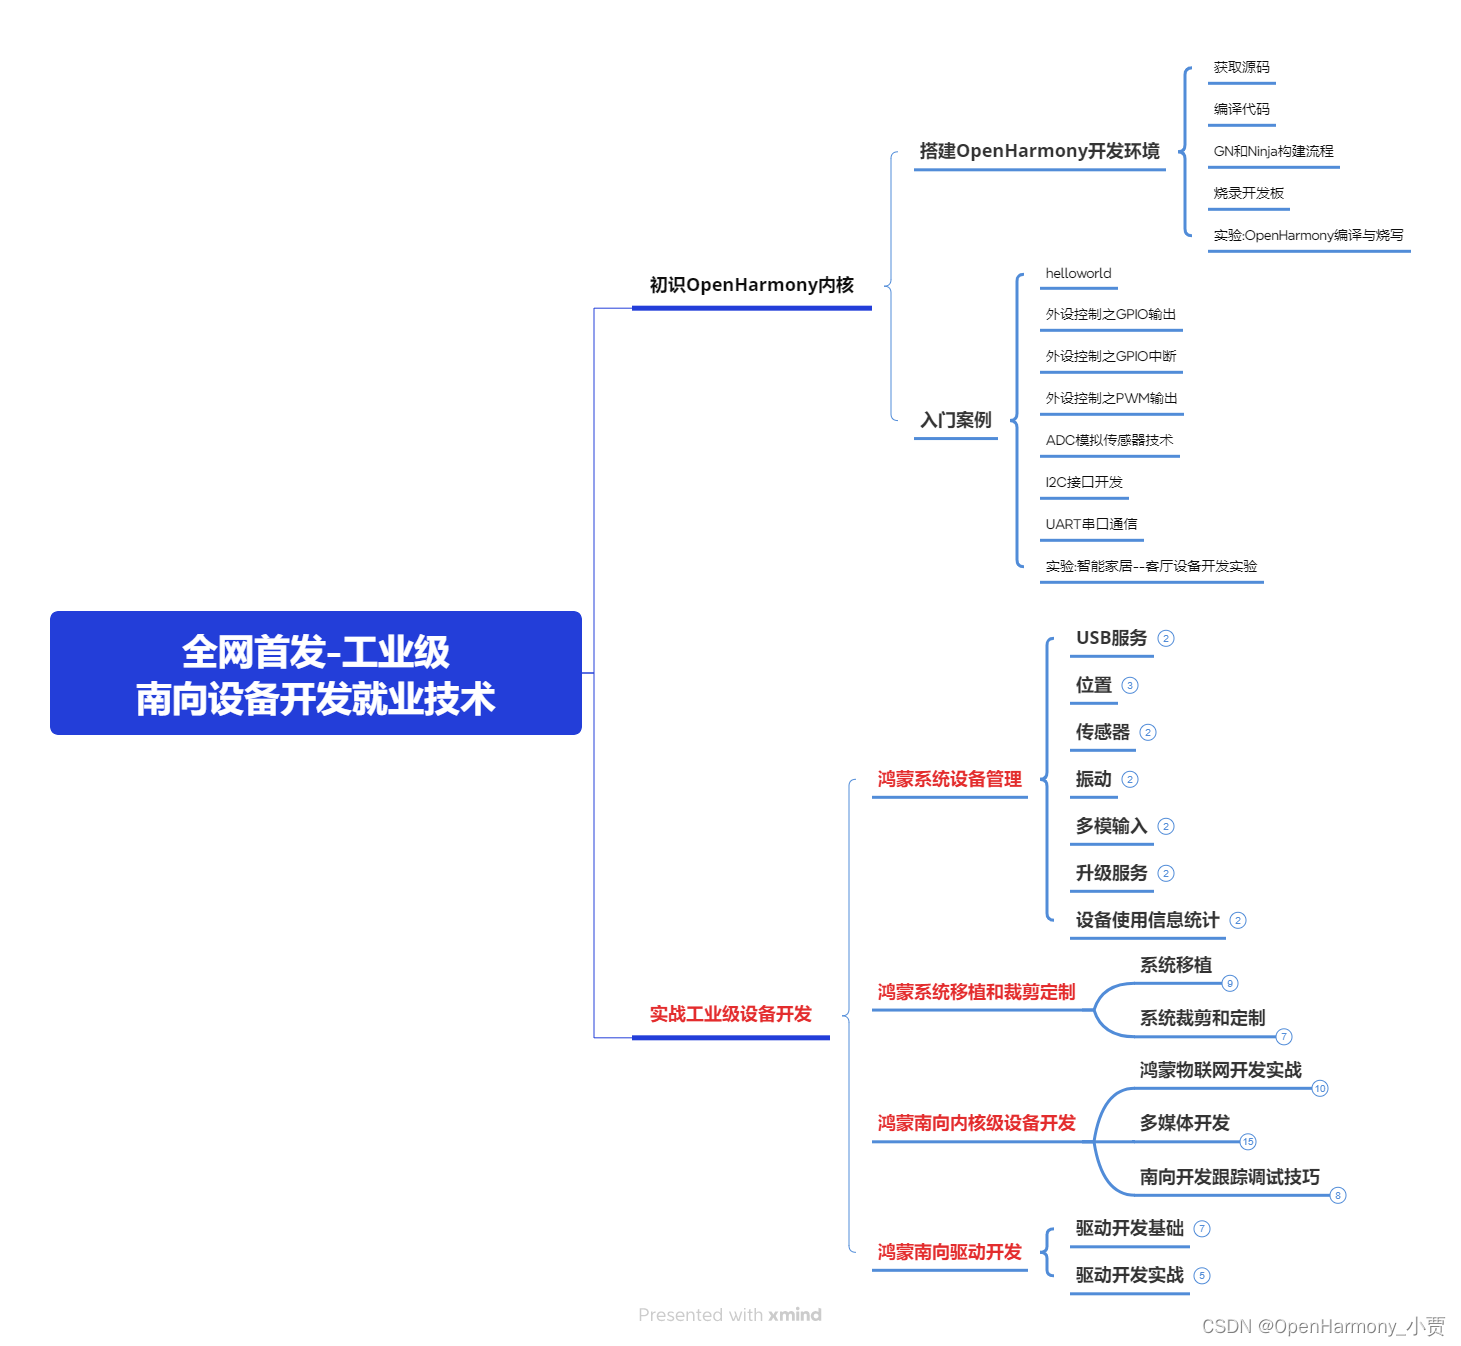
第四阶段:全网首发-工业级南向设备开发就业技术:gitee.com/MNxiaona/733GH
《鸿蒙 (Harmony OS)开发学习手册》(共计892页)
如何快速入门?
1.基本概念
2.构建第一个ArkTS应用
3.……
开发基础知识:gitee.com/MNxiaona/733GH
1.应用基础知识
2.配置文件
3.应用数据管理
4.应用安全管理
5.应用隐私保护
6.三方应用调用管控机制
7.资源分类与访问
8.学习ArkTS语言
9.……
基于ArkTS 开发
1.Ability开发
2.UI开发
3.公共事件与通知
4.窗口管理
5.媒体
6.安全
7.网络与链接
8.电话服务
9.数据管理
10.后台任务(Background Task)管理
11.设备管理
12.设备使用信息统计
13.DFX
14.国际化开发
15.折叠屏系列
16.……
鸿蒙开发面试真题(含参考答案):gitee.com/MNxiaona/733GH
鸿蒙入门教学视频:
美团APP实战开发教学:gitee.com/MNxiaona/733GH

写在最后
- 如果你觉得这篇内容对你还蛮有帮助,我想邀请你帮我三个小忙:
- 点赞,转发,有你们的 『点赞和评论』,才是我创造的动力。
- 关注小编,同时可以期待后续文章ing?,不定期分享原创知识。
- 想要获取更多完整鸿蒙最新学习资源,请移步前往小编:
gitee.com/MNxiaona/733GH


 微信名片
微信名片

评论记录:
回复评论: