
自定义页面请求响应
Web组件支持在应用拦截到页面请求后自定义响应请求能力。开发者通过 onInterceptRequest() 接口来实现自定义资源请求响应 。自定义请求能力可以用于开发者自定义Web页面响应、自定义文件资源响应等场景。
Web网页上发起资源加载请求,应用层收到资源请求消息。应用层构造本地资源响应消息发送给Web内核。Web内核解析应用层响应信息,根据此响应信息进行页面资源加载。
在下面的示例中,Web组件通过拦截页面请求“https://www.example.com/test.html”, 在应用侧代码构建响应资源,实现自定义页面响应场景。
- 前端页面index.html代码。
intercept test!
- 1
- 2
- 3
- 4
- 5
- 6
- 7
- 8
- 9
- 10
- 应用侧代码。
// xxx.ets
import { webview } from '@kit.ArkWeb';
@Entry
@Component
struct WebComponent {
controller: webview.WebviewController = new webview.WebviewController();
responseResource: WebResourceResponse = new WebResourceResponse();
// 开发者自定义响应数据
@State webData: string = '\n' +
'\n' +
'\n' +
'intercept test \n' +
'\n' +
'\n' +
'intercept ok
\n' +
'\n' +
''
build() {
Column() {
Web({ src: $rawfile('index.html'), controller: this.controller })
.onInterceptRequest((event) => {
if (event) {
console.info('url:' + event.request.getRequestUrl());
// 拦截页面请求
if (event.request.getRequestUrl() !== 'https://www.example.com/test.html') {
return null;
}
}
// 构造响应数据
this.responseResource.setResponseData(this.webData);
this.responseResource.setResponseEncoding('utf-8');
this.responseResource.setResponseMimeType('text/html');
this.responseResource.setResponseCode(200);
this.responseResource.setReasonMessage('OK');
return this.responseResource;
})
}
}
}

- 1
- 2
- 3
- 4
- 5
- 6
- 7
- 8
- 9
- 10
- 11
- 12
- 13
- 14
- 15
- 16
- 17
- 18
- 19
- 20
- 21
- 22
- 23
- 24
- 25
- 26
- 27
- 28
- 29
- 30
- 31
- 32
- 33
- 34
- 35
- 36
- 37
- 38
- 39
- 40
- 41
为自定义的JavaScript请求响应生成 CodeCache:自定义请求响应的资源类型如果是JavaScript脚本,可以在响应头中添加“ResponseDataID”字段,Web内核读取到该字段后会在为该JS资源生成CodeCache,加速JS执行,并且ResponseData如果有更新时必须更新该字段。不添加“ResponseDataID”字段的情况下默认不生成CodeCache。
在下面的示例中,Web组件通过拦截页面请求“https://www.example.com/test.js”, 应用侧代码构建响应资源,在响应头中添加“ResponseDataID”字段,开启生成CodeCache的功能。
- 前端页面index.html代码。
this is a test div
this is a test div
this is a test div
this is a test div
this is a test div
this is a test div
this is a test div
this is a test div
this is a test div
this is a test div
this is a test div
- 1
- 2
- 3
- 4
- 5
- 6
- 7
- 8
- 9
- 10
- 11
- 12
- 13
- 14
- 15
- 16
- 17
- 18
- 19
- 20
- 21
- 22
- 应用侧代码。
// xxx.ets
import { webview } from '@kit.ArkWeb';

@Entry
@Component
struct WebComponent {
  controller: webview.WebviewController = new webview.WebviewController();
  responseResource: WebResourceResponse = new WebResourceResponse();
  // 开发者自定义响应数据(响应数据长度需大于等于1024才会生成codecache)
  @State jsData: string = 'let text_msg = "the modified content:version 0000000000001";\n' +
    'let element1 = window.document.getElementById("div-1");\n' +
    'let element2 = window.document.getElementById("div-2");\n' +
    'let element3 = window.document.getElementById("div-3");\n' +
    'let element4 = window.document.getElementById("div-4");\n' +
    'let element5 = window.document.getElementById("div-5");\n' +
    'let element6 = window.document.getElementById("div-6");\n' +
    'let element7 = window.document.getElementById("div-7");\n' +
    'let element8 = window.document.getElementById("div-8");\n' +
    'let element9 = window.document.getElementById("div-9");\n' +
    'let element10 = window.document.getElementById("div-10");\n' +
    'let element11 = window.document.getElementById("div-11");\n' +
    'element1.innerHTML = text_msg;\n' +
    'element2.innerHTML = text_msg;\n' +
    'element3.innerHTML = text_msg;\n' +
    'element4.innerHTML = text_msg;\n' +
    'element5.innerHTML = text_msg;\n' +
    'element6.innerHTML = text_msg;\n' +
    'element7.innerHTML = text_msg;\n' +
    'element8.innerHTML = text_msg;\n' +
    'element9.innerHTML = text_msg;\n' +
    'element10.innerHTML = text_msg;\n' +
    'element11.innerHTML = text_msg;\n';

  build() {
    Column() {
      Web({ src: $rawfile('index.html'), controller: this.controller })
        .onInterceptRequest((event) => {
          // 拦截页面请求
          if (event?.request.getRequestUrl() == 'https://www.example.com/test.js') {
            // 构造响应数据
            this.responseResource.setResponseHeader([
              {
                // 格式:不超过13位纯数字。js识别码,Js有更新时必须更新该字段
                headerKey: "ResponseDataID",
                headerValue: "0000000000001"
              }]);
            this.responseResource.setResponseData(this.jsData);
            this.responseResource.setResponseEncoding('utf-8');
            this.responseResource.setResponseMimeType('application/javascript');
            this.responseResource.setResponseCode(200);
            this.responseResource.setReasonMessage('OK');
            return this.responseResource;
          }
          return null;
        })
    }
  }
}
- 1
- 2
- 3
- 4
- 5
- 6
- 7
- 8
- 9
- 10
- 11
- 12
- 13
- 14
- 15
- 16
- 17
- 18
- 19
- 20
- 21
- 22
- 23
- 24
- 25
- 26
- 27
- 28
- 29
- 30
- 31
- 32
- 33
- 34
- 35
- 36
- 37
- 38
- 39
- 40
- 41
- 42
- 43
- 44
- 45
- 46
- 47
- 48
- 49
- 50
- 51
- 52
- 53
- 54
- 55
- 56
- 57
- 58
加速Web页面的访问
当Web页面加载缓慢时,可以使用预连接、预加载和预获取post请求的能力加速Web页面的访问。
预解析和预连接
可以通过 prepareForPageLoad() 来预解析或者预连接将要加载的页面。
在下面的示例中,在Web组件的onAppear中对要加载的页面进行预连接。
// xxx.ets
import { webview } from '@kit.ArkWeb';

@Entry
@Component
struct WebComponent {
  webviewController: webview.WebviewController = new webview.WebviewController();

  build() {
    Column() {
      Button('loadData')
        .onClick(() => {
          if (this.webviewController.accessBackward()) {
            this.webviewController.backward();
          }
        })
      Web({ src: 'https://www.example.com/', controller: this.webviewController })
        .onAppear(() => {
          // 指定第二个参数为true,代表要进行预连接,如果为false该接口只会对网址进行dns预解析
          // 第三个参数为要预连接socket的个数。最多允许6个。
          webview.WebviewController.prepareForPageLoad('https://www.example.com/', true, 2);
        })
    }
  }
}
- 1
- 2
- 3
- 4
- 5
- 6
- 7
- 8
- 9
- 10
- 11
- 12
- 13
- 14
- 15
- 16
- 17
- 18
- 19
- 20
- 21
- 22
- 23
- 24
- 25
也可以通过 initializeBrowserEngine() 来提前初始化内核,然后在初始化内核后调用
prepareForPageLoad() 对即将要加载的页面进行预解析、预连接。这种方式适合提前对首页进行
预解析、预连接。
在下面的示例中,Ability的onCreate中提前初始化Web内核并对首页进行预连接。
// xxx.ets
import { webview } from '@kit.ArkWeb';
import { AbilityConstant, UIAbility, Want } from '@kit.AbilityKit';

export default class EntryAbility extends UIAbility {
  onCreate(want: Want, launchParam: AbilityConstant.LaunchParam) {
    console.log("EntryAbility onCreate");
    webview.WebviewController.initializeWebEngine();
    // 预连接时,需要將'https://www.example.com'替换成真实要访问的网站地址。
    webview.WebviewController.prepareForPageLoad("https://www.example.com/", true, 2);
    AppStorage.setOrCreate("abilityWant", want);
    console.log("EntryAbility onCreate done");
  }
}
- 1
- 2
- 3
- 4
- 5
- 6
- 7
- 8
- 9
- 10
- 11
- 12
- 13
- 14
预加载
如果能够预测到Web组件将要加载的页面或者即将要跳转的页面。可以通过 prefetchPage() 来预加载即将要加载页面。
预加载会提前下载页面所需的资源,包括主资源子资源,但不会执行网页JavaScript代码。预加载是WebviewController的实例方法,需要一个已经关联好Web组件的WebviewController实例。
在下面的示例中,在onPageEnd的时候触发写一个要访问的页面的预加载。
// xxx.ets
import { webview } from '@kit.ArkWeb';

@Entry
@Component
struct WebComponent {
  webviewController: webview.WebviewController = new webview.WebviewController();

  build() {
    Column() {
      Web({ src: 'https://www.example.com/', controller: this.webviewController })
        .onPageEnd(() => {
          // 预加载https://www.iana.org/help/example-domains。
          this.webviewController.prefetchPage('https://www.iana.org/help/example-domains');
        })
    }
  }
}
- 1
- 2
- 3
- 4
- 5
- 6
- 7
- 8
- 9
- 10
- 11
- 12
- 13
- 14
- 15
- 16
- 17
- 18
预获取post请求
可以通过 prefetchResource() 预获取将要加载页面中的post请求。在页面加载结束时,可以通过 clearPrefetchedResource() 清除后续不再使用的预获取资源缓存。
以下示例,在Web组件onAppear中,对要加载页面中的post请求进行预获取。在onPageEnd中,可以清除预获取的post请求缓存。
// xxx.ets
import { webview } from '@kit.ArkWeb';

@Entry
@Component
struct WebComponent {
  webviewController: webview.WebviewController = new webview.WebviewController();

  build() {
    Column() {
      Web({ src: "https://www.example.com/", controller: this.webviewController})
        .onAppear(() => {
          // 预获取时,需要將"https://www.example1.com/post?e=f&g=h"替换成真实要访问的网站地址。
          webview.WebviewController.prefetchResource(
            {url:"https://www.example1.com/post?e=f&g=h",
              method:"POST",
              formData:"a=x&b=y",},
            [{headerKey:"c",
              headerValue:"z",},],
            "KeyX", 500);
        })
        .onPageEnd(() => {
          // 清除后续不再使用的预获取资源缓存。
          webview.WebviewController.clearPrefetchedResource(["KeyX",]);
        })
    }
  }
}
- 1
- 2
- 3
- 4
- 5
- 6
- 7
- 8
- 9
- 10
- 11
- 12
- 13
- 14
- 15
- 16
- 17
- 18
- 19
- 20
- 21
- 22
- 23
- 24
- 25
- 26
- 27
- 28
如果能够预测到Web组件将要加载页面或者即将要跳转页面中的post请求。可以通过 prefetchResource() 预获取即将要加载页面的post请求。
以下示例,在onPageEnd中,触发预获取一个要访问页面的post请求。
// xxx.ets
import { webview } from '@kit.ArkWeb';

@Entry
@Component
struct WebComponent {
  webviewController: webview.WebviewController = new webview.WebviewController();

  build() {
    Column() {
      Web({ src: 'https://www.example.com/', controller: this.webviewController})
        .onPageEnd(() => {
          // 预获取时,需要將"https://www.example1.com/post?e=f&g=h"替换成真实要访问的网站地址。
          webview.WebviewController.prefetchResource(
            {url:"https://www.example1.com/post?e=f&g=h",
              method:"POST",
              formData:"a=x&b=y",},
            [{headerKey:"c",
              headerValue:"z",},],
            "KeyX", 500);
        })
    }
  }
}
- 1
- 2
- 3
- 4
- 5
- 6
- 7
- 8
- 9
- 10
- 11
- 12
- 13
- 14
- 15
- 16
- 17
- 18
- 19
- 20
- 21
- 22
- 23
- 24
也可以通过 initializeBrowserEngine() 提前初始化内核,然后在初始化内核后调用 prefetchResource() 预获取将要加载页面中的post请求。这种方式适合提前预获取首页的post请求。
以下示例,在Ability的onCreate中,提前初始化Web内核并预获取首页的post请求。
// xxx.ets
import { webview } from '@kit.ArkWeb';
import { AbilityConstant, UIAbility, Want } from '@kit.AbilityKit';

export default class EntryAbility extends UIAbility {
  onCreate(want: Want, launchParam: AbilityConstant.LaunchParam) {
    console.log("EntryAbility onCreate");
    webview.WebviewController.initializeWebEngine();
    // 预获取时,需要將"https://www.example1.com/post?e=f&g=h"替换成真实要访问的网站地址。
    webview.WebviewController.prefetchResource(
      {url:"https://www.example1.com/post?e=f&g=h",
        method:"POST",
        formData:"a=x&b=y",},
      [{headerKey:"c",
        headerValue:"z",},],
      "KeyX", 500);
    AppStorage.setOrCreate("abilityWant", want);
    console.log("EntryAbility onCreate done");
  }
}
- 1
- 2
- 3
- 4
- 5
- 6
- 7
- 8
- 9
- 10
- 11
- 12
- 13
- 14
- 15
- 16
- 17
- 18
- 19
- 20
预编译生成编译缓存
可以通过 precompileJavaScript() 在页面加载前提前生成脚本文件的编译缓存。
推荐配合动态组件使用,使用离线的Web组件用于生成字节码缓存,并在适当的时机加载业务用Web组件使用这些字节码缓存。下方是代码示例:
- 首先,在EntryAbility中将UIContext存到localStorage中。
// EntryAbility.ets
import { UIAbility } from '@kit.AbilityKit';
import { window } from '@kit.ArkUI';

const localStorage: LocalStorage = new LocalStorage('uiContext');

export default class EntryAbility extends UIAbility {
  storage: LocalStorage = localStorage;

  onWindowStageCreate(windowStage: window.WindowStage) {
    windowStage.loadContent('pages/Index', this.storage, (err, data) => {
      if (err.code) {
        return;
      }

      this.storage.setOrCreate("uiContext", windowStage.getMainWindowSync().getUIContext());
    });
  }
}
- 1
- 2
- 3
- 4
- 5
- 6
- 7
- 8
- 9
- 10
- 11
- 12
- 13
- 14
- 15
- 16
- 17
- 18
- 19
- 编写动态组件所需基础代码。
// DynamicComponent.ets
import { NodeController, BuilderNode, FrameNode, UIContext } from '@kit.ArkUI';

export interface BuilderData {
  url: string;
  controller: WebviewController;
}

const storage = LocalStorage.getShared();

export class NodeControllerImpl extends NodeController {
  private rootNode: BuilderNode | null = null;
  private wrappedBuilder: WrappedBuilder | null = null;

  constructor(wrappedBuilder: WrappedBuilder) {
    super();
    this.wrappedBuilder = wrappedBuilder;
  }

  makeNode(): FrameNode | null {
    if (this.rootNode != null) {
      return this.rootNode.getFrameNode();
    }
    return null;
  }

  initWeb(url: string, controller: WebviewController) {
    if(this.rootNode != null) {
      return;
    }

    const uiContext: UIContext = storage.get("uiContext") as UIContext;
    if (!uiContext) {
      return;
    }
    this.rootNode = new BuilderNode(uiContext);
    this.rootNode.build(this.wrappedBuilder, { url: url, controller: controller });
  }
}

export const createNode = (wrappedBuilder: WrappedBuilder, data: BuilderData) => {
  const baseNode = new NodeControllerImpl(wrappedBuilder);
  baseNode.initWeb(data.url, data.controller);
  return baseNode;
}
- 1
- 2
- 3
- 4
- 5
- 6
- 7
- 8
- 9
- 10
- 11
- 12
- 13
- 14
- 15
- 16
- 17
- 18
- 19
- 20
- 21
- 22
- 23
- 24
- 25
- 26
- 27
- 28
- 29
- 30
- 31
- 32
- 33
- 34
- 35
- 36
- 37
- 38
- 39
- 40
- 41
- 42
- 43
- 44
- 45
- 编写用于生成字节码缓存的组件,本例中的本地Javascript资源内容通过文件读取接口读取rawfile目录下的本地文件。
// PrecompileWebview.ets
import { BuilderData } from "./DynamicComponent";
import { Config, configs } from "./PrecompileConfig";

@Builder
function WebBuilder(data: BuilderData) {
  Web({ src: data.url, controller: data.controller })
    .onControllerAttached(() => {
      precompile(data.controller, configs);
    })
    .fileAccess(true)
}

export const precompileWebview = wrapBuilder(WebBuilder);

export const precompile = async (controller: WebviewController, configs: Array) => {
  for (const config of configs) {
    let content = await readRawFile(config.localPath);

    try {
      controller.precompileJavaScript(config.url, content, config.options)
        .then(errCode => {
          console.error("precompile successfully! " + errCode);
        }).catch((errCode: number) => {
          console.error("precompile failed. " + errCode);
      });
    } catch (err) {
      console.error("precompile failed. " + err.code + " " + err.message);
    }
  }
}

async function readRawFile(path: string) {
  try {
    return await getContext().resourceManager.getRawFileContent(path);;
  } catch (err) {
    return new Uint8Array(0);
  }
}
- 1
- 2
- 3
- 4
- 5
- 6
- 7
- 8
- 9
- 10
- 11
- 12
- 13
- 14
- 15
- 16
- 17
- 18
- 19
- 20
- 21
- 22
- 23
- 24
- 25
- 26
- 27
- 28
- 29
- 30
- 31
- 32
- 33
- 34
- 35
- 36
- 37
- 38
- 39
JavaScript资源的获取方式也可通过 网络请求 的方式获取,但此方法获取到的http响应头非标准HTTP响应头格式,需额外将响应头转换成标准HTTP响应头格式后使用。如通过网络请求获取到的响应头是e-tag,则需要将其转换成E-Tag后使用。
- 编写业务用组件代码。
// BusinessWebview.ets
import { BuilderData } from "./DynamicComponent";

@Builder
function WebBuilder(data: BuilderData) {
  // 此处组件可根据业务需要自行扩展
  Web({ src: data.url, controller: data.controller })
    .cacheMode(CacheMode.Default)
}

export const businessWebview = wrapBuilder(WebBuilder);
- 1
- 2
- 3
- 4
- 5
- 6
- 7
- 8
- 9
- 10
- 11
- 编写资源配置信息。
// PrecompileConfig.ets
import { webview } from '@kit.ArkWeb'

export interface Config {
  url:  string,
  localPath: string, // 本地资源路径
  options: webview.CacheOptions
}

export let configs: Array = [
  {
    url: "https://www.example.com/example.js",
    localPath: "example.js",
    options: {
      responseHeaders: [
        { headerKey: "E-Tag", headerValue: "aWO42N9P9dG/5xqYQCxsx+vDOoU="},
        { headerKey: "Last-Modified", headerValue: "Wed, 21 Mar 2024 10:38:41 GMT"}
      ]
    }
  }
]
- 1
- 2
- 3
- 4
- 5
- 6
- 7
- 8
- 9
- 10
- 11
- 12
- 13
- 14
- 15
- 16
- 17
- 18
- 19
- 20
- 21
- 在页面中使用。
// Index.ets
import { webview } from '@kit.ArkWeb';
import { NodeController } from '@kit.ArkUI';
import { createNode } from "./DynamicComponent"
import { precompileWebview } from "./PrecompileWebview"
import { businessWebview } from "./BusinessWebview"

@Entry
@Component
struct Index {
  @State precompileNode: NodeController | undefined = undefined;
  precompileController: webview.WebviewController = new webview.WebviewController();

  @State businessNode: NodeController | undefined = undefined;
  businessController: webview.WebviewController = new webview.WebviewController();

  aboutToAppear(): void {
    // 初始化用于注入本地资源的Web组件
    this.precompileNode = createNode(precompileWebview,
      { url: "https://www.example.com/empty.html", controller: this.precompileController});
  }

  build() {
    Column() {
      // 在适当的时机加载业务用Web组件,本例以Button点击触发为例
      Button("加载页面")
        .onClick(() => {
          this.businessNode = createNode(businessWebview, {
            url:  "https://www.example.com/business.html",
            controller: this.businessController
          });
        })
      // 用于业务的Web组件
      NodeContainer(this.businessNode);
    }
  }
}
- 1
- 2
- 3
- 4
- 5
- 6
- 7
- 8
- 9
- 10
- 11
- 12
- 13
- 14
- 15
- 16
- 17
- 18
- 19
- 20
- 21
- 22
- 23
- 24
- 25
- 26
- 27
- 28
- 29
- 30
- 31
- 32
- 33
- 34
- 35
- 36
- 37
当需要更新本地已经生成的编译字节码时,修改cacheOptions参数中responseHeaders中的E-Tag或Last-Modified响应头对应的值,再次调用接口即可。
离线资源免拦截注入
可以通过 injectOfflineResources() 在页面加载前提前将图片、样式表或脚本资源注入到应用的内存缓存中。
推荐配合动态组件使用,使用离线的Web组件用于将资源注入到内核的内存缓存中,并在适当的时机加载业务用Web组件使用这些资源。下方是代码示例:
- 首先,在EntryAbility中将UIContext存到localStorage中。
// EntryAbility.ets
import { UIAbility } from '@kit.AbilityKit';
import { window } from '@kit.ArkUI';

const localStorage: LocalStorage = new LocalStorage('uiContext');

export default class EntryAbility extends UIAbility {
  storage: LocalStorage = localStorage;

  onWindowStageCreate(windowStage: window.WindowStage) {
    windowStage.loadContent('pages/Index', this.storage, (err, data) => {
      if (err.code) {
        return;
      }

      this.storage.setOrCreate("uiContext", windowStage.getMainWindowSync().getUIContext());
    });
  }
}
- 1
- 2
- 3
- 4
- 5
- 6
- 7
- 8
- 9
- 10
- 11
- 12
- 13
- 14
- 15
- 16
- 17
- 18
- 19
- 编写动态组件所需基础代码。
// DynamicComponent.ets
import { NodeController, BuilderNode, FrameNode, UIContext } from '@kit.ArkUI';

export interface BuilderData {
  url: string;
  controller: WebviewController;
}

const storage = LocalStorage.getShared();

export class NodeControllerImpl extends NodeController {
  private rootNode: BuilderNode | null = null;
  private wrappedBuilder: WrappedBuilder | null = null;

  constructor(wrappedBuilder: WrappedBuilder) {
    super();
    this.wrappedBuilder = wrappedBuilder;
  }

  makeNode(): FrameNode | null {
    if (this.rootNode != null) {
      return this.rootNode.getFrameNode();
    }
    return null;
  }

  initWeb(url: string, controller: WebviewController) {
    if(this.rootNode != null) {
      return;
    }

    const uiContext: UIContext = storage.get("uiContext") as UIContext;
    if (!uiContext) {
      return;
    }
    this.rootNode = new BuilderNode(uiContext);
    this.rootNode.build(this.wrappedBuilder, { url: url, controller: controller });
  }
}

export const createNode = (wrappedBuilder: WrappedBuilder, data: BuilderData) => {
  const baseNode = new NodeControllerImpl(wrappedBuilder);
  baseNode.initWeb(data.url, data.controller);
  return baseNode;
}
- 1
- 2
- 3
- 4
- 5
- 6
- 7
- 8
- 9
- 10
- 11
- 12
- 13
- 14
- 15
- 16
- 17
- 18
- 19
- 20
- 21
- 22
- 23
- 24
- 25
- 26
- 27
- 28
- 29
- 30
- 31
- 32
- 33
- 34
- 35
- 36
- 37
- 38
- 39
- 40
- 41
- 42
- 43
- 44
- 45
- 编写用于注入资源的组件代码,本例中的本地资源内容通过文件读取接口读取rawfile目录下的本地文件。
// InjectWebview.ets
import { webview } from '@kit.ArkWeb';
import { resourceConfigs } from "./Resource";
import { BuilderData } from "./DynamicComponent";

@Builder
function WebBuilder(data: BuilderData) {
  Web({ src: data.url, controller: data.controller })
    .onControllerAttached(async () => {
      try {
        data.controller.injectOfflineResources(await getData ());
      } catch (err) {
        console.error("error: " + err.code + " " + err.message);
      }
    })
    .fileAccess(true)
}

export const injectWebview = wrapBuilder(WebBuilder);

export async function getData() {
  const resourceMapArr: Array = [];

  // 读取配置,从rawfile目录中读取文件内容
  for (let config of resourceConfigs) {
    let buf: Uint8Array = new Uint8Array(0);
    if (config.localPath) {
      buf = await readRawFile(config.localPath);
    }

    resourceMapArr.push({
      urlList: config.urlList,
      resource: buf,
      responseHeaders: config.responseHeaders,
      type: config.type,
    })
  }

  return resourceMapArr;
}

export async function readRawFile(url: string) {
  try {
    return await getContext().resourceManager.getRawFileContent(url);
  } catch (err) {
    return new Uint8Array(0);
  }
}
- 1
- 2
- 3
- 4
- 5
- 6
- 7
- 8
- 9
- 10
- 11
- 12
- 13
- 14
- 15
- 16
- 17
- 18
- 19
- 20
- 21
- 22
- 23
- 24
- 25
- 26
- 27
- 28
- 29
- 30
- 31
- 32
- 33
- 34
- 35
- 36
- 37
- 38
- 39
- 40
- 41
- 42
- 43
- 44
- 45
- 46
- 47
- 48
- 编写业务用组件代码。
// BusinessWebview.ets
import { BuilderData } from "./DynamicComponent";

@Builder
function WebBuilder(data: BuilderData) {
  // 此处组件可根据业务需要自行扩展
  Web({ src: data.url, controller: data.controller })
    .cacheMode(CacheMode.Default)
}

export const businessWebview = wrapBuilder(WebBuilder);
- 1
- 2
- 3
- 4
- 5
- 6
- 7
- 8
- 9
- 10
- 11
- 编写资源配置信息。
// Resource.ets
import { webview } from '@kit.ArkWeb';

export interface ResourceConfig {
  urlList: Array,
  type: webview.OfflineResourceType,
  responseHeaders: Array,
  localPath: string, // 本地资源存放在rawfile目录下的路径
}

export const resourceConfigs: Array = [
  {
    localPath: "example.png",
    urlList: [
      "https://www.example.com/",
      "https://www.example.com/path1/example.png",
      "https://www.example.com/path2/example.png",
    ],
    type: webview.OfflineResourceType.IMAGE,
    responseHeaders: [
      { headerKey: "Cache-Control", headerValue: "max-age=1000" },
      { headerKey: "Content-Type", headerValue: "image/png" },
    ]
  },
  {
    localPath: "example.js",
    urlList: [ // 仅提供一个url,这个url既作为资源的源,也作为资源的网络请求地址
      "https://www.example.com/example.js",
    ],
    type: webview.OfflineResourceType.CLASSIC_JS,
    responseHeaders: [
      // 以方式使用,提供额外的响应头
      { headerKey: "Cross-Origin", headerValue:"anonymous" }
    ]
  },
];
- 1
- 2
- 3
- 4
- 5
- 6
- 7
- 8
- 9
- 10
- 11
- 12
- 13
- 14
- 15
- 16
- 17
- 18
- 19
- 20
- 21
- 22
- 23
- 24
- 25
- 26
- 27
- 28
- 29
- 30
- 31
- 32
- 33
- 34
- 35
- 36
- 在页面中使用。
// Index.ets
import { webview } from '@kit.ArkWeb';
import { NodeController } from '@kit.ArkUI';
import { createNode } from "./DynamicComponent"
import { injectWebview } from "./InjectWebview"
import { businessWebview } from "./BusinessWebview"

@Entry
@Component
struct Index {
  @State injectNode: NodeController | undefined = undefined;
  injectController: webview.WebviewController = new webview.WebviewController();

  @State businessNode: NodeController | undefined = undefined;
  businessController: webview.WebviewController = new webview.WebviewController();

  aboutToAppear(): void {
    // 初始化用于注入本地资源的Web组件, 提供一个空的html页面作为url即可
    this.injectNode = createNode(injectWebview,
        { url: "https://www.example.com/empty.html", controller: this.injectController});
  }

  build() {
    Column() {
      // 在适当的时机加载业务用Web组件,本例以Button点击触发为例
      Button("加载页面")
        .onClick(() => {
          this.businessNode = createNode(businessWebview, {
            url: "https://www.example.com/business.html",
            controller: this.businessController
          });
        })
      // 用于业务的Web组件
      NodeContainer(this.businessNode);
    }
  }
}
- 1
- 2
- 3
- 4
- 5
- 6
- 7
- 8
- 9
- 10
- 11
- 12
- 13
- 14
- 15
- 16
- 17
- 18
- 19
- 20
- 21
- 22
- 23
- 24
- 25
- 26
- 27
- 28
- 29
- 30
- 31
- 32
- 33
- 34
- 35
- 36
- 37
- 加载的HTML网页示例。


- 1
- 2
- 3
- 4
- 5
- 6
- 7
- 8
- 9
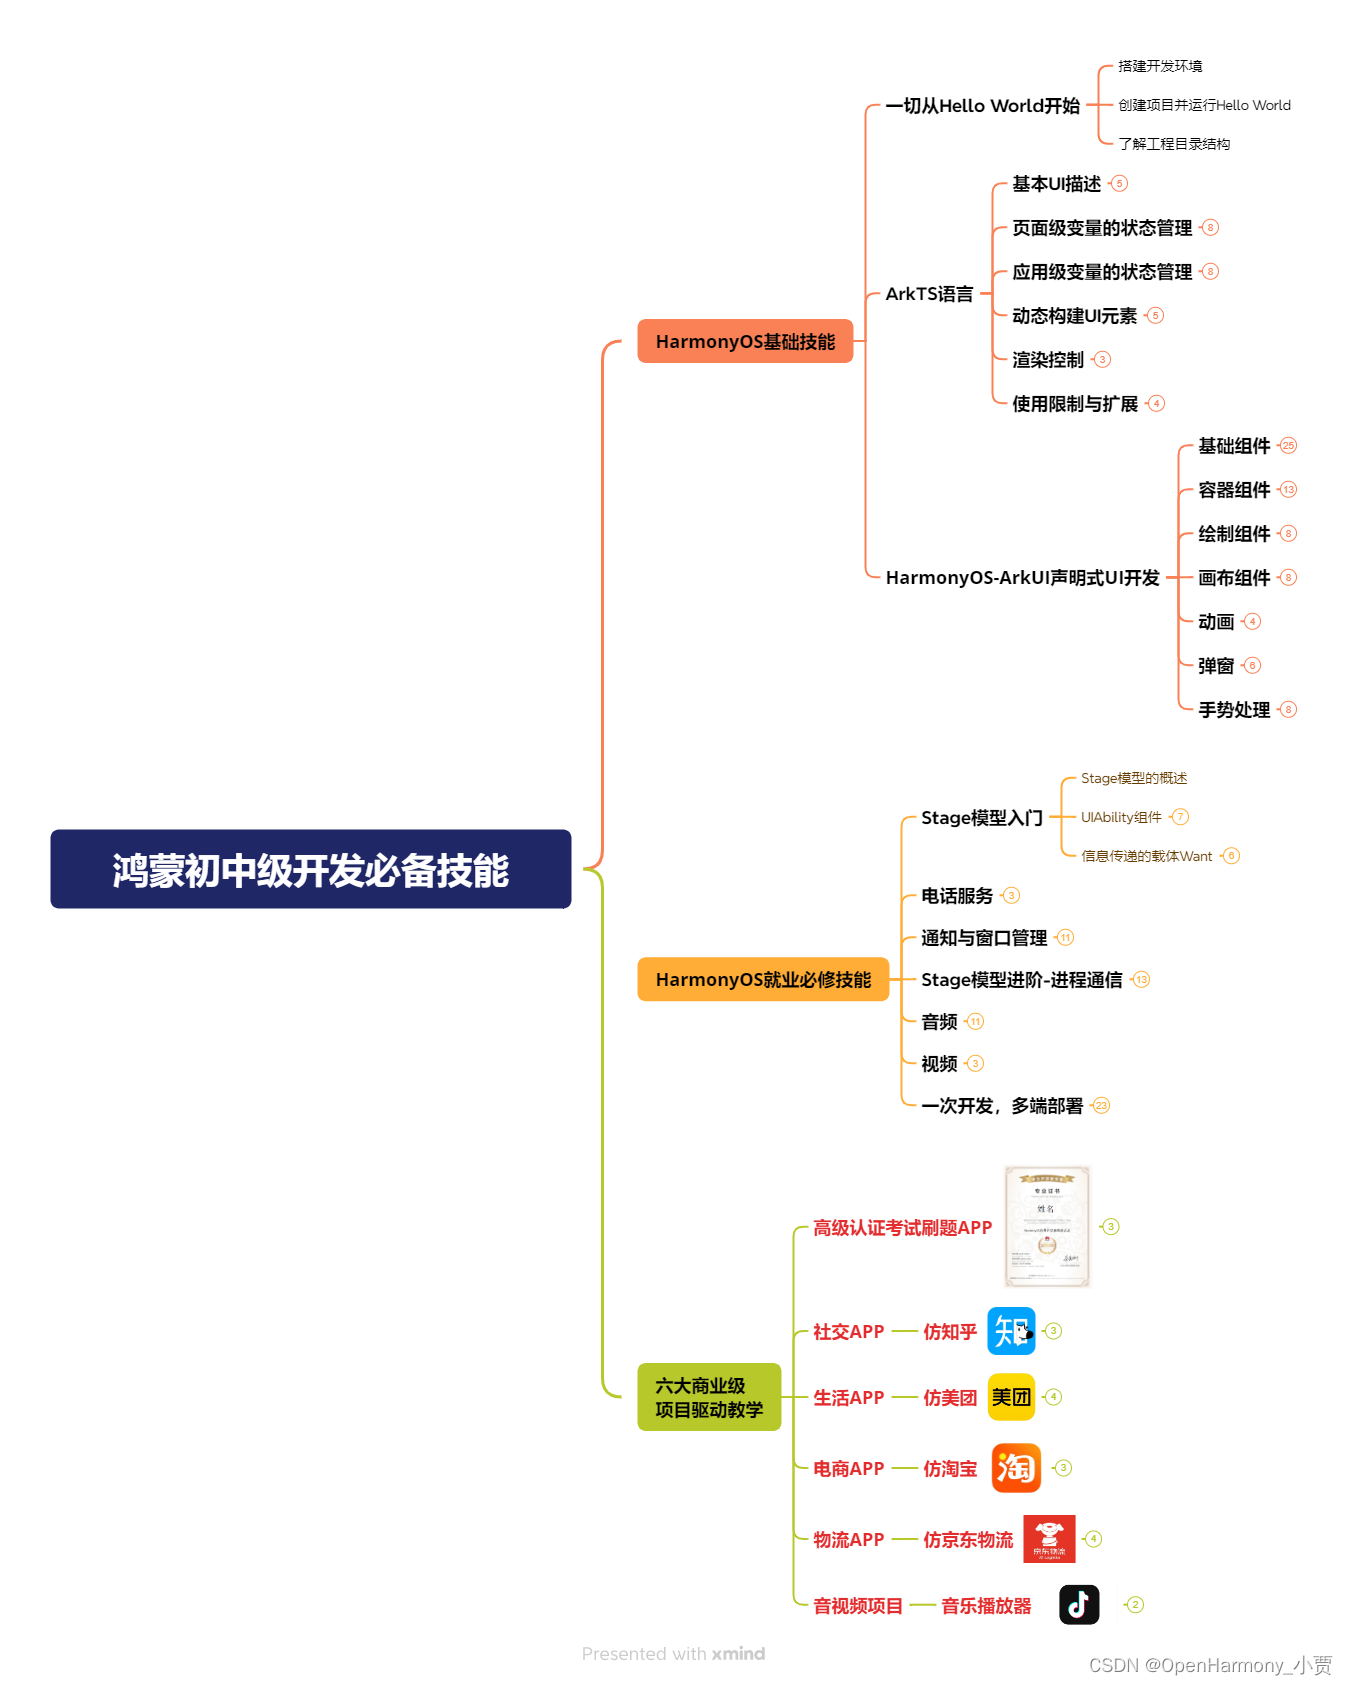
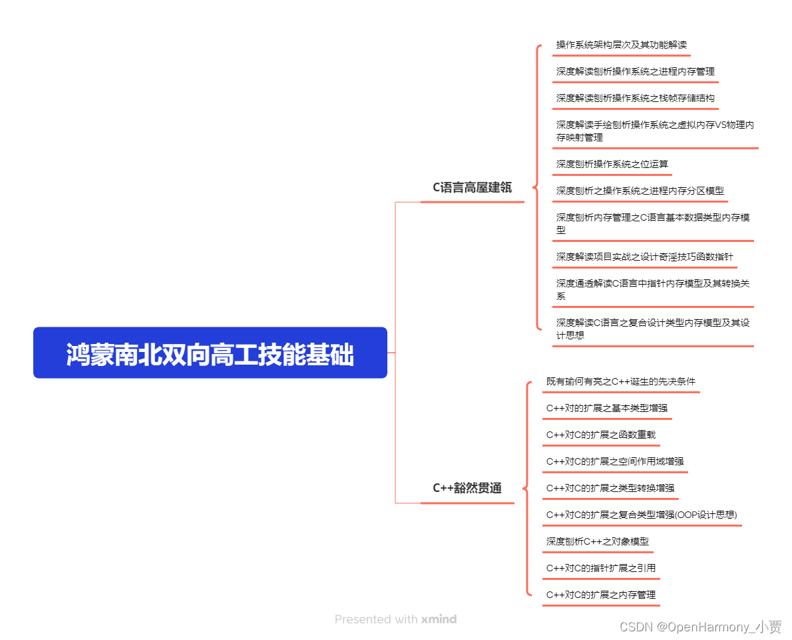
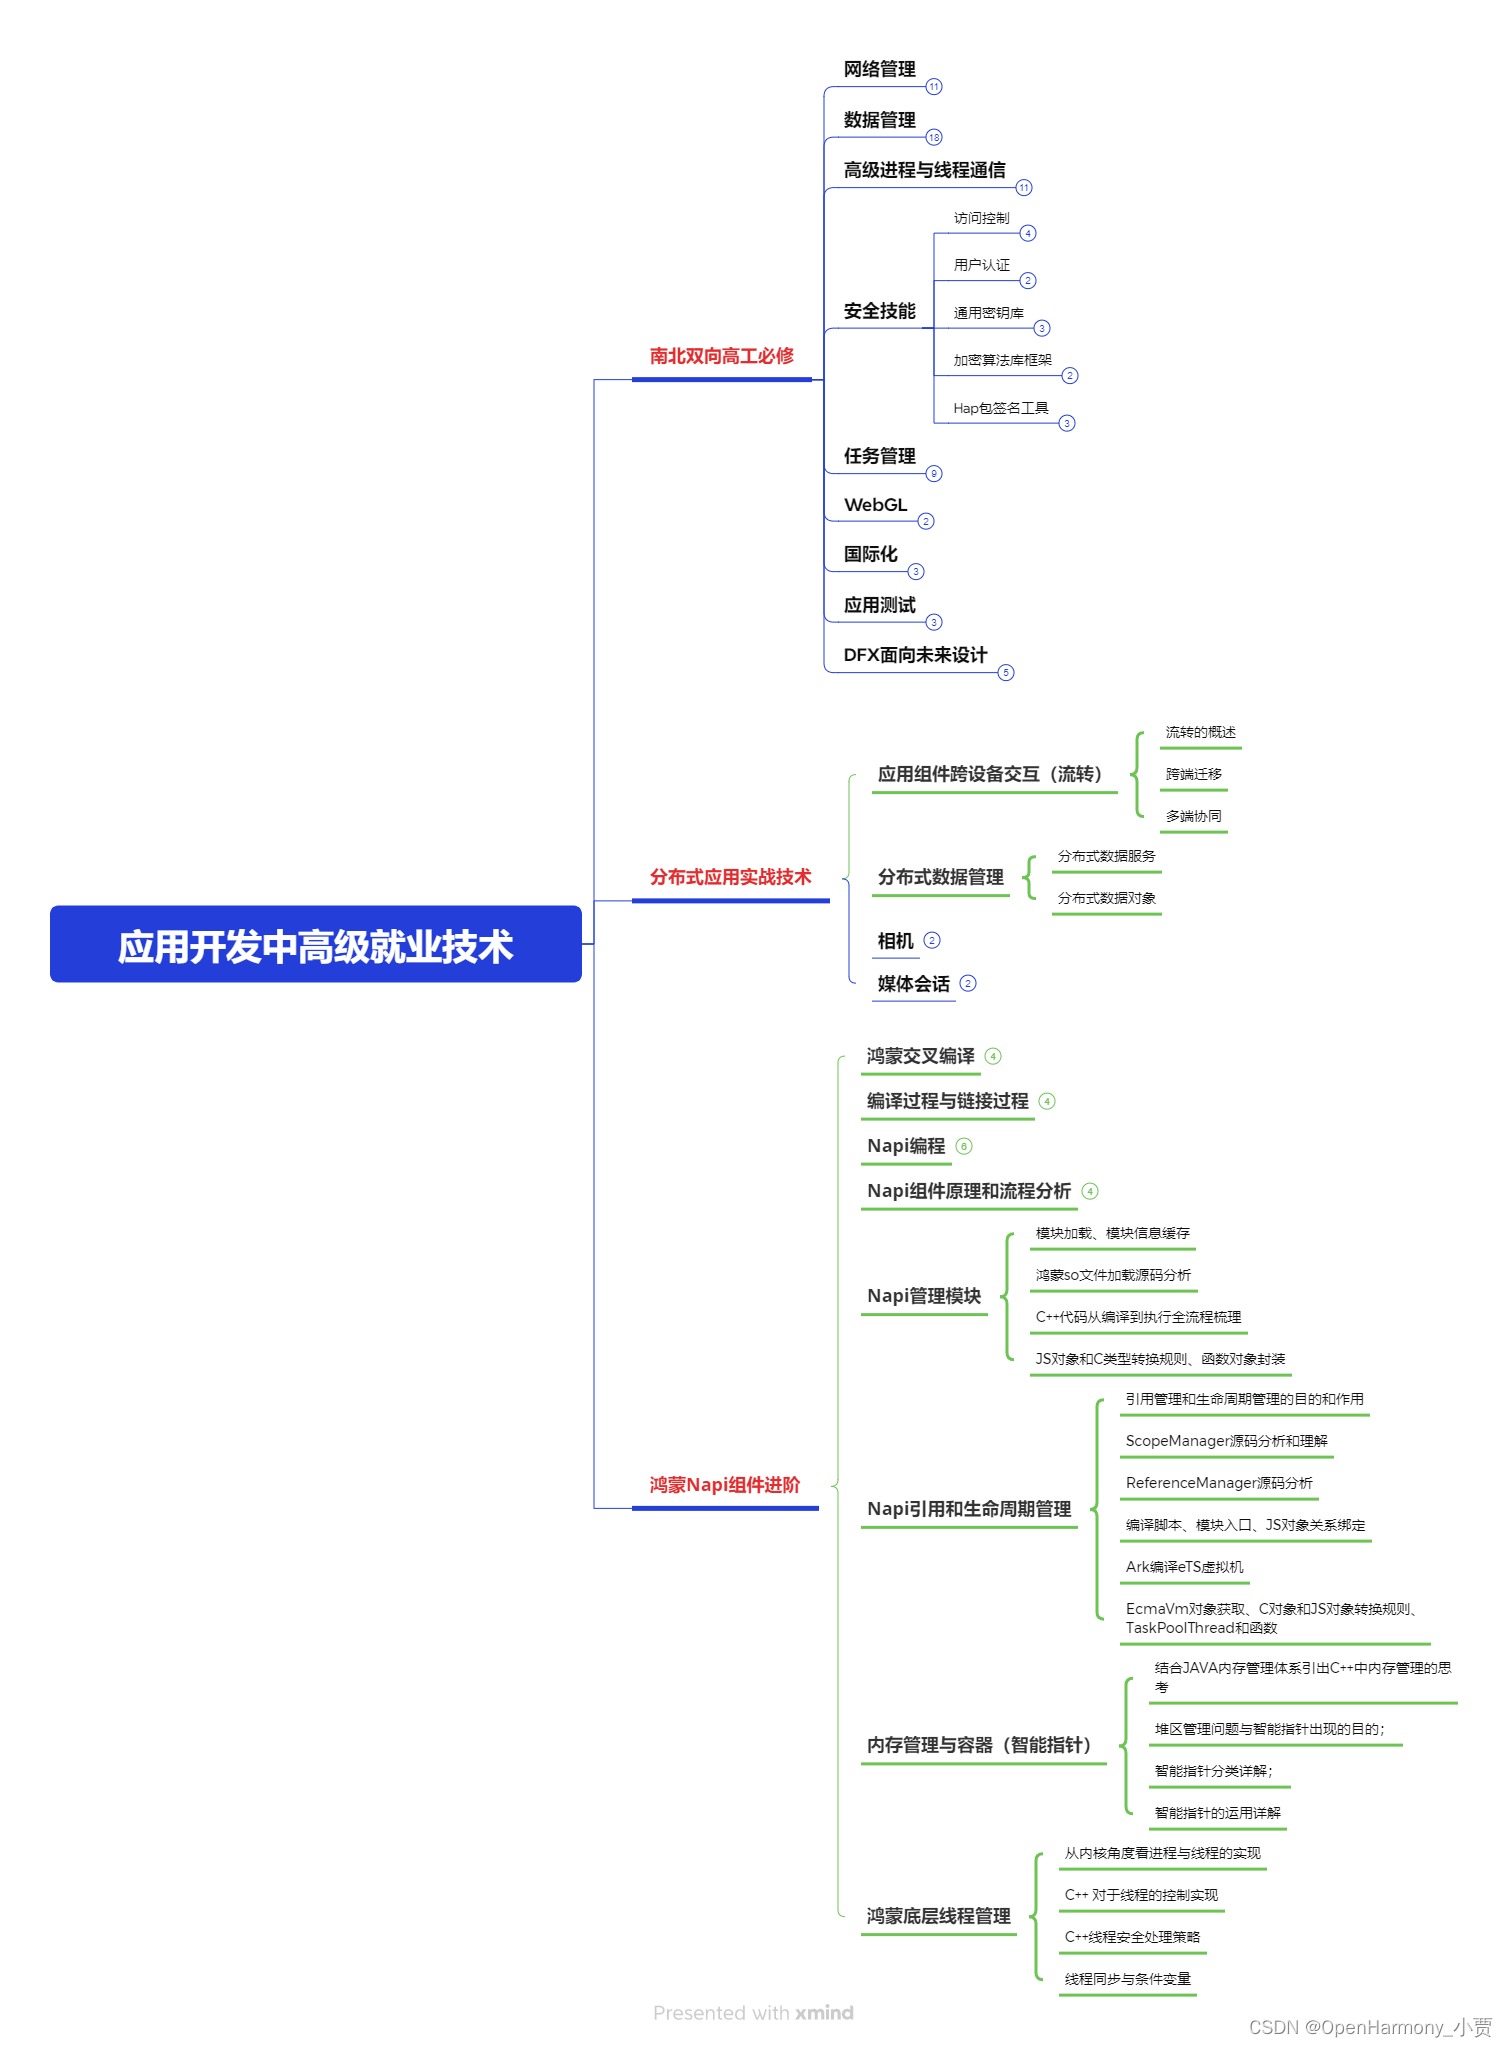
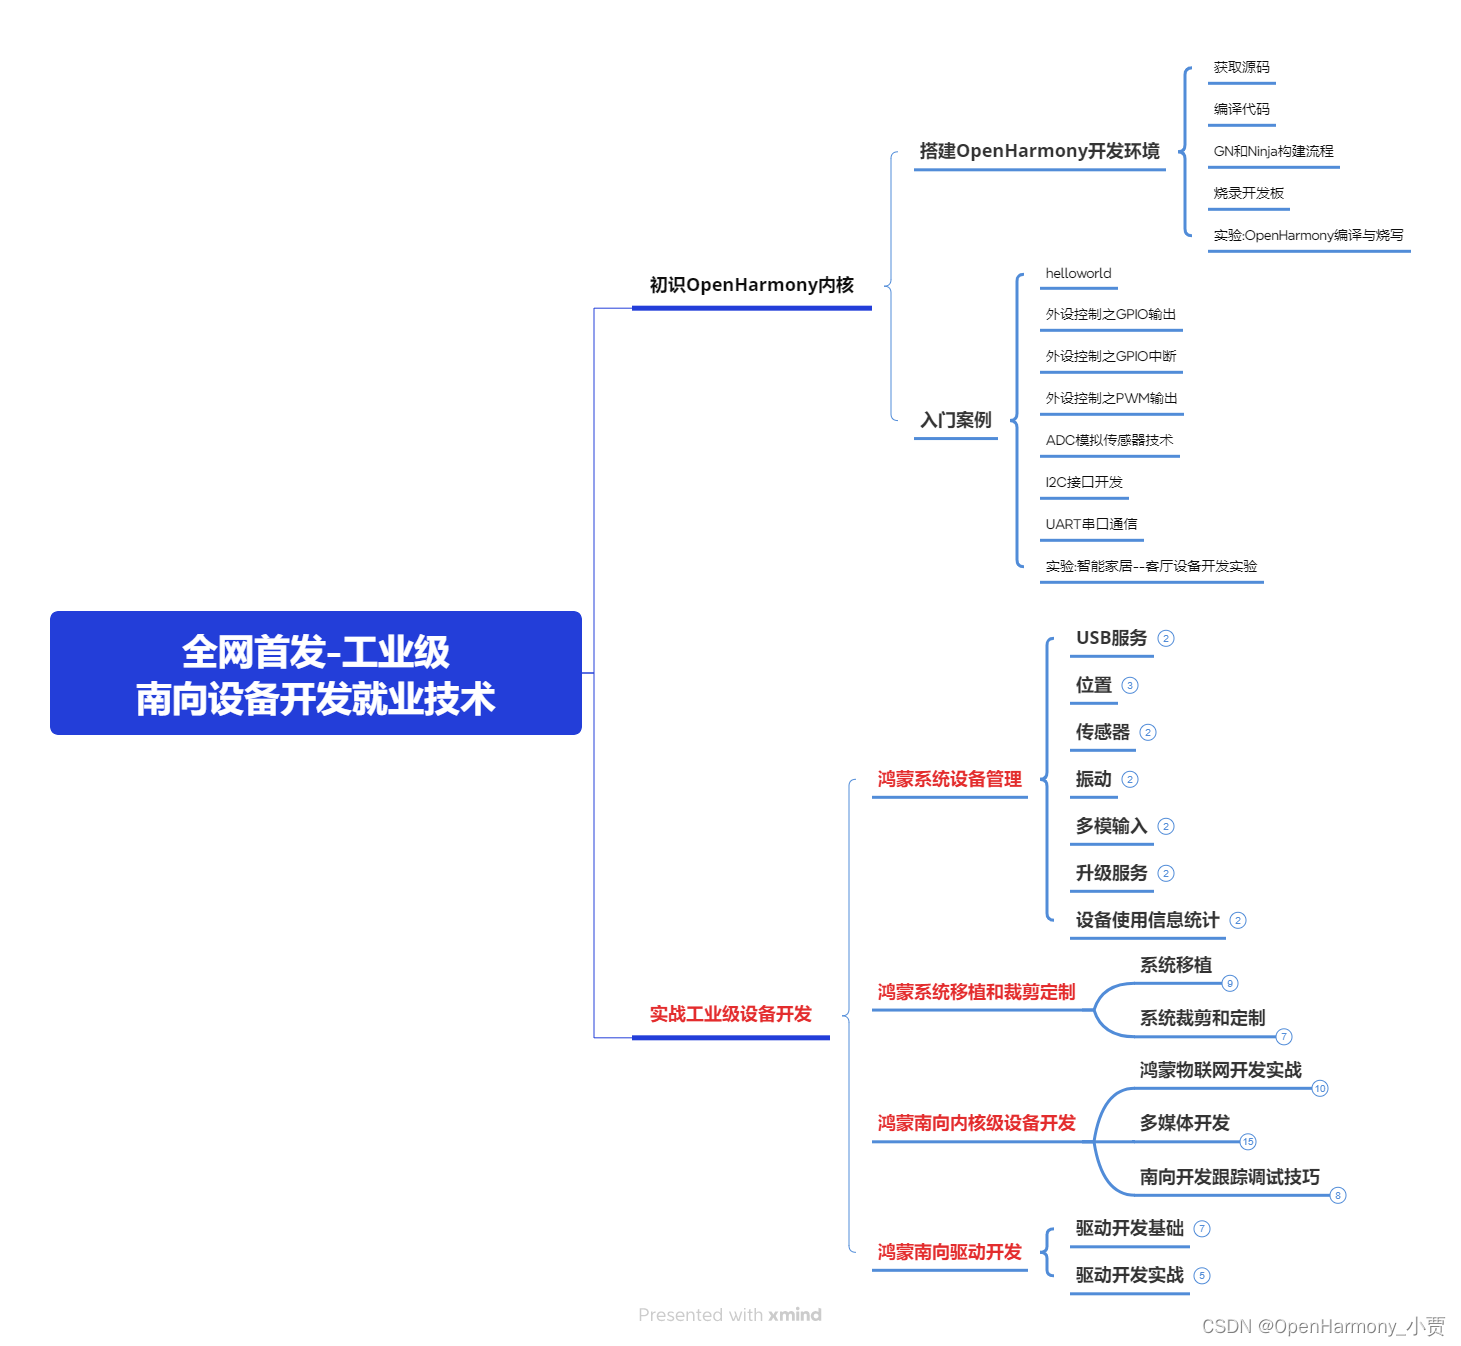
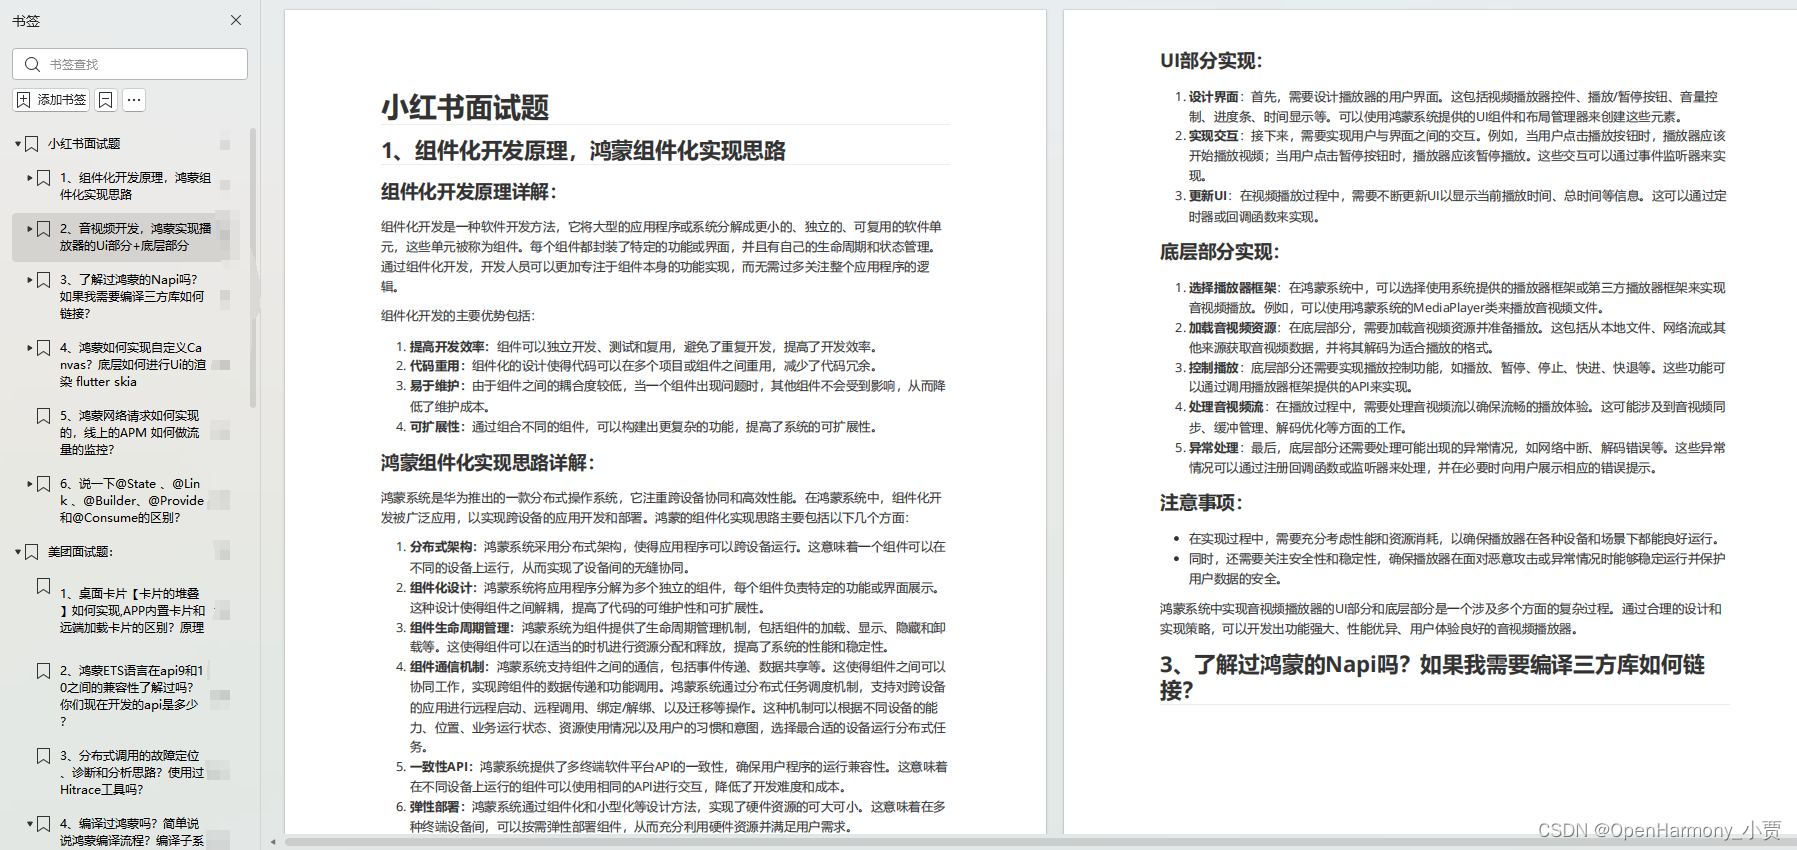
鸿蒙全栈开发全新学习指南
有很多小伙伴不知道学习哪些鸿蒙开发技术?不知道需要重点掌握哪些鸿蒙应用开发知识点?而且学习时频繁踩坑,最终浪费大量时间。所以要有一份实用的鸿蒙(HarmonyOS NEXT)学习路线与学习文档用来跟着学习是非常有必要的。
针对一些列因素,整理了一套纯血版鸿蒙(HarmonyOS Next)全栈开发技术的学习路线,包含了鸿蒙开发必掌握的核心知识要点,内容有(ArkTS、ArkUI开发组件、Stage模型、多端部署、分布式应用开发、WebGL、元服务、OpenHarmony多媒体技术、Napi组件、OpenHarmony内核、OpenHarmony驱动开发、系统定制移植等等)鸿蒙(HarmonyOS NEXT)技术知识点。
本路线共分为四个阶段:
第一阶段:鸿蒙初中级开发必备技能
第二阶段:鸿蒙南北双向高工技能基础:gitee.com/MNxiaona/733GH
第三阶段:应用开发中高级就业技术
第四阶段:全网首发-工业级南向设备开发就业技术:gitee.com/MNxiaona/733GH
《鸿蒙 (Harmony OS)开发学习手册》(共计892页)
如何快速入门?
1.基本概念
2.构建第一个ArkTS应用
3.……
开发基础知识:gitee.com/MNxiaona/733GH
1.应用基础知识
2.配置文件
3.应用数据管理
4.应用安全管理
5.应用隐私保护
6.三方应用调用管控机制
7.资源分类与访问
8.学习ArkTS语言
9.……
基于ArkTS 开发
1.Ability开发
2.UI开发
3.公共事件与通知
4.窗口管理
5.媒体
6.安全
7.网络与链接
8.电话服务
9.数据管理
10.后台任务(Background Task)管理
11.设备管理
12.设备使用信息统计
13.DFX
14.国际化开发
15.折叠屏系列
16.……
鸿蒙开发面试真题(含参考答案):gitee.com/MNxiaona/733GH
鸿蒙入门教学视频:
美团APP实战开发教学:gitee.com/MNxiaona/733GH

写在最后
- 如果你觉得这篇内容对你还蛮有帮助,我想邀请你帮我三个小忙:
- 点赞,转发,有你们的 『点赞和评论』,才是我创造的动力。
- 关注小编,同时可以期待后续文章ing?,不定期分享原创知识。
- 想要获取更多完整鸿蒙最新学习资源,请移步前往小编:
gitee.com/MNxiaona/733GH


 微信名片
微信名片

评论记录:
回复评论: