
1. 源由
这次的源由可能是整理的最多的,因为前期这块内容整理了不少。
1.1 安装问题
其实安装wfb-ng并不陌生,因为前期已经有过不少安装过程介绍:
【1】wfb-ng Release 23.01镜像无头烧录&配置(1)
【2】wfb-ng Release 23.01镜像无头烧录&配置(2)
【3】ubuntu22.04@laptop安装&配置wfb-ng
【4】wfb-ng 开源代码之Jetson Orin安装
但是,在树莓派3B+上作为摄像头从源代码安装,还一直没有折腾过。
1.2 性能问题
树莓派3B+性能大约在H264 720P ~100ms的样子,放到飞机上总感觉不爽,所以后续飞机上还是要飞稳定的60FPS高清摄像头
【1】FPV Camera(RPI3+V2.1) | wfb-ng Release 23.01 | ubuntu20.04 gnome软解测试
【2】FPV Camera(RPI3+V2.1) | wfb-ng Release 23.01 | Ubuntu 20.04 xfce软解测试
【3】FPV Camera(RPI 3B+/Zero W+V2.1) | wfb-ng Release 23.01 | H264硬解测试
1.3 测试问题
最近,为了将OpenIPC FPV摄像头从Rover上移动到四轴Copter上去外测,Rover上就缺了一个数字摄像头。
打算将之前留下的树莓派3B+利用一下,正好可以把树莓派夜视摄像头用上,晚上也可以出去浪一圈。
同时,也是为了确保Rover作为一个自动测试平台,配上一个不可或缺OpenIPC FPV摄像头做后期测试。
2. 准备工作
步骤一:无头烧录bookworm系统
略:参考《Raspbian镜像无头烧录》
注:请自行研究,笔者这次安装的是2024-11-19-raspios-bookworm-arm64-lite.img.xz。
$ uname -a
Linux raspberrypi 6.6.62+rpt-rpi-v8 #1 SMP PREEMPT Debian 1:6.6.62-1+rpt1 (2024-11-25) aarch64 GNU/Linux
daniel@raspberrypi:~ $ lsb_release -a
No LSB modules are available.
Distributor ID: Debian
Description:    Debian GNU/Linux 12 (bookworm)
Release:        12
Codename:       bookworm
- 1
- 2
- 3
- 4
- 5
- 6
- 7
- 8
步骤二:bash配置修改
$ sudo rm /bin/sh
$ sudo ln -s /bin/bash /bin/sh
- 1
- 2
步骤三:系统升级
$ sudo apt update && sudo apt upgrade -y
$ sudo apt install -y build-essential git make iw net-tools aptitude tree
- 1
- 2
3. 安装软件
rtl8812au编译环境
$ sudo apt install -y dkms bc rpm libelf-dev
- 1
wfb-ng编译环境
$ sudo apt install -y libpcap-dev libsodium-dev libevent-dev debhelper dh-python python3-all python3-pip python3-pyroute2 python3-future python3-twisted python3-msgpack python3-stdeb python3-all-dev python3-setuptools python3-jinja2 python3-serial virtualenv
- 1
msposd编译环境
$ sudo apt install -y libcsfml-dev libcairo-dev
- 1
3.1 安装rtl8812au网卡
步骤一:下载
- 下载驱动
$ git clone -b v5.2.20 [email protected]:SnapDragonfly/rtl8812au.git
$ cd rtl8812au/
- 1
- 2
步骤二:编译
修改配置,代码编译。
$ sed -i 's/CONFIG_PLATFORM_I386_PC = y/CONFIG_PLATFORM_I386_PC = n/g' Makefile
$ sed -i 's/CONFIG_PLATFORM_ARM64_RPI = n/CONFIG_PLATFORM_ARM64_RPI = y/g' Makefile
$ make
- 1
- 2
- 3
步骤三:安装
$ sudo make install
$ sudo ./dkms-install.sh
- 1
- 2
步骤四:配置
- 屏蔽系统默认蓝牙和wifi驱动
$ echo "blacklist brcmfmac" | sudo tee -a /etc/modprobe.d/blacklist.conf > /dev/null
$ echo "blacklist bluetooth" | sudo tee -a /etc/modprobe.d/blacklist.conf > /dev/null
- 1
- 2
- 允许使用wifi(默认状态wifi被软件阻塞)
$ sudo rfkill unblock all
$ rfkill list
- 1
- 2
- 插入网卡,查看、配置
wlan0
$ ethtool -i wlan0
$ sudo ip link set wlan0 up
- 1
- 2
- 确认配置结果
$ lsmod |grep 88XX
88XXau_wfb           1867776  0
cfg80211              983040  2 brcmfmac,88XXau_wfb

$ sudo dmesg|grep 88X
[    8.371253] 88XXau_wfb: loading out-of-tree module taints kernel.

$ ethtool -i wlan0
driver: rtl88xxau_wfb
version: 6.6.62+rpt-rpi-v8
firmware-version:
expansion-rom-version:
bus-info: 1-1.2:1.0
supports-statistics: no
supports-test: no
supports-eeprom-access: no
supports-register-dump: no
supports-priv-flags: no

$ ifconfig
eth0: flags=4163<UP,BROADCAST,RUNNING,MULTICAST>  mtu 1500
        inet 192.168.1.201  netmask 255.255.255.0  broadcast 192.168.1.255
        inet6 2408:8240:613:edf0:e311:7d4f:513c:36ee  prefixlen 64  scopeid 0x0<global>
        inet6 fe80::4897:bf99:f785:db2d  prefixlen 64  scopeid 0x20<link>
        ether b8:27:eb:f3:69:a6  txqueuelen 1000  (Ethernet)
        RX packets 4874  bytes 377412 (368.5 KiB)
        RX errors 0  dropped 0  overruns 0  frame 0
        TX packets 877  bytes 148278 (144.8 KiB)
        TX errors 0  dropped 0 overruns 0  carrier 0  collisions 0

lo: flags=73<UP,LOOPBACK,RUNNING>  mtu 65536
        inet 127.0.0.1  netmask 255.0.0.0
        inet6 ::1  prefixlen 128  scopeid 0x10<host>
        loop  txqueuelen 1000  (Local Loopback)
        RX packets 22  bytes 3360 (3.2 KiB)
        RX errors 0  dropped 0  overruns 0  frame 0
        TX packets 22  bytes 3360 (3.2 KiB)
        TX errors 0  dropped 0 overruns 0  carrier 0  collisions 0

wlan0: flags=4163<UP,BROADCAST,RUNNING,MULTICAST>  mtu 4052
        ether 0c:91:60:03:5b:62  txqueuelen 1000  (Ethernet)
        RX packets 0  bytes 0 (0.0 B)
        RX errors 0  dropped 0  overruns 0  frame 0
        TX packets 0  bytes 0 (0.0 B)
        TX errors 0  dropped 0 overruns 0  carrier 0  collisions 0

- 1
- 2
- 3
- 4
- 5
- 6
- 7
- 8
- 9
- 10
- 11
- 12
- 13
- 14
- 15
- 16
- 17
- 18
- 19
- 20
- 21
- 22
- 23
- 24
- 25
- 26
- 27
- 28
- 29
- 30
- 31
- 32
- 33
- 34
- 35
- 36
- 37
- 38
- 39
- 40
- 41
- 42
- 43
- 44
- 45
rfkill问题
bookworm系统很奇怪,无法打开wifi,始终配置禁用wifi。
$ rfkill list
0: hci0: Bluetooth
        Soft blocked: no
        Hard blocked: no
1: phy0: Wireless LAN
        Soft blocked: yes
        Hard blocked: no
- 1
- 2
- 3
- 4
- 5
- 6
- 7
- 寻找了很多方法,最终安装以下软件、配置、重启wifi后解决。
$ sudo apt install urfkill
$ sudo rfkill unblock wifi
$ sudo rfkill unblock all
$ sudo raspi-config nonint do_wifi_country CN
$ sudo reboot
- 1
- 2
- 3
- 4
- 5
- 重启板子后,检查状态:
daniel@raspberrypi:~ $ rfkill list
0: hci0: Bluetooth
        Soft blocked: no
        Hard blocked: no
1: phy0: Wireless LAN
        Soft blocked: no
        Hard blocked: no
- 1
- 2
- 3
- 4
- 5
- 6
- 7
注:重点是配置wifi区域。
3.2 安装wfb-ng软件
步骤一:下载
git clone [email protected]:SnapDragonfly/wfb-ng.git
cd wfb-ng
- 1
- 2
步骤二:编译
make
make bdist
- 1
- 2
步骤三:安装
sudo dpkg -i deb_dist/wfb-ng_24.11.29.69559-1_arm64.deb
- 1
步骤四:配置
- 配置
/etc/modprobe.d/wfb.conf文件
$ sudo cat > /etc/modprobe.d/wfb.conf <<EOF
# blacklist stock module
blacklist 88XXau
blacklist 8812au
blacklist rtl8812au
blacklist rtl88x2bs
# maximize output power, see note below
options 88XXau_wfb rtw_tx_pwr_idx_override=30
EOF
- 1
- 2
- 3
- 4
- 5
- 6
- 7
- 8
- 9
- 上传
/etc/drone.key/etc/gs.key
$ wfb_keygen
Drone keypair (drone sec + gs pub) saved to drone.key
GS keypair (gs sec + drone pub) saved to gs.key
$ ls
drone.key  gs.key
- 1
- 2
- 3
- 4
- 5
- 启用内核的 BPF (Berkeley Packet Filter)
$ echo "net.core.bpf_jit_enable = 1" | sudo tee -a /etc/sysctl.conf
$ sudo sysctl -p
$ sysctl net.core.bpf_jit_enable
- 1
- 2
- 3
- 配置
/etc/wifibroadcast.cfg文件
sudo tee /etc/wifibroadcast.cfg > /dev/null <<EOF
[common]
wifi_channel = 149     # 149 -- radio channel @5745 MHz, range: 5735–5755 MHz, width 20MHz
wifi_region = 'BO'     # Your country for CRDA (use BO or GY if you want max tx power)

[drone_mavlink]
# use autopilot connected to /dev/ttyUSB0 at 115200 baud:
# peer = 'serial:ttyUSB0:115200'

# Connect to autopilot via malink-router or mavlink-proxy:
peer = 'listen://0.0.0.0:14550'   # incoming connection
# peer = 'connect://127.0.0.1:14550'  # outgoing connection

[drone_video]
peer = 'listen://0.0.0.0:5602'  # listen for video stream (gstreamer on drone)

EOF
- 1
- 2
- 3
- 4
- 5
- 6
- 7
- 8
- 9
- 10
- 11
- 12
- 13
- 14
- 15
- 16
- 17
注:树莓派现在不太可能用来做GS端了,毕竟性能瓶颈导致了该板子最多只能作为天空端存在。
- 配置
wfb-ng网卡
$ cat /etc/default/wifibroadcast
#WFB_NICS="wlx00c0caa578a9"
#WFB_NICS="wlan1 wlan2"
# For multi-link setup you can specify path to custom config
# and/or list of cards in /etc/default/wifibroadcast.- 1
- 2
- 3
- 4
- 5
- 6
- 7
步骤五:启动服务
$ sudo systemctl start wifibroadcast@drone
- 1
- 检查
wifibroadcast状态
$ sudo systemctl status wifibroadcast@drone
- 1
3.3 安装gst-launch-1.0
步骤一:安装deb软件包
$ sudo apt install -y gstreamer1.0-tools gstreamer1.0-plugins-base gstreamer1.0-plugins-good
$ sudo apt install -y gstreamer1.0-plugins-bad gstreamer1.0-plugins-ugly
- 1
- 2
步骤二:启动树莓派视频流
$ libcamera-vid --inline --width 960 --height 540 --bitrate 4000000 --framerate 30 --hflip --vflip --timeout 0 -o - | gst-launch-1.0 -v fdsrc ! h264parse ! rtph264pay config-interval=1 pt=35 ! udpsink sync=false host=127.0.0.1 port=5602
- 1
注1: 支持最高30FPS/Cannot achieve high framerate video recording using Camera Module v3 #546
注2: 树莓派摄像头支持的规格数据,支持高FPS,但是树莓派3B+性能有瓶颈。
步骤三: 地面端验证视频流
可使用jetson-fpv或者其他地面端软硬件(比如:OpenIPC Hi3536、PixelPilot),参考:
3.4 安装msposd
步骤一:获取代码
$ git clone [email protected]:SnapDragonfly/msposd.git
- 1
步骤二:编译代码
$ ./build.sh native
- 1
步骤三:安装工程
$ sudo cp msposd /usr/bin/
$ sudo cp fonts/*.png /usr/bin/
$ sudo cp fonts/UbuntuMono-Regular.ttf /usr/share/fonts/truetype/
- 1
- 2
- 3
- 目录结构:
tree /usr/share/fonts/
/usr/share/fonts/
└── truetype
    └── UbuntuMono-Regular.ttf

/usr/bin/
├── font_ardu_hd.png
├── font_ardu.png
├── font_btfl_hd.png
├── font_btfl.png
├── font_inav_hd.png
├── font_inav.png
└── msposd
- 1
- 2
- 3
- 4
- 5
- 6
- 7
- 8
- 9
- 10
- 11
- 12
- 13
- 帮助菜单
$ msposd --version
Ver: 07fb941 Compiled at: 20241225_074330
msposd: unrecognized option '--version'
Usage: msposd [OPTIONS]
Where:
        -m --master      Serial port to receive MSP (/dev/ttyAMA0 by default)
        -b --baudrate    Serial port baudrate (115200 by default)
        -o --output              UDP endpoint to forward aggregated MSP messages ()
        -c --channels    RC Channel to listen for commands (0 by default) and exec channels.sh. This command can be repeated. Channel values are 1-based.
        -w --wait        Delay after each command received(2000ms default)
        -r --fps         Max MSP Display refresh rate(5..50)
        -p --persist     How long a channel value must persist to generate a command - for multiposition switches (0ms default)
        -t --temp        Read SoC temperature
        -d --wfb         Monitors wfb.log file and reports errors via HUD messages
        -s --osd         Parse MSP and draw OSD over the video
        -a --ahi         Draw graphic AHI, mode [0-No, 2-Simple 1-Ladder, 3-LadderEx]
        -x --matrix      OSD matrix (0 - 53:20 , 1- 50:18 chars)
           --mspvtx      Enable mspvtx support
        -v --verbose     Show debug infot
        --help           Display this help
- 1
- 2
- 3
- 4
- 5
- 6
- 7
- 8
- 9
- 10
- 11
- 12
- 13
- 14
- 15
- 16
- 17
- 18
- 19
- 20
步骤四:启动程序
$ sudo systemctl start wifibroadcast@drone
$ wfb_tx -p 17 -u 14560 -K /etc/drone.key -B 20 -M 1 -S 1 -L 1 -G long -k 1 -n 2 -T 0 -i 7669206 -f data wlan0 &
$ msposd --master /dev/ttyUSB0 --baudrate 115200 --out 127.0.0.1:14560 --matrix 11 --ahi 1 -r 30 -c 7 -c 9 &
- 1
- 2
- 3
4. 自启动FPV服务
步骤一:创建脚本
$ sudo nano /usr/local/bin/fpv-drone.sh
$ sudo chmod +x /usr/local/bin/fpv-drone.sh
- 1
- 2
修改如下内容:
$ cat /usr/local/bin/fpv-drone.sh
#!/bin/bash
/usr/bin/wfb_tx -p 17 -u 14560 -K /etc/drone.key -B 20 -M 1 -S 1 -L 1 -G long -k 1 -n 2 -T 0 -i 7669206 -f data wlan0 &
/usr/bin/msposd --master /dev/ttyUSB0 --baudrate 115200 --out 127.0.0.1:14560 --matrix 11 --ahi 1 -r 30 -c 7 -c 9 &
/usr/bin/libcamera-vid --inline --width 1920 --height 1080 --bitrate 4000000 --framerate 30 --hflip --vflip --timeout 0 -o - | /usr/bin/gst-launch-1.0 -v fdsrc ! h264parse ! rtph264pay config-interval=1 pt=35 ! udpsink sync=false host=127.0.0.1 port=5602 &

wait
- 1
- 2
- 3
- 4
- 5
- 6
- 7
步骤二:配置fpv-drone服务
$ sudo nano /etc/systemd/system/fpvdrone.service
- 1
修改如下内容:
$ cat /etc/systemd/system/fpvdrone.service
[Unit]
Description=FPV Drone Service
Requires=wifibroadcast.service
ReloadPropagatedFrom=wifibroadcast.service
After=wifibroadcast.service

[Service]
Type=simple
ExecStartPre=/bin/sleep 5
ExecStart=/usr/local/bin/fpv-drone.sh

Restart=always
User=root
Group=root
AmbientCapabilities=CAP_NET_RAW CAP_NET_ADMIN
WorkingDirectory=/
StandardOutput=journal
StandardError=journal
Restart=on-failure
RestartSec=5s

[Install]
WantedBy=multi-user.target
- 1
- 2
- 3
- 4
- 5
- 6
- 7
- 8
- 9
- 10
- 11
- 12
- 13
- 14
- 15
- 16
- 17
- 18
- 19
- 20
- 21
- 22
- 23
- 24
重新加载服务
$ sudo systemctl daemon-reload
- 1
步骤三:启动wifibroadcast服务
$ sudo systemctl start wifibroadcast@drone
- 1
步骤四:启动fpv-drone服务
$ sudo systemctl start fpvdrone.service
- 1
步骤五:配置默认启动
$ sudo systemctl enable wifibroadcast@drone
$ sudo systemctl enable fpvdrone.service
- 1
- 2
5. 总结
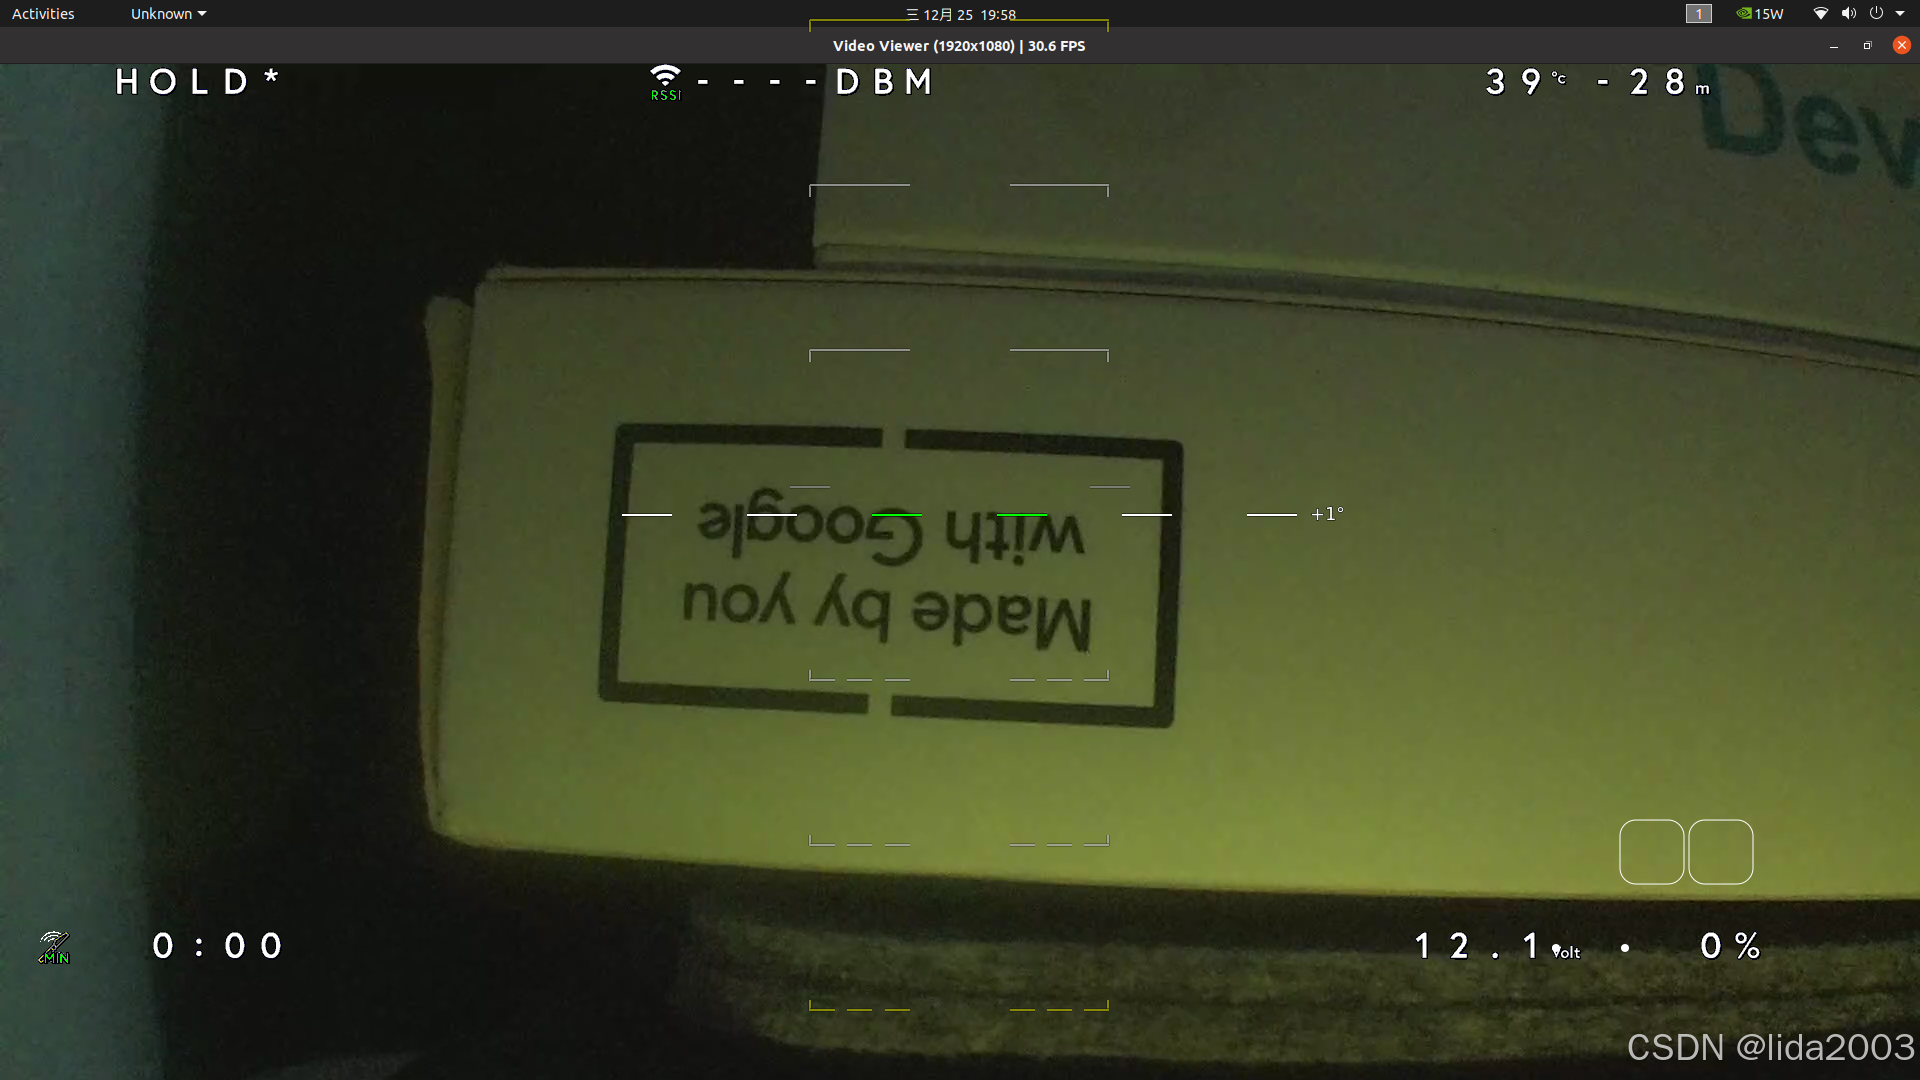
$ git clone https://github.com/SnapDragonfly/jetson-fpv.git
$ cd jetson-fpv
$ sudo ./wrapper.sh viewer start
- 1
- 2
- 3
通过上述命令,查看OSD和视频状态。总体来看,一切皆在掌控中!!!
6. 参考资料
【1】wfb-ng 开源工程结构&代码框架简明介绍
【2】wfb-ng 开源代码之wfb_tx&wfb_rx
【3】wfb-ng 开源代码之wfb_tx模式更新
【4】wfb-ng 开源代码之libsodium应用
7. 补充
7.1 配置wfb-cli
本次环境配置直接使用了命令:
- 发射端(drone):
wfb_tx -p 17 -u 14560 -K /etc/drone.key -B 20 -M 1 -S 1 -L 1 -G long -k 1 -n 2 -T 0 -i 7669206 -f data wlan0 - 接收端(gs):
wfb_rx -p 17 -i 7669206 -u 14560 -K /etc/gs.key wlan1
为了更好的被wfb-ng管理和调试,应该采用配置文件的方式:
7.2 配置msposd
目前msposd相关文件由于navtive build方式安装问题,导致所有的文件都暂时放在了/usr/bin路径下,不便于维护。
- 目录结构调整如下:
$ tree /usr/local/bin/fpvdrone/
/usr/local/bin/fpvdrone/
├── font_ardu_hd.png
├── font_ardu.png
├── font_btfl_hd.png
├── font_btfl.png
├── font_inav_hd.png
├── font_inav.png
├── fpv-drone.sh
└── msposd

1 directory, 8 files
- 1
- 2
- 3
- 4
- 5
- 6
- 7
- 8
- 9
- 10
- 11
- 12
- 启动脚本调整如下:
$ cat /usr/local/bin/fpvdrone/fpv-drone.sh
#!/bin/bash

export PATH=$PATH:/usr/local/bin:/usr/bin
export LD_LIBRARY_PATH=/usr/local/lib:/usr/lib

/usr/bin/wfb_tx -p 17 -u 14560 -K /etc/drone.key -B 20 -M 1 -S 1 -L 1 -G long -k 1 -n 2 -T 0 -i 7669206 -f data wfb-rf0 &
/usr/bin/libcamera-vid --inline --width 1920 --height 1080 --bitrate 4000000 --framerate 30 --hflip --vflip --timeout 0 -o - | /usr/bin/gst-launch-1.0 -v fdsrc ! h264parse ! rtph264pay config-interval=1 pt=35 ! udpsink sync=false host=127.0.0.1 port=5602 &

cd /usr/local/bin/fpvdrone/
/usr/local/bin/fpvdrone/msposd --master /dev/ttyUSB0 --baudrate 115200 --out 127.0.0.1:14560 --matrix 11 --ahi 1 -r 30 -c 7 -c 9 &

wait
- 1
- 2
- 3
- 4
- 5
- 6
- 7
- 8
- 9
- 10
- 11
- 12
- 13
- 启动服务调整如下:
$ cat /etc/systemd/system/fpvdrone.service
[Unit]
Description=FPV Drone Service
Requires=wifibroadcast.service
ReloadPropagatedFrom=wifibroadcast.service
After=wifibroadcast.service

[Service]
Type=simple
ExecStartPre=/bin/sleep 10
ExecStart=/usr/local/bin/fpvdrone/fpv-drone.sh

Restart=always
User=root
Group=root
AmbientCapabilities=CAP_NET_RAW CAP_NET_ADMIN
WorkingDirectory=/
StandardOutput=journal
StandardError=journal
Restart=on-failure
RestartSec=5s

[Install]
WantedBy=multi-user.target
- 1
- 2
- 3
- 4
- 5
- 6
- 7
- 8
- 9
- 10
- 11
- 12
- 13
- 14
- 15
- 16
- 17
- 18
- 19
- 20
- 21
- 22
- 23
- 24
7.3 定时更新osd
- 定义update脚本 (每秒更新)
$ sudo nano /usr/local/bin/fpvdrone/fpv-update.sh
$ sudo chmod +x /usr/local/bin/fpvdrone/fpv-update.sh
$ cat /usr/local/bin/fpvdrone/fpv-update.sh
#!/bin/bash

while true; do
  echo "Monitor... &L24 &F28 CPU:&C &B temp:&T" > /usr/local/bin/fpvdrone/MSPOSD.msg
  sleep 1
done
- 1
- 2
- 3
- 4
- 5
- 6
- 7
- 8
- 9
- 增加到启动脚本
/usr/local/bin/fpvdrone/fpv-update.sh &
$ sudo nano /usr/local/bin/fpvdrone/fpv-drone.sh
$ cat /usr/local/bin/fpvdrone/fpv-drone.sh
#!/bin/bash

export PATH=$PATH:/usr/local/bin:/usr/bin
export LD_LIBRARY_PATH=/usr/local/lib:/usr/lib

/usr/bin/wfb_tx -p 17 -u 14560 -K /etc/drone.key -B 20 -M 1 -S 1 -L 1 -G long -k 1 -n 2 -T 0 -i 7669206 -f data wfb-rf0 &
/usr/bin/libcamera-vid --inline --width 1920 --height 1080 --bitrate 4000000 --framerate 30 --hflip --vflip --timeout 0 -o - | /usr/bin/gst-launch-1.0 -v fdsrc ! h264parse ! rtph264pay config-interval=1 pt=35 ! udpsink sync=false host=127.0.0.1 port=5602 &

cd /usr/local/bin/fpvdrone/
/usr/local/bin/fpvdrone/msposd --master /dev/ttyUSB0 --baudrate 115200 --out 127.0.0.1:14560 --matrix 11 --ahi 1 -r 30 -c 7 -c 9 &

/usr/local/bin/fpvdrone/fpv-update.sh &

wait
- 1
- 2
- 3
- 4
- 5
- 6
- 7
- 8
- 9
- 10
- 11
- 12
- 13
- 14
- 15
- 16
评论记录:
回复评论: