
1.简介
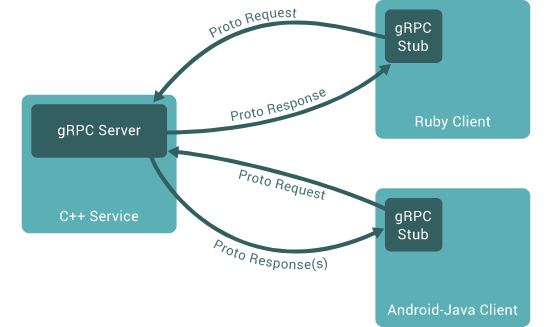
gRPC是Google开发的一个跨平台、开源的远程过程调用(remote procedure call, RPC)框架,可以使用Protocol Buffers作为接口定义语言(IDL)和底层消息交换格式。
在gRPC中,客户端应用程序可以直接调用位于不同机器上的服务器应用程序的方法,就像本地对象一样,从而可以更容易地创建分布式应用和服务。与很多RPC系统一样,gRPC是基于定义服务的思想,即指定可以远程调用的方法及其参数和返回类型。服务端实现这个接口并运行一个gRPC服务器来处理客户端调用,客户端有一个提供相同的方法的桩接口(stub)。
gRPC支持C++、Java、Python、Go、Ruby等多种语言,可以运行在多种不同的环境中,如下图所示。
2.快速入门
2.1 C++
2.1.1 安装
由于C++没有统一的依赖管理工具,因此必须手动构建并安装gRPC及其依赖。
(1)安装CMake 3.13+,参考CMake构建工具使用教程
(2)安装其他必需的工具:
sudo apt install build-essential autoconf libtool pkg-config
- 1
或者
sudo yum install make automake gcc gcc-c++ kernel-devel autoconf libtool pkgconfig
- 1
(3) 安装gRPC
首先克隆grpc仓库:
git clone --recurse-submodules -b v1.54.0 --depth 1 --shallow-submodules https://github.com/grpc/grpc
- 1
之后依次执行以下命令:
$ cd grpc
$ mkdir -p cmake/build && cd cmake/build
$ cmake -DgRPC_INSTALL=ON \
    -DgRPC_BUILD_TESTS=OFF \
    -DCMAKE_INSTALL_PREFIX=$HOME/.local \
    -S ../..
$ make -j 4
$ make install
- 1
- 2
- 3
- 4
- 5
- 6
- 7
- 8
其中CMAKE_INSTALL_PREFIX选项用于指定安装目录,安装完成后头文件和库文件将分别被拷贝至该目录下的include和lib目录下。
注:官方文档中给出的这种安装方式是全局的,即只需安装一次即可在所有项目中使用,但比较繁琐。另一种方式是使用CMake的FetchContent模块,见2.1.3节。
2.1.2 构建示例
示例代码位于grpc/example目录,下面构建其中的helloworld示例。
$ cd examples/cpp/helloworld
$ mkdir -p cmake/build && cd cmake/build
$ cmake -DCMAKE_INSTALL_PREFIX=$HOME/.local -S ../..
$ make -j 4
- 1
- 2
- 3
- 4
构建完成后,服务器和客户端的可执行程序在examples/cpp/helloworld/cmake/build目录下。
运行服务器:
$ ./greeter_server
Server listening on 0.0.0.0:50051
- 1
- 2
在另一个终端运行客户端,将会看到客户端输出:
$ ./greeter_client
Greeter received: Hello world
- 1
- 2
2.1.3 使用CMake构建
官方文档中的示例是在grpc仓库下构建的,这对于实际项目是不可行的。下面介绍如何在独立的项目中利用CMake的FetchContent模块构建gRPC应用。这种方法的优点是gRPC及其依赖库的构建完全由CMake自动完成,缺点是占用磁盘空间较大(gRPC仓库构建后的大小约为3.5 GB,而每个使用FetchContent模块依赖gRPC的CMake项目都会拷贝一份gRPC仓库)。
首先创建项目根目录grpc-demo,将grpc仓库示例目录中的greeter_client.cc、greeter_server.cc以及helloworld.proto分别拷贝到helloworld和protos目录下:
grpc-demo/
    helloworld/
        greeter_client.cc
        greeter_server.cc
    protos/
        helloworld.proto
- 1
- 2
- 3
- 4
- 5
- 6
之后在根目录和helloworld目录下分别创建一个CMakeLists.txt文件:
CMakeLists.txt
cmake_minimum_required(VERSION 3.13)
project(grpc-demo)

set(CMAKE_CXX_STANDARD 14)

include(FetchContent)
FetchContent_Declare(
  grpc
  GIT_REPOSITORY https://github.com/grpc/grpc.git
  GIT_TAG v1.54.0
)
set(FETCHCONTENT_QUIET OFF)
FetchContent_MakeAvailable(grpc)

add_subdirectory(helloworld)
- 1
- 2
- 3
- 4
- 5
- 6
- 7
- 8
- 9
- 10
- 11
- 12
- 13
- 14
- 15
helloworld/CMakeLists.txt
# proto targets
set(helloworld_proto_srcs
  ${CMAKE_CURRENT_BINARY_DIR}/helloworld.pb.cc
  ${CMAKE_CURRENT_BINARY_DIR}/helloworld.grpc.pb.cc)

add_custom_command(
  OUTPUT ${helloworld_proto_srcs}
  COMMAND protobuf::protoc
    -I${CMAKE_SOURCE_DIR}/protos
    --cpp_out=${CMAKE_CURRENT_BINARY_DIR}
    --grpc_out=${CMAKE_CURRENT_BINARY_DIR}
    --plugin=protoc-gen-grpc=$
    helloworld.proto)

add_library(helloworld_proto ${helloworld_proto_srcs})
target_link_libraries(helloworld_proto
  PUBLIC protobuf::libprotobuf
  PRIVATE grpc++ grpc++_reflection)
target_include_directories(helloworld_proto PUBLIC ${CMAKE_CURRENT_BINARY_DIR})

# client/server targets
foreach(target greeter_client greeter_server)
  add_executable(${target} ${target}.cc)
  target_link_libraries(${target} helloworld_proto
    absl::flags absl::flags_parse grpc++ grpc++_reflection)
endforeach()

- 1
- 2
- 3
- 4
- 5
- 6
- 7
- 8
- 9
- 10
- 11
- 12
- 13
- 14
- 15
- 16
- 17
- 18
- 19
- 20
- 21
- 22
- 23
- 24
- 25
- 26
其中,构建目标helloworld_proto将helloworld.proto编译为库文件,并链接到grpc和protobuf库;greeter_client和greeter_server分别将对应的源文件编译为可执行文件,并链接到helloworld_proto库。
在项目根目录下执行配置命令:
mkdir cmake-build
cmake -B cmake-build
- 1
- 2
CMake将自动下载gRPC及其依赖(如googletest、protobuf等)的源代码。
配置完成后,执行构建命令:
cmake --build cmake-build -t greeter_client greeter_server
- 1
构建完成后将在cmake-build/helloworld目录下生成客户端和服务器的可执行程序greeter_client和greeter_server。分别在两个终端运行这两个程序即可。
3.基础教程
3.1 C++
本教程将介绍:
- 如何在.proto文件中定义RPC服务
- 如何使用protoc编译器生成RPC服务代码
- 如何使用gRPC API为RPC服务编写简单的服务器和客户端
教程中的示例是一个简单的地图应用,支持客户端获取地图上的位置信息、记录路线(录制轨迹)、与其他客户端聊天等功能。
该示例的代码在grpc仓库的examples/cpp/route_guide目录下。
3.1.1 定义服务
第一步是使用protobuf定义gRPC 服务(service)以及接口的请求(request)和响应(response)类型。完整的.proto文件在examples/protos/route_guide.proto。
其中包含基本概念的message定义:
Point:地图上的一个地理位置点(经纬度)Rectangle:地图上的一个矩形区域,由两个Point表示Feature:地图上的一个实体,由一个Point和一个名字表示RouteNote:在某个点发出的一条消息RouteSummary:记录路线结束后的反馈,包括记录点的数量、路线经过的特征数量、总距离和总时间
在.proto文件中使用service定义服务:
service RouteGuide {
  ...
}
- 1
- 2
- 3
之后使用rpc定义方法(接口)。gRPC允许定义四种方法(在RouteGuide中都使用过):
(1)简单RPC(simple RPC):客户端发送一个请求并,服务器返回一个响应,类似于普通的函数调用。
// 获取给定位置的特征
rpc GetFeature(Point) returns (Feature) {}
- 1
- 2
(2)服务端流式RPC(server-side streaming RPC):客户端发送一个请求,服务器返回一系列响应。可以在响应类型前加上stream关键字来指定服务端流式RPC。
// 获取指定的矩形区域覆盖的所有特征
rpc ListFeatures(Rectangle) returns (stream Feature) {}
- 1
- 2
注:服务端流式RPC的响应是流式返回的,即每次只返回一条数据,而不是一次性返回所有数据(返回一个具有repeated字段的消息)。
(3)客户端流式RPC(client-side streaming RPC):客户端发送一系列消息,服务端返回一个响应。可以在请求类型前加上stream关键字来指定客户端流式RPC。
// 记录路线功能:接受路线经过的一系列点,记录完成后返回一个RouteSummary
rpc RecordRoute(stream Point) returns (RouteSummary) {}
- 1
- 2
(4)双向流式RPC(bidirectional streaming RPC):双端都发送一系列消息。两个流操作是独立的,因此客户端和服务器可以以任何顺序读写消息。可以在请求和响应类型前都加上stream关键字来指定双向流式RPC。
// 聊天功能:接受一系列消息,同时接收其他消息(例如来自其他用户)
rpc RouteChat(stream RouteNote) returns (stream RouteNote) {}
- 1
- 2
3.1.2 生成服务代码
接下来从.proto文件定义的服务生成服务接口代码。这需要使用protoc编译器以及gRPC C++插件:
protoc -I ../../protos --cpp_out=. --grpc_out=. --plugin=protoc-gen-grpc=`which grpc_cpp_plugin` ../../protos/route_guide.proto
- 1
注:3.1.5节将使用CMake来完成。
该命令生成了下列文件:
- route_guide.pb.h和route_guide.pb.cc:包含消息类的定义,用于创建、序列化和获取请求和响应消息类型
- route_guide.grpc.pb.h和route_guide.grpc.pb.cc:包含服务类
RouteGuide的定义,其中包含:- 桩接口类
RouteGuide::Stub,用于客户端调用RouteGuide服务定义的RPC方法 - 抽象接口类
RouteGuide::Service,用于服务器实现RouteGuide服务定义的RPC方法
- 桩接口类
3.1.3 创建服务器
创建RouteGuide服务器包括两个部分:
- 实现服务接口
- 运行gRPC服务器,监听客户端请求
实现代码在route_guide_server.cc。
3.1.3.1 实现RPC方法
服务器定义了RouteGuideImpl类来实现RouteGuide::Service接口:
class RouteGuideImpl final : public RouteGuide::Service {
 public:
  Status GetFeature(
      ServerContext* context, const Point* point, Feature* feature) override;
  Status ListFeatures(
      ServerContext* context, const routeguide::Rectangle* rectangle,
      ServerWriter<Feature>* writer) override;
  Status RecordRoute(
      ServerContext* context, ServerReader<Point>* reader, RouteSummary* summary) override;
  Status RouteChat(
      ServerContext* context, ServerReaderWriter<RouteNote, RouteNote>* stream) override;

 private:
  std::vector<Feature> feature_list_;
  std::mutex mu_;
  std::vector<RouteNote> received_notes_;
};
- 1
- 2
- 3
- 4
- 5
- 6
- 7
- 8
- 9
- 10
- 11
- 12
- 13
- 14
- 15
- 16
- 17
注:这里实现的是RouteGuide服务的同步版本,也可以实现异步版本RouteGuide::AsyncService。
RouteGuideImpl实现了所有4个RPC方法。第一个方法GetFeature()从客户端获取一个Point,返回数据库中对应的Feature:
Status GetFeature(ServerContext* context, const Point* point,
                  Feature* feature) override {
  feature->set_name(GetFeatureName(*point, feature_list_));
  feature->mutable_location()->CopyFrom(*point);
  return Status::OK;
}
- 1
- 2
- 3
- 4
- 5
- 6
方法的point参数来自客户端请求,feature参数用于填充响应。返回Status::OK 用于告诉gRPC已经完成处理请求,可以将响应返回给客户端。
注:feature_list_包含所有的特征数据,来自一个JSON文件,相当于“数据库”。
注意,所有的RPC方法都可能会同时被多个线程(客户端)调用,因此必须确保方法实现是线程安全的。在这个例子中,feature_list_ 只被读取而没有被修改,因此本身就是线程安全的。而如果方法会修改共享数据,则必须采用同步访问(例如加锁)。
示例请求和响应(用JSON格式表示):
// 请求
{
    "latitude": 409146138,
    "longitude": -746188906
}

// 响应
{
    "name": "BerkshireValleyManagementAreaTrail,Jefferson,NJ,USA",
    "location": {
        "latitude": 409146138,
        "longitude": -746188906
    }
}
- 1
- 2
- 3
- 4
- 5
- 6
- 7
- 8
- 9
- 10
- 11
- 12
- 13
- 14
注:纬度的范围是[-90, 90],经度的范围是[-180, 180],乘以107表示。
第二个方法ListFeatures()是服务端流式RPC,从客户端获取一个Rectangle,返回该矩形区域覆盖的所有Feature:
Status ListFeatures(ServerContext* context,
                    const routeguide::Rectangle* rectangle,
                    ServerWriter<Feature>* writer) override {
  auto lo = rectangle->lo();
  auto hi = rectangle->hi();
  long left = (std::min)(lo.longitude(), hi.longitude());
  long right = (std::max)(lo.longitude(), hi.longitude());
  long top = (std::max)(lo.latitude(), hi.latitude());
  long bottom = (std::min)(lo.latitude(), hi.latitude());
  for (const Feature& f : feature_list_) {
    if (f.location().longitude() >= left &&
        f.location().longitude() <= right &&
        f.location().latitude() >= bottom && f.location().latitude() <= top) {
      writer->Write(f);
    }
  }
  return Status::OK;
}
- 1
- 2
- 3
- 4
- 5
- 6
- 7
- 8
- 9
- 10
- 11
- 12
- 13
- 14
- 15
- 16
- 17
- 18
可以看到,该方法有一个ServerWriter参数,可以使用其Write()方法每次发送一个响应,返回Status::OK告诉gRPC响应已经发送完成。
示例请求和响应:
// 请求
{
    "hi": {
        "latitude": 400000000,
        "longitude": -750000000
    },
    "lo": {
        "latitude": 420000000,
        "longitude": -730000000
    }
}

// 响应
{
    "name": "PatriotsPath,Mendham,NJ07945,USA",
    "location": {
        "latitude": 407838351,
        "longitude": -746143763
    }
}
{
    "name": "101NewJersey10,Whippany,NJ07981,USA",
    "location": {
        "latitude": 408122808,
        "longitude": -743999179
    }
}
{
    "name": "U.S.6,Shohola,PA18458,USA",
    "location": {
        "latitude": 413628156,
        "longitude": -749015468
    }
}
...
- 1
- 2
- 3
- 4
- 5
- 6
- 7
- 8
- 9
- 10
- 11
- 12
- 13
- 14
- 15
- 16
- 17
- 18
- 19
- 20
- 21
- 22
- 23
- 24
- 25
- 26
- 27
- 28
- 29
- 30
- 31
- 32
- 33
- 34
- 35
第三个方法RecordRoute()是客户端流式RPC,与ListFeatures()类似,但参数是ServerReader而不是一个请求对象,可以使用其Read()方法每次读取一个请求对象,如果没有更多消息则返回false:
Status RecordRoute(ServerContext* context, ServerReader<Point>* reader,
                   RouteSummary* summary) override {
  Point point;
  int point_count = 0;
  int feature_count = 0;
  float distance = 0.0;
  Point previous;

  system_clock::time_point start_time = system_clock::now();
  while (reader->Read(&point)) {
    point_count++;
    if (!GetFeatureName(point, feature_list_).empty()) {
      feature_count++;
    }
    if (point_count != 1) {
      distance += GetDistance(previous, point);
    }
    previous = point;
  }
  system_clock::time_point end_time = system_clock::now();
  summary->set_point_count(point_count);
  summary->set_feature_count(feature_count);
  summary->set_distance(static_cast<long>(distance));
  auto secs =
      std::chrono::duration_cast<std::chrono::seconds>(end_time - start_time);
  summary->set_elapsed_time(secs.count());

  return Status::OK;
}
- 1
- 2
- 3
- 4
- 5
- 6
- 7
- 8
- 9
- 10
- 11
- 12
- 13
- 14
- 15
- 16
- 17
- 18
- 19
- 20
- 21
- 22
- 23
- 24
- 25
- 26
- 27
- 28
- 29
示例请求和响应:
// 请求
{
    "latitude": 404318328,
    "longitude": -740835638
}
{
    "latitude": 405957808,
    "longitude": -743255336
}
{
    "latitude": 418465462,
    "longitude": -746859398
}
...

// 响应
{
    "point_count": 10,
    "feature_count": 6,
    "distance": 713837,
    "elapsed_time": 65
}
- 1
- 2
- 3
- 4
- 5
- 6
- 7
- 8
- 9
- 10
- 11
- 12
- 13
- 14
- 15
- 16
- 17
- 18
- 19
- 20
- 21
- 22
最后是双向流式RPC方法RouteChat():
Status RouteChat(ServerContext* context,
ServerReaderWriter<RouteNote, RouteNote>* stream) override {
RouteNote note;
while (stream->Read(¬e)) {
std::unique_lock<std::mutex> lock(mu_);
for (const RouteNote& n : received_notes_) {
if (n.location().latitude() == note.location().latitude() &&
n.location().longitude() == note.location().longitude()) {
stream->Write(n);
}
}
received_notes_.push_back(note);
}
return Status::OK;
}
- 1
- 2
- 3
- 4
- 5
- 6
- 7
- 8
- 9
- 10
- 11
- 12
- 13
- 14
- 15
- 16
方法参数是ServerReaderWriter,可用于读写消息,同样是使用Read()和Write()方法。两个方向的流是相互独立的,客户端和服务器都可以以任意顺序读写消息,并且双方读取到消息的顺序与对方写入的顺序相同。
该方法将客户端发送的RouteNote记录在received_notes_中,并将已经记录的(可能是其他客户端)在相同位置发送的RouteNote返回给客户端。注意,由于received_notes_被并发读写,因此必须使用锁来保证互斥访问。
3.1.3.2 启动服务器
实现了所有方法后,还需要启动gRPC服务器来处理客户端请求。
void RunServer(const std::string& db_path) {
  std::string server_address("0.0.0.0:50051");
  RouteGuideImpl service(db_path);

  ServerBuilder builder;
  builder.AddListeningPort(server_address, grpc::InsecureServerCredentials());
  builder.RegisterService(&service);
  std::unique_ptr<Server> server(builder.BuildAndStart());
  std::cout << "Server listening on " << server_address << std::endl;
  server->Wait();
}
- 1
- 2
- 3
- 4
- 5
- 6
- 7
- 8
- 9
- 10
- 11
可以看到,我们通过以下步骤创建并启动服务器:
- 创建服务实现类
RouteGuideImpl的实例。 - 创建工厂类
ServerBuilder的实例。 - 使用
builder.AddListeningPort()方法指定服务器监听的地址和端口号。 - 注册服务。
- 调用
builder.BuildAndStart()创建并启动RPC服务器。 - 调用服务器的
Wait()方法进入阻塞等待,直到进程被杀掉或者调用了Shutdown()。
3.1.4 创建客户端
本节将创建RouteGuide服务的客户端。实现代码在route_guide_client.cc。
3.1.4.1 创建桩
为了调用服务的RPC方法,首选需要创建一个桩(stub)。
在创建桩之前要先创建一个gRPC 通道(channel),指定连接服务器的地址和端口号:
grpc::CreateChannel("localhost:50051", grpc::InsecureChannelCredentials());
- 1
之后使用RouteGuide::NewStub()方法创建桩RouteGuide::Stub:
class RouteGuideClient {
 public:
  RouteGuideClient(std::shared_ptr<Channel> channel, const std::string& db)
      : stub_(RouteGuide::NewStub(channel)) {
    ...
  }

 private:
  std::unique_ptr<RouteGuide::Stub> stub_;
};
- 1
- 2
- 3
- 4
- 5
- 6
- 7
- 8
- 9
- 10
3.1.4.2 调用RPC方法
下面通过桩来调用RPC方法。
调用简单RPC方法GetFeature()几乎和调用本地方法一样直接:
void GetFeature() {
  Point point;
  Feature feature;
  point = MakePoint(409146138, -746188906);
  GetOneFeature(point, &feature);
  ...
}

bool GetOneFeature(const Point& point, Feature* feature) {
  ClientContext context;
  Status status = stub_->GetFeature(&context, point, feature);
  ...
  std::cout << "Found feature called " << feature->name() << " at "
            << feature->location().latitude() / kCoordFactor_ << ", "
            << feature->location().longitude() / kCoordFactor_ << std::endl;
}
- 1
- 2
- 3
- 4
- 5
- 6
- 7
- 8
- 9
- 10
- 11
- 12
- 13
- 14
- 15
- 16
注意,不能在两次调用之间复用ClientContext对象。
下面调用服务端流式RPC方法ListFeatures(),该方法将返回一个ClientReader,客户端使用其Read()方法读取服务端的响应,直到返回false,最后调用Finish()获取RPC状态。
void ListFeatures() {
  ...
  std::unique_ptr<ClientReader<Feature> > reader(
      stub_->ListFeatures(&context, rect));
  while (reader->Read(&feature)) {
    std::cout << "Found feature called " << feature.name() << " at "
              << feature.location().latitude() / kCoordFactor_ << ", "
              << feature.location().longitude() / kCoordFactor_ << std::endl;
  }
  Status status = reader->Finish();
  ...
}
- 1
- 2
- 3
- 4
- 5
- 6
- 7
- 8
- 9
- 10
- 11
- 12
客户端流式RPC方法RecordRoute()与之类似,除了返回一个ClientWriter。客户端使用其Write()方法发送若干个请求对象,调用WritesDone()告诉gRPC请求发送完成,最后调用Finish()获取RPC状态。如果状态是OK,则响应对象将会被填充为服务器的响应。
void RecordRoute() {
  ...
  std::unique_ptr<ClientWriter<Point> > writer(
      stub_->RecordRoute(&context, &stats));
  for (int i = 0; i < kPoints; i++) {
    const Feature& f = ...;
    std::cout << "Visiting point " << f.location().latitude() / kCoordFactor_
              << ", " << f.location().longitude() / kCoordFactor_
              << std::endl;
    if (!writer->Write(f.location())) {
      // Broken stream.
      break;
    }
    ...
  }
  writer->WritesDone();
  Status status = writer->Finish();
  if (status.ok()) {
    std::cout << "Finished trip with " << stats.point_count() << " points\n"
              << "Passed " << stats.feature_count() << " features\n"
              << "Travelled " << stats.distance() << " meters\n"
              << "It took " << stats.elapsed_time() << " seconds"
              << std::endl;
  } else {
    std::cout << "RecordRoute rpc failed." << std::endl;
  }
}
- 1
- 2
- 3
- 4
- 5
- 6
- 7
- 8
- 9
- 10
- 11
- 12
- 13
- 14
- 15
- 16
- 17
- 18
- 19
- 20
- 21
- 22
- 23
- 24
- 25
- 26
- 27
最后是双向流式RPC方法RouteChat(),该方法返回一个ClientReaderWriter,可用于读写消息:
  void RouteChat() {
    ClientContext context;

    std::shared_ptr<ClientReaderWriter<RouteNote, RouteNote> > stream(
        stub_->RouteChat(&context));

    std::thread writer([stream]() {
      ...
      for (const RouteNote& note : notes) {
        std::cout << "Sending message " << note.message() << " at "
                  << note.location().latitude() << ", "
                  << note.location().longitude() << std::endl;
        stream->Write(note);
      }
      stream->WritesDone();
    });

    RouteNote server_note;
    while (stream->Read(&server_note)) {
      std::cout << "Got message " << server_note.message() << " at "
                << server_note.location().latitude() << ", "
                << server_note.location().longitude() << std::endl;
    }
    writer.join();
    Status status = stream->Finish();
    ...
  }
- 1
- 2
- 3
- 4
- 5
- 6
- 7
- 8
- 9
- 10
- 11
- 12
- 13
- 14
- 15
- 16
- 17
- 18
- 19
- 20
- 21
- 22
- 23
- 24
- 25
- 26
- 27
3.1.5 构建和运行
首先创建如下的目录结构:
grpc-demo/
    CMakeLists.txt
    route_guide/
        CMakeLists.txt
        helper.h
        helper.cc
        route_guide_client.cc
        route_guide_server.cc
        route_guide_db.json
    protos/
        route_guide.proto
- 1
- 2
- 3
- 4
- 5
- 6
- 7
- 8
- 9
- 10
- 11
根目录下的CMakeLists.txt内容与2.1.3节相同,除了将add_subdirectory()的目录改为route_guide。
route_guide/CMakeLists.txt也与2.1.3节类似:
# proto targets
set(route_guide_proto_srcs
  ${CMAKE_CURRENT_BINARY_DIR}/route_guide.pb.cc
  ${CMAKE_CURRENT_BINARY_DIR}/route_guide.grpc.pb.cc)

add_custom_command(
  OUTPUT ${route_guide_proto_srcs}
  COMMAND protobuf::protoc
    -I${CMAKE_SOURCE_DIR}/protos
    --cpp_out=${CMAKE_CURRENT_BINARY_DIR}
    --grpc_out=${CMAKE_CURRENT_BINARY_DIR}
    --plugin=protoc-gen-grpc=$
    route_guide.proto)

add_library(route_guide_proto ${route_guide_proto_srcs})
target_link_libraries(route_guide_proto
  PUBLIC protobuf::libprotobuf
  PRIVATE grpc++ grpc++_reflection)
target_include_directories(route_guide_proto PUBLIC ${CMAKE_CURRENT_BINARY_DIR})

# route_guide_helper
add_library(route_guide_helper helper.cc)
target_link_libraries(route_guide_helper route_guide_proto grpc++ grpc++_reflection)

# client/server targets
foreach(target route_guide_client route_guide_server)
  add_executable(${target} ${target}.cc)
  target_link_libraries(${target} route_guide_proto route_guide_helper grpc++ grpc++_reflection)
endforeach()
- 1
- 2
- 3
- 4
- 5
- 6
- 7
- 8
- 9
- 10
- 11
- 12
- 13
- 14
- 15
- 16
- 17
- 18
- 19
- 20
- 21
- 22
- 23
- 24
- 25
- 26
- 27
- 28
- 29
之后在项目根目录下执行以下命令:
mkdir cmake-build
cmake -B cmake-build
cmake --build cmake-build -t route_guide_client route_guide_server
- 1
- 2
- 3
构建完成后将在cmake-build/route_guide目录下生成客户端和服务器的可执行程序route_guide_client和route_guide_server。分别在两个终端运行这两个程序即可。
$ ./route_guide_server --db_path=/path/to/route_guide_db.json
DB parsed, loaded 100 features.
Server listening on 0.0.0.0:50051
- 1
- 2
- 3
$ ./route_guide_client --db_path=/path/to/route_guide_db.json
DB parsed, loaded 100 features.
-------------- GetFeature --------------
Found feature called BerkshireValleyManagementAreaTrail,Jefferson,NJ,USA at 40.9146, -74.6189
Found no feature at 0, 0
-------------- ListFeatures --------------
Looking for features between 40, -75 and 42, -73
Found feature called PatriotsPath,Mendham,NJ07945,USA at 40.7838, -74.6144
Found feature called 101NewJersey10,Whippany,NJ07981,USA at 40.8123, -74.3999
Found feature called U.S.6,Shohola,PA18458,USA at 41.3628, -74.9016
...
ListFeatures rpc succeeded.
-------------- RecordRoute --------------
Visiting point 41.2346, -74.4027
Visiting point 40.8472, -74.0726
Visiting point 40.6337, -74.0122
...
Finished trip with 10 points
Passed 6 features
Travelled 576876 meters
It took 9 seconds
-------------- RouteChat --------------
Sending message First message at 0, 0
Sending message Second message at 0, 1
Sending message Third message at 1, 0
Sending message Fourth message at 0, 0
Got message First message at 0, 0
- 1
- 2
- 3
- 4
- 5
- 6
- 7
- 8
- 9
- 10
- 11
- 12
- 13
- 14
- 15
- 16
- 17
- 18
- 19
- 20
- 21
- 22
- 23
- 24
- 25
- 26
- 27
评论记录:
回复评论: